Print this article Font size 16
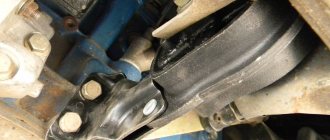
The cushion is one of the support elements that performs the functions of attaching the engine to the body of your car. This is a rubber-metal product consisting of a steel body and a thick rubber cushion.
The main function of engine mounts is to dampen vibrations that come from the engine.
How to replace engine mounts on a VAZ 2110?
Each individual VAZ 2110 engine mounting mount and all of them together are designed to provide reliable mounting while simultaneously vibration isolating the engine and gearbox on the vehicle.
Therefore, if, while driving over bumps, when changing gears or during other actions, you begin to feel vibrations and characteristic tapping and creaking in the engine area, as if the pieces of iron are hitting each other, you should really suspect the motor mounts.
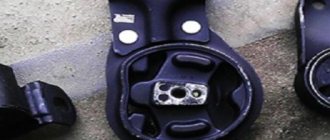
On the VAZ 2110, the cushion is a rubber-metal part such as a silent block. On one side this part is attached to the body, on the other - to the engine cylinder block. They hold not only the engine, but also the gearbox.
This design has proven itself well - it is reliable and not expensive. But - as long as the pillows are not destroyed.
When is the engine mount replaced?
The main reason for replacing engine mounts is the natural wear and tear of the rubber part. This process is irreversible and any rubber product is susceptible to it. However, there are a number of cases when replacing a support may be necessary ahead of schedule - this is an accident or any other accidental damage.
Symptoms of faulty supports include the following:
- Various knocks that appear when you suddenly start moving or braking. Sometimes it can occur when changing gears.
- Vibrations that are transmitted from the engine to the body. If the level of vibrations in the cabin has increased, then it’s time to assess the condition of the supports.
- It may happen that when replacing the timing belt, the mechanism cover will not be so easy to remove due to the fact that the engine tilts towards the mudguard. This phenomenon is associated with subsidence of the rubber part of the support.
- Due to a sagging engine, the geometry of the CV joints is disrupted. Therefore, if you notice too rapid wear of the grenades, you need to carefully check the engine mounts.
- Shifting the gearbox may be accompanied by a certain metal grinding noise. This suggests that due to the sagging engine, the wings have dropped lower. Accordingly, when switching, they touch other parts of the car.
- There are cracks and other defects on the rubber parts of the support.
If you delay replacement until a later date, the engine may collapse and then repairs will become much more expensive. That is why, try to change the supports immediately after detecting malfunctions.
Design difference
On a VAZ 2110, the engine is usually held by three or four points at the bottom, and two or three at the top. But you should know that the 8 valve engine has a rear engine mount. The 16 valve does not have it, but it has additional supports.
Rear support cushion for 8-valve engine
But in general, their replacement is similar.
By the way, if desired, additional support can also be installed.
Functionality check
Before changing pillows, you should check the functionality of the old ones. It may happen that the cause of vibration and knocking is not in them.
- We put the VAZ 2110 on supports;
- We install a jack with a backing made of board or timber under the oil pan and jack up the engine until the cushions are freed from its weight;
- We check all the pillows, namely: • Are there any cracks on them; • How easy it is to separate them from the substrate (it is made of metal); • Are they still hard? • If no obvious deficiencies are found, and replacement is not yet necessary, check the play between the frame and the plates; • Lubricate the cushions with a protective compound, lower the motor, tighten the fasteners and nuts.
Replacement features
If the vibration from the engine is very noticeable, then you need to change the pillow. Some car owners neglect this procedure, believing that the vibration can be tolerated, but this will not make the car drive any worse. This is a fundamentally wrong position, since constant vibration will lead to the destruction of engine attachments, as well as to breakdown of the gearbox.
When replacing engine mounts, you can go to a service station, but it will cost a decent amount. For those who want to save money, it is recommended to replace the engine mounts yourself.
Checking the performance of engine mounts
The engine mounts must not show any visible damage.
Before you begin work on replacing the engine mounts, you need to make sure that they are the cause of the engine vibration. To do this you need to do the following:
- The car must be placed on special supports.
- Place a jack under the oil pan. To avoid breaking through the oil pan, you need to place a board or timber on the jack platform.
- Next you need to lift the engine up. Lifting must be continued until the cushions are completely freed from the weight of the engine.
- To avoid injury, you need to place another support next to the jack. This will hold the engine if the jack comes off.
- Next you need to check the condition of the engine mounts. Both the metal base of the pillow and the condition of the rubber are checked.
- If everything is visually in order, you need to check if there is any play between the frame and the plates.
If you're lucky, the repair may be limited to tightening the fastening nuts. In more complex cases, the pillows will need to be replaced, since they cannot be restored.
Selection of engine mounts
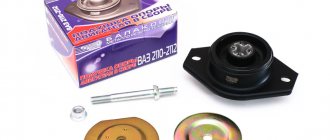
Buying new engine mounts for the eight-valve VAZ-2110 engine is not difficult. Any auto store will provide you with a catalog where you can find both original parts and their analogues. Here is a list of original mountings for an 8-valve engine:
- The right side pillow has the article number 21100-1001204-82.
- Left side pillow - 21100-1001240-82.
- Rear cushion - 21100-0-1001280-82.
8 valve engine
If you need a replacement on an 8-valve valve, then proceed as follows:
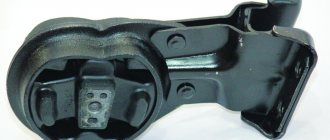
- Right pillow. It is necessary to unscrew: • The upper nut; • Bolts for fastening to the bracket; • Bolts under the wheel arch securing the bracket to the side member. We remove the bracket and install a new pillow, reassembling it in the reverse order.
- Left. After unscrewing the top nut, lower the motor onto the prepared support and pull out the top washer from the support. We unscrew the fastening bolts, remove the washer, after which you can replace it;
- Rear (8-valve only). Unscrew the nuts that secure the airbag to the body, then the bolts securing it to the gearbox. The new part may come with a bracket. But if it is not there, install it with the removed one and assemble all the parts in place.
Diagnostics of pillows
Now that the motor is freely suspended, diagnostics can begin:
- Visually assess the condition of rubber and metal parts. There should be no cracks on them.
- The rubber part should not separate from the metal part.
- Check the play (free play). The fastening bolts must be tightened until they stop.
If you have not identified a malfunction, then there is no point in replacing the pillows - vibrations and knocking appear for another reason. Upon completion of the diagnosis, it is necessary to lubricate the cushions with a protective agent and lower the engine. Be sure to tighten all threaded connections.
Additional support
In order to reduce engine movement in the longitudinal direction, an additional support (suspension rod) can be installed. They are mainly purchased in online stores. An additional support is installed on all types of VAZ 2110, but it has its own characteristics.
For an 8-valve model, you also need a special bracket that is used to carry the ignition module. Those who installed such a bar claim that when the car starts moving, the engine does not wobble, the cushions do not wear out as much, and the lower hose does not come off the radiator (which is what dozens of people “suffer from”).
Opinions differ regarding the decrease/increase in vibrations.
Source
When should you change the power unit mounts on a VAZ 2110: signs and reasons
Before you change the engine mounts of a VAZ 2110 car and watch a video of this process, you need to study the signs that indicate a breakdown of the rubber-metal mounts. The main symptoms characterizing problems with damper units:
- Vibrations transmitted to the steering wheel and pedal unit when idling.
- Extraneous noise in the cabin when moving on an uneven surface.
- A characteristic knocking sound in the engine compartment during acceleration and braking.
When drawing conclusions after your observations, you should not confuse vibrations on the steering wheel during braking, which are associated with defects in the brake discs or pads. To be more convincing, you need to open the hood and inspect the power unit supports. If you place your palm on a running internal combustion engine, you can feel changes in its operation.
Many years of experience in operating the Lada 2110 allows us to assert that the reasons for the failure of damper cushions are the following factors:
- Deformation phenomena on the rubber support due to mechanical and temperature influences, as well as due to exhausted service life.
- Cracking and delamination of rubber from exposure to chemically active components.
- Loss of elasticity caused by temperature changes.
Premature failure of the damper support can be caused by the owner’s excessive enthusiasm for such extreme techniques as sudden starts and emergency braking. Suspension parts are already subject to serious stress while driving, and a sporty driving style further increases the risk of their failure.
Manufacturers and prices
Now you know how to change engine mounts, and you need to talk about the cost of the products. The most popular producers in Russia are Balakovo and Tolyatti. Which manufacturer of the part to choose is up to you to decide. They differ little in quality; the choice depends only on individual preferences. Their prices are approximately the same:
- Engine side mount (popularly called “guitar” for its resemblance) - cost 480-600 rubles, depending on the seller.
- Rear airbag attached to the gearbox (without bracket) – 350 rubles.
- For 16-valve engines, supports cost about 450-500 rubles.
A complete set will cost you approximately 1500-1800 rubles. But this will significantly improve driving comfort, and the level of extraneous noise will decrease, since the new rubber installed in the supports is much more elastic. Usually there is little choice in stores. Therefore, before removing the engine, make sure that all the cushions are in good condition. If not, replace it.
We repair competently: how to change the damper mounts of a VAZ 2110 engine and video of work processes
Replacing the right damper support
Before changing the right engine mount of a VAZ 2110 car following the video example, you should install wheel chocks and also disconnect the negative terminal from the battery. The further process is carried out according to the following scheme:
- Loosen the generator fasteners with a 13mm wrench and remove the belt drive.
- Loosen the tensioner bolt.
- Jack up the right side of the car.
- Using a 15mm wrench, unscrew the nut securing the support.
- Using a 13mm wrench, unscrew the two bolts securing the support to the bracket.
- Using a 17mm socket, unscrew the three bolts securing the bracket to the right side member.
- Remove the bracket and install the new support in the reverse order.
Replacing the left damper support
The procedure for changing the engine damper on the left side of the car is performed in the following order:
- Remove the car crankcase protection.
- Place a jack under the car in the area of the gearbox, place a wooden beam and lift the car, removing the load from the support.
- Using a 15mm socket and a wrench, unscrew the support pin fasteners.
Replacing the rear damper mount
Reading how to change the rear engine mounts on a VAZ 2110 and watching the video is half the battle. It is important to strictly adhere to the order of repair work:
- Remove the engine crankcase protection.
- Using a 17mm socket, unscrew the two nuts securing the support to the car body.
- Using two 19mm wrenches, unscrew the two bolts securing the gearbox and remove the support.
- Clamp the removed bracket in a vice and use a 19mm wrench to unscrew the bolt securing the support.
- Remove the bolt and install a new rubber support in the bracket.
- Assembly of the unit is performed in the reverse order while maintaining the perpendicularity of the mating planes.
Based on practical experience, it can be argued that the process of replacing the damper supports of the power unit on the “ten” is not particularly difficult. Usually, after repair, vibrations disappear, but if everything remains unchanged, then the solution to the problem may lie in a different plane. It makes sense then to look for a problem in the suspension or in the CV joint components.
Source
Replacement
The replacement procedure should not cause much difficulty for those who have independently repaired their car more than once, especially the suspension and chassis.
If you have no experience, then we recommend contacting a service station. Only proven and reliable.
Dismantling works
Replacement has its own nuances depending on the pillows for each engine in question. We will separately talk about the repair of 8 and 16 valve engines.
8 valve engines
- Select a flat surface for repairs, place chocks under the rear wheels, and turn on the handles.
- Remove the engine protection.
- Unscrew the bolts of the generator belt tensioner, after which this belt must be removed. You will need a 13mm wrench.
- Place a jack under the car, place a strong wooden board on top and lift the engine until it releases the load from the supports.
- Using a 15 wrench, unscrew the central fastening nut of the worn pillow.
- Now use a 13mm wrench to unscrew the airbag fixing bolts mounted on the bracket.
- From below, near the right arch, 3 more bolts are unscrewed. They are responsible for connecting the bracket to the spar. You need a 17mm wrench.
- The bracket is removed, the pillow is removed and replaced with a new one.
- Next, perform assembly in reverse order.
- Place the jack under the transmission and then lift it up.
- Using a 15 wrench, unscrew the nut of the central fastening of the left pillow.
- Using a 13mm wrench, unscrew a pair of bolts securing the support, after which it is removed.
- Replace the damaged element, and then carry out the reassembly procedure.
- Remove a pair of nuts with a 17mm wrench. They secure the cushion to the body. Then a couple more nuts connecting the cushion to the gearbox are unscrewed.
- Remove the rear support.
- Using a 17mm wrench, remove the fastening nut connecting the bracket to the cushion. A new rubber part is installed in place of the old element.
- The rear support is returned to its original state by reassembly.
16 valve engine
If you have a 16 valve engine under the hood, then there are some nuances for replacement.
On 8 and 16 valve engines, dismantling and replacing the side cushions is carried out in a similar manner, there is no difference. But the front lower ones change differently.
To change the front lower mount on a 16 valve engine, you need:
- Unscrew the front lower support rod fixing bolts in relation to the front suspension cross member. For these purposes, arm yourself with a 15 key;
- Unscrew the fastening nut that holds the support to the engine bracket. You will need a pair of keys at once and both are 15. The bolt is removed;
- Remove the support, change the cushion on it or replace the entire assembly;
- Reassemble;
- In the engine compartment, unscrew the fastening bolt of the upper front support to the car body, while holding its nut by hand. This is where the key for 17 comes in handy;
- Remove the bolt and nut;
- Remove the fastening bolt of the front upper support in relation to the power unit bracket using 15mm wrenches. The bolt and nut are removed;
- The support can now be removed, the pillow or the entire assembly can be replaced;
- Assembly is performed in reverse order.
Assembly of the unit
Additional support
Additional support
To mount an additional support on the 8-valve power unit installed under the hood of your VAZ 2110, you will need to purchase a special bracket used to transfer the ignition module.
Reviews from those who have performed such operations claim that when starting off the car does not jerk, the engine does not become loose, which has a positive effect on the wear of the cushions.
There are a lot of opinions regarding reducing vibrations. Some consider this a useless exercise, while others, on the contrary, note significant improvements in the behavior of the car.
Prevention measures
To prevent breakdowns, it is best to carry out periodic maintenance. This way you will spend much less effort and time on repairs.
Preventive measures include:
- Periodic check of bolt tightness;
- Removing dirt and oil traces from the rubber elements of the engine mounts with a dry rag;
- Regular repetition of these activities every 4 months.
In practice, even a relative beginner in the field of do-it-yourself repairs takes no more than 5 hours to replace engine mounts. But this allows you to develop your own skills, as well as save a decent amount of money on the services of service stations.
Replacing engine mounts on VAZ 2110, VAZ 2111, VAZ 2112
Welcome! Engine mounts - thanks to them, the vibration that the engine emits is not transmitted to the car body (It is damped due to the rubber from which the mounts are made), thus, if the car’s engine shakes, then these vibrations are not particularly transmitted to the body thanks to the mounts, except for this When driving over bumps, the engine standing on supports (cushions) does not knock much, but again softly springs and these vibrations are damped with the help of the material from which the cushions are made (rubber).
Note! To replace all engine mounts or just one, you will need to stock up on the same set of tools, namely: A set of wrenches, a set of spanners and a wrench with spanner heads, and in addition to all this, you will need a jack and a long flat board !
Summary:
Where are the engine mounts located? There are only three of them in 8-valve engines and four in 16-valve engines, while two airbags on both engines are in the same place, these are the lower left and lower right, they attach the engine to the car body from the very bottom, we immediately say that everything We will not be able to show them to you, but will only verbally tell you their approximate location; you will become more familiar with the replacement of each pillow as you read this article.
When do you need to change engine mounts? If the vibration on the body that the engine gives increases and when inspecting it (When it is running) it shakes, then you can think about replacing the engine mounts with new ones, they can be changed either individually or all together (At your discretion and according to the condition you need to look , if the pillow is in excellent condition, then it may not be necessary to change it) and besides, by visually looking at them, you can already understand by their condition whether they need replacing or not, to make this easier, you need to do the following operation, take a jack and a small but not small board that will cover the entire oil pan, then place this board on the jack and begin to lift it up (They should rest on the pallet) and as soon as the engine rises (it will no longer lie on the cushions) , proceed to inspect the cushions, if it suddenly turns out that the cushions do not need to be replaced, then before lowering the engine, we recommend that you lubricate them with some kind of protective compound and only then lower the jack along with the motor, by the way, when the motor is holding the jack, check for play between the pillow plates and the engine frame, if it turns out that there is play, then eliminate it by tightening the pillow mounting nuts and it is possible that the engine shaking will stop after the operation.
Preparing for diagnostics
Before replacing the VAZ-2110 engine mounts, you need to check them. Very often, knocking and vibration do not appear due to the failure of rubber-metal products. To check them, follow these steps:
- Place the car on stands.
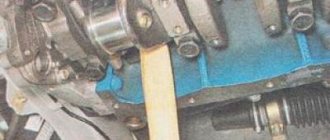
- Place a jack under the pallet and a small piece of wooden slats or blocks on top of it. Raise the jack until the cushions are free from the weight of the engine.
- Carry out diagnostics of all pillows, evaluate the condition of the mounting bolts. If the thread is damaged, restore it or make a new, larger one.
How to replace engine mounts on a VAZ 2110-VAZ 2112?
Note! In this article we will talk exclusively about 8-valve cars, if you are looking for information about 16-valve engines, then go to another article called: “Replacing the pillows on the engine of a Lada Priora car,” in fact, the pillows in these two engines are not particularly different , it’s just that in 16-valve cars, additional cushions were added and one rear engine cushion was removed, despite this, the left and right engine cushions are present in both 16-valve cars and 8-valve cars, but information on replacing these two cushions is only posted in this article, so if you start with them, then do not follow the links, but simply continue reading this article on replacement!
Replacing the left engine mount:
First, crawl under the car and place a support under the gearbox itself that will rest on the jack (This board can be and in no case do not lift the box with a jack alone, it may be damaged or if your jack has a flat surface and you are sure that it will not damage the gearbox body, you can try to lift the gearbox without any support), then lift the jack a little at a time (it’s best to use a hydraulic one, it’s unlikely to fall off, but you just need to secure it well) and behind the gearbox, a little the engine itself will rise, when this is done, unscrew the nut securing the engine to the cushion (Indicated by the red arrow) and carefully lower the jack so that the rod comes out of the cushion, as soon as the operation is completed, unscrew the two bolts that secure the cushion (Indicated by blue arrows) and completely remove it from the car, install a new and metal support on it, which you also removed from the old cushion, then lift the engine again by the box and tighten the nut that secures the engine rod to the cushion, but only before that, be sure to tighten the bolts securing the cushion to the body.
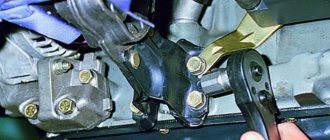
Replacing the right engine mount:
The replacement is carried out as with the left cushion, namely, a jack is placed (Indicated by a red arrow), but not under the gearbox, but under the engine crankcase (Indicated by a blue arrow) and after which it lifts the engine and the nut that secures the power unit to the cushion is unscrewed (see small photo, it just shows unscrewing this nut), then the two bolts securing the airbag itself are unscrewed (indicated by green arrows) and it can already be removed from the car.
Note! This cushion is placed on the bracket, if suddenly it is bent or if you just want to change it, then unscrew the three bolts securing this bracket to the body spar and then remove it, by the way, before starting this operation, remove the generator belt, as To do this, read the article: “Replacing the alternator belt on a car”, point 1 you need!
Replacing the rear engine mount:
This cushion is the easiest to get to and, as a rule, if you have a good tool, it can be quickly removed, and this is how it is removed: first, a jack is placed under the gearbox and it lifts it a little, then two nuts are unscrewed (They are not visible in the photo below, the pillow itself is indicated by a blue arrow and the knob is indicated by a red one, with the help of which one of the nuts is unscrewed) which secure the pillow to the body and two more nuts of bolts that secure the pillow through the bracket to the box (These nuts are indicated by green arrows in the small photo) and you can remove an old pillow, together with a bracket from the power unit.
Note! Pillows in the store can be sold either assembled with a bracket or without it, if you suddenly bought just such a pillow, then be sure to remove the bracket for it from the old one, they are fastened together with just one bolt (Indicated by the red arrow), by unscrewing it, the bracket can be separated from the pillow (We recommend clamping the bracket in a vice, this will make it much more convenient to unscrew the bolt)!
Additional video: To roughly understand the entire process of replacing engine mounts on cars of the tenth family, you can read the article and watch the video below with visual instructions.
Source