In the interior of the VAZ 2110, the dashboard is the most noticeable part. Every driver wants to sit in a stylish and well-maintained interior. But the standard panel looks angular and gray. This is especially noticeable after long-term use, when abrasions, scratches and cracks appear on the panel. Motorists solve this problem in different ways - some install another standard dashboard from a VAZ 2110, other drivers prefer to install a Europanel - this is the name of the trim from a third-party manufacturer. The trim allows you to transform the interior and turn the “ten” into a foreign car, at least on the inside. Whatever you choose, removing the panel is a must. In this material we will tell you how to properly dismantle the standard panel and install the Euro version.
Tuning techniques
To successfully complete any modification to a car or its dashboard, you need to know a few simple techniques that will allow you to perform the necessary actions. We have already talked about how to properly stick tint film, and these are the same techniques that are used when gluing translucent films to the back of the device display with slots so that the divisions and numbers glow with the right light. Another no less interesting technique is the use of fluorescent paints to paint the needle or scale divisions of the device. To apply this paint evenly, it is enough to use either a simple template over which you can safely paint, or simply carefully apply it with a thin brush. Also, do not forget about the need to correctly calibrate the pointer after removing it, because an incorrectly calibrated device is a very serious problem that can only be solved in a service center.
Torpedo from BMW E30
I walked and wandered around and bought a lot of spare parts and a new resonator and muffler. Such tuning can be done in two ways: Replacing the dashboard; Replacement of the entire torpedo. The first option will allow you to get by with little expense and replace the panel with another one that suits you more. You just have to adjust the socket a little in size. It is somewhat more difficult to install a new panel. At the same time, it must be suitable in size and provide the ability to connect all vehicle systems.
The final choice depends on your ultimate goals and capabilities. Dashboard Let's start with the simplest tuning option. A donor will have to be found for a replacement. The simplest option would be to install a panel from a VAZ. There will be a minimum of problems with this work, and the resulting design will look much more advantageous. You will have almost no problems connecting wires. Here they are almost identical. All main devices are also connected in the same way.
Then the handle is removed from the mileage reset button.
VAZ 2107 dashboard reupholstery
On the right side of these levers, the decorative plug is removed. Using a Phillips screwdriver, unscrew the self-tapping screw that holds the VAZ torpedo. The next step is to disconnect the speedometer drive cable from it.
To do this, unscrew the knurled nut. Next, the vacuum supply hose and the bags with wires, which are initially marked, are disconnected. If necessary, repair work is carried out, including replacing the light bulbs of the main devices.
The procedure is carried out by scrolling the cartridge counterclockwise. Dismantling work involves unscrewing the nut securing the holders to the torpedo body.
Dismantling an old torpedo If we talk about which car the panel fits the VAZ from, then auto mechanics recommend installing a torpedo from a BMW or Volga
Tuning the gear knob
BMW 528i: technical specifications, photos and reviews
A shabby gearshift lever can be updated in three ways:
- replace the gearshift knob cover with a new cover;
- install the short-stroke lever;
- change the knob.
A new leather cover for the gearshift lever can be purchased at a car store. This is a ready-made product that needs to be put on a lever and secured in the floor or under the rug with a special ring.
The cover for the gearshift lever can be made of either eco-leather or genuine leather
Or you can sew the cover yourself using a pattern.
You can make a drawing of the casing pattern yourself by taking the required dimensions from the old casing
Most owners of “sixes” shorten the gearshift lever. To do this, unscrew the lever, clamp it in a vice and saw off about 6-7 cm with a hacksaw.
Short throw lever appeals to most drivers
The simplest and most affordable way to tune the gearshift knob is to replace the knob. A new accessory is screwed onto the lever, which will decorate the interior of the car.
Retro-style knob will create an atmosphere of the 70s
The main advantage of tuning is its uniqueness. For owners who are in love with their cars, the possibility of tuning brings trepidation to the soul. In addition, a tuned car reflects the character of the owner. An unprepossessing car turns into a dream car and attracts the admiring glances of passers-by. Tuning is beautiful, so go ahead and realize your ideas.
Which seats are suitable?
You can replace the seats either by contacting specialists at service stations in tuning centers, or by yourself.
Which seats are suitable:
You can install standard, original, factory seats, but most often car enthusiasts try to replace the old “Seven” seats with seats from foreign cars, sports cars, or anatomical ones. Of course, installing new ones is not a cheap process. Therefore, a frequently asked question among car enthusiasts on various forums is which seats are best to choose or which seats are suitable (preferably with the least amount of intervention in installation).
It is indeed possible to install “foreign” seats on a VAZ two thousand one hundred seven. For example, seats from a Mercedes W210 (preferably one thousand nine hundred ninety six year of manufacture), or from a Toyota Corolla (1993 year of manufacture) are perfect for this purpose. Another option that works well are seats from SKODA and Fiat. In this case, it will be necessary to make two additional holes to install a more reliable fastening.
They also use seats from the Peugeot and Nissan brands, but you will have to deal with some inconsistency and a little work during the installation process. From the Volkswagen brand, these parts fit well without unnecessary modifications. These seats are quite convenient and comfortable, but it is not recommended to install them, since they will be quite high, which will lead to inconvenience. According to experts, any seats can be installed, the main thing is that they fit the dimensions and there is the possibility of welding.
Dismantling the VAZ-2107 dashboard
Replacing the cylinder head gasket with your own hands: instructions with photos and videos
Removing the dashboard on a classic “Seven” is quite simple. This procedure is necessary when replacing lamps or electrical appliances, as well as if you want to tune the VAZ-2107 torpedo. The work is not a difficult process: it does not require special tools or extensive knowledge in the plumbing field.
Step-by-step procedure for dismantling the VAZ-2107 dashboard:
- the ground cable is disconnected from the battery terminal;
- the levers of the heating device are removed using a screwdriver;
- the protective plug is removed from the bolt responsible for fastening the panel;
- the bolt is unscrewed, after which the panel is dismantled;
- the speedometer cable nut is unscrewed, after which the device itself is removed;
- the voltage supply cables are disconnected from the economizer;
- the wire blocks are removed;
- The dashboard is removed.
After the structure is removed, you can begin work on replacing any of its components and elements. You can install the device using the same instructions, the steps of which are performed in reverse order.
Recommendations to avoid problems during the process of removing the torpedo
If you intend to remove the dashboard in a VAZ-2107 car for the first time, be sure to follow the following rules:
When removing the upper part of the steering column protective cover, be careful not to damage the ignition switch O-ring. This part is made of rather flimsy rubber that cannot withstand strong mechanical stress; label all connectors, wires and switches that you remove to gain easy access to the dashboard
They will avoid confusion during the installation process; When removing the additional dashboard, do not try to use force, as there is a fairly high risk of breaking the plastic clips. Finding a replacement for them will not be so easy.
We remove the torpedo
Removing and installing a new torpedo on a VAZ 2110 takes a lot of time, we also advise you to be patient, since there are dozens of connections and wires in this part of the interior. Each action must be careful, since the VAZ 2110 mounts are very fragile and can be easily broken. After this, the panel will no longer fit properly, and the car will noticeably increase in squeaking while driving.
In some cases, it is not necessary to completely dismantle the standard panel. Our article provides a description of a complete analysis.
Necessary tool
To remove the case, you should have in your arsenal:
- Labels with adhesive backing.
- Marker or pencil.
- Set of screwdrivers and keys.
The main assistants in this work will be a 10 mm wrench and a Phillips screwdriver. We need a pencil or a washable marker in order to mark the removed elements. This also applies to self-adhesive labels. There are too many wires and parts, after disassembling you will already forget where each component is located. Markings and stickers will remind you of the location of wires and parts.
Preparatory work
Some people prefer to disassemble without dismantling other components of the interior, but this significantly complicates and prolongs the work. We recommend preparing the interior as you will need room to maneuver. Remove the seats and steering wheel - follow this sequence. It is also worth dismantling the floor tunnel.
What is dashboard tuning like?
Subaru tuning
Tuning this element of the car can be conditionally classified as either functional improvements or aesthetic ones. Often, motorists who are thinking about improving their car dashboard have both goals and want to make the panel both more beautiful and more functional.
A rather complex but interesting process of tuning the dashboard in detail:
Functional tuning is primarily aimed at either replacing vehicle controls or instruments with more advanced analogues, or simply involves adding additional instruments or controls. The main goal of such tuning is to improve the quality of obtaining information about the condition of the car or about weather or other conditions outside. Aesthetic tuning, in turn, is aimed solely at improving the appearance of the dashboard. Naturally, such improvements can be made even at the expense of functionality, which does not always have a good effect on the car, but if a person wants to do something with his car, it is difficult to stop him.
Description of the electronic instrument cluster
In our country there are several manufacturers of this type of equipment that offer their products to consumers. The electronic panel for the VAZ 2107 model car is a set of indicators and units of measuring devices, assembled in a single housing and adapted for installation instead of the factory one. This instrument combination contains the following elements:
- on-board computer with a liquid crystal display measuring 132x48 pixels;
- speedometer;
- tachometer;
- fuel level indicator;
- econometrician;
- turn signal indicators;
- indicator lamps for oil pressure in the lubrication system and battery charge level.
To make it easier for the driver to perceive information, the computerized dashboard for the VAZ 2107 car has a familiar appearance. The speedometer, tachometer and fuel level indicator are designed as dial indicators. This instrument combination has the following functionality:
- diagnostic tester;
- trip computer;
- alarm indicator;
- alarm clock and calendar;
- dynamic parameters indicator;
- storage and display of service book information.
After appropriate configuration, this instrument cluster will remind you of the need to perform vehicle maintenance operations. The information content of such a panel on a VAZ 2107 car is at a very high level, and well-chosen lighting does not distract from driving the car. The instrument cluster works on the principle of indicating only those parameters that have significant deviations from the specified ones.
Beard tuning
The center of the car interior is the console, which is called the beard
It acts as a continuation of the torpedo and attracts the attention of all passengers
When tuning, you can place in your beard:
- watch;
- radio;
- pocket for small items;
- armrest;
- USB sockets;
- switches;
- backlight
Typically, the beard for “classics” is made from plywood, fiberglass, or from spare parts from foreign cars.
Beard drawings can be found on the Internet or taken measurements from an old console. For the pattern, thick cardboard is used, which holds its shape well. The template is transferred to plywood and, after carefully checking the dimensions, cut out along the contour. Next, the parts are connected with self-tapping screws. The finished frame is covered with leatherette or other material in the color of the upholstery. The material is secured with a furniture stapler and glue.
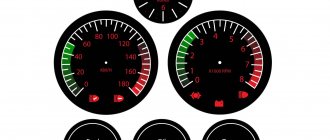
Speedometer and tachometer
The speedometer on the instrument panel (2) is a dial instrument, but not with a mechanical drive, as was the case in older cars, but with an electric one. Essentially, it is a voltmeter that responds to an impulse generated in the speedometer sensor, and it is installed in the gearbox. The higher the voltage at the sensor output, the higher the speed the device displays. The factory error is approximately 5 km/h, but it is necessary to take into account the diameter of the wheels, which greatly affect the accuracy of the electric speedometer.
The tachometer on the instrument panel is indicated by the number 5 and it is also an electrical device that responds to an impulse generated by the crankshaft speed sensor. The sensor first transmits the readings to the electronic engine control unit for analysis and correction, after which the pulse is sent to the tachometer control circuit. The red zone of the tachometer scale indicates unacceptably high speeds, at which rapid wear of engine parts, incorrect operation and an increase in coolant temperature are possible. Long-term operation of the engine in the red zone of the tachometer is extremely unacceptable.
Glass tinting
Glass tinting is an elementary type of tuning the panel of a Lada Priora. The film is attached to the outside of the glass. You can use film No. 15 or any other depending on the driver’s preference. The main thing is to choose the right shade to make the glass look good. American film, which often has a reddish tint, is not suitable for every interior.
The film is applied as usual - degrease the glass using any dishwashing detergent, Fairy and others will do
We apply the film and cut it, paying special attention to the edges. It is better to cut off the edges so that the film does not start to bubble after installing the glass in place.
Indication symbols
As you know, all the lights on the control panel come on when the ignition is turned on, and then, when the engine is already running, most of them go out. But when one remains on or blinks, this cannot but be alarming, because not everyone can immediately figure out what malfunctions this indicates, which of the systems needs urgent repairs.
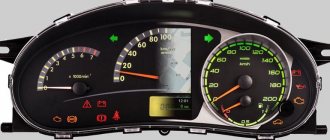
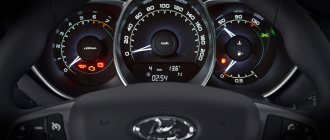
Let's look at the designations of the instrument panel of the VAZ 2110. You should know that regardless of whether the panel is new or old on your car, the designations are almost the same, but the indicators may be located slightly differently.
Before deciding to upgrade the instrument panel, it is recommended to understand its pinout. Details:
Instrument panel VAZ 2110
Design features of the VAZ 2114 dashboard
In addition to a certain functional purpose, the VAZ 2114 dashboard also performs an aesthetic function. It is she who is seen most by the driver and front passenger; she is the first thing that catches your eye when getting into the car. When tuning the interior, it is impossible to do without upgrading the dashboard. Before you do this, you need to familiarize yourself with the characteristics of the dashboard, design features and the main components that make up it.
The peculiarity of the VAZ 2114 panel is that it is equipped with electronic devices. Unlike its predecessor VAZ 2109, where the panel was illuminated from the outside, here it is illuminated from the inside. While the vehicle is operating, the dashboard displays 19 characteristics of the vehicle’s technical condition, the main ones being mileage, speed, engine speed and temperature, and fuel level.
The VAZ 2114 dashboard displays 19 characteristics
There is a temperature sensor on the left side of the dashboard. Its red zone is between 105–130 °C. Next is the tachometer, speedometer and fuel level sensor.
Why is the VAZ 2114 dashboard and dashboard tuned?
Although the standard dashboard of the VAZ 2114 looks quite attractive and is made of high-quality plastic, owners often try to tune it and make their car exclusive, unique, so that it differs from similar cars. In addition, correctly performed tuning allows you to feel more comfortable in the cabin.
How to remove the dashboard
To make it easier to dismantle the VAZ 2114 dashboard, you need to familiarize yourself with its design. The dashboard includes the following elements:
- Dashboard base.
- Overlays.
- Bracket.
- Stub.
- Ashtray.
- Two crossbars.
- Right dashboard screen.
- A shield that blocks access to the wiring.
- Central bracket.
- Left screen of the instrument panel.
- Left cross member. The elements that make up the VAZ 2114 dashboard are arranged in a certain sequence
Before you begin tuning the dashboard, you must first remove it. For this you will need:
- a set of keys;
- flat and Phillips screwdrivers;
- flashlight.
Complete dismantling of the dashboard is performed in the following order:
- Remove the left screen. Using a screwdriver, unscrew the 3 mounting screws. The left screen of the VAZ 2114 console is removed with a Phillips screwdriver
- Remove the right screen. It is secured with 5 screws.
- They remove the tape recorder. To do this, disconnect the negative cable from the battery. Pull out the tape recorder and disconnect the block with wires from it.
- Disconnect the wires from the cigarette lighter and ashtray illumination, and then remove them as well.
- Remove the heater damper control levers, do this using a flat screwdriver and the handle of its switch. To remove the heater damper control levers, use a screwdriver
- Remove the center console panel. Unscrew the 4 screws located on its left and right sides, and then remove the plastic cover. There is a plug next to the heated rear window button; pull it out and unscrew the screw. Now the trim is removed and the instrument panel can be removed. Open dashboard - there is access to the necessary elements
- Disconnect the panel posts from the floor. Unscrew all the screws and also remove the cross member. The panel stand is dismantled using a wrench
- The intermediate body is pulled out of the torpedo socket.
- Disconnect the nozzles of the ventilation and heating system and unscrew the bracket fastenings.
- Remove all elements, including the APS block, master cylinder, and harnesses. This is done when the panel is completely removed.
- Measuring instruments are removed. The console is pryed up with a screwdriver, the cable is unscrewed from the speedometer, the wires are disconnected, but the sequence of their connection is remembered.
- Dismantle the linings that go onto the windshield.
- Remove the console. At the last stage, finally remove the dashboard
This procedure for performing work is provided only in the case of a complete replacement of the dashboard. When it is necessary to replace or tune individual elements, it is enough to provide access to the selected parts.
Removing the standard instrument cluster
Removing the factory panel from a VAZ 2107 is quite simple; it is installed in a niche on special brackets and secured to them with screws. The procedure for dismantling the equipment is as follows:
- We disconnect the battery by disconnecting the negative wire from the corresponding terminal of the battery.
- Using a flat-head screwdriver, remove the handles from the control levers of the interior ventilation and heating system.
- We unscrew the locking nut of the daily counter reset handle with a wrench and remove it together with the washer.
- We take out the plug for the screw securing the decorative panel and unscrew it.
- With a slight turn, we take the assembly out of the niche and gain access to the instrument cluster.
- By hand, unscrew the union nut securing the speedometer cable to the device and undock it.
- We remove the tube from the econometer fitting and disconnect three electrical connectors.
Where to start tuning
No matter how you plan to improve your car’s dashboard, first prepare the necessary tools:
Tools for disassembling the dashboard Industrial hair dryer Utility knife or sharp blade Required wiring and controls Soldering iron and solder
The rest of the necessary tools and materials will vary depending on what you are going to do with the dashboard. You may also need specific tools if disassembling the panel requires using non-standard techniques and non-standard tools. Find out in advance what tools are needed to remove the car trim and unscrew those elements that need to be replaced or modified.
Disassembling the dashboard
Experts recommend carrying out any work in a dry, dust-free room. This is a fairly important point on which the overall success of our venture depends. Firstly, dust can prevent us from evenly gluing various colored films to change the color of the instrument lighting on the panel, and high humidity will simply ruin the wiring. You should carefully remove the trim on the dashboard of your car in order to gain access to those controls or monitoring the condition of the car that you want to work on. If you are going to change the scale on the instruments, we advise you to remove the arrows very carefully. A simple marker is ideal for this, which marks the junction of the arrow using a dash or dots. If the arrow is soldered, you can use a soldering iron and heat the tin that holds the arrow to the coil. However, do not forget that the arrow will still need to be installed back, and in order to do this correctly, you need to mark the connection points, because otherwise calibration can only be carried out in a car service center.
How to improve your dashboard
Once you've disassembled the dashboard to the point where it can be worked on, it's worth stopping and rethinking what you're planning to do. You also need to check whether your modifications will damage the car and if everything is in order, then you can continue. After this, you can do almost whatever you want with your dashboard, but with the abundance of different possibilities, you often start to get lost, so let's look at several tuning options.
Changing the instrument scale
First of all, you can replace the scale on the instruments. To do this, you can either paint over the old scale and apply a design on it by hand or using a stencil, or stick a special film with a printed design on top of the scale. Most often, this option gives the most beautiful and high-quality result.
In order to make such a film, it is enough, even in the simplest graphics editor, to draw a model of what markings you want to see on a particular device and print it on a special film, for which you can contact a printing house. In the same case, if you want to change the color of the needle or individual elements on the instrument scale, you can even carefully paint over the desired areas with paint. Some motorists who want to achieve interesting glow effects use fluorescent paint for this, which glows perfectly when even a small LED is connected to the backlight.
Replacement of instrument lighting
Since we are talking about adding LEDs to the lighting of certain devices, it is worth saying that LED lighting of devices is a very popular tuning. However, despite its popularity, you should be very careful when adding or completely replacing the backlight with LED. Firstly, you will have to face a rather complicated process of removing the factory wiring and factory backlight bulbs, and secondly, you can go overboard with the number of LEDs. To prevent this from happening, we advise you to limit yourself to 1-2 LEDs per device, which will be enough for a bright backlight that will be clearly visible at dusk, but it will not hurt your eyes at night. If the device has a glow from the inside, and the device scale itself is transparent, you can add a little more LEDs, but they should be placed in such a way that their direct light does not fall into the eyes of the driver or passengers.
An interesting way to replace the backlight on a Skoda Octavia:
To install such a backlight, you should use the car’s original wiring, since it is initially connected to the controls and you won’t have to worry about how to power the backlight or where to place the button to turn it on.
Installation highlights
Before deciding which panel you can install, you should take into account that the original VAZ 2107 torpedo can be returned at any time. If such a procedure is carried out independently, it is recommended to use a book on repairing classics. It will take a lot of time to complete the work.
When connecting the wires, you need to remember that one goes to ground, and the second goes to the panel to the corresponding contact. It is recommended to label which connector goes where. To operate the speedometer, a speed sensor from model 2110 with 6 pulses is installed. If the “seven” is equipped with an econometer, it is recommended to install a tee from 2106 on 2 sensors, including a pressure sensor from engine 402..
Video: tuning the “Seven” dashboard
How to remove the instrument panel from a VAZ 2106 car
The dashboard installed on the VAZ 2106 car is actually one hundred percent similar to the dashboard that was equipped with the VAZ 2103 model. Accordingly, the process of removing the panel is valid for both the VAZ 2103 and the VAZ 2106.
1. Disconnect the negative terminal from the car battery.
2. Using a Phillips screwdriver, unscrew the screws securing the storage shelf. Then unscrew the screws of the lower fastening of the radio panel: one on the right side and one on the left. We also unscrew the screw on the top fastening of the radio panel.
3. Using a flat screwdriver, carefully pry the bar with the control elements out of the radio panel. Disconnect the wires from the buttons and switches.
4. Unscrew the screws securing the radio console. And we completely remove it.
How to remove the tidy from a VAZ 2101
I decided to redesign the dashboard
according to the budget option, don’t judge too harshly) There are still a lot of alterations, enter:…
5. Unscrew the screws securing the decorative trim of the right windshield pillar and remove it. Similarly, we dismantle the left pillar trim.
6. Remove the decorative and protective casing of the column control shaft. To do this, unscrew 5 screws and carefully separate the top and bottom covers.
7. Using two straight screwdrivers, we pry off the clamping plates, which secure the composition of devices. Pull out the device shield.
8. Unscrew the union nut of the speedometer drive cable. Disconnect the cable and move it to the side.
9. We make marks on the connectors of the wires that go to the arrangement of devices so that later, when installing the dashboard in its original place, we do not confuse them. We disconnect the connectors and completely remove the instrument cluster.
10. Use a screwdriver to pry up the electronic clock located in the center of the dashboard, disconnect the wires from it and completely remove the clock. We do the same with the heater operating mode switch.
11. Using a small straight screwdriver, slightly open the latches of the heater control knobs and remove them from the levers.
12. Disconnect the conductors from the socket with the glove box illumination lamp.
13. Unscrew the screws that secure the side parts of the storage compartment. We remove the side panel. We unscrew the nuts securing the instrument panel to the body, which are located under the glove compartment lid.
13. Unscrew the screws that secure the instrument panel to the body from the bottom. We also unscrew the two nuts securing the panel at the location of the instrument cluster.
14. Having slightly lifted the dashboard up, remove it. Installation is carried out in reverse order.
Alternative torpedo
The alternative dashboard is softer than the standard “tens” dashboard, but the main advantage is the absence of unpleasant grinding and squeaking. Motorists decide to get rid of the standard one precisely because of the squeaking. For the VAZ 2110 car there are several types of panels that differ in design.
The panel is sold as a set:
- The panel itself, which is an alternative to standard plastic.
- Buttons, brackets and inserts for blowers and instrument panels.
- A set of wires and a block for a double switch.
- Buttons for low beam, heating, dimensions and fog lights.
- Plugs for buttons are installed in places where keys are not needed.
The experience of the owners of the “Ten” shows that proper removal and installation of the Europanel improves sound insulation, increases airflow and changes the appearance of the VAZ 2110 interior for the better.
Installing a dashboard on a VAZ-2107 from another car
In some cases, drivers who do not want to bother with the selection of components simply replace the “Seven” dashboard with a similar design originally produced for another car. If you have such a desire, you will need:
Find and buy a new dashboard from a more modern car
Please note: such a rather expensive purchase may cost more than the “seven” itself. For example, a Ferrum torpedo, with a built-in on-board computer, will cost the car owner 20-25 thousand rubles. Update the panel in the area of design visual elements - re-stick the stickers and indicator arrows. Install a newly purchased shield from another vehicle.
Before purchasing a dashboard from another car, you should compare the configuration of the element with the provided connector on the VAZ-2107. In some cases, it may be necessary to adjust some areas of the panel in shape and size.
Dashboard from another VAZ model
The easiest option for changing the panel on the “Seven” is to install a structure designed for another VAZ model. The easiest way to carry out installation and dismantling work is to use a VAZ-2110 torpedo: no problems are expected during the process, and the final result will give the interior a better external image.
With such a replacement, the technician will not have to tinker with electrical wires and connecting devices for a long time: the cables of the two panels are identical and are connected according to similar circuits.
Gazelle dashboard
When replacing the instrument panel on a VAZ-2107, the equally popular Gazelle often becomes the donor. Despite the fact that the manufacturer of these two machines is the same, the work will be more complex. The Gazelle panel has large dimensions and also has a completely different configuration, shape and size. You will also have to tinker with the electrical wiring: you will need a number of adapters, as well as knowledge from the field of electrical engineering.
In such work, you will have to use a jigsaw and a soldering station to resolder the adapters. This is a rather painstaking procedure that should be approached with special care.
Dashboard from a foreign car
Installing a dashboard from a foreign car on a VAZ-2107 is the most complex option, characterized by the greatest efficiency. Before purchasing a device from a third-party car, you should compare the characteristics of the original and new units, taking into account their correspondence to each other. When choosing a panel, you should focus on foreign brands of cars produced in early 1990.
Description of the electronic instrument cluster
The standard instrument panel on the VAZ 2107 has a simple design and does not represent anything remarkable. That is why owners of sevens often wonder about tuning the standard one, or replacing the analog panel with a digital one. Among all the advantages of the Europanel is the possibility of installing it on the seven yourself without the help of specialists. The only drawback is the price, which varies from 8 to 10 thousand rubles.
Electronic instrument clusters in Russia are produced by different manufacturers. You can install digital equipment only on injection sevens. This type of equipment may be partially unsuitable for carburetor cars. The design of the equipment uses light indicators and units of measuring devices. If we delve into the details of such a device for the VAZ 2107, then it is worth noting the following points:
- The on-board computer is one of the biggest advantages of the installation. When replacing an analog panel with a digital one, the owner automatically acquires an on-board computer. As you understand, the computer only works on injection-type cars.
- The speedometer and tachometer are the two main indicators by which the speed of movement is controlled, as well as the speed of the crankshaft.
- Fuel indicator.
- Econometer.
- Emergency stop indicator and direction indicators.
- Control indication of oil pressure and battery charging.
The new instrument panel on the VAZ 2107 is not only beautiful and modern. With this equipment, the driver will be informed about the need to perform maintenance procedures, having previously configured the system. The device has a backlight adjustment function, which eliminates the possibility of blinding the driver while driving in the dark. One of the positive functions of the installation is the display of only those parameters that deviate from the specified ones.
Installation of electronic combination
Electronic devices are adapted to work with control units January 5.1, VS 5.1, 7.2, M7.3, M7.4 and Bosch M1.5.4, MP7.0 and M17.9. It is also possible to connect parking sensors to the dashboard. It is not rational to install the equipment in question on carburetor sevens, since in this case the on-board computer will not function, as well as indicators, the operation of which is tied to the computer.
When installing equipment on a car, you must first remove the analog instrument panel. Initially, do not forget to turn off the power to the car by disconnecting the negative terminal from the battery. In place of the standard one, a digital instrument panel is installed, which is fixed with similar fasteners. First, power wires are connected to the device and terminated with clips. On the back of the device there are corresponding sockets for connecting plugs. In this case, no modifications will be required.
After installing and connecting the digital instrument panel, you will also need to install the handles on the control levers for the ventilation and heating system of the car. After assembling the equipment, you need to connect the terminal to the battery and turn on the ignition. When you turn on the ignition, enjoy the updated modern instrument panel on the seven.
It is worth noting separately that the necessary wires and adapters are included with the installed equipment. The on-board computer controls many different parameters, and therefore, having installed such a device on the seven, you will no longer need to frequently visit a car service center to conduct a diagnostic study and identify errors.
In conclusion, it is worth noting that the owners who installed the devices on the injection sevens are satisfied with modern equipment, modernization of the interior, as well as an increase in the number of options. In addition to the high cost, the electronic panel has another drawback - if the car already has an on-board computer, it will have to be dismantled.
Source
Radio tape recorder
No upgrade of the “six” is complete without installing a speaker system or at least a simple radio. A standard place for a radio receiver in the beard of a small-sized “six”. It should be trimmed to standard 1DIN. This can be done with a metal file. Then sand the edges with sandpaper.
Installing a radio
The radio tape recorder is attached to the beard using a metal case. Radio installation steps:
- Having bent all the tabs, use special spatulas to remove the radio from the case.
- The metal base is inserted into the prepared hole.
- We fix it using special tongues.
- Then carefully insert the radio unit itself, which should snap into place.
Cables are included to connect the player. The most commonly used are:
- black - “earth”;
- red and yellow (often wound together) - ignition “+”;
- blue - power for the active antenna;
- white - front left (FL) speaker;
- gray - front right (FR) speaker;
- green - rear left (RL) speaker;
- purple - right rear (RR) speaker.
You can connect the radio to the ignition switch to the free INT terminal. Then it will only work when the engine is running and the ignition is on. This connection scheme will protect forgetful car owners from completely draining the battery.
If you twist the red and yellow wires together, the radio will no longer depend on the ignition. You can listen to music with the ignition off too.
The standard connection diagram is usually glued to the cassette player
Typically, a connection manual comes with the audio system. Following the instructions and color scheme, installing audio equipment in the “classic” will not be difficult.
Speaker installation
A good place to place the speakers would be the front door panels. If you choose the right size speakers, they will fit here very well. To install, perform the following steps:
- Remove the trim from the doors.
- On the casing we cut a hole for the speaker. A hole of the required size can be made using a template. To do this, trace the speaker on paper. You need to work carefully so as not to miss the size.
- We attach the column and screw it to the casing using the fastening that comes with the kit.
- We carefully lay the wires in the cavity of the doors so that they do not sag or fall out.
- We install the casing in place.
To give a finished look, the door cards are covered with leatherette, and a protective grille is installed on the speaker.
Additional speakers are placed on the dashboard or on the side pillars of the windshield.
For better sound distribution, high-frequency speakers are installed at the head level of the driver and passenger
If the car owner changes the entire beard, creating it himself to his own size, then he can place a 2DIN radio in it. A player with a large screen will add charm to the appearance of the car.
If the car has a 2DIN radio, then you can connect the rear view camera to it
Some craftsmen insert speakers instead of air ducts. But from personal experience I know that the standard “six” torpedo does not have side window blowing. In humid and cold weather, windows fog up and freeze. If you remove the air ducts for the windshield, the airflow will worsen even more. Therefore, I do not recommend this installation of speakers.
What does the panel consist of?
The panel consists of a large number of elements that are responsible for the operation of certain components of the VAZ 2107 car. The instrument panel is located in the car interior and is directly embedded in the dashboard on the driver’s side. The main elements are located under a special plastic transparent glass, which protects them from mechanical damage. The elements of the instrument panel include the following elements:
- Accumulator charging;
- speedometer;
- odometer;
- tachometer;
- motor temperature sensor;
- ECON – instantaneous fuel consumption indicator;
- additional signaling elements;
- resettable odometer;
- and 10 – fuel level in the gas tank and warning light.
Let's briefly look at the purposes of each of these elements.
- Speedometer. The device located on the right side of the panel is called a speedometer. Serves as an informant for the driver about the speed of the vehicle. The scale has values from 0 to 180, which indicates the speed of the vehicle. There are two dials on the device that keep track of the distance traveled by the “seven”. One of them has the ability to adjust, but the bottom one does not.
- Tachometer. The device located on the left side serves to inform the owner about the crankshaft rotation speed in relation to a unit of time. Most drivers do not really understand the purpose of this element and rarely pay attention to it. But this element is very important, since it is a direct indicator of the quality of engine operation. The closer the arrow gets to the red mark, the more the motor is overloaded. And when it crosses the red line, the car’s movement should be stopped immediately, since the engine is operating in critical mode.
- ECON flow indicator. The indicator, located in the upper left corner of the instrument panel, performs the function of indicating the consumption of the fuel mixture in instantaneous time while the engine is running. When driving at speeds above 90 km/h, fuel consumption increases and the arrow moves to a yellow position. A very useful feature for the driver to be able to save fuel.
- Temperature indicator. Designed to indicate the motor temperature value. Above 100 degrees Celsius, the needle moves to the red mark, which indicates overheating.
- Fuel indicator. Using this indicator, drivers determine the amount of fuel in the tank, which is transmitted through an electronic sensor and level.
- Battery charge. Indicates how good the battery is; position on the red mark indicates the need to recharge.
These are only the main components of the instrument panel; we will look at all the elements in more detail in the diagrams.
Instrument panel diagrams
So, the operating diagram of the instruments located on the main panel in the cabin includes the following elements and combinations:
- indicator of the presence of engine oil in the engine;
- coolant temperature sensor;
- mounting switching block;
- fuel sensor;
- combinations of turns;
- indicator of the amount of fuel in the tank;
- tachometer;
- coolant temperature indicator;
- turning off the ignition;
- ignition relay;
The diagram shows the relationship of the sensors on the instrument panel with the main elements that directly perform the main work. Pointers only read information from operating devices and display it in an understandable form for human perception.
The above diagram makes it clear about the exact location of the instruments on the dashboard, which are important elements in driving the VAZ 2107.
| 1 | Lever designed to switch wiper and washer modes |
| 2 | Buzzer button |
| 3 | Turn signal control lever |
| 4 | Headlight switch (high, low) |
| 5 | Elements for supplying fresh or warm air to the cabin |
| 6 | Hydraulic adjustment of headlights |
| 7 | Lever designed to open the hood |
| 8 | 12V power socket |
| 9 | Turning off the ignition |
| 10 | Turning on the hazard warning lights |
| 11 | Clutch |
| 12 | Brake |
| 13 | Heater switch |
| 14 | Instrument panel lighting switch button |
| 15 | Gas/accelerator |
| 16 | Head unit |
| 17 | Switch panel (outside light, heater fan, heated rear window) |
| 18 | Hand or parking brake |
| 19 | Lamp indicating that seat belts are not fastened |
| 20 | Reserve |
| 21 | Transfer speed switch |
| 22 | Built-in mechanical clock |
| 23 | Cigarette lighter with additional 12V socket |
| 24 | Lamp indicating the operation of the rear window heating |
| 25 | Warning light indicating the presence of brake fluid |
| 26 | Built-in ashtray |
| 27 | Storage box |
| 28 | Shelf for tools and things |
| 30 | Choke or manual gas |
| 35 | Instrument clusters |
Based on the above information, we can say that the VAZ 2107 car has in its set almost all the elements necessary to control the movement of the vehicle. It is important to monitor the operation of each device; if any of them does not function, then operation of the car is prohibited until the problem is corrected.
Another article will tell you how to replace and repair instrument panel sensors. At this point, all the necessary information on instrument panel diagrams for owners of the “Seven” is described and will become useful.
The torpedo is the most important component of the car interior: it houses all the instruments and indicators that help the driver control his car. It will be useful for the owner of a VAZ 2107 to be able to identify and troubleshoot instrument faults, and, if necessary, replace them independently.