Print this article Font size 16
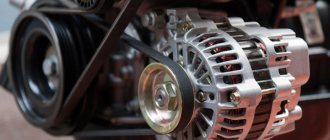
The generator is the basis for the functioning of the entire car. It can be compared to the human heart, since the generator is responsible for transporting electricity through all systems and components that depend on electricity. Mechanical energy is converted into electricity.
Like any other element of the machine, the VAZ 2110 generator has its own characteristics, functions, and operating principle. Today we will get to know him in as much detail as possible.
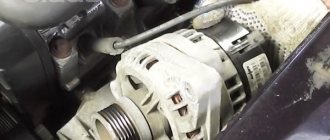
Appearance of the device
The principle of operation of the VAZ 2110 generator
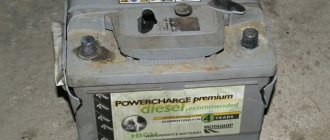
When starting the engine, starting current is supplied to the starter from the battery. But the battery itself does not produce energy, but only accumulates it and then releases it. If you use only the battery to power all consumers, it will quickly discharge.
A car generator produces electricity, charges the battery and powers the vehicle's on-board network while the engine is running (when it reaches a certain crankshaft speed). Car generator The generator begins to produce electric current starting from the idle speed, however, it reaches optimal operating mode when the engine reaches 1600-1800 rpm or more.
Interchangeability of autogenerators
Interchangeability of generators for Lada cars is achieved if the following requirements are met:
- the main technical characteristics of the installed generator are not lower than those of the device being replaced;
- the gear ratio from the internal combustion engine to the generator is the same;
- the devices have similar electrical circuits;
- The new generator is suitable in terms of weight and dimensions and type of fasteners.
Most Russian-made automobile generators have a 2-leg mount. These fasteners are found on both covers. For equipment of foreign brands, installation is carried out using 1 paw, the fasteners are located on the front cover.
In order to correctly install and securely fasten a foreign generator in a car from AvtoVAZ, it is necessary to replace the bracket.
What functions does it perform and what is it responsible for?
So, what is a generator for? First of all, in order to provide all VAZ 2110 equipment that runs on electricity with energy. Perhaps someone thinks that this is the battery's task. Not really, because the battery is needed to maintain functionality when the engine is not running (it starts the engine, supports the alarm, music system while parked, etc.).
But when the engine has already started, with the help of the battery, the generator comes into play. During the trip, it is he who supports the operation of all electronics, air conditioning, audio (or even video systems), and everything else that you have added to your VAZ 2110.
Another equally important function of the generator is charging the battery. This also happens when the engine is running. And if it weren’t for this device, the battery would not be able to cope with its tasks, and it would have to be charged all the time.
Considering that today on the VAZ 2110, in addition to the standard layout, many additional energy consumers are installed, it happens that the generator voltage is not enough. In this case, it makes sense to install a 120 amp generator.
Rectifier module
The rectifier module is designed to convert alternating current into direct current. It is based on six silicon diodes (gates): three positive and three negative. They are located on two horseshoe-shaped plates. To smooth out voltage surges, the terminals of the positive and negative diodes are connected through a 2.2 μF capacitor.
How to check the generator on a VAZ-2110 for the functionality of the rectifier unit with your own hands? To do this, you will need a regular car tester or test lamp. The essence of the test is based on the ability of diodes to pass current in only one direction. A faulty valve either does not pass current at all, or passes in both directions.
So, first you need to remove the casing of the rectifier unit. Next, connect the first wire of the test lamp to the “B+” terminal of the generator, and the second to the ground of the device. If the unit is working properly, the lamp should not light up. If it lights up, there is a short circuit in the rectifier and it needs to be replaced.
Don't be lazy to check the capacitor as well. Turn the tester into ohmmeter mode (1-10 MOhm) and measure its resistance. For a working capacitor, it should first take a minimum value and then gradually increase. If this does not happen, replace the capacitor.
Common malfunctions (signs) of the VAZ 2110 generator
So, it is very easy to determine that it is the generator that is acting up; just know a few basic signs of this - here they are:
- The device does not perform its main function, that is, it does not produce current. In this case, the car is driven only by the battery. Moreover, in this case you will not be able to travel far.
- The drive belt is spinning.
- The generator brushes are faulty.
- The rotor clings and touches the stator.
- There is no wire contact with the battery.
- The device begins to make a lot of noise.
- The battery does not charge while driving.
All these signs are very specific and only an experienced driver can identify them. However, if you have even slight doubts about the performance of the generator of VAZ 21099, 2109, 2110 cars.
Open circuit (short circuit) in the windings
In a VAZ-2110, the generator may also fail due to a break (short circuit) in the rotor or stator windings. Such a malfunction does not bode well, since it is almost impossible to eliminate it on your own. Here you will need to either rewind the windings or replace the faulty element (rotor or stator).
Before checking the generator on the VAZ-2110, it will need to be removed from the car and disassembled. Let's start with the stator. We take the tester, turn it on in ohmmeter mode and measure the resistance between each winding terminal and the housing. For a working stator it should tend to infinity. If the device shows less than 50 kOhm, there is a short circuit in the winding.
Let's move on to the rotor. Here it is necessary to measure the resistance between the slip rings. It should be within a few ohms. If the resistance is close to zero, the winding turns are closed. If the device produces too high readings, a break may occur.
Which generator to choose for the “ten”
The choice of motorists is not limited to Katek generators. Therefore, if the old device fails, you should think about who will take its place.
There are several main options.
- Katek. A standard, fairly reliable and very efficient generator. AvtoVAZ’s choice in its favor is due precisely to this. Plus it is a domestic manufacturer.
- Chinese products. The attitude of motorists towards Chinese generators is quite skeptical. There are explanations for this. Compared to them, Katek is simply an ideal solution. Although in fairness, we note that you can find some pretty good Chinese-assembled options. But this is the exception rather than the rule.
- Imported analogues. Here, first of all, you should pay attention to Bosch companies. Denso and Delphi. High build quality, impressive service life, efficient operation. They cost more than their Russian counterparts in the form of Katek, but for such a thing it makes sense to spend a little more.
Among imported devices, the following are considered good options:
- Dynamo - manufacturer Bulgaria;
- Eldix - also produced in Bulgaria;
- BATE - produced in the city of Borisov, in Belarus.
When choosing a new generator for your car, pay attention to its technical characteristics and safety margin. Then think about the manufacturer. We do not recommend looking towards China if you are doing repairs for yourself and want to achieve high quality work.
Some useful tips to extend the life of your generator
To ensure that your “ten” generator serves for a long time and does not present unpleasant surprises, use the following tips.
- At least once a month, check the condition of the device’s drive belt and its tension. If it is damaged, immediately take measures to replace it.
- Pay attention to the sound of the generator. If you hear a hum characteristic of failed bearings, replace them yourself, or contact a service center for this.
- Do not connect electrical appliances to the vehicle's on-board network that consume a current greater than the current generated by the generator.
- If the warning light on the instrument panel is constantly on, indicating that the battery is not charging, check the voltage regulator. If it fails, replace it.
- Do not expose the generator to water. It can cause a short circuit.
How to disassemble a VAZ 2110 generator: step-by-step instructions
In order to disassemble the VAZ 2110 generator, follow these steps:
- First of all, use a screwdriver or permanent marker to make a longitudinal mark on the body where the front and back covers separate. This will make it easier to assemble the generator in the future.
- We press the three spring-loaded latches on the plastic protective casing of the rectifier unit and remove it.
- Using a Phillips screwdriver, unscrew the two screws securing the voltage regulator and lift it up. Then remove the terminal of the appropriate wire from the regulator terminal and carefully remove the regulator completely. Electrically removable brushes are replaced along with the unit.
- Using a size 8 spanner, unscrew the three bolts connecting the rectifier unit to the annular terminals of the stator windings. We carefully move the conclusions to the sides. Remember the location of the thrust and insulating washers on the removed bolts. Now, using a Phillips screwdriver, unscrew the screw securing the noise suppression capacitor to the housing. Disconnect the appropriate wires. We remove the block itself and the capacitor. Using a 10 mm socket wrench, unscrew the two nuts of the contact bolts of the generator and take them out together with the spacer and insulating sleeve, and release the capacitor tip. It is worth noting that wear (or damage) of brushes is the most common cause of malfunction of the generator.
- Using a size 8 wrench, unscrew the 4 bolts holding the rear and front covers of the electric generator together. We push them apart with a face screwdriver and remove the back cover along with the stator winding.
- We remove the stator from the cover, having previously marked it with a mark of their relative position.
- If the front bearing needs to be replaced, remove the generator pulley. To do this, use a 22mm socket wrench to unscrew the nut securing the pulley to the rotor shaft, carefully holding it with pliers or wedging the rotor with a screwdriver. Do not damage the impeller blades, which are made of thin metal.
- Carefully remove the pulley, washers and spacer bushing.
- We return the nut to the rotor shaft, screwing it flush with the end of the armature shaft. Using a rubber hammer, knock the rotor (armature) out of the cover.
- It all depends on the degree of damage to its parts. So:
- First of all, use a screwdriver or permanent marker to make a longitudinal mark on the body where the front and back covers separate. This will make it easier to assemble the generator in the future.
- We press the three spring-loaded latches on the plastic protective casing of the rectifier unit and remove it.
- Using a Phillips screwdriver, unscrew the two screws securing the voltage regulator and lift it up. Then remove the terminal of the appropriate wire from the regulator terminal and carefully remove the regulator completely. Electrically removable brushes are replaced along with the unit.
- Using a size 8 spanner, unscrew the three bolts connecting the rectifier unit to the annular terminals of the stator windings. We carefully move the conclusions to the sides. Remember the location of the thrust and insulating washers on the removed bolts. Now, using a Phillips screwdriver, unscrew the screw securing the noise suppression capacitor to the housing. Disconnect the appropriate wires. We remove the block itself and the capacitor. Using a 10 mm socket wrench, unscrew the two nuts of the contact bolts of the generator and take them out together with the spacer and insulating sleeve, and release the capacitor tip. It is worth noting that wear (or damage) of brushes is the most common cause of malfunction of the generator.
- Using a size 8 wrench, unscrew the 4 bolts holding the rear and front covers of the electric generator together. We push them apart with a face screwdriver and remove the back cover along with the stator winding.
- We remove the stator from the cover, having previously marked it with a mark of their relative position.
- If the front bearing needs to be replaced, remove the generator pulley. To do this, use a 22mm socket wrench to unscrew the nut securing the pulley to the rotor shaft, carefully holding it with pliers or wedging the rotor with a screwdriver. Do not damage the impeller blades, which are made of thin metal.
- Carefully remove the pulley, washers and spacer bushing.
- We return the nut to the rotor shaft, screwing it flush with the end of the armature shaft. Using a rubber hammer, knock the rotor (armature) out of the cover.
Design Features
The stator core has a cylindrical shape. A three-phase winding is wound on it according to a star circuit, the ends of which are brought out to the rectifier block. The stator is protected from above by a housing consisting of two covers fastened together with four bolts. There is an anchor inside it. It is mounted on two ball bearings. Their purpose is to ensure uniform rotation of the shaft.
At the rear of the generator there is a rectifier module consisting of six diodes, as well as a voltage regulator with a brush holder and brushes. For protection purposes, these elements are covered with a steel casing.
Do-it-yourself VAZ 2110 generator repair
So let's look at the common malfunctions of the VAZ 2110 generator and how to repair them:
How to check the generator capacitor of a VAZ 2110
The capacitor of the VAZ 2110 generator is one of the elements of the car’s electrical circuit and is a capacitance consisting of a pair of electrodes isolated from each other by a dielectric.
Since the main task of a capacitor is the accumulation of electrical energy, its capacitance can be considered the main indicator (the larger the capacitance, the greater the accumulated charge). So, in the capacitor body, a positive charge accumulates on one of the plates, while a negative charge of equal magnitude accumulates on the other (connected to ground)
Replacing a capacitor in a VAZ 2110 generator begins with its diagnosis. The main parameter by which one can judge its damage is increased radio interference while the engine is running.
Advice! Make sure that the capacitor does not have loose contact with ground (which also contributes to noise).
Checking the bearings of the VAZ 2110 generator
Quite often the generator bearing fails, and the car owner will hear an obsessive hum when driving. But you don’t have to immediately go to a car service center; first, you can independently determine whether the problem is with the bearing.
How to understand a bearing failure?
- Visual inspection. If the design of the car allows, you can carry out an external inspection of the part for cracks in the area of the clips, metal damage, and wear of the seats.
- If there is a hum from the generator when driving, try tightening the fastening nut that secures the fan pulley. The cessation of extraneous noise after such manipulations means that replacement of the generator bearing is not required.
- Sometimes the hum stops after disassembling the generator and checking the starter with the rectifier unit. This also confirms that the generator bearing has nothing to do with it, but completely other parts are faulty.
- If the hum remains, the contact rings with brushes should be cleaned. This is best done with a regular rag soaked in gasoline. If the noise remains after this, then replacing the bearings is inevitable.
- As for the rear bearing of the generator, its failure is much easier to determine. To do this, shake the outer ring of the part and rotate it. If the ring rotates freely and there is no play or noise, then everything is in order. Otherwise, the spare part must be replaced.
- front bearing of the generator is checked in the same way as the previous one. You need to rock and rotate the front cover while supporting the pulley. Seizing, play, noise - all this indicates bearing wear.
Signs of an unusable generator bearing:
- Noise, hum, whistling sounds when the rotor rotates;
- Rapid and excessive heating;
- Rotating the pulley;
- Unstable charging.
Bearings
A faulty bearing in a VAZ-2110 generator is easy to recognize by the sound it makes. Usually it hums or rustles. This sound is a clear sign of wear on the device.
The front bearing of the VAZ-2110 generator is pressed into the “seat” of the cover. It is impossible to remove it from there, since it is rolled up. It changes along with the front cover. The rear bearing is packed onto the armature shaft and supported by a cover. Its replacement is possible if you have a special puller.
Malfunction of the VAZ 2110 generator relay
The regulator performs the function of a kind of stabilizer. Thanks to it, the voltage of the vehicle’s on-board network is the same, regardless of the number of revolutions of the running engine. Essentially, a regulator is a relay that closes and opens a circuit.
It happens like this. The voltage dropped below the required value, or rose above the norm - the relay disconnected the generator from the network. The voltage has reached the desired range - the regulator connected the device. There are no electromechanical elements in the VAZ-2110 generator relay. It is built on semiconductors. In addition, its design also includes a brush holder with brushes. It is almost impossible to repair the regulator on your own. It's easier to replace it with a new one.
Checking the functionality of the relay takes no more than five minutes. Yes, and there is no need to disassemble anything here. The diagnostic procedure is as follows. We start the engine and warm it up to operating temperature. Turn on the low beam headlights and the heater fan. Using a tester turned on in voltmeter mode, we measure the voltage at the battery terminals. The voltage should not go beyond 13.2 - 14.7 V.
If it is higher or lower, the relay is faulty. A regulator is considered faulty if its brushes are damaged or excessively worn. The minimum length of brushes is 5 mm.
Checking the tensioner belt of the VAZ 2110 generator
Checking the tension of the VAZ 2110 generator belt must be carried out periodically. If the tension is weak, the alternator belt may simply slip, especially during wet weather. As a result, poor belt tension can lead to insufficient battery charging. But you should not overtighten the alternator belt; this will lead to rapid wear of the belt itself or its unexpected break. In addition, when the belt is overtightened, the generator bearings are subject to additional stress and wear out quickly. Below is a schematic drawing that will help you understand how to properly tension the VAZ 2110 alternator belt.
What's wrong with the belt
The VAZ-2110 generator belt serves as a drive for the rotor of the device. It transmits torque from the engine crankshaft to the armature pulley. The operation of the generator directly depends on its condition. An important point is belt tension. If it is loose, the pulley may slip. Because of this, the device will not be able to generate the current required parameters.
A sign of a loose belt is a characteristic “whistle”, which is more likely to occur in wet weather. The same symptoms indicate its wear and tear. Over-tensioning the belt distorts the rotor shaft. This contributes to accelerated wear of the device bearings.
The optimal belt tension is such that each of its fields in the middle between the pulleys can be shifted to the opposite side by a maximum of 15 mm.
Step-by-step instructions for installing and assembling the tens generator
Guide to dismantling the VAZ 2110 generator:
- The tensioner nut is unscrewed.
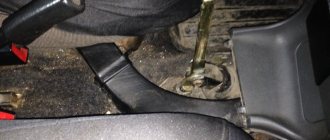
- The generator unit moves slightly back towards the vehicle interior. The drive belt is removed from the pulleys. Then the electrical power circuits of the device are turned off. One block with wires is fixed with a nut and a stud; they must be unscrewed and disconnected. The second connector is attached using a regular block, which is detached.
- After this, the lower nut securing the assembly is unscrewed. This action is performed from under the bottom of the car. To complete the task, it is necessary to dismantle the power unit protection, if any.
- The screw that needs to be removed is usually fastened tightly. When unscrewing it, you need to treat the part with WD-40 if it is stuck and cannot be removed. You can use a hammer to remove the retainer.
- Then, from the reverse side, this element is removed completely.
- At the final stage, the nut that secures the tensioning device is completely unscrewed. The generator unit is moved to the side, this will allow it to be completely dismantled.
Stories from our readers
“Fucking basin. "
Hi all! My name is Mikhail, now I’ll tell you a story about how I managed to exchange my two-wheeler for a 2010 Camry. It all started with the fact that I began to be wildly irritated by the breakdowns of the two-wheeler, it seemed like nothing serious was broken, but damn it, there were so many little things that really started to irritate me. This is where the idea arose that it was time to change the car to a foreign car. The choice fell on the melting Camry of the tenth years.
Yes, I had matured morally, but financially I just couldn’t handle it. I’ll say right away that I am against loans and taking a car, especially not a new one, on credit is unreasonable. My salary is 24k a month, so collecting 600-700 thousand is almost impossible for me. I started looking for different ways to make money on the Internet. You can’t imagine how many scams there are, what I haven’t tried: sports betting, network marketing, and even the volcano casino, where I successfully lost about 10 thousand ((The only direction in which it seemed to me that I could make money was currency trading on the stock exchange, they call it Forex. But when I started delving into it, I realized that it was very difficult for me. I continued to dig further and came across binary options. The essence is the same as in Forex, but it’s much easier to understand. I started reading forums, studying trading strategies. I tried it on a demo account, then opened a real account. To be honest, I didn’t manage to start earning money right away, until I understood all the mechanics of options, I lost about 3,000 rubles, but as it turned out, it was a precious experience. Now I earn 5-7 thousand rubles a day. I managed to get the car buy after half a year, but in my opinion this is a good result, and it’s not about the car, my life has changed, I naturally quit my job, I have more free time for myself and my family. You’ll laugh, but I work directly on the phone)) If If you want to change your life like me, then here’s what I advise you to do right now: 1. Register on the site 2. Practice on a Demo account (it’s free). 3. As soon as you get something on the Demo account, top up your REAL ACCOUNT and go to REAL MONEY! I also advise you to download the application to your phone, it’s much more convenient to work from your phone. Download here.
The service life of a generator varies greatly and depends on the quality of its workmanship. For example, a standard generator can last 140 thousand km, which is almost 10 years of operation.
Which generator is better to choose? First, decide on the manufacturer. It is much easier to find spare parts for Russian generators, while for unpopular generators it is almost impossible to find a replacement for a broken part. Decide on the current strength. From the factory, the tens generator has a current strength of 80A, this is quite enough even if there are additional current consumers. If the generator is missing, then first try to inspect it and clean the contacts. Powerful 120A generators are installed, as a rule, when the car has “strong” acoustics; they do not harm the battery. Anyone who wants to install a 3-level voltage regulator (VR) in the future is recommended to first determine on the manufacturer’s website which generators it is structurally compatible with. They say that generators with the numbers -03- at the end of the model number have a new model LV, which is better than the old one. Also, pay attention to the presence of a guarantee, then you can easily exchange the generator for a new one in case of a defect. By the way, the defect rate of generators is almost 25-50%!
Size and catalog numbers
These parameters of the ball bearing are necessary for purchase, since without these numbers it is very difficult to buy the right part suitable for your car.
The dimensions of the bearings varied depending on the year of manufacture of the car, so the selection of a bearing can be carried out based on the year of manufacture. auto.
Cars manufactured before 2001 with carburetor engines they have bearings of type 6302 front and 6202 rear.
Cars produced after 2001 with injection engines, have bearings type 6303 front and 6203 rear.
Catalog numbers (articles) and external dimensions
| Bearing, no. | vendor code | Dimensions, mm |
| 6303 | 180302 | 17*47*14 |
| 6203 | 80203 | 17*40*12 |
| 6302 | 180303 | 15*42*13 |
| 6202 | 80202 | 15*35*11 |