Should the rear caliper cylinder be turned or pushed?
Re: from all your clever picking, it’s so nifang and not according to Damn, well, if you’re trying to push it in, it means it’s pushed out.
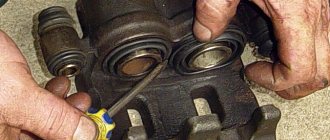
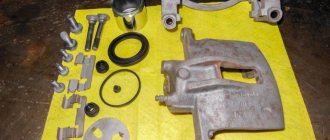
Remove the retaining ring and rubber band. Look at the mirror of the cylinder - if, as they say, it can be screwed in, then you will see it, but if the mirror is flat, then it cannot be screwed in - it is simply inserted. Then take a puller and press. If you want to play it safe, press the brake pedal until the cylinder falls out completely (the brake fluid will leak). You will look and understand everything - at the same time you will lubricate everything and evaluate the condition. The brakes will just have to be bled.
Gyyyy. Screw it in :-)))))) This is real tough :-)))))))))) Drive such a friend :-))))))
If you can’t push the piston in, it means it’s gone sour. Kolzoz puller. A plate with a thread and a long screw, and then a plate just where it will rest. And twist it carefully. The pressing force is in any case less than the strength of the caliper legs, if you press evenly, of course. And open the lid of the brake fluid reservoir
What did you press with? A crowbar? You can foolishly break a crowbar if you apply disproportionate force on one side of the caliper - and this ALWAYS happens if you try, as in the manual, “Press with the handle of a hammer,” and use a metal mounting tool instead of a handle.
Breaking the caliper in half by tightening the “puller” screw installed in the spacer is almost impossible. And if it’s broken, then THAT’S THE WAY FOR HIM. This means it could break right on the road when braking.
And I won’t even comment on “tightening the piston with a large screwdriver along the threads” :-)))
Lukas are often the same on the rear axle
Almost all “English” Japanese cars, including Avensis, have Lucas brakes, and the rear piston is screwed in there
Source
How to recess the rear caliper piston
Today I lubricated the rear caliper guides, but I couldn’t get the piston to sink no matter how hard I tried, everything came together tightly and now the hub is heating up. How to drown him?
Try it with a pry bar or a small crowbar.
Someone wrote that it seems like you need to twist and press, but with what and how?
Tried it, doesn't work
Someone wrote that it seems like you need to twist and press, but with what and how?
The piston must be twisted. Using sliding pliers.
it needs to be screwed in; a grinder key is great for this.
I'll try it today and post the results
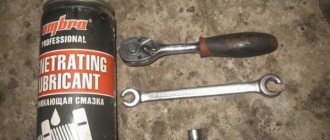
They are usually screwed in clockwise. It is recessed very tightly and in a small turn, in the service standards there is a special gadget. If you use a key for an angle grinder or a bike, loosen the bolt a little so that when pressed, the brake fluid flows out. The piston will go in much easier
. cut the hose it will be even easier
+1000 clockwise, the main thing is not to overdo it and don’t catch the boot - it will tear
Thanks to all! Everything worked out. I lubricated all the guides, as quiet as in . I didn’t even turn on music, I enjoyed the silence.
Damn, I'm also interested in this topic, I tried to change the rear pads over the weekend. So everything seems to be fine, damn it changes, but I couldn’t move the piston. True, the description says that you need to unscrew the hose from the caliper, but to be honest. I was afraid to unscrew it since I was in an area 250 km from Moscow. What are some easy ways to remove a brake piston? Mosh, who has the key, so to speak, for these matters. I agree to rent it if you don’t mind.
In the end, how did I solve this problem? tell the society?
How to remove a brake caliper
Removing a car brake caliper
You are quite capable of repairing the caliper yourself.
- We tear off the wheel bolts (17, 19, 21 turnkey sizes).
- We put the car on the handbrake, lift it and secure it additionally with a special wooden “goat” or something else.
- Unscrew the wheel bolts or studs (whatever you have).
- We remove the wheel.
- Next, using a screwdriver, we try to press the caliper away from us. If it is jammed, we try to move it at least a little.
- Behind the caliper there are two bolts (usually 14). We unscrew them.
- We remove the caliper. Prepare a stand for it in advance, or hang it on the shock absorber spring. Under no circumstances should the caliper hang on the brake hose.
- Remove the brake pads from the mount.
What is the tool used for?
The pressing device is used during brake system repairs.
When the caliper is removed from the disc, the rod remains in the pressed-out position and does not allow the part to be installed back.
To complete the repair, you need to press it into place. Many car enthusiasts use for this purpose everything that is at hand: a vice, keys, etc. However, you can make a special device that will greatly facilitate the task.
The piston is pressed down due to a screw-in worm mechanism.
Ceramic brake pads: advantages and features The high-speed mode of a modern car requires a high-quality and reliable braking system. Stopping a car at...
How to make it yourself
To make the device yourself, you need to prepare three nuts, a long bolt and old pads.
The whole process will consist of four simple steps:
- Take a drill according to the diameter of the fastener and drill a hole in the block exactly in the center.
- Weld the nut to the hole.
- Sharpen the bolt to a cone.
An easy way to unscrew a stud that has broken off - detailed life hack A broken stud is a fairly common problem, especially on the exhaust manifold. Fastening metal…
- Weld two nuts to the head of the bolt to form an improvised valve.
This tool is only suitable for front calipers. For the rear ones, you need to add a special hook to the end of the fastener, which will rotate the rod.
How to repair a burnt-out muffler without welding The muffler, in addition to the main function of reducing engine noise, also performs several additional tasks - reduces...
After repairing the brake system, do not throw away the old part. You can use it to make a simple but necessary tool for recessing pistons.
Stay up to date with AUTO news - subscribe to the channel in Yandex.Zen
Principle of operation
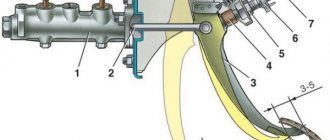
This is a fairly simple system, there is nothing complicated about it. It is used on almost all passenger cars, that is, the design is similar, changes are minimal. Based on hydraulic pressure.
After you press the brake pedal, a special piston in the master cylinder begins to press the brake fluid. She, in turn, begins to go through tubes and later through hoses to the brake caliper.
There is a piston in the caliper; under pressure, it begins to move forward. One brake pad is installed on one side of the piston and presses on one side of the disc, on the other side the other, it is simply attached to the caliper without movement. Thus, the disc is clamped by the pads, they rub against it and stop. The disk, in turn, is rigidly connected to the wheel of the car, thus “damping” the speed of the entire car. It should be noted that such contact generates quite a lot of heat, so low-quality pads often creak ; they simply cannot withstand the increased temperature.
Calipers range from minimal designs to those large enough to accommodate wide or long brake pads. As a rule, this type of structure is installed on the hub and is used in almost all modern cars.
DIY brake caliper repair
Car brake caliper repair
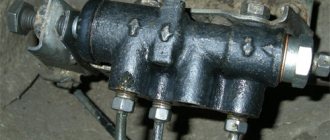
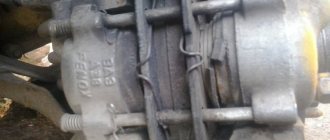
The first thing to do is to inspect the caliper guides (popularly called “soldiers”), they most often fail.
The first thing to do is to inspect the caliper guides (popularly called “soldiers”), they most often fail. “Soldiers” should easily walk back and forth. Naturally, they must be intact and completely removable. If their movement is difficult, or they have “soured” in one place, then make a simple repair of the caliper guides.
- Using “VD-40” (or another), clean the guide boots and their seats. As soon as light foam appears instead of dark foam, it means the dirt has come out.
- Now you need to take a special lubricant for the brake caliper guides (you can use lithol). Liberally lubricate the body of the “soldier”, then walk it back and forth several times in the seat.
Perhaps this is all that can be done with your own hands when repairing caliper guides. If the boot is damaged, we buy it and install a new one. The guide is broken - you also need to purchase a new one (remove the piece before doing this), welding is not recommended. Caliper guide repair kits are available for sale; they include four guides and boots (for rear brakes only or for front brakes only).
Why are there bevels on brake pads?
Applied to both the front and rear of the part, the bevels ensure stable contact between the planes both when the vehicle moves forward and in reverse. In addition, this technology allows you to optimize the grinding of the pad to the disc, optimizing friction and increasing component life.
Interesting materials:
Where are the brains on the VAZ 21099? Where is the United Arab Emirates? Where are the Olympic venues in Sochi? Where are the shipping bolts located on a Candy washing machine? Where are all the masks in Skyrim? Where are all the horseshoes in GTA SA? Where was New Carthage located? Where to find the Sea of Azov? Where is the photo archive on Instagram? Where is the Bering Strait located?
Causes of squeaking and jamming of the caliper
The initial warning signal to a motorist about the presence of a malfunction in the operation of a car caliper should be the appearance of a creaking sound. This factor may indicate severe wear of the car caliper. In addition, the following problems may be among the main causes of squeaking:
- Incorrectly installed brake pads;
- Lack of lubricant or incorrectly selected lubricant;
- Excessive wear of brake discs.
If the pads are not parallel to the brake discs, this will most likely lead to squeaking. In addition, an unpleasant sound may appear due to an incorrectly selected lubricant. The lubricant must meet the requirements.
What to do if a problem occurs?
If the motorist is confident that the caliper is in good condition, and creaking and jamming occur, then you can try to solve the problem yourself. You can do this as follows:
- Unscrew the brake caliper;
- Then unscrew the piston with a wrench and pull it out of the cylinder;
- Inspect the dismantled part for chips and cracks, rust and other damage;
- If necessary, clean the part from rust using improvised means;
- Drain the fluid from the caliper and remove the sealing ring;
- Dry all the parts, pour the liquid back in and reassemble the part.
Since the procedures described above require a lot of time from the performer, preventive measures may be the best way out of the situation. To avoid the formation of corrosion, once every six months, car calipers must be lubricated with a special lubricant and the part must be periodically visually inspected for damage.
This video will talk about caliper squeaking and how to eliminate it: Published: June 18, 2020
How to change front and rear caliper piston
As was said earlier, it makes absolutely no difference which caliper we are dealing with, since the scope of repair work will be the same for them, and therefore the components will be exactly the same. Before replacing the piston, you must purchase a new part to match your vehicle's brake system. Pistons from other calipers are absolutely not interchangeable and can lead to new breakdowns. To prevent this from happening, purchase only high-quality kits for your car brand in advance.
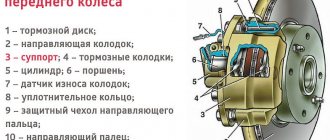
Device
There will be a separate article about the caliper, but now I want to show on the “fingers” what moving parts there are that suffer first of all. This is a fairly simple device; it has only two working elements - guides and pistons.
They are the ones who are responsible for the whole “triumph”; if they fail, then the work is disrupted. However, the structure of the piston is now quite strong; physical leakage, when you break, say, a brake hose, is now a rare phenomenon. And therefore the caliper breaks due to souring of the pistons and guides, but more on that below.
Caliper malfunctions
As you understand, nothing lasts forever, and this unit wears out with constant work; moreover, it works in a constant aggressive environment, and it also heats up a lot. In general, heating is another “enemy” of this design; often fake spare parts (from China) can simply collapse from overheating. So it is important to choose normal spare parts or originals. Remember - they don’t skimp on the brakes.
Often, all caliper malfunctions are connected, oddly enough, with its anthers. How? - you ask. Yes, it’s very simple, the boot protects the mirror surface of the piston, as well as the oil seals (which seal the internal working cavity) from various aggressive environments. Simply, it does not allow it to rust, and also does not let dust, dirt and other “charms” inside. It should be noted that a caliper with a working boot will work for a very long time. But as soon as this “rubber band” breaks, rust immediately begins to appear on the surface of the working piston, and particles of sand, dust and dirt penetrate inside the caliper. They simply break the seals and leaks appear. Thus, the brake fluid will simply leave the brake system, and the pads will not compress effectively (perhaps not at all).
Yes, a leak can be called malfunction number “1”.
The second is a banal souring of the piston . This usually happens when the pad is already very worn and the piston is constantly extended to its maximum length. He seems to be pressing the block. But it does not return back, because on its surface, from too much “extension,” a soured edge is formed, which prevents it from returning back.
What does this mean for the driver:
- Increased brake pad wear.
- Increased disc wear.
- Uneven pad wear. You know this when one is still almost intact, and the second is completely worn out.
- Overheating of the discs, which means that the car will stop worse and will squeak more often, especially in the summer.
- Steering wheel beating. The piston can constantly press on the disc, which can cause vibrations in the steering wheel, especially strongly if you press the brake pedal at high speeds.
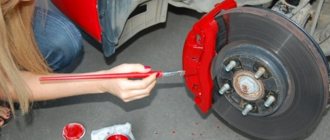
How to press in a caliper piston or a non-trivial replacement of pads.
The pads ran out, it would seem that there was nothing complicated, but that was not the case. Purchased: • 0K75A33692
— Rubber band on the upper caliper bolt with a groove (installed on cars after 98 onwards) •
0K04533692
— boot on the caliper bolt •
0K04533671
— rubber ring on the piston •
0K04533242
— cover on the piston •
PKB014
— front pads Parts Mall
And this is where the jokes began.
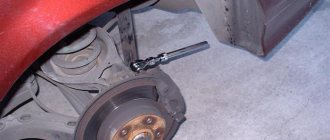
I put my fist on the car. However, difficulties arose when unscrewing the bracket mounting bolts. The meter-long pipe didn’t help - I couldn’t crawl up. I had to use my know-how - press on the knob with a jack.
I changed the bracket, cleaning the finger grooves from dirt. The piston pressed in like this
That's it on the right side.
But on the left it was necessary to replace the cylinder boot.
I pressed the pedal and the piston jumped out. We tear out the rubber ring from the caliper and clean the groove.
We put the boot on the cylinder and lower it like a skirt down to the base.
Carefully tuck the skirt into the grooves of the caliper and push the piston in. First with your fingers, then it’s convenient to use the key
Check to see if the boot has come out.
We collect everything and pump it forward. And then the fitting breaks ☺
It turned out that to drill a fitting, you need to accurately measure the depth of the hole and the depth of the thread. So far I have tightened it with bolts instead of fittings.
They are pumped as usual, but the pedal does not go away as quickly as with fittings
Source
How to avoid caliper failure
The procedures described above for completely cleaning the caliper are very complex and require a lot of time. To ensure that they are carried out as rarely as possible, be sure to lubricate the caliper surface with special grease or WD-40 every 6 months to avoid corrosion.
It is also recommended to inspect the caliper annually for corrosion, damage, dirt, and boot rupture. We recommend reading: Car calipers are knocking: diagnostics and troubleshooting ( 402 votes, average: 4.56 out of 5)
Related Posts
All-round vehicle viewing system
Why does the car shake at speed, during acceleration and at idle?
How to carry out independent repairs if the caliper is stuck on the road
If the driver notices signs indicating that the brake mechanism is jammed, the following is urgently required:
- Stop the car. Turn off the engine.
- Take a small board, attach it to the caliper, and knock lightly.
Of course, there is no 100% guarantee of the effectiveness of this method, but when there is absolutely no time, like other available means, they resort to it.
It is best to carry out self-diagnosis. The algorithm is as follows:
- leave the car cold for at least 15 minutes;
- drive 100 meters to warm up the vehicle;
- stop the car, test each wheel - which one will be the hottest, that’s where the caliper is stuck.
Next, carry out the following actions:
- jack up the vehicle and remove the wheel;
- when the handbrake cable is jammed, clean it with universal lubricant WD-40;
- If the piston is jammed, use the plank method described above.
When the driver does not have the skills to carry out emergency repairs, it is better to call a tow truck to take the car to professional mechanics.
Causes of failure
The caliper as an element of disc brakes is subjected to significant temperature loads, as well as exposure to external adverse factors: dirt, dust, moisture, chemicals. All this happens due to the fact that his device does not allow him to be protected from these negative phenomena. If there is significant overheating, as well as if the boot ruptures, the lubrication of the guides may disappear.
Improper maintenance of the guides, in which some craftsmen manage to stuff inappropriate lubricant into their boots: graphite or similar, leads to their swelling and souring, after which they jam or knock when suddenly activated.
A rupture of the piston boot causes dirt and moisture to enter it. After which it stops working - it starts to jam or, conversely, knock.
Deformation of the sealing ring contributes to brake fluid leakage and oiling of the pads.
Rear brake jammed: reasons
Typically, the structure of the rear caliper is complicated by the parking brake. The mechanism includes a number of elements:
- coupling;
- spring;
- balloons;
- stock.
When damage occurs in one of them, it affects the operation of the clamping device.
Mechanics quickly identify problems caused by problems with the handbrake. The main symptom is poor performance of the brake mechanism when trying to press on the pedals. There are also indirect manifestations: uneven wear of the linings, creaking, braking of the rear axle.
Piston repair
Here the task is more difficult, because they are located inside the caliper body and the repair is not so simple. I would like to note right away that there are times when the piston gets stuck in the housing and it does not move at all! There can be two actions here:
1) Try to revive this caliper, put it to “soak”, say, in gasoline or silicone grease. Then carefully try to pull the piston out of the housing.
2) Buy a corny new caliper. Sometimes it jams very firmly, breaking the body; repair will not help here.
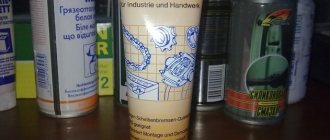
If the pistons are still moving, the first difficulty concerns pulling them out of the housing. To do this, the service station uses compressed air, which is supplied to the hole for the brake fluid. Thus, the piston simply flies out, if you are doing repairs in the garage, then you need to “squeeze it out” using brake fluid, simply without disconnecting them from the general system. Don’t worry about the brake fluid leaking; change it after repair anyway.
Now let's inspect the body. If there are traces of bending, rust, or mechanical damage, then it definitely needs to be changed; repairs will not be justified. To do this, we purchase a repair kit, with rubber seals and new pistons; it is important to replace it; it must contain a special lubricant, usually for both the guides and the pistons! IT IS IMPORTANT!
Without it, there will be no point in repairing, because the new seals can be torn.
Now I’ll list it point by point:
1) Take out the old rubber bands and seals.
3) Clean the body, both outside and inside.
4) Then, using new lubricant, we treat all fastening points.
5) Install rubber seals
6) Install the pistons, also pre-lubricating them.
After these manipulations, we assemble the caliper. The repair is complete and you can install it on your car. Don't forget to change the brake fluid and then bleed the system.
Now I want to provide you with a detailed video on the repair, everything is described in more detail.
That's all, I think my article was useful to you, let's like it on social media. networks!
( 10 votes, average: 4.50 out of 5)
When replacing or simply servicing calipers, it is recommended to lubricate the rubbing, moving parts with special lubricants to ensure normal operation of the unit as a whole. The caliper is one of the main components in the brake system, which is why it requires special attention. Here it is important to monitor the condition of the guides for the clamping brackets, the so-called “fingers,” since they are the most vulnerable spot. Moreover, the importance of periodic lubrication is even indicated in the manufacturers’ “manuals” for almost every model.
Caliper repair: design nuances and maintenance features
Sooner or later, any mechanism wears out, and brakes are no exception. Items such as brake discs and pads are consumables and are simply replaced with new ones. But brake calipers are an expensive and responsible part. If they break down, they require careful diagnosis and repair.
What does it consist of and what wears out?
Most brakes on cars are single-piston calipers with floating calipers. On powerful machines, mechanisms with two or more cylinders and a fixed caliper are used. The rear brake mechanisms usually also have a parking brake mechanism, which on most modern passenger cars is implemented through service brake pads.
All these mechanisms contain moving parts. At a minimum, this is one hydraulic cylinder per caliper, guides, and the parking brake also has a mechanism for mechanically pressing the pads. In addition, hydraulic shut-off valves are subject to wear, and the surface of the calipers gradually loses paint and oxidizes due to heating and mechanical stress.
The main points of wear are the anthers of the hydraulic cylinders, which are both the “spring” of the cylinder and part of the self-feeding mechanism of the pads, as well as the caliper guides, or, in common parlance, “fingers”. It is because of the wear of these elements that the brakes jam, squeak and overheat.
In addition to the wear and tear of these basic elements, there are also related problems. Thus, due to wear of the hydraulic cylinder boot, the working piston of the hydraulic cylinder and even the working surface of the caliper cylinder are subject to corrosion and abrasive wear. In addition to the wear of the caliper pins, their guides in the caliper may also be worn. And, of course, there is always a chance of a violation of the geometry of the caliper bracket or its other elements, especially if it is light alloy. This happens when there is uneven pressure from hydraulic cylinders on the disk and external mechanical influence, as well as severe overheating.
A separate set of malfunctions occurs in the rear calipers with a built-in parking brake mechanism. The Teves/ATE type brake mechanisms, which appeared back in the 80s, have now almost replaced other types of parking brake mechanisms. For such calipers, in addition to breakdowns of the main working part, the installation parts of the caliper body, corroded rods, studs and other fastening and other elements may require repair.
The service life of calipers is usually more than 7-8 years, even in our climate. However, there are exceptions. Thus, calipers with light-alloy pistons that operate without boots (for example, in Lockheed/AP Racing multi-piston calipers used on many heavy crossovers and SUVs, as well as sports brakes) may require repair much earlier, especially if they still use original aluminum chrome plated pistons.
Also, calipers may require repairs after service errors. This happens especially often with rear brake mechanisms with a handbrake. The main prerequisites for repair are not squeaking or whistling brakes at all - this kind of “trouble” in most cases is associated with an unsuccessful choice of brake pads, their incorrect installation or contamination. Uneven braking, lack of braking force, incomplete release of the brakes or fluid leaks are clear prerequisites for caliper repair.
How are faults resolved?
First of all, the caliper is disassembled and cleaned. Disassembly is not always a simple task, and brakes with integrated parking brakes may require special tools and skill. Cleaning in a specialized workshop is done using shot blasting, but for individual jobs chemical cleaning or mechanical cleaning with brushes/drill attachments can be used.
A separate job is cleaning the hydraulic channels from rust. The shut-off valves are simply replaced, and new fittings must be installed. The external connecting pipes on multi-piston calipers are cleaned, checked and, if necessary, also replaced.
After complete disassembly, a decision is made about the possibility of restoring the caliper. There is no point in repairing violations such as deep corrosion of cylinders or mechanical damage only if the brake mechanisms are unique.
If the decision to restore is positive, the caliper undergoes final cleaning. Sometimes material is welded on to bore new fastening/installation points and, if necessary, painted. New pistons are selected or manufactured. If they are sharpened from steel, they are additionally chrome plated.
If the caliper has anthers, then they are installed on the piston, after which the hydraulics are assembled. Next, the remaining part is assembled, in particular, the parking brake mechanisms. After this, the caliper is checked with a working pressure of 200 kgf/cm2 and monitored for leaks. That's it - the restored brake mechanism is ready for use.
What's the point of repairing if you can buy a new caliper?
Of course, the main reason is financial feasibility. The price of even simple calipers in the original design is at least 15–20 thousand rubles, and multi-piston brake mechanisms can cost as much as 120–170 thousand. And do not forget that these parts need to be replaced in pairs.
But repairs are relatively inexpensive. For common models produced by Bosch, it will be about 1,500–2,000 rubles in a specialized service, rarely for any models - more than 5 thousand rubles. At the same time, all wearing parts will be new, which means that the resource will not be much less than that of a new mechanism.
Breakdown detection
Like all other systems and mechanisms of the car, the brake system becomes unusable from time to time and requires replacement of some parts. You should not put off replacing one of the brake system components until later, as this can lead to a serious accident.
To replace one of the brake system components, you need to correctly determine what has become unusable. Most often, pads and discs become unusable. The fact is that when braking, due to friction, these devices reach high temperatures, so they wear out quickly. When purchasing new units, you should pay attention not only to strength, but also to how they handle high temperatures.
If all temperature parameters are observed, pistons and cylinders can be protected from jamming or deformation, which can lead to more expensive repairs. The piston causes a lot of trouble, for example, it may not return the pads back.
You should pay attention to all the devices of this system; the smallest and most insignificant elements at first glance play an important role in the entire mechanism. For example, the guide bushing boot is an unnecessary part at first glance, but it is the guide bushing boot that protects the caliper from jamming. The cuff inside the housing plays a major role in ensuring the tightness of the entire system.
The same seemingly unimportant part is the brake cylinder oil seal. Just like other seals, this one retains fluid in the housing. When the oil seal wears out, it should be immediately replaced with a new one.
Creaking and ringing in the front or rear suspension area, as well as poor brake performance, are signs of a system that is no longer working at all. If it is discovered that the pads or calipers need to be replaced, then this process should be taken very seriously.
To completely get rid of excess noise in the system, you need to change faulty units on both the left and right sides. Most often, on some cars, it is the right caliper that jams. This is due to the fact that most often drivers change only the left caliper, because it is located on the driver’s side, and the right one remains to the side.
What is the mileage before replacement on a Toyota Corolla?
The pads should be changed if the diagnostics showed extreme wear of the friction clutch (less than 2 mm) or you saw an obvious increase in the braking distance. Another sign is a loud squeak when braking. The average service life of front pads on foreign cars is 25–30 thousand km. The rear ones go twice as long. But it is always necessary to look at the actual condition. numbers of original pads: how to press out the brake cylinder when replacing. Average times may vary significantly due to driving style or the properties of the spare part.
Repair kit
Replacing a caliper is a drastic measure; often you can limit yourself to repairing and replacing its components. Basically, the standard repair kit includes rubber elements:
- cuffs,
- anthers,
- protective rubber bands of the fitting,
- piston sealing rings.
But depending on the necessary repairs, they may include:
- retaining rings,
- clamping brackets,
- guides,
- directly the pistons themselves.
Thanks to the repair kit, you can significantly save and improve the operation of this brake system unit.
Guide repair
Often, guides are a kind of bolts that are screwed into special ears of the case. If they show pockets of corrosion that cannot be removed, then they simply need to be replaced.
We unscrew it from the mount (ear) and insert a new guide, a very simple replacement. After this, you need to use only the correct lubricant (usually included in the kit), and it is also important not to forget to put on the boots, immediately check them for leaks, there should be no breaks or cracks. Now I propose to move on to the pistons.
Source
Tags: VAZ, brake repair
Comments 63
I pushed the pistons with a gas wrench: www.drive2.ru/l/4367699/
Well, Idk. A new piston from the store, installed and pumped, is simply pressed in by hand. If you have to use significant force, this means that it is wedged and does not release the brake, or does not release the brake completely.
I press the piston with two spark plug wrenches.
I wasted the grease under the cuff; it’s useless there.
For what! The piston does not rust.
The piston contacts the cylinder up to the main cuff, and there the brake seal. There is no contact above the cuff. The piston should not slide in the cuff. When braking, the piston extends and deforms the cuff, which subsequently returns it back. Whatever rusts, the boot must be intact. And lubricant can only make it worse, dry out due to temperatures or corrode the boot over time.
Learn materiel! The piston is returned not by the cuff, but by the rubber ring in the cylinder. The cuff protects against dirt and corrosion.
Don’t listen to the speaker above, you need to lubricate the piston, the oil seal and fill a lot of good lubricant under the boot, only lubricant that does not dry out, so that the piston does not become covered with corrosion and does not jam.
You can only use lubricant for the calipers there. The rest will dry out or become coked from the heat.
Don’t listen to the speaker above, you need to lubricate the piston, the oil seal and fill a lot of good lubricant under the boot, only lubricant that does not dry out, so that the piston does not become covered with corrosion and does not jam.