A brake force regulator, or sorcerer in common parlance, is a mechanical device designed to relieve excess pressure in the rear drum brakes.
On VAZ-2109, VAZ-2108, VAZ-2114 and other front-wheel drive models produced in Togliatti, it was installed in the rear left part of the body, under the bottom, in front of the rear suspension beam. The brake pressure regulator on the VAZ-2107 model and other “classics” is located on the right in the direction of travel of the car.
New vehicles equipped with ABS and EBD do not use the sorcerer.
Why do you need a brake force regulator?
The function of the regulator is to temporarily reduce the braking force during heavy braking. The fact is that force evenly distributed on the rear and front axles can lead to a skid of the car. If the rear brakes start working a little later and weaker than the front ones, this does not happen.
Based on the above, we can conclude that the sorcerer is an element of the car’s safety system, partly preserving its stability on the road when the brake pedal is pressed in an emergency. On modern models, this function is performed by ABS. That is why there is no need today to use a technically outdated device in production.
Features of replacing the rear brake cylinder 2114
It is well known that the serviceability of the brake system in a car is of great importance, since it is directly related to road safety. Therefore, if any problems occur in this system, it is necessary to urgently repair and replace parts that are problematic.
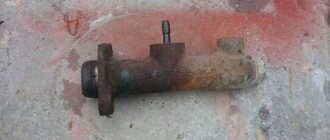
Rear brake cylinder
How does a sorcerer work?
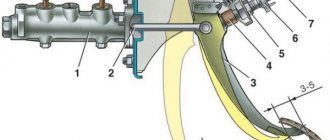
The regulator itself consists of a cylinder, valve, spring and rod. The latter is connected to the rear beam, which ensures the operation of the VAZ-2109 sorcerer. Also, brake fluid circuits pass through the rear brake pressure regulator. For their mounting on the device there are 4 threaded entries.
How does the sorcerer regulator work on a VAZ? During emergency braking, the front of the car is pressed to the ground, and the rear is raised. This causes the regulator rod to move, which blocks the flow of fluid to the rear cylinders. A spring located under the valve prevents it from closing completely. Therefore, the rear mechanisms still work, but later and weaker than the front ones.
Repair kit for rear brakes VAZ 2110
Finally spring and the planned repair of the rear brakes took place. Even in early autumn, a knocking and rustling sound was heard on the rear right wheel, suspicions were about the pads, and so it turned out, when they took it apart it became clear that the pad had simply fallen off (see photo for comparison) and even split, part lay on the cylinder and was driving on the block, then on the cylinder, hence the knocking and rustling. However, not all the pads were worn out, i.e. the system was basically faulty, they were not worn out painfully. But the problem did not come alone; as it turned out, the rear brakes worked at 25%, i.e. on the right side, one of the two blocks was still trying to do something. The block was hit by a jammed cylinder, which is probably why it broke. In the winter there was a case when the handbrake got stuck and no matter how hard I tried it wouldn’t let go of the wheels. In ice and snow it was not easy to rock the car with the handbrake jammed, the back was firmly standing, but still the car slowly moved forward and still tore the rear wheels off the dead center. , stupidly pulling through force. Further, in addition to this, the cables burst. The springs holding the pads remained intact. It was decided to change the drums too, because... I wanted to change the brake system completely, and the brake system always needs to be changed in parallel - always on both sides, if the cylinder is covered - change both, if the cable - then both, etc. The cables were pre-lubricated with oil, dripped inside, and during installation they must be tightened, as shown in the photo, with a special device in the form of a hook and an elastic band. Spare parts are factory-made from VazInterService. At the same time, I knocked off the accumulated dirt from the inside of the wheels, which causes an imbalance.
Summing up what it cost: Drums - 1160 rubles (for 2 drums) Pads - 350 rubles (set of 4 pieces) Cables - 250 rubles (for 2 cables) Cylinders - 360 rubles (for 2 cylinders) Labor - 1000 rubles. It took about 4 hours of work, including 10-minute tea breaks.
I would like to add that this also cost two, albeit extremely minor, accidents. And if the car used its full braking potential, then a couple of centimeters of the realized braking distance could be enough to prevent them. In particular, scratches on the bumper, there is also a crack on it, broken foglights and a headlight (already replaced, included in the list of all repairs).
As a result, the car brakes much more confidently and you can feel the energy-intensive brakes on all sides.
In continuation to the previous bortovik:
My guess is that the front calipers are due to the rare use of the car (the car is used on weekends, usually for long trips, the last one was the day before the car was put into operation, 1000 km in one breath) have become acidic or it’s time for lubrication (during final assembly from - due to the lack of normal lubrication, the calipers were lubricated with grease from the Mercedes A-Class brake repair kit). Well, as for the rear drums, I’ll open them up and have a look! For one thing, I will introduce you to the condition of the brake system after several years of operation.
Let's go: I take off the hubcaps and inspect the wheels. For the winter, install a winter kit, standard stamping, processed in a hypercube and painted using epoxy primer. Well preserved!
Possible malfunctions of the regulator
In general, there are few malfunctions that can occur in the sorcerer. These include:
- Valve jamming;
- Misalignment of position;
- Brake fluid leaks.
A deregulated sorcerer can be adjusted. You can determine the need for adjustment by the behavior of the car when you press the brake. If the regulator is set incorrectly, the car starts to toss to the side.
If the valve jams or fluid leaks, the mechanism must be replaced. Theoretically, it can be repaired. However, the process of such repairs is complex and expensive, which makes it unprofitable.
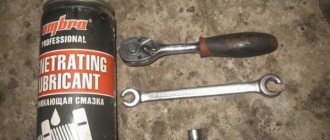
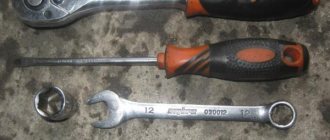
Required Tools
In order to replace the brake cylinder you will need the following tools:
- wheel wrench;
- jack;
- WD-40;
- socket wrench 10;
- a device for unscrewing fittings if necessary;
- metal brush;
- rags;
- pliers;
- a screwdriver or pin for tensioning the springs.
Before starting all types of work, be sure to provide a place for laying out all spare parts; when removing them, it is advisable to remember the sequence and methods of removing them. This will make the reverse process much easier. In addition, before such a procedure, it is advisable to stock up on a set of brake pads, because they still need to be changed every year depending on the intensity of driving. And besides, they don't cost that much. So, having everything listed in our arsenal, let's get to work.
Setting the brake force regulator
Adjustment of the sorcerer should be done on an overpass or inspection hole. At the same time, the car is unloaded and driven to the work site. To perform the manipulation you will need:
- Socket wrench 13 or corresponding socket;
- Drill diameter 2 mm.
To adjust the sorcerer, use a wrench to loosen the bolt securing it to the lever bracket. Next, use a screwdriver to move the bracket until the resulting gap allows you to insert a prepared two-millimeter drill into it. After this, the bolt is tightened.
Note: the brake pressure regulator of the VAZ-2110 and previous VAZ models turns sour during operation so that it is not possible to move its bracket. In such a situation, you should pour WD-40 liquid over the rusted area, wait 15-30 minutes, and then use a hammer to move the part to the side using a soft drift.
BRAKE SYSTEM
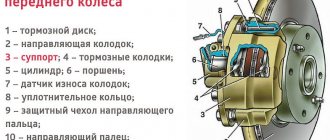
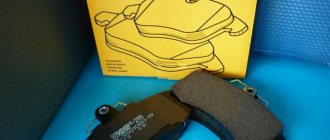
All modern cars have a hydraulic brake system, and discs or drums are used as braking elements. Discs are considered more efficient in their action, but drums do not wear out longer. The brake system of the VAZ 2114 contains the following parts:
- Brake master cylinder;
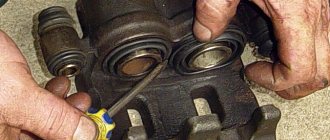
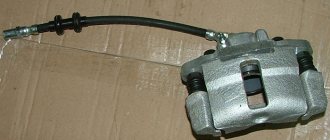
- Front caliper (right and left, they are not interchangeable with each other);
- Rear brake service cylinder (one for each rear wheel);
- Vacuum booster;
- Tubes;
- Hoses;
- Disks (on the front wheels, identical to each other);
- Drums (on the rear wheels, interchangeable with each other).
From the cabin, the system is controlled using a pedal, the free play is regulated by a rod.
Replacing the brake pressure regulator
The replacement of the sorcerer on VAZ-2110 cars and other vehicles equipped with an RTD is carried out on an overpass. You need a 13 mm spanner, a powerful screwdriver and a special 10 mm wrench designed for unscrewing brake pipes. Before starting work, the assembly must be cleaned of dirt and rust, doused with WD-40 or another penetrating compound, and then wait half an hour.
Work begins by unscrewing the bolt securing the bracket to the spring. Afterwards, the brake pipes are dismantled, the position of which is recommended to be pre-marked.
You can also unscrew the tube fittings with a regular wrench. However, using a special tool makes the job easier and reduces the likelihood of “licking” the edges. After the fittings, unscrew the two bolts securing the sorcerer to the body and remove the part. It is necessary to install the new VAZ-2110 sorcerer in strict reverse order. After installing it and before adjusting the RTD, you should bleed the rear brake circuits. Next, the above-described procedure for setting up the sorcerer is performed.
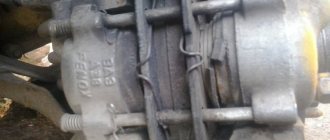
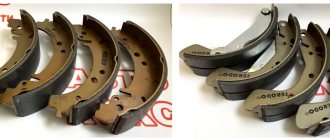
REAR BRAKE CYLINDER
The working rear brake cylinder on a VAZ is a device in which two pistons, under pressure created by the liquid, push the rear pads apart. The pads are pressed against the drums and braking occurs.
The rear brake cylinder for 2114 (ZTC) can be of different manufactures. In Russia there are quite a lot of enterprises specializing in the production of spare parts for cars. The original parts are produced by AvtoVAZ; many spare parts for VAZ cars are produced in Samara. But there are also products from other companies (including foreign ones):
- Ate, Germany;
- Samco, Italy;
- Lucas;
- Fenox;
- AP Lockheed;
- "Basalt";
- "Craft".
ZTC Kraft
Among all the listed companies, according to customer reviews, the products of ATE have proven themselves the best. Among Russian brands you can about
Depending on the manufacturer and region of sale, the price of a cylinder on average ranges from 250 to 700 rubles (as of 2105). There is no difference between the VAZ 2114 and VAZ 2115 models; the parts are completely interchangeable with each other.
On a fully assembled car, it is not visible where the rear brake cylinder is located; it is located inside the rear drum. But you can understand where it is by looking at the brake pipe that goes to the cylinder.
When to change cuffs?
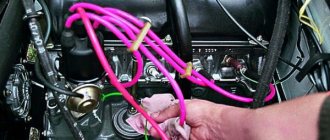
Any brake system contains a large number of metal pipes connected using metal fasteners and sealed with cuffs. The seals prevent brake fluid from leaking through moving parts and provide a sealed brake system.
The main signs of a cuff malfunction are a decrease in braking efficiency and a decrease in the level of brake fluid in the reservoir. First you need to find the specific location of the leak. To do this, you need to examine each wheel of the car one by one. If there are traces of brake fluid on it, then this is a clear sign that this brake cylinder has a faulty seal that needs to be replaced. After this, the brake lines and master cylinder are subject to diagnosis.
Found traces of brake fluid indicate a violation of the tightness of the element, which occurs due to worn out seals.
Malfunctions and methods for diagnosing a hydraulic cylinder
Checking the brake system in general and the GTZ in particular is performed when characteristic signs appear:
- the red lamp for insufficient brake fluid level came on on the instrument panel;
- the free play of the pedal has increased greatly or it openly fails;
- to slow down the car you have to press the pedal hard;
- uneven braking - the car pulls to the side when pressed sharply;
- the vehicle slows down with difficulty, the pedal presses to the floor.
The easiest way to diagnose hydraulic cylinder problems is to carefully inspect it for leaks. Usually the liquid is visible on the vacuum booster housing or on the side member under the turbocharger. If the expansion tank is intact, you need to remove and repair the master cylinder.
How to quickly and accurately identify a faulty turbocharger without checking other elements of the system:
- Using a 10 mm wrench, unscrew the brake pipes of all circuits one by one, screwing plugs in their place - M8 x 1 bolts.
- Also plug the removed ends of the tubes with caps or wooden wedges.
- Sit behind the wheel and apply the brake several times. If the hydraulic cylinder is working properly, after 2-3 pumping the chambers will be filled with liquid from the tank and the pedal will stop pressing.
On a problematic GTZ, the o-rings (cuffs) will begin to leak fluid back into the reservoir, and the pedal failures will not stop. To make sure the breakdown is complete, unscrew the 2 flange nuts of the cylinder and move it away from the vacuum booster - liquid will flow out of the hole.
It happens that the cuffs of the second chamber become limp, but the rings of the first section remain operational. Then during the diagnostic process the pedal will fall slower. Remember, a working turbocharger will not allow you to press the pedal more than 3 times and will not allow it to fail, since there is nowhere for the fluid to escape from the chambers.
Some tips
- If you start having problems with the brakes, first of all you need to carry out an external inspection of the vehicle: check the fluid level in the reservoir, make sure that the front/rear cylinders are not leaking. There should not even be stains of brake fluid in the brake hydraulics.
- “Brake fluid” must be filled with the same brand; it is recommended to completely replace the brake fluid at least once every two years.
- If faults are identified in the gas turbine engine, and it has already served for at least a year, it is more advisable to replace it completely than to repair it. The same can be said about the rear working cylinders.
- Before changing the turbocharger, the brake fluid should be removed from it; this operation is usually done using a syringe.
- Usually a leak in the master cylinder is not visible, but if there is any suspicion that this part is faulty, you should remove the main cylinder - there will be traces of leaks at the rear, and this indicates its faulty condition.
- If, during an external inspection, cracks were found on the brake hoses, it is better not to take risks and immediately replace the defective parts.
For every motorist, a car breakdown is a disappointment, but many problems can be solved without a service station thanks to a ready-made repair kit. Such sets also exist for master brake cylinders, but we’ll figure out how to use them below.
Design and principle of operation of the unit
At first glance, the design of the master cylinder seems complex, since it consists of many small parts. A diagram and list of these elements will help you understand the device (the positions in the picture and in the list are the same):
- Die-cast metal housing for 2 working chambers.
- The washer is a retainer for the bypass fitting.
- A discharge fitting connected by a hose to the expansion tank.
- Sealing gasket of the fitting.
- Limit screw washer.
- The screw is a piston movement limiter.
- Return spring.
- Support cup.
- Compensation spring.
- Ring sealing the gap between the piston and the body - 4 pcs.
- Spacer ring.
- Piston servicing the circuit of the rear wheels;
- Intermediate washer.
- A piston operating on 2 circuits of the front wheels.
Since there are 2 chambers in the GTZ housing, each has a separate bypass fitting (item 3) and a limit screw (item 6).
At one end the cylinder body is closed with a metal plug, at the second there is a connecting flange. At the top of each chamber there are channels for connecting system pipes (screwed on threads) and discharging liquid into the expansion tank through fittings and pipes. Sealing collars (item 10) are installed in the piston grooves.
The GTZ operating algorithm looks like this:
- Initially, return springs hold the pistons near the front walls of the chambers. Moreover, the spacer rings rest against the limiting screws, the liquid from the tank fills the chambers through open channels.
- The driver presses the brake pedal and selects free play (3-6 mm), the pusher moves the first piston, the cuff closes the channel of the expansion tank.
- The working stroke begins - the front piston squeezes the liquid into the tubes and forces the second piston to move. The fluid pressure in all pipes increases equally, and the brake pads of the front and rear wheels are activated simultaneously.
When the driver releases the pedal, the springs return the pistons to their original position. If the pressure in the system rises above normal, some of the liquid will flow through the channels into the tank.
An increase in pressure to a critical level often occurs due to boiling of the liquid. While on a trip, an acquaintance of mine added counterfeit DOT 4 to the expansion tank of the “Seven”, which subsequently boiled. The result is partial brake failure and urgent repairs.