The VAZ 2110 panel or the “tens” dashboard has become a new word in the interior of Lada cars. Despite its interesting shape and ergonomic appearance, the 2110 panel eventually begins to make a lot of unnecessary sounds when the car is moving. This is especially noticeable on cars with high mileage. Therefore, very often “dozens” of torpedoes are completely disassembled for complete sound insulation and elimination of squeaks.
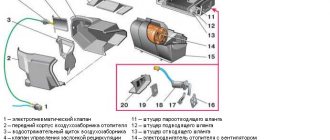
Let's say right away that disassembling a VAZ 2110 panel is not difficult in principle, but it is labor-intensive and time-consuming work and attention. The fact is that in order to remove the panel, you will have to completely unscrew the steering wheel and disconnect a lot of electrical connectors. In order not to damage the electrical system before disassembling the dashboard of the VAZ 2110, be sure to disconnect the battery. This is what the tens panel looks like schematically.
This figure shows in detail, down to the smallest detail, all the fasteners of the VAZ 2110 panel.
- 1 - panel
- 2 - side nozzle for ventilation and internal heating
- 3 — instrument panel trim
- 4 - screws for securing the cover
- 5 — panel mounting screws
- 6 - box
- 7 — console trim
- 8 - cover
- 9 — dashboard
- 10 — mounting block cover
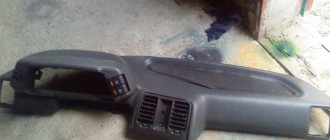
If you completely remove the panel, this should be all that remains, look at the photo -
The red arrows indicate where the nuts and screws attach, and the two large white arrows point to the special inspection pins. When installing the panel, it must be installed on them; they serve to center the instrument panel relative to the body.
Removal and installation of VAZ 2110 panel
And also detailed instructions for removing “a dozen” torpedoes.”
- Disconnect the battery
- Removing the switches on the steering wheel and steering column
- Make sure you remove the top floor tunnel cover
- Remove the glove box and unscrew the mounting screws
- Remove the headlight hydraulic adjustment handle by pulling
- Unscrew the hydraulic corrector nut and pull it out
- Remove the upper side air duct baffles by prying them up with a screwdriver
- Under the deflectors we find the panel fastening nuts, unscrew them
- We unscrew the screws from the bottom of the instrument panel, near the hood release lever, the mounting block, in the glove compartment niche, etc.
- Now you can remove the door seals, remove the trim covering the front pillars
- Disconnect the wiring terminals
- the panel can be removed by holding the steering column adjustment lever in the desired position
The fully unscrewed VAZ 2110 panel is supported by two guide pins (see photo above), white arrows point to them. We assemble the panels in reverse order.
Components
When purchasing, you will receive what is included in the kit, namely:
- Europlate;
- Inserts for switches (buttons) of devices;
- Trim on the instrument panel;
- Since your instrument combination may differ from those whose installation is structurally provided, there should also be six plugs; they can be inserted instead of buttons;
- The buttons themselves and two pads for them: • Double – for low beam and dimensions; • To turn on the fog lights; • Heated rear window.
- Air ducts;
- Block and wiring harness designed to connect a double button for side lights and low beam;
- Brackets securing the instrument panel.
In addition, if you are not entirely satisfied with this combination, and you need more buttons for other devices, then they, as well as the pads for them, can be purchased separately.
Soundproofing panel VAZ 2110
To soundproof the dashboard, “dozens” mainly use bitoplast, modelin, sealant and even polyurethane foam. Bitoplast and modelin are used for gluing plastic panels on a disassembled dashboard, which eliminates squeaking and improves sound insulation. Something similar to the photo below -
Bitoplast is glued to a special glue; when installed in the right places, this material is crushed where necessary. It is recommended to glue the panels from the inside naturally.
Some craftsmen, using ordinary foam rubber, turn the front panel into an impregnable fortress from vibrations and squeaks. However, it is not recommended to use such a radical method without some experience. As a result, this one sticks out from under the torpedo -
In addition to soundproofing the VAZ 2110 panel, it is necessary to carry out a similar procedure with the floor, roof, and doors. This complete sound insulation guarantees maximum acoustic comfort in the vehicle interior.
In conclusion, I want to say that the “ten” has two panels, the old and the new models. Photos of the old version can be found at the beginning of our article. A photo of the new version of the panel is attached below.
The most interesting thing is that instead of the old designer panels, you can install a new designer panel or a Europanel for the “ten”. In principle, they are interchangeable, but keep in mind that along with installing a new panel, you will have to install a new dashboard unit, another ACS unit (automatic control system for internal heating) and add an electric drive for the heater door. The mounting points for the panels of the old and new designs are the same, so there are no problems with installation.
What types of overlays are there?
If you just need a Euro pad, then there are two options:
- Euro-1 rubber, another name for which is Caprice. It has the same instrument cluster as the VAZ 2110, the only thing is that there is no shelf on the passenger side;
Panel trim VAZ 2110 Euro-1
Panel trim VAZ 2110 Euro-2
There is also a Euro-3 overlay on sale. But it is for later and more advanced VAZ cars - Priora, Kalina. The fact is that this version provides more devices, for example, there is a unit for climate control, which is not observed in the top ten. Although, in principle, if desired, installing this option is also possible.
Panel trim VAZ 2110 Euro-3
Any Euro pad mentioned above is a quality product, unless, of course, it is a cheap fake. It is softer and even, according to manufacturers, less traumatic, like the old one. In addition, after its installation, the supply of warm air to the side windows should improve.
Stories from our readers
“Fucking basin. "
Hi all! My name is Mikhail, now I’ll tell you a story about how I managed to exchange two cars for a Camry 2010. It all started with the fact that I was wildly worried about the breakdown of two, as if nothing had happened, it broke down, but in small things, damn, so many things , which really started to rage. Then the thought arose that it was time to change the car to a foreign car. The choice fell on the Camry Thayet tenths.
Yes, I matured morally, but financially I couldn’t. I’ll say right away that I am against loans and it is not advisable to take a car, especially not a new one, on credit. My salary is 24k per month, so it is almost impossible for me to raise 600-700k. I started looking for different ways to make money online. You can’t imagine how many scams there are that you haven’t tried yet: sports betting and network marketing, and even the volcano casino, in which she successfully lost about 10 thousand ((The only direction that seemed to me that can be done is Money trading currencies on the stock exchange , it's called forex. But when I started digging deeper, I realized that it was very difficult for me. I continued to dig further and came across binary options. The essence is the same as in Forex, but it is much easier to understand. I started reading forums , study trading strategies. I tried it on a demo account, then I opened a real account. To be honest, I could not make good money until I understood all the mechanics of the options, I lost about 3000 rubles, but it turned out to be a valuable experience. Now I earn 5-7 thousand rubles a day. I’ll buy it in a year and a half, but for me this is a good result, and it’s not about the car, my life has changed, I naturally quit my job, I have more free time for myself and my family. I work directly by phone)) If you want to change your life like me, here's what I recommend you do now: 1. Register on the site 2. Practice on a demo account (free). 3. Once you receive something in your Demo Account, fund your REAL ACCOUNT and send it to REAL MONEY! I also recommend downloading the application to your phone, it’s much more convenient to work from your phone. Download here.
- Upper lining
- Central part (more massive)
- Plastic bottom cover, which is attached from the bottom center
Repair of a peeled off corner of a VAZ 2110 panel
There are usually two reasons why a panel corner is sticking out:
- The screws that pull the top cover onto the panel are unscrewed
- The soft part of the panel has moved away from the metal part of the top cover
In the first case, you will have to remove the panel because the top cover cannot be tightened without removing the panel.
If the cover is tightly screwed to the panel and the soft part of the corner has moved away from the metal body, there may be several solutions to the problem. Due to strong tension, over time the corner of the panel moves away from the metal base. Inside the corner there is something like foam rubber, which crumbles and turns into dust over time, so it is unlikely that it will be possible to glue the corner of the panel. However, sometimes it is possible to glue a corner of the covering, but not to a metal part (since there is dust, the glue will be useless), but to a plastic air deflector.
Another way is to mask the resulting gap after separating the corner of the panel: The crack can be closed with thread (preferably black and thick enough). Route the wire inside the groove using a screwdriver. Therefore, the peeling corner of the panel will be without gaps and will no longer attract attention, and anyone who is not in the know will think that this is how it should be. Also, instead of a thread, you can use a headlight seal from a VAZ 2108.
The last option that will allow you to return the protruding corner of the panel to its place: To glue the corner in place, you can use polyurethane foam. That is, with the help of foam rubber the sheath is glued to the metal body, but this body must be cleaned and degreased.
Then we foam the insides and remove any foam that gets on the floor/tunnel with a damp cloth. Press the corners with money/card clips.
It is not necessary to immediately remove the foam near the corners; it will only smear. You need to wait until the foam dries and carefully remove it with a utility knife. After the foam has dried, draw it, for example, with a felt-tip pen.
At first glance, it seems that the foam, on the contrary, bursts and does not hold anything, but those who have used this method say that the corners of the panel no longer move away.
Repair of cracked panel VAZ 2110
It often happens when the panel cover bursts due to severe frost or heat.
It is possible to repair the panel trim:
- Use of plastic products for repair
- Drag the panel overlay with the material
The first method is the simplest, because you don’t need to remove the panel to repair the upholstery.
You can seal the gap in the panel using:
- Epoxy resin - according to reviews, it is suitable for repairs and takes good care of it.
- Cosmofen or cosmofen (liquid plastic), sold in pipes and used in the installation of PVC window coverings.
- Cold welding: over time, a gap of 1 mm still appears.
To prevent the crack from protruding, the panel can be painted.
The second way to repair the panel trim is to retighten the panel (with leather, leather vinyl), and first fill the crack with putty.
Conclusion
Have you ever had to repair a panel (dashboard) on a VAZ?
The need to remove and replace the instrument panel on a VAZ 2110 car may arise when repairing instruments and parts located below its surface. In particular, it is with the removal of the instrument panel that a major overhaul of the car’s air intakes is carried out. Sometimes they can become clogged and do not guarantee proper operation of the heating or air conditioning systems. The process of removing and replacing the instrument panel on a VAZ 2110 is not particularly simple. To complete it, you will need to be patient and master the skills of masterly working with instruments.
In today's article we will tell you how to remove, replace, install, modify and improve the dashboard on a VAZ 2110 with your own hands. In addition, we will provide you with a photo report of the work done and show you an interesting thematic video.
We cooperate with:
PEC
You can find the nearest representative office, track the cargo and calculate the cost of delivery on the website: pecom.ru
Business Line
You can find the nearest representative office, track the cargo and calculate the cost of delivery on the website: dellin.ru
Baikal Service
You can find the nearest representative office, track the cargo and calculate the cost of delivery on the website: baikalsr.ru
Energy
You can find the nearest representative office, track the cargo and calculate the cost of delivery on the website: nrg-tk.ru
WHALE
You can find the nearest representative office, track the cargo and calculate the cost of delivery on the website: tk-kit.ru
Zheldor expedition
You can find the nearest representative office, track the cargo and calculate the cost of delivery on the website: jde.ru
Vozovoz
You can find the nearest representative office, track the cargo and calculate the cost of delivery on the website: vozovoz.ru
SDEK
You can find the nearest representative office, track the cargo and calculate the cost of delivery on the website: cdek.ru
Delivery is carried out throughout Russia and the CIS.
Deadline for order delivery to T.K. from 1 to 4 business days from the date of receipt of funds. (orders are not processed on Saturday and Sunday).
Lead time for orders that include painting services: 5-10 business days.
The lead time for placing orders and “made to order” items is from 14 days; you can check with the manager for more detailed information.
ATTENTION! All fragile goods (headlights, plastic products, glass, etc.), by default, are sent in additional paid packaging from TK. If you take responsibility for the integrity, we can ship without it. To do this, you need to make a note in the comments when placing your order.
For additional information, please contact the managers.
What to consider when replacing a torpedo on a VAZ 2110
Replacing the torpedo on a VAZ 2110 will not only give the car a certain charm, but can also significantly increase ride comfort not only for the passenger, but also for the driver. After all, you can replace the dashboard with a dashboard. When replacing it, the following points should be taken into account:
- What exactly does the car owner want to achieve with a replacement? This could be an increase in interior space in front of the front seat.
- You make the car look expensive, so to speak.
- Organize a place to install additional devices: radios, screens, and so on.
One way or another, the most useful effect can be obtained from such a feat.
It is also worth considering the category of people, passengers, who will be in the car. Sometimes this improves vehicle safety.
Having decided on the type of torpedo, it is worth considering what additional functions it should perform. This could be the installation of additional equipment, a place for mobile phones, a place for an automatic audio system - speakers or a radio.
The next step is to choose a coating. It is best to make it as universal as possible and try installing torpedoes with the following coatings:
- Plastic. The torpedo is made entirely of plastic without unnecessary inserts.
- Plastic with wood or leather inserts.
These are the two most popular types of torpedoes for the VAZ 2110, which are the most practical to use and best suit almost any type of interior.
What types of overlays are there?
If you just need a Euro pad, then there are two options:
- Euro-1 rubber, another name for which is Caprice. It has the same instrument cluster as the VAZ 2110, the only thing is that there is no shelf on the passenger side;
- Euro-2 is practically no different except for the presence of the mentioned shelf.
There is also a Euro-3 overlay on sale. But it is for later and more advanced VAZ cars - Priora, Kalina. The fact is that this version provides more devices, for example, there is a unit for climate control, which is not observed in the top ten. Although, in principle, if desired, installing this option is also possible.
How to remove the instrument panel on a VAZ 2110 with your own hands: step-by-step instructions + photo report
To remove a torpedo on a VAZ 2110, you need to perform the following procedure:
- Unscrew 2 screws on the right and 2 on the left on the central tunnel.
- Then remove the covers on both sides.
- Remove the plug near the parking brake.
- Unscrew the screws to the left and right of the central tunnel.
- Unscrew the screws at the back of the central tunnel.
- Removing the plastic of the central tunnel.
- Disconnecting the cables from the cigarette lighter. Please note to avoid confusion when linking to the assembly.
- Remove the gear shift knob cover.
- Use a wrench to unscrew the internal heating air duct.
- Removing the air duct.
- Unscrew the fastenings of the front center panel.
- Unscrew the fasteners of the central panel at the back.
- Finally, remove the panel.
- We screw in the glove box screws.
- We remove the glove compartment.
- Disconnect the glove box light cables.
- Unscrew the screws inside the gap in place of the glove compartment.
- Unscrew the remaining screws on the sides of the torpedo.
- Unscrew the torpedo bolts as follows as in the photo.
- Removing the air duct.
- Unscrew the nut on the dashboard under the air duct.
- We lower the torpedo from the pins.
- We disconnect the wires from the front panel and mark them so as not to get confused during assembly.
Dismantling
Removing the dashboard takes a lot of time, since there are a huge number of wires under it, through which electricity is distributed throughout the cabin. The fastenings on the dashboard of the VAZ-2110 car are fragile, so every action during dismantling must be careful. If the fastenings are damaged, it will be impossible to firmly install the panel in its original place, and squeaks and noise during movement will increase significantly. In most cases, to improve the design there is no need to completely remove the panel; it is enough to dismantle only the upper part, but there are non-standard situations, so the article offers a description of a complete analysis.
Installing a torpedo on a VAZ 2110 - step-by-step instructions
To install the instrument cluster of the VAZ 2110 (torpedo), you must perform the following steps:
- Install the instrument panel so that the guide pins fit into the holes in the instrument panel.
- At the same time, insert the steering column adjustment knob into the hole in the instrument panel.
- Using a screwdriver, insert the threaded rods into the holes on both sides of the panel.
- Install the foot heating duct so that the duct fits into the hole in the air distributor housing.
- Reconnect all blocks with wires in reverse order. Secure the panel and reinstall all components removed during disassembly. After completing the work, check the operation of all devices.
Tools
In order to completely remove the housing, you will need:
- a set of keys and screwdrivers;
- marker;
- adhesive based labels.
The main work will involve a 10 mm wrench and a Phillips screwdriver. You will also need a water-based marker, since it washes off easily, it is necessary so as not to mix up the removed parts. This also applies to adhesive labels. There are too many parts and wires, so you shouldn't rely on memory. Stickers and bullet points will help you remember the starting place of all the components.
Refinement, modification and tuning of the instrument panel on the VAZ 2110
One of the most popular ways to modify the dashboard on a VAZ 2110 is to soundproof it. To do this you need to follow these steps:
- We remove the order, I already told you how to do this before
- Next, let's foam, but under no circumstances pour in a huge pile of foam at once; it won't dry out in a week.
- Don’t forget to try, so that you don’t find out later that the steering wheel touched it or you simply learned it too high.
- Essentially, the whole job consists of two things: you cut, foam, cut again, and so on many times.
- Next we apply the cheapest putty we could find.
- Next we coat the dashboard with Shumka.
- We install the torpedo back.
Where can I get Europanel?
The fact is that europlates, as well as assembled europanels, have become in short supply, since their production was discontinued more than five years ago. Therefore, they mostly sell used ones in good condition; it is quite difficult to find a new one. If suddenly the offered product does not suit you, you can install the Priorovskaya by completely disassembling the old one.
Didn't find the information you are looking for? on our forum.
We recommend reading:
VAZ 2110, when you press the gas, the car choke on the injector
The stove does not heat up at idle speed of the VAZ 2110
What is the best gear oil for vases
Gasoline consumption of Lada Vesta, what the manufacturer promises
VAZ 2110 gear shifts poorly: causes, troubleshooting, gearbox diseases
How to change the generator on a VAZ 2107
Gasoline consumption of Lada Largus per 100 km, city, highway, combined cycle
Low beam on VAZ 2114 went out
Replacing an internal part
Replacing the internal handles on the rear door of a Granta is slightly different from dismantling the external part. The internal element has more fastenings and is partially hidden by decorative trim. Algorithm of actions:
- The cladding is dismantled. To pull it out, you need to pry up the edge. To do this, use the thin edge of a screwdriver or a sharp knife.
- The rear door card unwinds. There is a rod inside that is important to disconnect.
- To remove the remains of the broken opening device, the fasteners are unscrewed. The handle is removed and a new part is mounted.
Before installation, the internal niche is cleaned. This can be done with alcohol infusion or detergent.
Logbook
Blog of user EVA in General
- 14 entries
- 133 comments
- 2494 views
The last notes
Summer tires for Grand Cherokee WK2
Having happily arrived for spring re-shoes and seeing the condition of the summer Bridgestone Alenza 001, which were purchased in the first year of owning a Jeep, I realized that it was time to update the summer shoes for my WK2.
It's amazing how time has flown by. The tires served faithfully for three summers - their total mileage was about 70 thousand km.
Is it important to change the license plate light bulb?
Above, I indicated that license plate lighting is a very important point, and not a whim of the traffic police, but why? After all, it has absolutely no effect on driving safety and does not affect drivers in any way - neither oncoming ones nor those following behind. Is it so?
Let's assume that a car with a faulty backlight has committed some minor offense (in the dark, of course). How can a traffic police officer or random witnesses identify him? Naturally, by license plate. But since there is no backlight, the number is impossible to read. This means that the violator is not caught, not punished, and will continue to violate until he himself gets hurt or injures other drivers or pedestrians. It turns out that the lack of license plate illumination affects road users!
Now let's look at the legal aspects of this problem. According to Art. 12.2 part 1 of the Code of Administrative Offenses of the Russian Federation, failure to illuminate the rear license plate at night will result in a warning or a fine of 500 rubles.
Important! Illumination of the front license plate is prohibited (same article, part 3), and the punishment for such a violation is much more severe: deprivation of the right to drive a vehicle for six months to a year. Therefore, when tuning your car, know when to stop.
In addition, we can say that the rear license plate should be illuminated only with white light of any shade (GOST 8769-75 clause 2.8.2). This is understandable; multi-colored lights can create confusion and confuse drivers following behind.
Fine for lack of rear license plate illumination
The lack of illumination of the rear registration plate makes it unreadable at night (Part 1 of Article 12.2 of the Administrative Code):
1. Driving a vehicle with unreadable, non-standard or installed state registration plates in violation of the requirements of the state standard, with the exception of cases provided for in Part 2 of this article -
entails a warning or the imposition of an administrative fine in the amount of five hundred rubles.
Note. A state registration plate is recognized as non-standard if it does not meet the requirements established in accordance with the legislation on technical regulation, and unreadable if at a distance of 20 meters it is not possible to read at least one of the letters or numbers of the rear state registration plate at night, and in daylight hours of at least one of the letters or numbers of the front or rear state registration plate.