Without a doubt, the dashboard is the most noticeable interior detail in a car, because it is located right in front of the eyes of passengers and drivers. The need to remove the dashboard on a VAZ 2110 may arise for car owners for a variety of reasons.
So, by removing this part, you can get full access to all the electrical components of your vehicle, replace the burnt-out wiring with a new one, connect additional devices or lighting, install a Euro trim or sound insulation.
Options for replacing the standard VAZ 2110 panel:
Panel trim for old VAZ 2110
Panel trim VAZ 2110 Euro-2
Panel trim VAZ 2110 Euro-1
Panel trim VAZ 2110 Euro-3
Overlay Kashtan panel VAZ 2110 (instrument panel according to class=”aligncenter” width=”1023″ height=”543″[/img] Overlay Kashtan panel VAZ 2110 (instrument panel according to class=”aligncenter” width=”660″ height=” 405″[/img] Panel trim VAZ 2110 Kashtan
Panel trim VAZ 2110 Kashtan
Panel trim VAZ 2110 Kashtan
If desired, you can cover the dashboard with various materials of your choice, thereby making the desired changes to the interior of the cabin.
We remove the torpedo
Removing and installing a new torpedo on a VAZ 2110 takes a lot of time, we also advise you to be patient, since there are dozens of connections and wires in this part of the interior. Each action must be careful, since the VAZ 2110 mounts are very fragile and can be easily broken. After this, the panel will no longer fit properly, and the car will noticeably increase in squeaking while driving.
In some cases, it is not necessary to completely dismantle the standard panel. Our article provides a description of a complete analysis.
Necessary tool
To remove the case, you should have in your arsenal:
- Labels with adhesive backing.
- Marker or pencil.
- Set of screwdrivers and keys.
The main assistants in this work will be a 10 mm wrench and a Phillips screwdriver. We need a pencil or a washable marker in order to mark the removed elements. This also applies to self-adhesive labels. There are too many wires and parts, after disassembling you will already forget where each component is located. Markings and stickers will remind you of the location of wires and parts.
Preparatory work
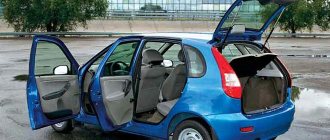
Some people prefer to disassemble without dismantling other components of the interior, but this significantly complicates and prolongs the work. We recommend preparing the interior as you will need room to maneuver. Remove the seats and steering wheel - follow this sequence. It is also worth dismantling the floor tunnel.
To do this, you need to unscrew the screws and move the VAZ 2110 part back. We perform the same operation with the lower part. The next step is to dismantle the glove compartment, now you can remove the mounting block and relay. During the process, each wire must be labeled. You need to be especially careful when handling speedometers.
Removal - step by step instructions
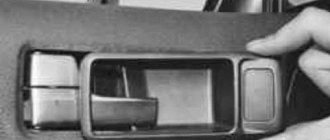
- We find the central panel, on the right side of it there are two self-tapping screws - unscrew them. We do the same with the opposite side. Now we dismantle the shield on both sides, as shown in the photo.
That's it, the torpedo is dismantled, you can replace its individual components, install another panel from a VAZ 2110, or carry out tuning using a Europanel. Assembly proceeds in reverse order. Will there be an overlay installed instead of the standard panel? Then move on to the next section.
Dismantling
Removing the dashboard takes a lot of time, since there are a huge number of wires under it, through which electricity is distributed throughout the cabin. The fastenings on the dashboard of the VAZ-2110 car are fragile, so every action during dismantling must be careful. If the fastenings are damaged, it will be impossible to firmly install the panel in its original place, and squeaks and noise during movement will increase significantly. In most cases, to improve the design there is no need to completely remove the panel; it is enough to dismantle only the upper part, but there are non-standard situations, so the article offers a description of a complete analysis.
How to remove a VAZ 2110 torpedo? Photo and video.
Below you will find an interesting video clip.
How to remove the entire dashboard europanel on a VAZ 2110, 11, 12
AutoNews / Reviews / Tests
How to Remove the Top Panel of a VAZ 2110
Europanel on VAZ 2110 instead of an old torpedo
A frequently asked question is where to buy and how to install a Euro panel or a dashboard cover on a VAZ 2110 with your own hands. This is not surprising, you are already tired of dozens of ancient panels and want to somehow update the interior. In this article I will show you what is needed in order to change the old VAZ 2110 torpedo to the euro and many important issues that you will encounter when replacing the old torpedo.
First, let's define what it is to install a torpedo on a VAZ 2110. Essentially, only the panel overlay is different, and the lower part of the panel remains the same. It turns out that the torpedo is collapsible and consists of 3 parts. We are talking about the very top trim, so installing it is not as difficult as replacing the entire dashboard of a car.
Indication symbols
As you know, all the lights on the control panel come on when the ignition is turned on, and then, when the engine is already running, most of them go out. But when one remains on or blinks, this cannot but be alarming, because not everyone can immediately figure out what malfunctions this indicates, which of the systems needs urgent repairs.
Let's look at the designations of the instrument panel of the VAZ 2110. You should know that regardless of whether the panel is new or old on your car, the designations are almost the same, but the indicators may be located slightly differently.
How to properly remove a torpedo on a VAZ-2110 without damaging it: step-by-step instructions
In the design of the VAZ-2110 car, the torpedo is the most revealing part. Every driver wants to sit in a beautiful and expensive interior while driving. But the factory panel has a moody, angular appearance. This becomes especially noticeable after using the car for a long time, when abrasions and scratches begin to appear on it.
Each driver solves this problem in his own way, some purchase a new factory dashboard, others install a panel from foreign car manufacturers. A beautiful trim from a third-party manufacturer allows you to decorate the interior to the level of a foreign car. Whatever option is chosen, you initially need to know how to remove the dashboard on a VAZ-2110 car in order to install another one.
Painting, ceiling covering
Over time, the ceiling in the VAZ 2110, and frankly speaking, in any other car, gets dirty, damaged, and generally becomes unsightly and spoils the appearance of the interior. Reupholstery or restoration costs a lot of money, and it must be admitted that it is quite labor-intensive.
The photo shows the process of painting the ceiling
Therefore, now many drivers decide on such tuning as painting the ceiling, especially since you can choose a color and tone to suit every taste. What are the options for ceiling paints?
- Universal paint in aerosol cans (you will need about five pieces). You can choose matte paint or shimmer. The only thing you need to remember is that the top may “crumble” a little, plus the interior must be ventilated for several days.
- Universal and water-based paint. They are mixed to soften and better adhere the paint to the soft ceiling material.
- Paints for velor, suede, textiles in the form of aerosols. These types are best used for the ceiling, since painting with them will not make it hard, and the paint will apply more evenly and without stains.
Lada 2112 Dvin4ik › Logbook › Removing the VAZ 2110 2111 2112 torpedo.
Good day! I couldn’t post the material for a long time for personal reasons) But the time has come, iii) Let’s go, Unfortunately, part of the material was lost forever, so the photo shows a general view, except for the gearbox tannel! for the first time in one mask) I myself relied on the disassembly manuals) Not everything is written there, I want to say. And if it is written, then a lot complicates the work as a whole. Therefore, if possible, rely on my report. The hardest part was removing the torpedo! What we need for this: A 10mm head, preferably with a small ratchet! 24mm socket (socket) or ratchet with extension! Crosshead screwdriver! Flathead screwdriver! Well sharpened! For those who are afraid to disassemble and not reassemble the connectors correctly, Adhesive Band-Aid and Marker! A box is desirable for bolts, screws, etc. Pliers! Scissors!
First, we remove the gearbox panel, otherwise removing the torpedo will turn into a puzzle. Removing the gearbox panel is easy. We unscrew the fastening bolts on the sides (difficulties will arise with the bolts next to the seats, we climb under the saddle or look for a way to get to the bolts) We remove the cover from the handbrake, if it is not clear what I mean, lower the handbrake and the cover will be right under your fist. There we unscrew the bolt. + Remove the gearshift lever cover and unscrew the 3 bolts + Remove the buttons for the beet lifters and other tunnel options. We take hold of the ashtray of the rear passengers (tunnel) and lift the cover of the tunnel to the top and with small jerks we pull it towards the rear sofa. Having gained access to the bottom of the tunnel, unscrew all the bolts securing it to the floor. TUNNEL HAS BEEN REMOVED!
Tools
In order to completely remove the housing, you will need:
- a set of keys and screwdrivers;
- marker;
- adhesive based labels.
The main work will involve a 10 mm wrench and a Phillips screwdriver. You will also need a water-based marker, since it washes off easily, it is necessary so as not to mix up the removed parts. This also applies to adhesive labels. There are too many parts and wires, so you shouldn't rely on memory. Stickers and bullet points will help you remember the starting place of all the components.
Description and location of indicators and instruments on the panel
Let's start with a description and designation of the instrument panel icons and symbols in 21102:
- Engine coolant temperature controller; this sensor determines the temperature of the engine as a whole. Thanks to the device, it is possible to promptly detect overheating of the power unit.
- Tachometer. This controller is designed to display crankshaft speed readings.
- The left turn signal indicator always flashes when the turn is turned on.
- Left right turn signal. Icons numbered 3 and 4 blink synchronously when the light alarm is turned on.
- Speedometer. Thanks to the speedometer, the driver can know how fast his car is moving.
- A controller for the volume of remaining fuel in the tank, which helps the driver navigate when to refuel. If there are about 5-7 liters of fuel left in the tank, a yellow indicator in the form of a gas pump will light up next to the sensor. Do not operate a car with a yellow light on regularly, as this can lead to failure of the fuel pump.
- The gas station indicator, which we described above.
- Light symbol for turning on the side lights.
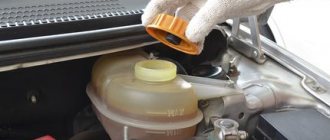
- The brake system performance symbol appears on the instrument panel when the engine is running if there is not enough brake fluid in the expansion tank. The problem may be due to a leak.
- High beam activation icon.
- Clock setting regulator with switch. Can be used to switch between daily and total mileage data.
- At the bottom of the instrument cluster there is a small screen that displays data on the vehicle's kilometers traveled.
- A light bulb that lights up when the light alarm is activated.
- Check Engine symbol. Its appearance indicates that the control unit has detected a problem with the motor. It is advisable to turn off the power unit and identify the breakdown, which is often caused by the inoperability of auxiliary sensors.
- Clock screen. When the regulator is switched, it may display data on the outside air temperature if such a sensor is installed.
- This instrument lamp indicates a detected malfunction in the battery charging system. The cause may be a loose, worn or broken generator set drive belt. It may also indicate a malfunction of the unit itself, damage to the power circuit and other problems in its operation.
- Handbrake activation icon.
- The symbol in the form of an oil can indicates an insufficient level of engine fluid pressure in the internal combustion engine. When it appears, you need to turn off the car engine and find the cause, which is usually an oil leak from the system.
- The air damper icon is placed only on carburetor engines (the author of the video is the In the Garage channel).
Features of the old and new dashboard
Over the decades of production of the VAZ 2110, the dashboard has undergone certain changes. Therefore, devices can be divided into two groups - devices of the old and new models. It should be noted that these dashboards are not interchangeable, since they have different electrical connection diagrams, as well as designs of the central console in the cars. Moreover, both types of devices are characterized by different shapes, but as for the location of sensors and indicators, in fact it is almost the same.
Over time, devices began to be equipped with backlight brightness controls. In addition, digital odometers (mileage meters) were not used on old-style dashboards; they began to be installed much later. At first, the odometer was mechanical (author - proVAZ-2110 channel).
Top part
So let's start from left to right. First, the top part of the control panel:
- Side scale from 50 to 130 and arrow. Shows the temperature of antifreeze (antifreeze) in the engine cooling system;
- Almost round scale (0 – 80) and arrow. Tachometer showing engine speed;
- Two arrows at the top, almost in the middle of the control panel - turn signals (right, left);
- Speedometer. Well, this device, probably everyone knows, shows the speed at which the car is moving;
- A side scale with an arrow and, most often, two images of a filling column (white and red). Instead of a red column there may be a yellow light. This is an indicator of the fuel level in the tank. If the red column (yellow light) lights up, it means that there is very little fuel left in the tank - no more than 7 liters, urgent refueling is required.
Vibrant variety of colors
Today, the fashion for changing the dashboard lighting is gaining fantastic momentum. Almost everywhere cars have neon lighting or internal LED illumination. However, all these innovations are not a cheap pleasure, which not everyone can afford. The situation is different when replacing the factory backlight with a multi-colored one.
You can, no doubt, use ready-made tuning options, but this will also cost a lot. It is best to do it yourself. In this situation, the main thing is to have the necessary materials and patience. First you have to disassemble the “tidy”. The protective glass must be removed. Next we remove the arrows. To do this, you need to use a screwdriver and hard cardboard.
It should be placed under the arrow, and then pry it off with a screwdriver. Then you need to carefully and slowly lift it to the top. Next, remove the backing. A utility knife will be useful for this. It must be inserted between the panel and the substrate and a layer of sealant must be cut in a circle. Then remove the backing. Let's disassemble the panel and get started.
1. Remove the filter layer using a utility knife. A filter is a colored layer of paint. It is applied from the back of the substrate and gives color illumination to the speedometer numbers and other sensors. To completely get rid of the filter, you can use acetone or another liquid that contains alcohol.
2. Next, change the backlight color. First, you can change the odometer backlight. To do this, you will need to dismantle the odometer screen, and then remove the blue film and remove the backlight bulb. It should be replaced with a multi-color universal LED. He can change colors. We connect the LED to the socket of a standard light bulb. Reinstall the odometer screen.
3. Now you can start completely replacing the backlight. We attach the LEDs to the “tidy” frame. Such LEDs can be purchased complete with a color switch. We install them in place and attach them to the standard dashboard backlight contacts.
4. Let's move on. Now we need to make sure that the arrows have the ability to change the backlight. To do this, remove the layer of red paint from the arrows. For this operation, you can use a stationery knife and acetone. Once the arrow is clean, it can be painted using white nail polish. The main thing is that the arrow is white, since this color conveys the color scheme of the LEDs.
5. Before the final stage, you need to attach the LED color switch to the panel. Such a switch can be installed, for example, in the lower right corner of the dashboard. After this, you can install everything in place. First, the substrate is installed. For greater reliability, you can use a sealant. After this, we put the arrows in place. We insert the protective glass. After that we admire the result.
Interior reupholstery and materials
Reupholstering the interior with leatherette, leather or other fabric is a long and painstaking task, and without experience in such work, it is unlikely that you will be able to perform such tuning efficiently and with your own hands. But even before entrusting the work to a master, it is worth choosing the right material for each surface. For example, some people cover the front panel with fabric, even a very thick one. Not the most outstanding solution, since the fabric quickly fades in the sun, absorbs dust and dirt from hands, and after a few months only memories will remain from the freshly re-covered panel.
The best materials for reupholstering the interior, door panels, panels and pillars are good leatherette, or as sellers call it, to be on trend, vinyl leather. For the ceiling, door panels and rear panel, thick automotive fabric, carpet or the same leather substitute is perfect. For seat reupholstery, special automotive upholstery fabric or Alcantara is still unrivaled.
Disassembly
Now let's talk specifically about how to remove the panel on a VAZ 2110. To do this, it is enough to follow a certain sequence that will allow you to dismantle the unit correctly and quickly without unnecessary risks.
Removing the lining
Many motorists, being confident in their own abilities, ignore recommendations and do not follow instructions. At the same time, they remove the panel, while simultaneously dismantling another half of the interior.
Article on the topic: Changing the heater and cooling radiator of a VAZ 2110: don’t forget about the pipes
The step-by-step guide we offer will allow you to avoid unnecessary manipulations, save time, effort and nerves.
- Buy special self-adhesive pieces of paper. The type that they stick on products in stores. You will also need a marker, pen or just a pencil. Each element to be removed should be marked so as not to get confused later when reassembling the elements. Write down the sequence on a piece of paper, or have your assistant do it under your dictation.
- Removing the front seats will make access to the instrument panel much easier. You won’t have much time to sit on them, and in order to get to certain fastening elements, the chairs may simply get in the way.
- There are screws on the sides that will allow you to remove the tunnel. Moreover, the upper part is removed first, and only then the lower. The order is not important, you can try in reverse order. Only then will it be frankly inconvenient for you to work. Tested by many craftsmen when disassembling the dashboard.
- Remove the steering column cover. This way you can remove the cover itself, as well as the steering wheel. To perform this task, three self-tapping screws and four fixing screws are removed. The steering wheel will sit on the splines quite firmly, so you will have to remove it with force. You can shake the steering wheel to the sides, tug. Just take care of your face, because with a sudden force the steering wheel can fly out of its seat and fly right at you.
- The steering column switches must be removed.
- Remove the glove compartment fasteners and remove it from its seat.
- After that, proceed to the mounting block. You have to remove not only the cover, but also remove all the connectors and relays.
- Now it’s time to figure out how to remove the VAZ 2110 panel trim and pillar trims. This is done quite simply, given that all fasteners are not hidden. Be sure to unscrew the fasteners of the headlight hydraulic corrector and push it inward.
- Now comes one of the most important moments - removing the screws that hold the instrument panel. They connect the panel to the body of your car. Unscrew the screws and two studs. It is not difficult to find them, since these studs are located under the cover of the air supply tunnel to the side windows.
- Having completed all the specified procedures, only the lower air duct and the steering shaft will hold the panel. After this, you can begin the planned repair or modernization of the car, which required the mandatory removal of the dashboard.
Article on the topic: Spark plugs are splashed with oil or filled with gasoline on a VAZ 2110
The dismantling procedure cannot be considered complete at this point, since when you open the dashboard, you will find a huge number of wires underneath it. What should we do with them?
Removal instructions
It is recommended to remove the VAZ 2110 torpedo in the following sequence:
- Interior details. Before starting work directly, it is necessary to prepare the interior, since disassembling the front panel of the VAZ 2110 is best done with room for maneuvers. Therefore, the first thing we do is remove the front seats and steering wheel of the car. It is advisable to carry out dismantling in exactly the same sequence as indicated above, since otherwise it will be extremely difficult to remove the driver’s seat. In order not to break anything, consider your strength when pulling the wheel out of the column splines; to do this, loosen the steering wheel nut a little, and then pull it towards you while loosening it from side to side;
- Transmission tunnel. After the salon is prepared and there is a place to work, we are faced with the next task - dismantling the floor tunnel in the salon. Simply unscrew the screws and push the top of the part being disassembled back. Then do the same with the bottom of the tunnel;
- Steering wheel and steering column. Unscrew the screws on the steering column casing of the VAZ 2110, and then remove the steering column switches. Mark all the wires and connectors released during disassembly with a marker or labels; this will later work to your advantage when, when assembling the torpedo, you end up with a large number of wires of different colors. It is recommended to use the marking especially for owners of cars that are already equipped with an audio system and alarm system;
- Glovebox. The next stage of work will be to dismantle the glove compartment, after which it is necessary to remove the relay and mounting block. Don’t forget to mark the wires as you work and take special care with the fragile speedometer and other dashboard elements that also require special treatment;
- Torpedo. And now we can move on to the immediate purpose of the repair - we have to remove the dashboard. To do this, it is necessary to unscrew the screws in the resulting void behind the glove compartment and unscrew the fastenings. After that, use a screwdriver to hook the air duct on the left side and remove it. Then all that remains is to unscrew the nut, holding the torpedo with your hand, the torpedo and pull it out from the studs, at the same time do not forget to mark the wires with a marker so as not to get confused.
The dashboard has been removed, we have disassembled everything that needed to be disassembled, all that remains is to carry out the repair work, for which the whole procedure was actually started.
Finally, I would like to advise - take the opportunity, do not be lazy and clean the ventilation ducts, sooner or later they will still become clogged and you will have to remove the dashboard again.
Soundproofing panel VAZ 2110
To soundproof the “tens” dashboard, they mainly use bitoplast, modelin, sealant and even polyurethane foam. Bitoplast and modelin are used to cover plastic panels on a disassembled dashboard, which eliminates squeaks and improves sound insulation. Something like this in the photo below -
Bitoplast is glued with a special glue; when installed in place in the right places, this material is compressed where necessary. It is recommended to paste over the panel naturally from the inside.
Some craftsmen turn the front panel into an impregnable fortress for vibrations and squeaks using ordinary mounting foam. However, it is not recommended to use such a radical method without some experience. As a result, this is what sticks out from under the torpedo -
In addition to soundproofing the VAZ 2110 panel, it is necessary to carry out a similar procedure with the floor, roof, and doors. Such comprehensive sound insulation will ensure maximum acoustic comfort in the cabin.
In conclusion, I would like to say that there are two panels installed on the “ten”, old and new models. Photos of the old version can be found at the beginning of our article. A photo of the new version of the panel is attached below.
The most interesting thing is that a new-style panel or a Europanel for the “ten” can be installed instead of the old-style panel. In principle, they are interchangeable, but it is worth considering that along with the installation of a new panel, you will have to install a new instrument panel assembly, another ACS unit (automatic control system for interior heating) and add an electric heater damper drive. The mounting points of the old and new panels themselves are the same, so there are no problems with installation.
Bottom part
Let's look at the indicators at the bottom of the control panel. If they don’t light up, it means the machine is working normally, and when any of them lights up, this indicates a malfunction in certain components. Most often, this is a signal that repairs are needed, and the sooner the better. From left to right:
- The indicator on the far left at the bottom is the air damper light (if you have a carburetor engine);
- Icon in the form of an oil can. If this light comes on, it means there is insufficient oil pressure in the engine. An alarming signal. You need to stop, find the reason;
- A round icon with the letter P inside on the control panel indicates that you have the parking brake on, which, as you know, should be turned off when moving away;
- Indicator of a fault related to the generator or battery (a symbolic image of the battery is shown on the indicator). Perhaps the battery is not charging from the generator, there is an open circuit, or the generator belt is loose or broken. In any case, your intervention and repairs are needed, otherwise troubles cannot be avoided;
- If the engine is running and the Check Engine indicator is on on the control panel, this is the most unpleasant thing for the driver, since it indicates serious malfunctions in the engine. In general, when this indicator lights up, it is recommended to stop driving and turn off the engine. Most likely it needs repairs;
- Typically there is a red triangle above the Check Engine. It lights up when the “hazard light” is on - an emergency signal sign;
- The headlight light indicates that the high beam is on. Designed to control headlights: when an oncoming car appears, do not forget to switch to low beam;
- A very important indication icon on the front panel (in a red circle) is a signal that there is not enough brake fluid. Perhaps it is leaking somewhere, which it is advisable to find out as soon as possible and, if necessary, carry out urgent repairs and replenish the level;
- The icon of a burning light is a control for turning on the dimensions;
- In addition to the indicated lights, the front control panel has time indicators (and a button for setting hours and minutes) as well as a display that shows the total and daily mileage. On the new panel, this display may be narrow.
How to disassemble the instrument panel of a VAZ 2110
How to quickly and carefully disassemble a panel on a VAZ 2110
Prerequisites
The car constantly throws up difficulties that have to be solved either using independent knowledge, resourcefulness and tips from experienced car enthusiasts, or by calling the service department. In the latter case, the result will be more expensive, but not always better.
Even if you are not going to do this right now, it still doesn’t hurt to know how to correctly disassemble the panel on a VAZ 2110, and even more so if you are one step away from this work.
Device panel VAZ 2110
When you need it
It should be seen that the instrument panel on the VAZ 2110 is not particularly durable, so it can simply be destroyed. Or it has become worn, frayed, scratched.
But often the reason is different: I would like the design to be more beautiful, and not everyone is satisfied with the “standard” lighting. And there are more modern ones, LED, elegant. But in order to change something or change anything at all, you must first disassemble the old instrument panel.
Disassembly procedure
Many people are interested in whether it is possible to remove the dashboard of a VAZ 2110 without “demolishing” the floor of the cabin? It's probably possible, but it would be very inconvenient.
Therefore, we act according to this plan:
- Let's prepare a marker and self-adhesive labels (which are usually glued to the product). They can be bought at points where all sorts of small things are sold such as napkins, bags, etc., as well as in stationery stores;
- We remove the front seats from the interior;
- We unscrew the screws on the sides, remove the tunnel (first its upper part, then the lower);
- We disassemble the steering column casing, remove it and the steering wheel. To do this, you need to unscrew 3 self-tapping screws and 4 screws. Please note that the VAZ 2110 steering wheel sits quite tightly on the splines, so you need to remove it by rocking and tugging, but being careful of a sharp blow to the face, if you suddenly overdo it and it will fly out;
- Next are the steering column switches. They also need to be removed;
- Don’t forget to mark everything and write down on a piece of paper what we are filming;
- We unscrew the glove compartment (in “understandable” language - the glove compartment) and also take it out;
- Next comes the disassembly of the mounting block and its cover. To do this, disconnect all connectors and relays;
- Now we have almost opened the instrument panel on the VAZ 2110. All that remains is to remove the strut covers, unscrew the headlight hydraulic adjustment and push it inward;
- Now the main task is to unscrew the screws securing the instrument panel to the body. To remove it completely, you need to unscrew the two studs located under the covers of the tunnels for supplying air to the side windows.
Dashboard VAZ 2115, disassembly and assembly
the VAZ dashboard
2115, Niva-Taiga. LED odometer illumination 2115-.
After all these manipulations, the panel hangs, and is held in place only by the steering shaft and the lower air duct.
What to do with the wires?
You will probably be amazed at the number of wires located in the panel space, intended to power various devices in your VAZ 2110. It would be more convenient to remove everything together with a lump of wires. But take your time.
It is unlikely that you are going to change anything on a completely new car, so in the future you will spend a long time figuring out which wire comes from what, and how to connect it.
So that it turns out that disassembly went quite smoothly, but reassembly led to a slight stupor.
Disassembled instrument panel of VAZ 2110
So try to disconnect all the connectors and wires that you can. Now you can finally remove the panel and remove it from the car. For fresh traces, do not forget to separate (you can tie in a pile) the entire wiring harness that belongs directly to the instrument panel, and mark the rest with self-adhesives. This will help you a lot when you start installing new equipment.
Preparatory work
Some are satisfied with dismantling without removing the remaining components of the interior, but this takes extra time and complicates the process as a whole. In order not to add more work to yourself, it is recommended to clear the interior for free movement. Strictly observing the sequence, you need to remove:
- armchairs;
- glove box;
- steering wheel;
- disassemble the floor tunnel. To do this, you need to unscrew the screws and move the part back a little.
We dismantle the lower part in the same way. The next step is to remove the glove compartment, after which you should remove the relay and mounting block. As you disassemble, you need to mark all the wires. Particular attention should be paid to the speedometer.
How to remove the Europanel on a VAZ 2112 + video
The average owner of a VAZ 2112 rarely faces the need to remove the instrument panel of his car. The main reason why you have to dismantle the Europanel is body repair, electrical repair or repair of devices installed directly behind the instrument panel. Since it can be very difficult or even impossible to get to such devices without removing the instrument panel, in such cases you have to remove the entire europanel. Removing the instrument panel is also required when eliminating squeaks and other noises that occur while driving a car, or when installing additional sound insulation for the interior. In addition, even with careful handling of the car, over time the instrument panel may lose its appearance and require replacement with a new one.
In this article we will try to cover the main stages of removing the europanel from a VAZ 2112 car. The “Euro” instrument panel can be found on cars of the VAZ 2110, VAZ 2111 and VAZ 2112 line. Therefore, everything that will be said below about dismantling the VAZ 2112 europanel is also true for the rest models. In addition, it should be noted that the fastenings of the Europanel are identical to the fastenings of a conventional instrument panel, so this step-by-step instructions can also be used when dismantling a conventional panel.
So, when removing the Europanel from a VAZ 2112 car, the sequence of actions should be as follows:
For safety reasons, it is necessary to turn off the power to the vehicle's on-board network. To do this, you need to disconnect the negative terminal from the battery.
The steering wheel needs to be removed. To do this, use a flat screwdriver to pry up and remove the decorative trim with the inscription “LADA” from the steering wheel. Next, using a Phillips screwdriver (PH2), unscrew the two screws that are located in the recesses under the removed cover. After this, remove the horn switch cover.
Now you need to fix the steering wheel. This can be done in two ways: turn the steering wheel all the way to the left or remove the key from the ignition switch and turn the steering wheel in any direction until it clicks when it locks. After this, you should unscrew the central nut holding the steering wheel. To do this, you will need a socket wrench with a 24mm head (for convenience, it is advisable to use a socket wrench with a ratchet).
For safety reasons, there is no need to immediately remove the central nut - it should be left on the last 3-4 turns of the thread. After this, set the steering wheel to the middle position (the front wheels should be parallel to the longitudinal axis of the car). In order not to waste time finding the correct position of the steering wheel when installing it, before removing the steering wheel, you can apply coaxial marks on the steering wheel itself and the upper plastic cover of the steering column.
Next, you need to use medium-force blows on the rear of the steering wheel from the left - right and from above - from below to knock it off the splines of the steering shaft. After this, you can completely unscrew the central nut and remove the steering wheel.
The process of removing the steering wheel from VAZ 2110-2112 cars is shown in detail in the following video:
Now you need to remove the side panels on the left and right sides of the center console. Each shield is secured at the rear with two screws, which must be removed using a Phillips screwdriver (PH2).
Next, use a Phillips screwdriver (PH2) to unscrew the screws securing the glove compartment, located underneath the glove compartment at the front wall of the car interior. Having removed the glove compartment from its place, it is necessary to disconnect the wires going to the glove compartment illumination lamp. After this, the glove compartment can be completely removed.
The next step is to use a Phillips screwdriver to unscrew the screws securing the instrument panel. One of the screws is located in the glove compartment niche, the rest are along the edges at the bottom of the instrument panel.
Now you need to use an 8-mm open-end wrench and a Phillips screwdriver to unscrew the screws securing the instrument panel in the area of the center console.
After this, remove the protective grilles of the air ducts located along the edges of the instrument panel. To do this, just pry them off with a flat-head screwdriver.
Next, use a socket wrench to unscrew the nuts located under the removed air duct grilles.
Remove the instrument panel from the studs by lifting it up and pulling it towards you. After this, you need to disconnect all the connectors on the wiring harnesses going to the instrument panel, having previously marked them for subsequent assembly. Now the instrument panel can be completely removed.
The process of removing the instrument panel from a VAZ 2112 is shown in the following video:
We hope our instructions will be useful for you!
Subtleties
I would like to say right away that removing and replacing a torpedo on a VAZ 2110 will require a lot of time and patience from you. In addition, all repair work must be carried out extremely carefully and carefully so as not to accidentally break the fastening, since the dashboard will not fit back as it should and will creak when driving.
To work you will need the following tools:
- marker;
- self-adhesive labels;
- set of screwdrivers and wrenches.
When disassembly is required
There are several reasons why car owners want to remove the tidy:
- It is damaged by mechanical shocks, as a result of hitting potholes, etc. In fact, the strength of the standard dashboard leaves much to be desired, so damage is not uncommon for dozens;
- There are scratches and abrasions on the surface of the device, the paint has peeled off somewhere, and there are signs of wear. That is, the appearance of the panel leaves much to be desired, so to correct the situation it needs to be removed;
- The desire to transform the interior of the car. Many VAZ 2110 owners decide to get rid of the old dashboard in order to put something more modern, original in its place, and change the backlight to LED lights.
To make any changes to the instrument panel, the first priority for the car owner is to remove the old structure. It's not difficult to do this yourself. Follow the instructions strictly, do not break the sequence of steps, and pay close attention to the markings of all elements and especially wires.
https://youtube.com/watch?v=QH_04nB8OrI
If you connect something incorrectly and reassemble the panel without checking, you risk not only having to re-disassemble the dashboard, but also encountering non-functioning devices, short circuits and even worse consequences.
Separately illuminated arrows
LED instrument panel VAZ 2110
If you want the arrows to glow a different color, you can do the following:
- Remove the dashboard.
- Take it apart.
- Install separate LEDs under the arrows.
Note: in this case, the arrows will light up in a different color only when ignited.
With panel disassembly
The first stage is carried out according to the plan already described. Next, we proceed like this:
- We assemble the trim, installing our instrument cluster, air duct panels and those accessories included in the kit;
- At the base of the panel we carefully attach the wiring harness;
- We connect the wires from the Euro pad to this harness, tightening everything with mounting ties;
- We connect devices to the required buttons using connectors;
- We secure the cover with self-tapping screws.
This method, although it takes more time, provides high-quality sound insulation to eliminate all annoying squeaks.
We also recommend replacing light bulbs with high-quality analogues or LEDs. So, the updated panel will look even more solid.
Installing the dashboard trim
The cover will be installed after complete disassembly - it’s easier and more convenient. The instructions say that the trim must be cut around the perimeter. Now you can assemble the case: we place in it the accessories and instrument connectors that came in the kit. Carefully lay out the wiring from the base of the cover. All joints of the new VAZ 2110 panel must be glued with anti-creak.
We attach additional harnesses to the standard wires and tighten them with zip ties. Please note that there are additional buttons on the cover - standard connectors must be connected to them. The cover is attached to the original panel using self-tapping screws. Now you can carry out the installation in reverse order.
Removal instructions
It is recommended to remove the VAZ 2110 torpedo in the following sequence:
- Interior details. Before starting work directly, it is necessary to prepare the interior, since disassembling the front panel of the VAZ 2110 is best done with room for maneuvers. Therefore, the first thing we do is remove the front seats and steering wheel of the car. It is advisable to carry out dismantling in exactly the same sequence as indicated above, since otherwise it will be extremely difficult to remove the driver’s seat. In order not to break anything, consider your strength when pulling the wheel out of the column splines; to do this, loosen the steering wheel nut a little, and then pull it towards you while loosening it from side to side;
- Transmission tunnel. After the salon is prepared and there is a place to work, we are faced with the next task - dismantling the floor tunnel in the salon. Simply unscrew the screws and push the top of the part being disassembled back. Then do the same with the bottom of the tunnel;
- Steering wheel and steering column. Unscrew the screws on the steering column casing of the VAZ 2110, and then remove the steering column switches. Mark all the wires and connectors released during disassembly with a marker or labels; this will later work to your advantage when, when assembling the torpedo, you end up with a large number of wires of different colors. It is recommended to use the marking especially for owners of cars that are already equipped with an audio system and alarm system;
- Glovebox. The next stage of work will be to dismantle the glove compartment, after which it is necessary to remove the relay and mounting block. Don’t forget to mark the wires as you work and take special care with the fragile speedometer and other dashboard elements that also require special treatment;
- Torpedo. And now we can move on to the immediate purpose of the repair - we have to remove the dashboard. To do this, it is necessary to unscrew the screws in the resulting void behind the glove compartment and unscrew the fastenings. After that, use a screwdriver to hook the air duct on the left side and dismantle it. Then all that remains is to unscrew the nut, holding the torpedo with your hand, the torpedo and pull it out from the studs, at the same time do not forget to mark the wires with a marker so as not to get confused.
Good afternoon. Today our guest is a VAZ 2110, 2111, 2112. He came to us with a problem with the operation of the air ducts. It was necessary to remove the torpedo. Therefore, in this article we will tell you how to remove and replace a VAZ 2110, 2111, 2112 torpedo. The process is very complex and time-consuming.
We remove the VAZ 2110 torpedo and install the trim: detailed instructions with photos
Inside the VAZ 2110 torpedo is the most noticeable part. Every driver wants to sit in a stylish and well-maintained interior. But a regular panel looks angular and gray. This is especially noticeable after prolonged use when the panel becomes nicked, scratched, and cracked. Motorists solve this problem in different ways. someone installs another torpedo with a VAZ 2110, other drivers prefer to install a Europanel. the so-called invoice from a third-party manufacturer. The lining allows you to transform the interior and turn the “ten” into a foreign car, at least on the inside. Regardless of what you choose, removing the panel is a requirement. In this material we will tell you how to properly dismantle the standard panel and install the Euro version.
Add a comment Cancel reply
You must be logged in to post a comment.
The VAZ 2110 panel or the “tens” dashboard has become a new word in the interior design of Lada cars. Despite its interesting shape and ergonomic appearance, panel 2110 eventually begins to make a lot of unnecessary sounds when the car is moving. This is especially noticeable on cars with high mileage. Therefore, very often the “tens” torpedo is completely disassembled in order to carry out total sound insulation and eliminate squeaks.
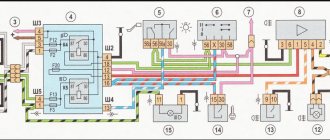
Let's say right away that disassembling the VAZ 2110 panel is not difficult in principle, but it is a very labor-intensive job that requires time and attention. The fact is that to remove the panel you will have to completely unscrew the steering wheel and disconnect a lot of electrical connectors. In order not to damage the electrics, before disassembling the VAZ 2110 dashboard, be sure to disconnect the battery . This is how the “tens” panel looks schematically.
This figure shows in detail, in the smallest detail, all the fasteners of the VAZ 2110 panel.
- 1 – panel
- 2 – side nozzle for ventilation and heating of the cabin
- 3 – instrument panel trim
- 4 – cover fastening screws
- 5 – panel fastening screws
- 6 – box
- 7 – console trim
- 8 – cover
- 9 – instrument panel panel
- 10 – mounting block cover
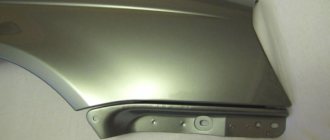
If you remove the panel completely, then only this should remain, look at the photo -
The red arrows indicate where the nuts and screws are attached, and the two large white arrows indicate the special mounting pins. When installing the panel, it must be installed on them; they serve to center the dashboard relative to the body.