How to fix angel eyes.
This connection method is not called “gentle” for nothing. The name comes from the fact that the eyes will automatically turn off when the high beam headlights are turned on. If you are going to use LED angel eyes, then this type of connection will have a beneficial effect on the process of use, as it will maximize the life of the lighting devices. There are two reasons for this at the same time.
How to fix angel eyes
The first is that the temperature of the diodes will be lower when used separately. The second is saving the life of diodes when they are turned off when necessary. When headlights and peepholes operate simultaneously, the latter practically do not stand out against the general background, which means they are useless in this case.
This installation method is not recommended for those who do not understand machine wiring. In this case, you better turn to the standard scheme.
1. We pass the wires into the engine compartment. 2. Next, after tightening the wires, we look for the pads and disconnect them. 3. In this case, the yellow wire should be responsible for the “+” dimensions. To connect the AG you need a relay. 4. We fix the relay in the car near the headlights. One relay goes to the right “mudguard”, the other to the left. 5. The yellow wire (“+” size) must be removed from the first part of the two-plug block. Next, connect the “mother” terminal to terminal “87” of the relay. 6. The “+” wires of the AG must be connected to the “30/51” terminal. 7. Connect ground to terminal “86” (complete the connection with the car and its body). 8. We are looking for a relay for the low/high beam (“mud flaps” of the car). 9. Branches are made from both relays to terminal “86”. It is best to make branches with a “mother” terminal. 10. Next, we solder diodes D1 and D2 to both branches. It is important to observe the polarity of the diodes; it can be checked with a tester. 11. Now you can connect the diodes to terminal “85” and the relay. 12. We do the same with the second side. When turning off the high beam peephole, you can also use an additional brightness control. With it, you can adjust the brightness of the angel eyes when glowing.
Below are other connection options.
Hello, dear friends! At one time, angel eyes on BMW cars made a splash on the market. It was optics of amazing beauty, especially in the dark. But even now fashion has not disappeared, and many people want to make angel eyes with their own hands.
In practice, there is nothing particularly complicated here. You will have to tinker, but the result will certainly please you. You can start from different instructions and manufacturing options. Some people use sites with videos that can be watched in parallel with taking notes in a notebook. Also on the Drive2 resource, motorists share their own experience of making peepholes, like those on a BMW.
I suggest you consider 3 interesting options. 2 of them are homemade and one more can be purchased online. The kit usually includes an ignition unit or a stabilizer, depending on the light source used.
How to install angel eyes?
There are several different ways to install angel eyes. Angel eye installation may vary depending on headlight configuration. Each headlight may have one or two luminous rings inside it.
Required tools and materials:
- Pliers for stripping wires and crimping contact terminals. This tool allows you to cut wires, strip insulation, and crimp connectors.
- Soldering iron. Required for connecting wires.
- Multimeter. Required for electronic work. Helps check voltage, resistance, wire integrity.
- Insulating tape.
- Screwdrivers and keys. Required for removing and disassembling the headlight.
- Corrugation for wiring. Protects wires from damage and kinks.
- Drill and drill bits. Depending on the vehicle, you may need to make holes to route the wiring to connect the angel eyes.
Second method
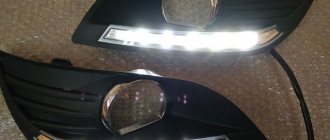
Here the design is also cool and interesting. It only differs in the use of a light source from an LED strip.
This option is often encountered when trying to install angel eyes:
- to Priora;
- Toyota Chaser 100;
- BMWs deprived of such a privilege;
- VAZ 2106;
- VAZ 2109;
- 2110;
- VAZ 2115;
- VAZ 2114;
- Renault Logan;
- Hyundai Solaris;
- Daewoo Lanos, etc.
Objectively, angel eyes look more advantageous on foreign cars. Although no one will forbid you to install such solutions on any machine.
To implement the task, you will need to prepare a slightly different set of materials and tools.
The following is required:
- double-density white LED strip, but without silicone coating;
- wires for connection;
- transparent silicone;
- glue;
- varnish (silver color);
- screwdriver;
- pliers;
- Have a good mood;
- extreme concentration and accuracy.
LED strips bend perfectly, which will allow you to easily make a ring of the required diameter. Just keep in mind that one headlight requires about 30-40 centimeters of tape.
Then the pads at one end are stripped to allow additional wires to be soldered there. They allow you to connect to a +12V power supply.
Next, a piece of tape is pointed onto a flat surface with the diodes facing upward. Gradually the tape is filled with transparent silicone. Do this slowly and carefully, armed with a mounting gun. This will allow you to coat the diodes with a uniform and even layer of silicone. It is important to wait for the resulting structure to dry completely, otherwise you will ruin everything with your own hands. Silicone will protect the product and act as a light diffuser.
To avoid wasting light illuminating the reflector, coat the back side of the tape with silver varnish. You can borrow it from your wife, sister or mother. Or buy it at your nearest store. The varnish will act as a reflector.
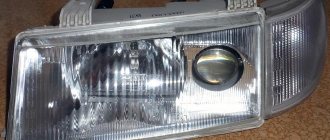
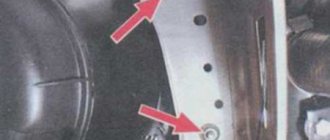
Disassembling headlights
- First you will need to remove both headlights from the car. Remember how everything was attached and connected and collect all the fastening parts in some kind of container so that nothing gets lost.
- It is necessary to remove everything removable from them, since the headlights will need to be heated in the oven.
- In order to disassemble the headlights, they need to be heated and the sealant that connects the two halves softened. Preheat the oven to 130-150 degrees and place the headlight inside. It should stay inside for about 7 minutes. You need to be careful not to overheat the headlight. When removing the headlight from the oven, use an oven mitt to avoid getting burned. Instead of an oven, you can also use a hair dryer.
- Next, you need to immediately carefully divide the headlight into two parts. For more information about disassembling a headlight, read the article “how to disassemble a headlight.”
How legal is it to use such tuning?
The question of whether angel eyes are allowed requires separate consideration. The fact is that there are no regulations that directly regulate the use of such headlight upgrades. At the same time, there are clear and unambiguously interpreted settings, according to which the front lighting devices must emit exclusively white color. Thus, the use of colored or multi-colored angel eyes is unacceptable.
At the same time, many standard lighting devices, especially on older cars, emit light close to the yellow spectrum. Therefore, RGB LEDs equipped with a controller can be given a yellowish tint without particularly worrying about the consequences. But for running lights that are red, blue, green or any other color, you can get a fine, and the inspector has the right to confiscate such devices that do not comply with traffic regulations.
Note that the only exception is orange, which is acceptable for side lights and direction indicators.
As for the shape and size of angel eyes, there should be no complaints against you here. Is it possible to undergo maintenance with such an improvement? This question is no longer relevant: the institute of technical inspections in Russia has sunk into oblivion. But when receiving a roadmap for insurance, the above nuance should be taken into account. If you are planning a trip abroad, you should carefully study the traffic rules of the country you intend to visit. But, based on our experience, we assert that such retrofitting of lighting devices is not considered a serious violation anywhere, so the occurrence of serious problems is unlikely.
But owners of show cars can use colored LEDs quite legally, even in exotic colors and with lighting effects.
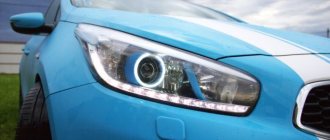
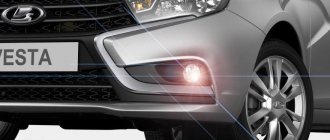
Installing angel eyes with LEDs on headlights with lenses
Angel eyes are sold in different sizes, usually from 60mm to 120mm. The LED angel eyes set contains rings with LEDs, one controller with a connector, and a remote control for changing the color of the angel eyes, including blinking modes. Diffuser caps can be added to the rings for a more traditional, uniform appearance.
“Angel eyes” in headlights with lenses are installed on the housing.
It can be pre-painted black to make the rings more visible. It is recommended that the rings be attached at three points at equal intervals. To attach the luminous rings inside the headlight, glue, double-sided tape or special wire are used. Glue has its drawbacks. Vibrations from driving and heat can weaken the adhesive bond. Double-sided tape cannot always be used, since there is not always a suitable surface inside the headlight for secure fastening in this way. It is better to use thin wire for hanging pictures. You need to drill small holes on the lens housing and screw the rings with wire. If you do everything carefully, you get an almost invisible fastening unless you look closely. The advantage of this method of fastening is that it is very reliable and does not weaken from vibrations and heat.
If you choose an adhesive connection as a method of attaching the rings, then apply a thin layer of glue to the back of the ring and to the reflector, in the place where the ring will be installed. Let the glue dry for 10 minutes before pulling the wires through. Gently press the ring into place for 5 minutes. Try not to move the ring until the glue dries.
Third method
In theory, it is the simplest, since you are simply buying a ready-made device, which has a diffuser, an ignition unit and other necessary components. It’s just important to choose a quality product, since the Internet offers many options that are not of the best quality.
Eyes based on CCFL rings have proven themselves to be excellent. They have high reliability indicators and are in many ways superior to their LED counterparts.
If we talk about Aliexpress, then I would not advise you to buy ready-made angel eyes based on LEDs. Low-quality products are used here, which can quickly overheat when the head optics are turned on. As a result, in less than a year they will have to be removed due to the significantly reduced brightness level.
Installation of “angel eyes” in headlights with a reflector (without lenses)
Installing angel eyes in reflector headlights is possible, but the light coming from the rings may reflect erratically off the headlight reflector. This way the glowing rings will blend into the background. These headlights have no obvious place to install the rings.
After opening the headlight, you need to determine what size rings you need to use and where to install them. You can cut an opening at the bottom of the reflector. This will allow the ring to be partially placed there and will hold it in place. It will be enough to recess the ring by 1–1.5 cm. The upper part of the ring will touch the reflector. To mark the bottom of the reflector for cutting, apply masking tape and make a slit along it using an engraver or other tool. Check that the ring fits easily, tightly, and is centered. You can drill two holes in the top of the reflector and thread a wire through them to hold the top of the ring.
To pull the power wires through, you need to drill a hole under the ring, remove the connector, push the wires through and put the connector back on.
Can I use red lenses?
Technically, the backlight can be any color, but don't choose blue and red. Traffic police officers regard the use of such colors in optics as an imitation of “flashing lights”, and will definitely want to talk to you about this. In extreme cases, they may even take the car to the impound lot. They react calmly to white, yellow or orange “angel eyes” (in most cases). Multi-colored lights are often considered by traffic police officers as a challenge and immediately cause an appropriate reaction.
What are the penalties for violation?
For those who like to argue, here are excerpts from the traffic rules.
For those who are slow-witted, sanctions are provided in the form of fines:
- for citizens - 2.5 thousand rubles;
- for officials - from 15 to 20 thousand rubles;
- for legal entities - from 400 to 500 thousand rubles.
In addition, unauthorized devices and devices are confiscated. The violator also faces a ban on the operation of the vehicle with the removal of the seal.
Traffic police inspectors will probably issue a fine for such tuning.
Is it possible to make installation rings yourself?
How to install angel eyes with your own hands in order to get true satisfaction from the process of finalizing optics tuning? Let's look at what you need for this. You can make a ring with an original glow yourself.
To do this, you need to take transparent, colorless plastic cylinders. These can be ordinary tubes. To securely fix them, you will need to use a sealant.
To make the rings glow beautifully, you will need LEDs, as well as a regular resistor with a resistance of about 2 ohms. To make rings from plastic tubes, you can use a hair dryer or gently heat them in another way.
There is one trick:
most headlights are the same diameter as glass drink bottles. Select a glass container of the required diameter, and then simply bend the heated plastic cylinder around the bottle. In this way, a ring of the required diameter can be produced without much effort.
Now the LEDs need to be fixed inside the rings, for which you can use ordinary colorless varnish.
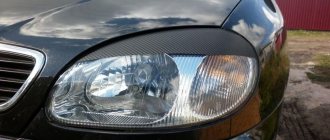
Making your own eyelashes
There is a category of motorists who prefer to do many things themselves. For them, there is no problem in making eyelashes for headlights with their own hands. The procedure is not the most complicated, but it requires attention, accuracy and consistency in the actions performed. If you are also interested in how you can make eyelashes on the headlights of your vehicle, listen to a few recommendations and follow step by step.
First you need to determine what shapes and contours the tuning element will have. To do this, you can take a regular marker and draw the expected eyelash on the body. If you are not satisfied with something, you can erase and reapply the lines
It is extremely important that the result satisfies the car enthusiast. To transfer the line you like to the second headlight to get identical lines, you can use a template pattern. Simply take masking tape, stick it along the contour of the drawn lines, and then transfer it to the second block
Try to match the template as accurately as possible with the contours of the wings and radiator grille. Now draw a line again on the second headlight. There is no need to dismantle the optics. You can install the eyelashes directly on the headlight assembly. But first it is recommended to cover all areas of the body around with protective material. This can be polyethylene or the same masking tape. Based on the template, you should make markings on the fiberglass from which the eyelash itself will be made. It is important to draw straight lines and make a cut along them. Fiberglass is not difficult to process, so you can easily handle this material with your own hands. The work uses polyester resin. The adhesive tape applied to the headlight is treated with resin, then glass mat 300 is applied. It should also be impregnated with resin. While the resin has not hardened, apply another mat of the same type and go over the resin again. The last layer is applied to the previous ones. Try to collect all excess polyester resin. To do this, use a brush or other convenient tool. Once the fiberglass has hardened, it will be easy to remove from the tape. All that remains is to saw off the material along the line that you applied as a marking. Next comes the decorative stage. It is necessary to process the resulting overlays with fine-grained sandpaper, achieve perfectly smooth edges, and also apply a layer of paint and varnish. The driver chooses the decor option himself. You can apply it yourself, or entrust the work to a professional painter. If you decide to paint it yourself, first apply universal putty to the workpiece, sand it and lubricate it with putty. The treated surface should be perfectly flat and smooth. Therefore, always keep sandpaper at hand. And use only sanding blocks. If you work with your fingers, you are more likely to wear off the leather than be able to work the fiberglass properly. When the putty has dried, a layer of primer is applied on top. This will allow you to further use layers of the selected paint material, or apply some patterns. Having made the eyelashes, they should be installed on the head optics of your vehicle. You will need fairly thin, but definitely double-sided tape. It is applied along the entire length of the headlight. Next, remove the second protective layer and carefully place the eyelash on top. Press firmly and hold for 15-20 seconds. Once the glue sets, the tape will not let go of the overlay just like that.
The main difficulty lies in precise adjustment of size and shape. Do not forget that sometimes the hood lid can interfere, which will rest against the eyelash or prevent its normal placement. Try to accurately take all measurements in advance, draw neat lines and provide for the thickness of the finished product, taking into account the thickness of the fastening double-sided tape.