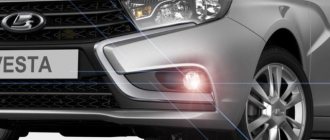
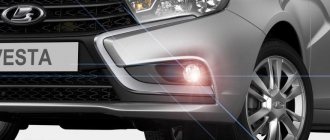
The manufacturer installs fog lights on Vesta only in the “luxury” configuration. The situation is similar with other AVTOVAZ models, so self-installation is one of the popular modifications. Do you know that installing PTF on Vesta is not as easy as on other modern Lada cars?
Choice of performance
First of all, you need to decide how the fog lights will be installed on the Lada Vesta - by an official dealer or independently.
Installation of PTF by a dealer - a condition for maintaining the right to warranty service - is carried out in the scope of work provided for when producing top versions of Lada Vesta, and, accordingly, including the entire list of components approved by the manufacturer. Even without taking into account the cost of performing the work, the amount turns out to be impressive.
The high cost in this case is due to the complexity of installing the Lada Vesta PTF, since the electronic support circuit of this car differs significantly from the electronics of previous models of the Lada line (Granta, Priora, Kalina) - the fog lights on Vesta are controlled from the steering column lever-switch by turning the sleeve-tip, which functions regardless of the position of the lever.
The reason for the high cost of installing a PTF by a dealer is the additional electronics unit, installed only on luxury versions of the Lada Vesta. This block is an intermediate link on the signal path from the switch to the headlights, which displays information about their inclusion on the dashboard. And the installation of this device also entails expensive changes in electrical wiring.
If the car’s warranty period has expired, then equipping the sedan with fog lights is possible using a much simpler scheme, which includes, in addition to fasteners, the ability to easily turn on/off the PTF with a button on the front panel.
Installation of the Lada Vesta headlight unit and replacement of low and high beam lamps
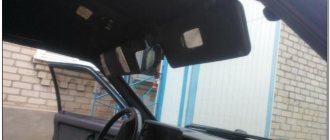
The Lada Vesta headlight unit has a complex architecture, but access to replacement lamps from under the hood is quite comfortable. To replace the lamps, no additional tools are needed; however, it is advisable to carry out the work using clean knitted gloves. This is explained by the fact that when you touch the bulb of any halogen lamp with your fingers, microscopic particles of fat remain on it.
At high temperatures, the fat begins to burn out, and the flask at the point of contact darkens and, due to uneven heating, bursts over time. Therefore, if we accidentally touch the flask with our fingers, it must be wiped with a soft cloth soaked in alcohol.
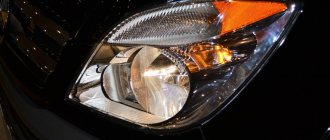
Layout of lamps in the Vesta headlight
The Vesta headlight unit is designed as follows. The plastic housing contains reflectors and lamp mounts. Under cover 1 there is a high beam lamp, under cover 2 there is a low beam lamp, the direction indicator is in socket 3, and the DRL and clearance lamp is in socket 4.
Which lamps are better for high beam Lada Vesta
As we have already found out, lamps with H1 and H7 sockets for high beam are suitable for the Vesta headlight. According to user reviews, these types of lamps and brands have become the most popular. For low beam lamps with H1 socket:
- Series of Korean MTF lamps. Very good quality at a reasonable price. The MTF Light MAGNESIUM H1 100W model is distinguished by a high resource (more than 550 hours), warm white light, and has a two-layer interference coating.
- MTF Light PALLADIUM H1 55W, good lamps from the same Korean company with a bright bluish light. They have one minor drawback - after 400-450 hours of operation they lose brightness.
- Osram H1 Cool Blue 4000K 64150 CB, for those who love xenon light. German quality, a little more expensive than Korean ones, but they work well. Under normal conditions, they work their 500 hours without loss of efficiency. Color temperature: 4000K.
- Osram H1 Night Breaker + 90% 64150 NBR, the manufacturer claims that the light cone extends 35 m further than analogues, has a bright white light and is popular with dozens of owners.
- Philips H1 Crystal Vision (4300K), another very popular model. Color temperature: 4300K, which makes their light similar to xenon, but the cone of light is more saturated, which makes the readability of signs and markings better.
- Philips H1 NightGuide DoubleLife, a new series, but is steadily in demand in 2017-2018 due to its three-color lighting technology - bright white, cool white and warm white colors are distributed across zones, increasing the readability of markings and preventing the glare of oncoming traffic.
Optimal lamps for low beam Vesta
The most popular low beam lamps with H7 socket are the following:
OSRAM H7 12V 55W PX26d
One of the leaders among users of second-generation Ford Focus halogen headlights. Excellent quality, German assembly and high lamp life are confirmed by reviews. According to the manufacturer, the lamp life is about five hundred hours, which is very good compared to competitors.
Philips H7 12V 55W PX26d LongeLife Ecovision
This is one of the brightest lamps in the rating. The resource is also good. At least the manufacturer claims a service life of 100,000 km. It’s hard to believe, but quartz glass and resistance to temperature changes put this lamp in second position.
Philips Vision H7
And again Phillips. This lamp promises a brighter and longer beam of light while keeping the price within the budget range. The flask is also made of quartz glass, the spiral is stress-resistant, protected from sunlight by a special coating.
Bosch H7 12V 55W PX26d ECO
New German PX26d lamp with increased luminous flux. This is one example of how a manufacturer should behave with a buyer. The PX26d does not promise a hundred-kilometer beam and the brightness of a borderline spotlight, but it gives good value for its money. Moreover, its service life, according to user reviews, is at least 70,000 km. Only then does the light become dimmer.
MTF Iridium H7
A good budget option with one drawback - the blurred border of the light spot. A filament with improved characteristics, which affected the brightness of the light beam. This figure is approximately 25-30% higher than other lamps in this price category. In addition, the lamp uses space zoning technology.
Selection of fog lights
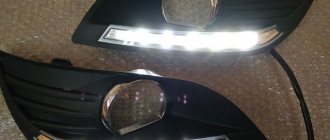
The standard PTFs of the luxury Lada Vesta configuration are equipped with H16 lamps with a power of 19 watts, which cannot be called the optimal option. The fog lights listed in the table below have higher performance and, especially Valeo, have proven themselves when installed instead of standard ones.
In addition to headlights, you must purchase the following materials:
- 4-pin relay – 1;
- headlight on/off button - 1;
- protective corrugated cover (tubing) for wire - 5 m;
- wire - 5 m;
- 16 A fuse - 1.
Removing the front bumper
Considering the massiveness and aesthetic component of this element in the exterior, dismantling the front bumper should be done carefully and strictly according to the instructions.
First of all, you need to disconnect and remove the battery from under the hood. Then, using a “10” head, unscrew the 2 bolts securing the air filter unit, which also hold the upper part of the bumper.
The registration numbers are removed, under which there are 2 screws securing the bumper to the central beam. Using an L-shaped TORX “20” key, unscrew these 2 screws and 2 of the same self-tapping screws that attach the bumper to the wings in the wheel arches.
Then, using an L-shaped TORX “30”, unscrew 4 screws securing the lower part of the bumper, and TORX-20 – 2 more screws securing them to the side panels on each side.
After this, the bumper is pulled forward, alternately on each side of the wheel arches, until its latches come out of the mounting sockets.
The bumper remains hanging on the top four TORX-30 key bolts, of which the central one (opposite the hood lock bracket) is unscrewed last, while keeping the bumper from falling, after which the accessory is completely disconnected from the car.
It is advisable to use this situation to simultaneously clean the radiator from insects and debris.
We dismantle the bumper on the Lada Vesta
The product is quite massive, so there is a risk of damage to the paintwork when removing it. Here we use all available precautions as much as possible.
- Disconnect the battery and remove it.
- We prepare the place where the removed bumper from the Lada Vesta will be placed in advance by spreading a soft cloth.
- The lower edge of the bumper is attached to the fender liners using 4 screws. They can be twisted.
- We also unscrew the two screws that connect the product to the lockers.
- The upper perimeter of the bumper is held in place by six bolts, which we also remove.
- We unscrew a couple of bolts under the license plate.
- We pull the body element towards ourselves, gradually allowing it to disengage from the side brackets.
Preparing seats for the installation of PTF
By placing the bumper on the soft canvas with its front side, you gain access to the fastenings of the niche plugs in which the fog lights are installed.
The front bumper of the Lada Vesta Optima configuration is equipped with plugs that are not designed to attach PTF to them, and does not have any additional fasteners on the rear side.
In this case, it is necessary to purchase brackets for installing fog lights (2 pieces included - right and left).
If fasteners are present, they must be removed to get to the plugs.
After dismantling the PTF mounting brackets, remove the plugs held in the grooves by latches and self-tapping screws.
In the removed plastic plugs, using a drill with a core drill, holes are cut out with a diameter corresponding to the existing contour or selected headlights, after which the cut edge is processed with fine sandpaper and the parts are installed in their standard places.
How necessary are anti-fog optics?
Lighting equipment for this purpose can improve conditions for safe movement. This point is especially acute in bad weather, when road visibility is significantly reduced. Here it is important not only to install effective fog lights, but also to adjust them correctly. The scattering angle and powerful light beam contribute to increased visibility. It will be easier for other drivers to notice a vehicle with its fog lights on.
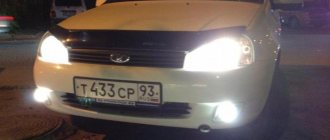
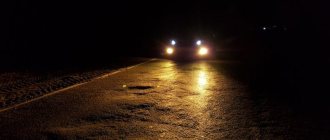
Also at night, fog lights have proven their effectiveness, as they allow the driver to see the situation not only in the immediate vicinity of the bumper, but also along the roadsides.
Let's touch on aesthetics. In this regard, the Lada Vesta, equipped with additional lighting equipment, looks more harmonious in comparison with a car in whose bumper the plugs sadly sit.
Connecting fog lights
The PTF power button is conveniently located on the central part of the console or to the left of the steering column in an existing recess. The hole for the button, depending on its configuration, is drilled or cut out, followed by careful processing of the edges without damaging the finish.
The wiring from both headlights should be brought into the cabin in the area of the pedal assembly; for this, it is convenient to route the wire of the right headlight along the transverse box between the side members.
To connect the headlights, it is advisable to use the classic circuit used in previous models of the Lada line (Priora, Kalina, Granta), simplified - take the power from the clamp bolt of the positive terminal of the battery.
This method will minimize interference with the vehicle’s electrical circuits and the cost of purchasing components.
How to turn on the fog lights on Vesta
Depending on the configuration of the Vesta, the foglights will be controlled differently. In the top version of the car, you can activate their operation by turning the ring on the left steering column switch. When you turn one notch, the headlights start working, and when you turn two, the front and rear lights start to work.
Fog lamp. Photo source: https://spares63.ru/catalog/optika_vaz/protivotumannye_fary_vaz/protivotumannye_fary_na_lada_vesta/protivotumannye_fary_na_lada_vesta_xray_original.html
In trim levels where there is no PTF in the database, owners have a choice of how to connect the PTF. The most common option is to connect via a button on the center console. For this purpose, the installation kits contain a block of buttons and a frame so that the owner himself can assemble and adjust the operation of the headlights. Another option for non-luxury versions is to buy a steering column switch assembly from the top-end Vesta.
Tuning daytime running lights
On the Lada Vesta, the manufacturer uses double-filament lamps in the side lights and daytime running lights. If instead of them you install LEDs modified in a certain way, then the yellow color of these lights, which is ineffective during the day, will change to a brighter white with blue.
Before performing this operation, you need to familiarize yourself with the pinout of the Lada Vesta daytime running lights sockets, since on this sedan it is non-classical:
- on one side of the cartridge there should be a “-” in the form of two contacts or one common one;
- on the opposite side - “+” for side lights and “+” for daytime running lights.
When purchasing LEDs, you must ensure that the polarity of the lamp base and the Vesta socket match. If such LEDs could not be found, a way out, which is not always harmless, may be to bend the contact pins of the elements according to the indicated pattern.
What kind of lamps are installed on Vesta from the factory?
Halogen light sources have not yet sung their swan song. At least on VAZ cars, and on all imported public sector cars as well. With proper adjustment, good care and careful selection of lamps, standard headlights without any modifications can shine quite informatively and no worse than foreign cars
It is important that the engineers took care not only of the visually pleasing modern architecture of the head optics, but also of the possibilities for its configuration and maintenance. For example, in order to replace the low beam, high beam, clearance or daytime running lights lamps, you do not need to completely dismantle the headlight, as was the case with the tenth family or Kalina
Lamps of the following base standards and power ratings were installed on Vesta from the factory:
- low beam lamp with H7 base 55 W;
- for high beams, lamps with an H1 socket of the same power are used;
- side lights and daylight - W21/5W;
- PY21W lamps with an orange bulb are used for the direction indicator.
As for the brands of lamps, Osram Bilux, a Mayak lamp or General Electric, as well as Phillips could be installed from the Vesta factory as a source of low or high beam.
PTF selection
It’s one thing if you decide to install LED daytime running lights on Vesta - here the choice will be much less hassle. However, when installing DRL on a Lada Vesta, it is necessary to take into account certain standards, for failure to comply with which the driver faces a fine. We talked in more detail about all the nuances of choosing DRLs in this article.
But when buying a PTF, you also need to take into account certain nuances, including:
- Appearance of optics. Everyone knows that in our market today it is very easy to fall for a fake, the operating efficiency of which will be significantly lower than that of the original headlights. Before purchasing, carefully inspect the fog lights - their housing in any case should be as airtight as possible and tightly fixed. Also pay attention to the material itself - it must be durable, since it will have to work in different operating conditions.
- Lenses. If we talk about lenses, they should be glass. Don’t even think about choosing a PTF with plastic lenses, because if even the smallest pebble gets on them while driving, the lens may crack.
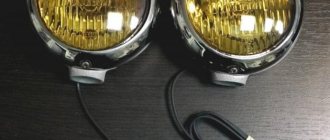
- Filter color. As for the light filter, it is desirable that it be yellow. As practice shows, yellow fog lights can better cope with cutting off the long light stream that appears during fog. But it should be borne in mind that a yellow tint can ruin the appearance of the vehicle, so, as an option, you can use special lamps in the PTF.
- Disassembly of the headlight. Another point that you need to pay attention to is the possibility of disassembling the headlight yourself. Sooner or later, any car owner will have to face the need to replace lamps, so if it burns out, you just need to replace it. If the headlight is not collapsible, then it will have to be changed completely (the author of the video about the development of LED headlights by domestic designers from Barnaul is the VESTI ALTAI channel).
Selection of fog lights
Before you buy the first fog lights you come across, you must first carefully study: what features you should pay attention to when choosing PTFs. The first thing that can tell about the quality of a part is its appearance.
It's no secret that today the market is simply overflowing with counterfeit products that are of much lower quality than the original. So, in order to protect yourself from purchasing such a product, first of all pay attention to the appearance of the PTF. Their housing must be sealed and tightly fastened. At the same time, the material from which the case will be made must withstand any weather conditions.
Installation and connection of PTF
If everything is clear with the choice of fogs, then let’s move on to their installation. Please note that installing optics involves connecting them to the unit, so if you do not have experience in this, it is better to immediately contact an electrician.
So, how to install fog lights on a Lada Vesta:
- First of all, the battery is disconnected and the front bumper is dismantled, and then it is necessary to remove the plugs installed at the location where the PTF is installed. After removing the plugs, holes are cut; for this purpose, you can use a regular stationery knife. Just do everything carefully to prevent scratches on the bumper.
- Next, the optics are fixed to the plugs; for this you can use simple self-tapping screws.
- Now you should install a button to activate the optics in the center console of the cabin. Choose any convenient place for us, as an option, the button can be placed on the steering column, on the left, near the trunk control button.
- After the installation steps are completed, the optics must be connected correctly. The wiring from the right lamp must be laid in a steel box, after which all cables must be pulled through a special technological hole located next to the pedal assembly. If we talk directly about the connection diagram, then for this you can use the universal option presented below. It is necessary to take load power from the battery through the bolt, which is supplied to the relay through the safety element.
- The “+” terminal is taken from the side light fuse directly in the block; for this you can also use the plus from the cigarette lighter. As for the direct installation of the relay, it is done either in the engine compartment or in the passenger compartment.
Lada Vesta Snow White neVESTA › Logbook › Installing PTF
Finally got some free time to work on the machine. My car does not have fog lights, so I definitely decided that I would install PTF in any case. We practically never have fogs, but I like how the fogs illuminate the side of the road, I appreciated this even on the grant. So, immediately after the purchase, I decided that I would install PTF. There is never too much light, and the appearance of a car with fog lights changes for the better.
I started thinking about installing a PTF on the Vesta, and, accordingly, studying this issue long ago.
I started from the very beginning - PTF buttons in the cabin. I immediately determined the best option for myself - to install a button instead of one of the plugs on the “beard” of the panel, next to the esp on/off button. I ordered the button itself with engraving. I contacted the seller, paid 190 rubles on the card and after 10 days the button was in my hands
Full sizeReady button with PTF engraving
They make them using their own plugs, the workmanship is excellent, so I can confidently recommend them for purchase.
Then I started tinkering with the electrics of the buttons. There is a lot of information on this issue. In short, you need to remove the board, solder a clock button onto it, LEDs - one white to illuminate the icon itself and the second (if needed) directly to indicate on/off + solder resistors and solder the button leads to ground and power supply for the LED.
All the necessary SMD components were purchased from the radio store:
- tact button. I didn’t get it right with the size, I bought a button slightly higher than the standard one and the button travel is longer than the original one - white LEDs, size 0805 - red LEDs, size 0805 I wanted orange ones, but I didn’t find them in stock, so for now it will be red - resistors 1.2 kOhm and 15 kOhm of standard size 1206 Everything turned out to be mere pennies.
Headlight tuning: options
Now let's briefly talk about optics tuning. As a rule, car owners are faced with the need for tuning if they want to improve the appearance of the vehicle.
So, PTF tuning options can be like this:
- Installation of lensed xenon lights. Installing xenon involves installing an additional unit. This tuning option will improve the visibility of the fog lights. But it should be borne in mind that it is better to install xenon if the headlights in your car are xenon.
- Installation of LED bulbs in lanterns. A cheaper, but no less effective option compared to xenon.
- Installing eyelashes on lanterns. This option is one of the most budget-friendly and simplest.
Lada Vesta Furia Roja › Logbook › Replacing the factory PTF with PTF Osvar.
Let's start with the fact that there were few factory PTFs, and I wanted a little more light from the PTF. Reading various forums suggested three options: installing bi-lenses with xenon instead of PTF, installing PTF with H11 lamps, and installing Russian-made PTF with H1 lamps. Of course, I wanted the first option since it is very bright + long-range mode, but the price tag here was 6 thousand+ and perhaps a little communication with traffic police officers, which I didn’t really want. The second option was more affordable, but the dubious quality of the PTFs themselves and the high cost of H11 lamps, compared to N1 lamps, gave rise to some doubts. The third option is Russian Osvar PTFs for the H1 lamp base . High-quality body, iron reflector and glass lens. Of course, the third option won, so to speak, cheaply - angrily! And so let's start, ordered: Lada 8450006276 right fog light bracket Lada 8450006277 left fog light bracket Hella 4RA 933 332-101 relay, operating current Osvar 360237 43 -2pcs. fog lamp renault logan/sandero/dusterOsram 64150NBU-HCB incandescent lamp, high beam headlight; incandescent lamp
I ordered everything on emex
relay from hella
I ordered the relay from Hella, I don’t know why), apparently Bosch were expensive. I used the relay to unload the standard wiring, since the standard PTFs had H16 lamps with a power of 19 watts, I didn’t take any risks and took the power from the battery, standard PTF wiring only controlled.
PTF themselves from OSVAR
On the left is Osvar, on the right is Valeo (factory)
The PTFs look very high quality and well assembled; the PTFs already have lamps. But he still advised me to coat the glass with sealant; after 10 thousand runs, a little sand appeared in the right PTF when I washed it generously. There were already lamps in the PTF.
simple lamps and standard brightness
Brackets for PTF
I ordered the brackets specially, because I knew that they needed to be modified, and I didn’t want to disfigure the factory ones.
Bracket already with PTF
As it turned out, you need to modify it a little, filing the plastic a little and the PTF fits like a family!
There is nothing special to explain about connecting the wiring; relay contacts 85.86 are taken from the wiring going to the PTF power supply; contact 87 is taken from + to the battery through the fuse. Contact 30 goes to the PTF power supply
I also threw a mat under the battery, purchased earlier for 50 rubles
We also purchased brighter lamps in PTF, high and low.
In the PTF I installed the previously installed PHILIPS H1 X-TREME VISION +130 in the far range, and in the far range I installed the OSRAM H1 NIGHT BREAKER +110. I haven’t installed the neighbor one yet, but they are waiting their turn PHILIPS H7 X-TREME VISION +130
And so, we begin removing the bumper to install the PTF
photo from the InternetInstallation of fog lights PTF Lada Vesta
We unscrew all the bolts that are shown in the picture, unclip the bumper from the wings, carefully and slightly pull the bumper towards you and turn off the temperature sensor in the bumper. Next, we place the bumper on a flat surface and dismantle the standard PTFs, which are held on by 2 screws, and also installed the new PTFs on 2 screws
Full size, in many places IZH is stamped on the plastic. Full size, in the back there were different lamps from the factory. on the left was GE, on the right was Philips (the lights were the same)
For the experiment, only one PTF was installed and the new PTF was adjusted using the factory PTF
Full size, passenger side OSVAR, driver's side VALEO
We configure the PTF and see the difference
Full size difference in light on face
I made the adjustment the next day and installed the second PTF and also adjusted it.
And now night photos of the headlights:
Only PTF
Full size light more white
PTF + Middle
Full size headlight low beam lamps are still factory
PTF+Near+Far
Full size satisfied with the lighting
I am pleased with the result of the work done! The lighting just got better! I recommend! Thank you all for watching, like and repost!) Criticism is welcome!)
Fog lights are an invariable attribute of a modern car. Unfortunately, AvtoVAZ equips models with pre-installed PTF only in luxury versions. Owners of basic modifications are forced to upgrade the car themselves and order paid services from a service station.
What is the reason for installing fog lights?
- road safety in fog, snowfall, and reduced visibility;
- aesthetic appearance: the car looks completely different, a certain element of tuning, modernization.
Why don't you have fog lights?
On modern domestic cars, such additional equipment is installed exclusively in luxury configurations or as an additional option. If our Vesta did not have foglights when we purchased it, then we will need to do the installation ourselves.
It is important to remember one immutable truth - even installing such a small thing as a pair of headlights automatically leads to loss of warranty.
There can only be one way out, try to perform the so-called re-equipment to a configuration an order of magnitude higher than the existing one. You will need a standard kit from AvtoVAZ, which includes:
- Two headlights ( 261500097R );
- Front wiring kit in harness (8450006983);
- Left fastening element (8450006277);
- Right fastening element (8450006276);
- Switch kit (8450006924);
- Body electronics unit ( 231A08052R );
- Instrument panel wiring harness kit (8450030715).
PTF installation cost
It would be good to first think about how much such a procedure would cost, because on Vesta an installation of this kind is a rather complicated and time-consuming task.
The cost of pleasure, at the time of writing, is approximately 50,000 rubles . If you have somewhere to add 15-20 thousand, then you can safely go to the dealer and install it on site. If something happens, you can always fix any damage under warranty. Has the desire to save money taken over? We do everything with our own hands.
Reviews are positive and negative
| № | Positive |
| 1. | Gennady, 32 years old, St. Petersburg: I bought the basic version of Vesta, I installed the PTF myself with a friend. There is nothing difficult about it, we did it in half an hour in total. |
| 2. | Kirill, 29 years old, Moscow: I traveled for two years without fog lights, it was very difficult in bad weather. I installed it at a service station, it was expensive, but the cost is worth it. |
| 3. | Vasily, 41 years old, Volgograd: bought the car second-hand, the previous owner installed a PTF. They illuminate well, cover the roadside, and visibility is good. |
| 4. | Dmitry, 45 years old, Samara: after a year of using Vesta, I realized that it wouldn’t work without additional lighting. I installed it myself and finished it in 20 minutes. |
| 5. | Alexander, 42 years old, Saratov: I bought Vesta in its basic configuration a year and a half ago. The car is good, but installing additional accessories is expensive. In particular, the fog lights cost me more than 45,000 rubles. |
| 6. | Ivan, 39 years old, Uralsk: my positive review of the PTF Autostol63261500097R, which I bought at a local store. Good price-quality ratio, warranty from the manufacturer. |
| 7. | Vyacheslav, 50 years old, Krasnodar: I don’t use the car very often, but I realized that I can’t do without additional headlights. Autumn time, often foggy, visibility is limited. I bought FranceCarFCR220029, my recommendations. |
| 8. | Alexey, 32 years old, Sevastopol: I bought a Lada Vesta in the basic version and decided to install fog lights. As it turned out, there was nothing complicated, there was more uncertainty. |
| Negative | |
| 9. | Vladimir, 32 years old, Moscow: I bought a car in a luxury configuration with PTF. I am dissatisfied with the quality of lighting, I plan to install Valeo 47401. In thick fog, visibility is still limited, despite the low landing. |
| 10. | Sergey, 33 years old, Samara: I drove for six months on factory fog lights, the quality is not very good. If possible, I will replace it with foreign analogues. |
| 11. | Kirill, 38 years old, St. Petersburg: garage mates recommended installing Autostol63261500097R instead of factory headlights. The cost of Autostol is one and a half thousand more expensive than the factory analogue, but the quality is obvious. |
| 12. | Valentin, 42 years old, Rostov-on-Don: I drove Vesta for six months, the car is good. There are not enough fog lights, weather conditions have worsened, visibility has decreased. I have selected several options: Valeo 47401, Autostol63 261500097R, I will choose and consult with specialists. |
| Video - Installing fog lights | Video - Installation without intervention in the ECU |
Rate the article!
Preparation for equipment installation
The main difficulty is that the electrical system design of this machine is significantly different from previous versions.
The lighting will be controlled using a switch mounted under the steering wheel, but does not have suitable positions for fixing the light output. The electrical signal comes from the lever through an additional unit, available only in the luxury version. So the most acceptable solution is to install a kit with a separate connection and a special button output.
List of tools needed for installation:
- pliers;
- screwdriver with Phillips bits;
- self-tapping screws;
- 76 mm bit for drilling holes;
- stationery knife;
- a set of keys for removing the bumper and installing optics.
How to adjust PTF on Vesta
A new car usually doesn't need any adjustments, but over time something goes wrong and the light hits the road unevenly. To correct this situation, the designers have provided the ability to adjust the PTF light level using an adjusting screw, accessible through a hole in the bumper. You can do this yourself by following the procedure:
- Place the car with the light on opposite the wall at a distance of about 5 meters.
- Place an assistant in the front seat or place a load weighing 70 kg.
- You need to make markings on the wall or place a screen to adjust the light.
- Cover one of the fogs with a sheet of cardboard to properly adjust the second one.
- Turn the adjusting screw through the hole in the bumper and align the upper limit of the light with the horizontal marking line.
- The same operation with the second fog.
https://youtube.com/watch?v=OTYIG9Q4xUU%3F
If the adjustment is unsuccessful, you need to check the correct installation of the bumper, the housing of the fog lights and the light bulbs themselves and, if necessary, replace them.
Beginning the installation of the lighting kit
This is how we will carry out the work in a simple and reliable way, while using a separate electrical circuit.
We remove the front bumper, carefully cut out holes with a diameter of 76 millimeters in the places where the plugs are located.
A sharp knife with a harder blade or a metal crown of the appropriate size will come in handy. We insert the headlights into the holes, securing them to the right and left brackets using self-tapping screws 15–20 millimeters long.
We install a switch button inside the car; you can use a standard VAZ one from LADA 2114, placing it next to the vertical adjustment wheel for the optics. You can draw a conclusion to the standard switch from Vesta, which will be without fixation, located just below the audio system.
We lead the wiring from the headlights through a metal corrugated box to the hole located in the area where the pedals are located. From there we draw output to the button.
Wiring diagram
We use the same principle as when installing Priora and Granta equipment.
The 12V load power for the relay must be taken from the battery using an M6 bolt, directly through the fuse.
Plus it will be possible to take it where the size fuse is located in the mounting block, from the cigarette lighter.
We mount the relay where it is most convenient: in the engine compartment or inside the cabin. So we got off with a “slight fright” - we interfered minimally with the electrical part, maintaining the warranty on Vesta.
Installation diagram for LUX version
conclusions
This article discussed the simplest, but most expensive method of installing anti-fog equipment.
In practice, especially if your Lada Vesta is no longer under warranty, everything can be done at much lower cost using plastic corrugation, simpler wiring, a 16-amp fuse, and a 4-pin relay. In general, the installation sequence will not differ.
By choosing the most suitable method, you can equip your car with enough light for comfortable driving in the dark, when visibility is very limited.
Fog lights, like the main optics of a car, play an important role in creating high-quality lighting. Fog lights are especially important in poor visibility conditions. For example, during rain, heavy fog or snowfall. As for the Lada Vesta, the situation here is such that fog lights are provided only in the “luxury” configuration. Therefore, installing PTF is relevant for this family of cars. If you are determined to install fog lights yourself, then this review is for you.
It must be said that installing PTF on Vesta yourself is somewhat more difficult than on other Lada cars. On the other hand, you will thus save quite a decent amount. So, for example, an official dealer can charge you up to 10 thousand rubles for installation, depending on the region. If you do not have such an amount, then it is better, of course, to carry out the installation yourself. Therefore, be patient and have enough time.
To install fog lights on Vesta you will need to purchase:
- The fog lights themselves - here you have a choice: take Original Valeo PTFs or a good quality analogue or Tune-auto PTFs (and look for bulbs) or take Chinese ones of dubious quality (there were precedents when they simply melted).
- Brackets for installing PTFs are actually what the fog lights are directly supported on. It is very difficult to find original brackets; AvtoVAZ does not release them on the free market. Analog brackets are very suitable; they are of decent quality, completely replicate the geometry of the original ones, and they are always in stock.
- PTF facings. Here the situation is simpler - you can cut holes in your trims for fog lamps with a diameter of 76 mm, or purchase luxury trims for fog lights.
- Wiring. You will need a set of wires to connect PTF Vesta. Everything is more complicated here, since there are no special buttons or space for a button to turn on the PTF in the cabin.
The first thing you will encounter when connecting is the electrical circuit, which is completely different from Grants or Priora. First of all, on Vesta the foglights are controlled via a steering column switch, which does not have a fixed position for turning off the PTF. At the same time, the signal to turn on the fog lights does not go directly to the headlights, but through a special unit, which is present only in luxury cars. Therefore, in order not to damage the car and not waste an extra couple of hours, we recommend adding a separate button for the PTF.
Now you can proceed to the direct installation of the PTF. First, remove the bumper and replace the existing PTF trims with “luxury” ones or carefully cut out the plugs using a utility knife or a 76 mm crown. Then take the fog lights and secure them to the brackets using self-tapping screws, and the bracket directly to the bumper.
Connection is the next and very important point. To do this, stretch the existing wires from the kit to each of the fog lights, the free end is connected to the relay (it can be installed in the mounting block or in the engine compartment). Now we connect according to a universal scheme, like Kalina or Priora. Take the “+” from the battery to the relay, and you must use a fuse. There you can take the “-” mass directly from the “negative” terminal, or it is better to find a nut nearby and screw it to it. The control plus on the relay comes from a button from the passenger compartment. Now stretch the wire for the button into the interior and install the button (the most convenient button for turning on the PTF 2109) on the decorative cover of the fuse box next to the headlight adjustment unit.
Finally, do not forget to check the functionality of the PTF and put the bumper in place.
Using such a circuit, you will minimally interfere with the electronics of the Lada Vesta, which means you will not harm it. The basic rule for installing PTF is to try to be as careful and attentive as possible, then you will get a positive result. Properly installed fog lights will provide you with not only proper visibility on the road, but also safety.
How much does installation work cost?
If you don’t have enough time to install fog lights yourself, you can turn to specialists for help. An official Lada dealer carries out such work for an amount approximately equal to 60-70 thousand rubles. Of this, at least 10 thousand rubles will have to be paid to an electrician for installation. The price consists of the cost of original spare parts required for installing the PTF and complex work that will completely copy the luxury version.
Installing foglights yourself will reduce the required budget. In addition to the headlights themselves, you will need to purchase other equipment, with a total cost of at least 5,000 rubles. To summarize, we can say that installing PTF on fret 2180 without outside help is about 5 times cheaper than from an official dealer.
Fog lights on the Lada Vesta are an integral part of the appearance and a necessary detail. Their main purpose is to provide the driver with good visibility of the road, even in conditions such as fog, heavy rain, snowstorm, etc.
On most of the latest models of the domestic automobile industry, PTFs are not installed by the factory on all modifications, but special holes and fastenings are provided for their installation. The exception is the Lada Vesta model. Factory fog lights are not suitable for everyone. Also, the quality of their lighting is average. Therefore, many owners of this model try to replace the factory headlights with better ones.
Benefits of fog lights
These headlights got their name because they are able to provide visibility in foggy conditions. This natural phenomenon minimizes visibility and can easily lead to an accident. It is also difficult for the driver to do without fog lights in rain, snow or blizzard conditions.
The design of such lighting devices as dimensions, low and high beams does not allow leveling the effect of fog. This fact remains evident even when installing the most powerful types of lamps (LED, xenon). The action of the above light devices does not help due to the fact that the rays collide with microscopic drops of H2O in the form of steam or snowflakes, and are reflected or scattered from this. As a result, a translucent veil is formed and significantly impairs visibility. In addition, a dazzling effect is created. Fog lights have trump cards and advantages over main lighting. After all, PTFs are located almost at ground level. But the fog condensate does not reach this level. Therefore, we get the effect that the headlights are directing light under a veil of fog. In addition, the upper beam received from the PTF light has a clear boundary horizontal level and does not allow reflection at all from drops of fog that fall into the driver’s field of vision.
Another advantage of fog lights: they have a wide lighting spectrum. Due to this, the side of the road remains illuminated even during fog, which makes driving on roads with sharp turns much easier. Also, these lighting devices allow drivers of oncoming vehicles to see the dimensions of the car during bad weather. The color of the flashlight does not affect the quality of dispersion, because during fog all colors from the spectrum are scattered similarly. Because of this, the fog appears white or gray in sunlight.
Due to the above advantages, we can conclude that the presence of fog lights is practically necessary for every car. Two main advantages from installing this lighting equipment:
- improving driving safety;
- exterior decoration.
The driver drives calmer and more confident, knowing that in case of bad weather visibility will not be limited. PTFs also help with night driving. They can be used as an additional lighting device. And the fact that fog lights decorate the exterior of a car is especially relevant in the case of the Lada Vesta. After all, with them the design of the sedan is solid and complete.
Most Vesta consumers, when purchasing a non-top version, tend to equip the car with foglights.
Via PC
Required
:
- Adapter ELM327, you can buy on AliExpress (see product catalog).
- Ddt4all() software.
How to activate the function
:
- Run ddt4all. Select a port. Select an adapter. Check the box and click Connect.
- In the window that opens, click the button marked with a circle (with a magnifying glass).
- Select search by CAN.
- Find and select the [EMM] block.
- Open the EMM_Cornering - Configuration item below.
- A menu should open.
- Change the value of Nbx_Cornering_CF in the WRITE field from 0 to 1.
- Turn on the Expert mode (in the menu at the top, second icon from the left) and press the Send button (right).
- In the READ field the value should change to 1. The value 40 in the READ field of the Cxx_CorneringSpeed_CF function means that the cornering illumination function will work up to 40 km/h (can be changed as desired, also using the Send button).
The process is also shown in the video:
Difficult installation situation
You need to figure out how to install PTF for Vesta. If the driver decides to install fog lights on Vesta from an official representative of AvtoVAZ, the price of the issue will be very high. In other words, the dealer’s installation of additional lights is carried out in the only possible way: partial modification of the vehicle’s equipment to a top-end one.
This procedure will cost the customer more than 60 thousand rubles. Such an exorbitant price is due to the fact that it is necessary to purchase original factory parts that make up the PTF system.
| Individual elements | Their cost |
| Directly 2 fog lights. | 3 thousand rubles |
| Assembled harness with wires (front). | It will cost more than 12 thousand rubles. |
| 2 brackets (for securing headlights on the left and right sides). | About 550 rub. |
| Steering column shift system module. | Up to 7 thousand rubles. |
| Body auxiliary electrical unit. | 3–4 thousand rubles. |
| The most expensive component is the dashboard wires. | More than 20 thousand rubles. |
If you add up the price of all the components, you already get a tidy sum. We should not forget about the cost of installing this equipment. In total we get the same 60 thousand. The installation of lighting devices on Lada Vesta by an official VAZ representative is carried out only in this way.
The complexity of equipping foglights at a dealer lies in the complexity of the circuit, which was designed by VAZ electronics specialists. The scheme for switching on this lighting in Lada Vesta differs from previous models and is more complex. In Vesta, the fog lights are controlled using a switch located under the steering wheel. This switch does not have a fixed on/off position.
In addition, as mentioned above, Vesta has an auxiliary body electronics unit, to which a signal is primarily sent from the steering column lever. The block transmits a signal to the headlights. Most drivers who purchased a Lada Vesta not in the highest configuration are unlikely to have an additional 60 thousand rubles. for the installation of fog lights.
The way out is to equip the car with headlights yourself and bypass the difficulties by assembling a separate headlight switching circuit. To do this, we use a separate button to turn it on/off.
How to choose the right headlights and materials for them?
The highest quality indicator is the original set of headlights produced by the Valeo brand (code: FCR220029). These devices cost 3 thousand rubles. for a couple.
If this price scares off the buyer, then you can choose products from Dlaa, and they are almost half the price. If you want to install xenon versions of PTF, you should study in detail the experience of the owners and material on this issue.
Important! You should not be inclined to buy cheap options, since their quality is far from ideal, and cases of melting are not so rare.
The next important elements of the kit are the mounting brackets. For two products you will have to pay about 700 rubles.
Now let's look at the other products included in the kit:
- button to turn the headlights on or off;
- relay;
- cables with a plastic corrugated sheath and connectors for switching;
- fuse (current – 16 A).
For the indicated set, sellers will “ask” about 600 rubles.
You should also additionally purchase a lining for the PTF. For 2 pcs. the owner will have to part with 800 rubles.
In general, purchasing a PTF set will require a budget of at least 5 thousand rubles. All of these products are available in the warehouses of most online stores, which makes the purchase a quick process.
What is included in the Grant standard package?
Granta Standard
Photo Lada Granta luxury photo
We install PTF ourselves
Let's look at the installation process. From the list of factory items you should purchase: fog lights, a power button, inserts for attaching the lights to the bumper, a 4-pin relay, a 16-amp fuse, a wire, a plastic corrugation (at least 5 m long). First you need to dismantle the bumper and cut through the plugs where the headlights are installed. The cuts are made either with a 76-diameter crown or with a knife. We attach the fog lamp bracket with self-tapping screws. In the lower left part under the steering wheel of the Lada Vesta (near the button that opens the trunk) we install a button for turning on the fog lights. It can also be placed directly on the instrument panel. You must first cut out a receiving hole for the button.
The wires leading to the right headlight should be hidden in a metal box. From the engine compartment to the passenger compartment we lay the wire through a special hole in the pedal assembly. In this case, a simplified scheme similar to the Lada Kalina, Priora, Grant is used.
Power to the relay is supplied from the battery (necessarily through a fuse). The positive contact for controlling the button is supplied from the mounting block. Take the plus coming from the dimensions or the cigarette lighter. The device for closing the circuit can be located both inside the cabin and under the hood. We connect all the elements of the circuit according to this diagram and check the operation of the PTF using the button.
As you can see, a set of fog lights installed independently is much cheaper.
Reasons for replacing a light bulb
Fog lights in a Lada Vesta car are connected to a common network separately from the head light. Therefore, if the fog lights stop working, you should pay attention to whether the other headlights are working.
If the head light works, then first of all you should check the fuse on the PTF. After removing it from the fuse box, check the integrity of the wire inside. If it is intact, then the reason is different, and if a break is found on it, then simply replace the fuse.
The second, no less common cause of headlight malfunction in the Lada Vesta model may be a break in the system itself. You need to look for it either in the wiring located between the bulbs and the relay, or in the relay itself. You can check the break using an ammeter, or see visually if the wire is broken.
If only one headlight does not light, you should look for the cause directly in it. Most likely, the light bulb has simply burned out and needs to be replaced. A more difficult situation is when, along with the PTF, the head light also does not light up. Then there can be a lot of reasons, starting from the battery power supply and ending with the head wiring.
Another reason why Lada Vesta owners replace fog lights is the quality of their lighting. From the factory, PTF bulbs are coded H-11, which is quite small in conditions of heavy fog or heavy rain. Also, the factory version has white filters, which are not at all effective when driving in bad weather.
As an option, instead of halogen lamps, xenon can be installed in the PTF, but with special curtains so as not to blind oncoming traffic.