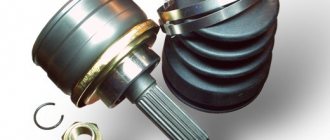
In what cases is it necessary to replace the inner CV joint?
Replacing the internal CV joint on front-wheel drive VAZ vehicles is required if the following symptoms are present:
- Crunching and knocking noises when driving and accelerating in a straight line;
- Vibration and shock when changing gears;
- Significant play when testing by hand;
- If the “grenade” fails completely, the vehicle cannot move further.
» alt=»»> The main reason for the malfunction of the VAZ “grenade” is the entry of water and dirt through the hole in the torn boot. The second possible cause of failure is a sharp press on the gas with the wheels fully turned, although in this case you risk killing the external rather than the internal grenade.
In addition to the above, replacing the internal CV joint on VAZ-2110 and other models may be necessary if the quality of the previously installed joint is poor.
Diagnosis of anthers
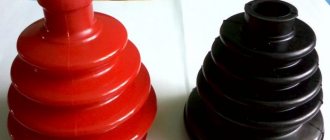
As a rule, these joints are common in passenger cars that have independent suspension. They can also be found in the rear wheels and front axles of SUVs. As for the boot itself, it is a kind of protective cover made of rubber. Its shape is a corrugated pipe. This cover is indispensable in protecting against various contaminants and dust.
The CV joint itself is a rather complex structure, which is much more demanding than the same ball joint, so it requires exceptional care. If there are dust particles in it, a peculiar crunching sound appears, which means huge problems. In this case, this part will completely fail quite soon, but there are ways to extend its life a little.
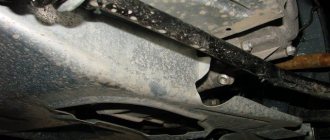
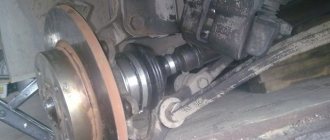
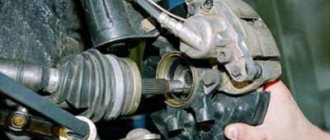
To figure out whether the outer CV joint boot needs to be replaced, some work needs to be done. First of all, you should literally turn all the wheels all the way in the required direction and see what is happening behind the front wheel.
The aforementioned corrugated rubber should be located in its very center and it is desirable that it be without damage. A good sign is also the fact that there is not a single trace of grease on it. If there are such marks or the rubber is damaged, or both, then replacement is inevitable.
However, a small crack on the boot is allowed, which does not mean its final failure, but does mean that the hour of judgment is quickly approaching. Still, it’s better not to be lazy, go to the appropriate store and immediately buy a similar new part for your car. It would be a good idea to have a few of these anthers in reserve. You cannot ignore even the slightest cracks in the structure of the boot, because through them not only dirt, but also the same dust can get into the system, which is why the CV joint will certainly not last long. All this also strongly supports the formation of a special development on its parts, which leads to the already mentioned crunch.
There is also a way to check without inspection. To do this, you need to find a road with as sharp turns as possible, and if the corresponding sound is heard on it, then problems cannot be avoided. This method is effective due to the fact that the CV joint itself is a special angular velocity joint that forces the front wheels to rotate and turn.
In other words, it is capable of transmitting rotations to axle shafts located at different angles. This hinge is created from very, very strong alloys, because a huge load is transferred to it when the car moves.
Replacing the inner CV joint with your own hands
» alt=»»> The procedure for replacing a “grenade” is the same for the entire front-wheel drive VAZ line, starting with 2108 and ending with VAZ-2115, “Kalina”, “Priora”, “Grant”. Before removing the inner CV joint, the oil is drained from the gearbox. Then proceed according to the following algorithm:
- Unlock and unscrew the hub nut. To make the work easier, a piece of pipe about 1 meter long should be put on the key.
- The desired side of the car is hung on a jack or lift.
- Remove the wheel.
- Remove the washer located under the hub nut installation site.
- Disconnect the steering tip.
- The CV joint is removed from the hub.
- Using a pry bar, remove the drive and internal joint from the gearbox.
Note: when removing both drives at the same time, a suitable mandrel should be installed in their place.
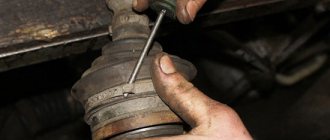
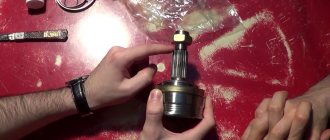
How to change the “grenade” with the drive removed? To do this, clamp the shaft in a vice, loosen the clamps and remove the boot. After this, the hinge is knocked off the splines with hammer blows.
The new CV joint should be hammered by applying light blows to its end with a hammer. For this it is better to use a wooden mallet. The “grenade” is first filled with a special lubricant.
Before installing a new constant velocity joint, it is necessary to clean its seat from old grease and install a new boot. Assembly is carried out in reverse order.
The repair is considered complete after successful sea trials. In this case, there should be no extraneous sounds from the drive side in all modes of vehicle movement.
Would you like to know the sizes of the CV joint boots on the vase?
Dimensions of Lada CV joint boots...
Hello dear readers of the auto blog RtiIvaz.ru. Today's article will focus on the sizes of CV joint boots on VAZ cars. In a modern car, all critical connections and assemblies are protected either by oil seals from oil leakage, or by various rubbers that protect the connections from the effects of the external environment.
Rubber products are also used in hydraulic systems: brake system; hydraulic clutch system; power steering. These are, for example: cuffs of hydraulic cylinders, as well as external and internal CV joint boots of cars of various sizes and designs.
To carry out repairs to hydraulic drive cylinders, there are VAZ repair kits of various sizes, which are equipped with a full set of everything necessary for replacement.
As a rule, rubber products of VAZs have a low cost compared to the cost of the parts they protect, so the quality of rubber production is important for every motorist.
For example, wear of cuffs in hydraulic cylinders of car drives is mainly caused by the fact that the brake fluid used for their operation is hygroscopic and attracts moisture, and with it dust. All this gradually accumulates in hydraulic cylinders, and such a mixture begins to act as an abrasive, wearing out both the sealing collars and the mirror of the cylinder itself.
Therefore, it is so important not to delay repairing the brake system cylinders or clutch drive. Replace worn rubber cuffs immediately when the first signs of unsatisfactory operation of the hydraulic cylinders or their leakage appear.
Did you know, car enthusiast, that old dirty brake fluid needs to be changed first. And only then install the rebuilt cylinder and bleed the system from the air that has entered it.
Before replacing worn boots and cuffs of a hydraulic cylinder, you must make sure that its mirror has no signs of wear, otherwise replacement will only save you for a short period of time. If the hydraulic cylinder mirror wears out, it must be replaced entirely.
As you know, most faults in moving joints are associated with the appearance of cracks or tears on the surface of the rubber protection. These are boots on the drives of axle shafts, ball joints, steering linkage joints, steering rack corrugations, also front and rear pillars, etc.
A torn rubber boot on a CV joint begins to let water and road dirt into the joint, which significantly reduces the service life of the vehicle unit. In addition to this, the connections have a decent cost, therefore: the condition of the external and internal anthers of the “grenade” must be given special attention.
It is worth immediately inspecting the condition of the anthers, for example CV joints, when driving through a suspicious obstacle, when you heard a scraping sound from below the car.
If, upon inspection, you see that the rubber of the “grenade” was caught by something and it was torn, then you can get to the garage by wrapping a plastic bag or a couple of bags on top of the “grenade”. Next, you need to secure the ends with electrical tape or tape or any available material. This way you will save the CV joint “grenade” from dirt. Otherwise, everything will end either with its removal, disassembly and washing, or even with an expensive replacement of the unit.
If your car's CV joint boot is torn, you need to select a new boot that fits the size and then replace it.
It is always necessary to take into account the “original” dimensions, which correspond to both the diameter of the axle shaft and the outer diameter of the CV joint. If you install a similar rubber protection on a “grenade”, then if the diameters do not match, the clamps will not be able to reliably clamp the boot at the junction. As a result, dust will be sucked in, as well as water will enter the hinges of the “grenade”.
Next, the car enthusiast looks at photos of “pomegranate” covers and their sizes...
Photos and sizes of CV joint boots on VAZ cars:
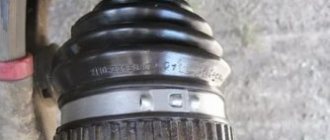
On the left is the internal boot of the grenade, on the right is the outer one. Photo of the joint covers, internal and external, of the VAZ-2018 family of cars; 2109; 2113; 2114; 2115; 2110; 2111; 2112 have design numbers:
- internal hinge cover 2108-2215068; size 2x8x7.5 cm
- outer hinge cover 2108-2215030; size 2x8.6x8 cm
On the left is the inner boot of the CV joint, on the right is the outer one. Photo of the joint covers, internal and external, of the VAZ-1111 Oka car, design numbers:
- cover of the internal hinge 1111-2215068; size 1.7x8.5x6.5 cm
- outer hinge cover 1111-2215030; size 1.7x9x6.5 cm
On the left is the outer CV joint boot, on the right is the inner one. Photo of joint covers for external and internal VAZ 2121 cars; 21213; 21214; 2131; 2123 Niva, they have design numbers:
- outer hinge cover 2121-2215030-01; size 2.1x12x8.5 cm
- internal hinge cover 2121-2215068-01; size 2x8.5x8.5
On the left is the outer CV joint boot, on the right is the inner one. Photo of joint covers for external and internal VAZ 1118 Kalina cars, design numbers:
- cover of the internal hinge 1118-2215068Р; size 2.2x9.2x7.5 cm
- cover of the outer hinge 1118-2215030Р; size 2.2x9.2x7.8 cm
I measured the dimensions of the covers with a simple school ruler, besides, the rubber expands and contracts depending on the temperature, so the measurement error is + plus or minus 2 mm. Also pay attention to the photo: I measured the seats of the covers according to the inner diameter.
To replace rubber products, purchase repair kits for vases and tires from well-known suppliers, thereby saving money on quality products.
All repair kits for vases from the production structure of the RTI plant are made of high-quality rubber with a set of additives in strict accordance with technology.
YouTube video:
Please, for those who want to change the CV joint boots, here is a link for selection in three sizes.
Source
Boot replacement and repair
The boot can be changed without removing the grenade if you have special equipment. His work is demonstrated on video. » alt=»»> If you do not have such a device, to remove and replace it, you must perform the above-described procedure for removing the drive and dismantling the hinge. The procedure is necessary if there is even minor through damage on the boot.
Temporary repairs to the CV joint boot can be made without removing it from the vehicle. To do this, you need to thoroughly clean and degrease the damage, then seal it with a piece of rubber and cyanoacrylate-based glue (superglue).
An alternative repair method is to seal the holes with silicone caulk. It should be remembered that it takes a day to completely polymerize.
Note: express repair is a temporary measure. Replacing the inner joint boot may be delayed for a short time, but not completely cancelled. Typically, these types of repair methods are used to get to the point of repair.
How to repair
Replacing the CV joint on a UAZ Patriot
If the boot still fails, but you don’t want to buy a new one (we strongly recommend that you change your mind) or are waiting for it to arrive, it is possible to seal the CV boot.
The first option is to use rubber patches, which are typically used for car tires. In principle, the method should justify itself, because the boot and the wheel are operated under approximately the same conditions. Take care of your purchase in advance:
- patches for car tires;
- external CV joint lubrication;
- sealant;
- kerosene for cleaning.
So, first, clean the surface and apply the patch according to the instructions. It will look something like this:
For greater reliability, fill the patch with sealant. After this, theoretically, you can move on. That is, this replacement method, in principle, allows you to seal the CV joint boot without removing it. However, such carelessness can be costly if dust or water gets into the hinge itself. Therefore, it would be better to remove the boot. Clean both it and the hinge. Refill it with grease and secure it securely with clamps.
Important! This method is suitable for repairing only rubber boots, not plastic ones!
The second option looks more like a repair in the field than a planned sealing. Nevertheless, those who have used it speak of its reliability, and most importantly, the speed of implementation and extreme low cost. For this repair you will need:
- plastic bag (stronger);
- scotch;
- CV joint lubricant.
Of course, you first need to jack up the car, remove the wheel and remove dirt from the surface. Then, using a syringe or any other similar tool, fill the boot with lubricant. It’s better, of course, to remove it, wash it and stuff it, but you can also do this through the hole that has formed in it. Next, take a plastic bag and wrap it around the boot and part of the shaft. Don't forget to push the bag into the grooves. Spin the wheel (always in the direction of travel!) to make sure that your structure can move freely. Now all that remains is to rewind it all with tape. Try to purchase not ordinary stationery tape, but special automotive tape (with the addition of metals for greater durability).
If you still have questions about repairing the CV joint boot yourself, watch this video. It presents the second repair method in sufficient detail and clearly:
- How to change injectors on a Priora
- How to change the fuel filter on a Priora
- How to change the cabin filter of Lada-Vesta
- How to change spark plugs on a Priora
VAZ cars: repair, maintenance, tuning
Depending on the manufacturer and quality of the CV joint, its service life ranges from 30 to 60 thousand kilometers. Replacement of the external grenade is usually done more often, especially on the right side. It is more susceptible to stress from bad roads. How to replace the outer CV joint in Grante and which one is better to buy, we will figure it out now.
CV joint repair
As mentioned above, the hinge cannot be repaired. Conventionally, one of the repair measures includes washing the “grenade” after driving with a damaged boot.
Washing is carried out at the same time when the damaged boot on the pomegranate is replaced. The hinge is carefully knocked off the shaft, inspected for damage and thoroughly washed to remove any dirt and grease in gasoline or kerosene.
Choosing an outer CV joint for the Lada Granta
There are enough hinges from different manufacturers on sale, it’s bad that sellers treat them like all Zhiguli spare parts - everything is the same. In practice, for the first generation Grants there are two types of external (and internal) CV joints - for cars with manual transmission and for Grants with automatic transmission. In a word, grenade 2215012-00 (21 teeth) .
For Lada Granta with a manual transmission there is a CV joint with catalog number 2215012-86 . In order not to be confused with numbers, let’s look at the differences between CV joints for Grants with automatic transmission and manual transmission:
- The spline connection in the outer hinge has changed in size, the number of teeth is 21 . A CV joint with 22 splines is suitable for a manual transmission.
- The geometric dimensions of the body have also been changed.
- The length of the outer spline part for manual transmission is 76.5 mm , for automatic transmission - 77 mm .
- height (without spline) 55 mm for automatic and 52.2 mm for manual .
- The number of teeth for the ABS ring does not change and remains 43.
Therefore, before purchasing an outer CV joint, we first look at the number of splines on the inside of the joint body. Among the manufacturers on the market, AvtoVAZ, Belmag and Triall dominate. The price of an outer CV joint on a Lada Granta is around $20.
It is important that the kit includes a locking ring, molybdenum disulfide-based lubricant and a neoprene boot. It should not be too hard, but a boot that is too thin will not last long.
What sizes do you need to know?
For some reason, there is an opinion among car owners that you need to select a boot based on the number of splines. Apparently, this misconception arose because the splines are unified elements. Their production must take place in accordance with GOST, which means that a certain number of splines must correspond to a certain shaft diameter. This is absolutely true, however, with the same mounting diameter, anthers from different manufacturers may differ in a number of parameters. Much more preferable and accurate is to select the CV joint boot according to the geometric dimensions of the grenade (this is the name of the hinge itself).
Therefore, before making any measurements, it is necessary to “get” to the grenade. If your outer boot is torn, then you are in luck, and at least you don’t have to remove the drive from the car (which would lead to the need to pour oil into the gearbox, that is, to unnecessary costs). If there are problems with the internal boot, there are absolutely no options, just remove the drive and measure.
In order to correctly select the CV joint boot, you need to measure three sizes:
- Full height (or length). Perhaps you will find what you are looking for already using this parameter. If not, take measurement number two;
- Measure the diameter of the mounting groove on the shaft;
- The last measurement is the outer diameter, which corresponds to the diameter of the groove on the grenade.
Based on these dimensions, selecting a CV joint boot should not cause you any difficulties.
We change the outer CV joint of the Lada Granta with our own hands
There shouldn’t be any difficulties when replacing the CV joint yourself if you use simple instructions and have a basic set of tools. It’s also a good idea to have a puller on hand for side dishes of equal angular velocities. It doesn't seem to have an article number, but that's what it looks like.
Alternatively, you can use a simple impact puller with a welded hub nut, but any extra shock loads on the transmission will not be very useful for it.
- While the car is on the ground, unscrew the hub nut using a 30mm socket with a long wrench.
- Raise the car, remove the wheel and unscrew the hub nut.
- We unscrew the caliper without disassembling it.
- Unscrew the ball joint bolts.
- We remove the hub from the CV joint and at the same time from the ball joint, and move it to the side.
- We loosen the clamps and move the boot further along the drive, closer to the gearbox.
- Using a puller or hammer, we ask the CV joint to leave its location.
- Remove the retaining ring.
- We fill the internal cavity of the CV joint with the lubricant that comes with the kit.
- We put the remaining grease into a new boot and put it in place.
- Screw the nut onto the new CV joint and install it in place.
- With light blows of a hammer on the nut, we move the hinge all the way until the stopper snaps into place.
- We install the boot, check that it is without distortions and tighten the clamps.
We put everything back together in reverse order, core the hub nut and do a test drive.
Assembly procedure step by step
We carry out the entire list of assembly operations in a Lada Kalina car in strictly reverse order. During the procedure, it is necessary to take into account some nuances.
- First, we put the boot on the axle shaft. If this is difficult, then its surface can be lubricated with the grease supplied with the new hinge kit.
- Now we fill the same grease into the CV joint bearing, and the remainder into the internal cavity of the boot.
- We install the hinge on the axle shaft. We also use a hammer, applying a shock load to the body. The retaining ring should be replaced.
- When the “grenade” “sits” in its place, we push the boot, after squeezing it with our hands to remove excess air. We install clamps.
- We do the same when replacing the internal hinge.
- Now we install the axle shaft into the transmission housing until the shaft engages with the side gear. Don’t forget to fill the unit with oil afterwards.
- We insert the outer joint into the steering knuckle until it fully engages with the splined race of the hub. Screw on the central nut (do not tighten it).
- We return the ball joint to its place.
- We hang the wheel and do not tighten its fasteners too much.
- We lower the car (we do not unload the jack completely). Tighten all fasteners to the required torques. We remove the jack and stops. Replacement of the outer CV joint is complete.
The owner of LADA Kalina will spend no more than 3 hours of his time to complete the full list of replacement actions. We check the correct installation of the hinges. To do this, we start driving the car with the wheels turned out as far as possible. We observe the absence of crunching and other characteristic sounds from the axle shaft. Now you know how to change a faulty CV joint.