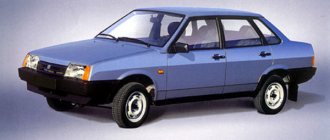
Life hack: brake discs of a Priora car - malfunctions, removal and installation
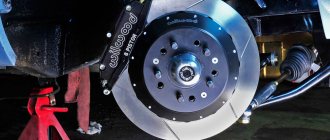
The brake discs on a Priora car, like any other, are an important part of the front suspension, which is the first to begin braking. There are two options for wheels on Priora - regular factory ones and ventilated ones.
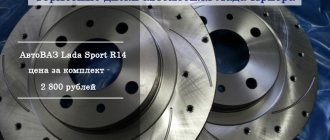
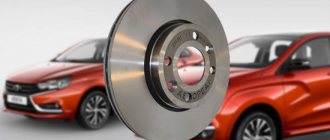
The design of the Lada Priora brake system is such that “drums” are installed at the rear, and calipers at the front. This has been going on since 2101. However, it is possible to modify the rear brakes - that is, install brake discs with calipers and backwards, instead of drums. Spare parts for the brake system on Priora must be purchased and installed by the owner on time - the safety of travel depends on their “freshness”. The ventilated front disc has an advantage over a regular one; it is lighter and has plenty of holes, which means it cools down faster! The Priora, of course, brakes well in stock, but until you have driven a Ford or Kia, disc brakes are better there. The price of ventilated brake discs for a Lada Priora car starts from 4,000 thousand rubles and above, standard ones are cheaper than 1,100. In three years, my factory production has reached 2 millimeters.
Remember that the price of these spare parts is incomparable to the damage that you may incur if the braking time increases due to wear and tear of the components. Replacement must be done on time. On the Priora, front brake discs are installed in all trim levels, but the rear ones are a subject of tuning for daring car owners.
The brake disc cannot be removed from the Priora hub
- To the beginning of the forum
- Forum Rules
- Old design
- FAQ
- Search
- Users
Well, everything is according to the usual scheme.
Spin it all out, Dil
I would carefully hit it with a sledgehammer a couple of times.
But by analogy with the drum, don’t you get it? those. with these fixing screws if you try to press the disc away from the hub? I understand they are flimsy, but it helps when removing the drum.
I also had discs stuck tightly to the hub, I tried all of the above. After three hours of working with a sledgehammer (first an hour through a piece of wood, then two without it), we managed to change the disks.
I wouldn’t tear the gearbox and CV joints in such barbaric ways as they advise. I had a similar epic, I wrapped a rag around the hub, put cotton wool in the bolt holes and periodically poured kerosene on the whole thing, on the third day the discs were torn off.
I do this all the time. I hang the wheel, take it off, unscrew the studs from the disk, then get into the car, start it, put it in fourth gear and accelerate the wheel to 100-120 mph. and I brake sharply without pressing the clutch, I press it only when I feel that the disc has not moved. And so several times until I tear off the disk, then I carefully knock it down with a hammer through a piece of wood. They do exactly the same thing in the service. This way there is no load on the suspension than hammering on the disc with a sledgehammer.
Source
Instructions for replacing brake discs on a Priora
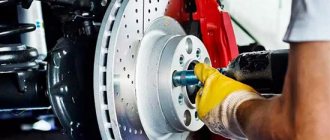
So, the first step is to jack up the front of the car, and then remove the front wheel brake caliper.
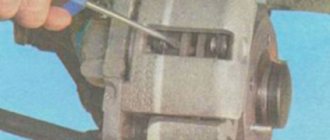
After that, using a 7 mm socket and a wrench, unscrew the guide pins of the brake disc, as is clearly shown in the photo below.
To minimize the risk of breaking the studs, tap them with a hammer first without using excessive force. And only then unscrew it. Then you can tap the area where it contacts the hub with a hammer.
Now you can try to remove it with your hands, or with the help of special devices. If you can’t remove it by hand, and you don’t have a puller at hand, you can carefully knock it off from the back with a hammer, of course, using a special wooden spacer.
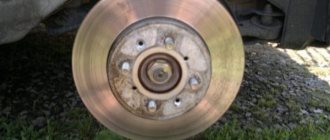
We finally remove the Priora brake disc from the front wheel hub, which is clearly demonstrated in the photo below.
Before installing new discs on the Priora, it is necessary to clean the surface of the hub with a metal brush if there is rust or other formations on it. It is also worth applying copper grease to the contact area between the hub and the inside of the disk.
This procedure will reduce the occurrence of vibration and extraneous sound when braking, as well as reduce the temperature effects on the elements of the braking system. Replacement is carried out on both sides simultaneously. To ensure that the surface of the disc remains smooth and free of defects, it is necessary to use only high-quality pads, and it is advisable to replace them at the same time!
The price of a new brake disc on a Priora is from 900 rubles per piece. Of course, there are more expensive options, even up to 1500 per unit, but factory components for around 1000 rubles per unit are also quite good.
The need to replace disks
The regulated period established by manufacturers for replacing a disc is not always available to car owners. In most cases, this parameter is controlled based on operating hours for each vehicle. Replacement is carried out when negative indirect signs are identified. The main problematic symptoms are:
- strong squeaking sound when pressing the brake pedal;
- prolonged pedal stroke while pressing, the appearance of dips;
- a noticeable decrease in brake fluid, which can be seen from the level in the expansion tank;
- When pressing the brake pedal, the driver feels the car pull to the side or a beating occurs.
If such signs appear, a diagnostic examination must be performed. It is advisable to carry out monitoring on each wheel in order to have a complete picture of the condition of the braking system. In many cases, replacing the pads will be enough. However, if obvious traces of wear are visible on the metal surface or the thickness is below the limit parameter, then the brake disc will need to be removed to replace it or partially restore it.
What front brake discs can be installed on the Lada Priora?
It should be noted that the front brake discs constantly heat up and are subject to greater loads than the rear ones. That is why their replacement is necessary more often than the rear ones. But it is important to familiarize yourself with all the dimensions in advance. Before you make a purchase, you need to decide on your budget. Original disks are usually slightly more expensive than analogues.
ATTENTION! A completely simple way to reduce fuel consumption has been found! Don't believe me? An auto mechanic with 15 years of experience also didn’t believe it until he tried it. And now he saves 35,000 rubles a year on gasoline! Read more"
At the same time, it is important to remember that the latter are sometimes in no way inferior in quality to the originals. Some famous brands have the status of official suppliers. Therefore, the quality of the products they supply is satisfactory. The price fluctuates depending on various factors. It is necessary to take into account all the nuances. If the car has ABS, discs are required, which require connecting the corresponding sensors.
The price also varies depending on the brand. Such as TRW and Ferodo will cost slightly more than noname products. The cost of ventilated and conventional ones varies. The latter are suitable for drivers practicing an aggressive driving style. They cool down much faster. Moreover, the pedal will be more responsive. But the cost of such disks is much higher.
Original
Many drivers choose original parts. Moreover, there is a certain logic in this. Since such components are 100% likely to fit. It is only important to study all offers in advance. Counterfeits of original components and parts are often found on sale. There is a hologram on AvtoVAZ boxes; the box itself is made of high-quality cardboard.
| Name | vendor code | Cost, rubles |
| LADA | 21120-3501070-02 | From 1 thousand rubles |
Substitutes
Purchasing analogues does not cause problems. It is only necessary not to confuse the article. The minimum cost of such components will be 800 rubles. Having installed such items, it is important for the owner to constantly monitor their condition. This will avoid many difficulties. It is better to replace the disks in advance.
| Name | vendor code | Cost, rubles |
| BREMBO Brake disc VAZ 2110-2112 R14 front ventilated | 09.8903.14 | From 1.2 thousand rubles |
| BOSCH Brake disc VAZ 2110-2112 R14 front ventilated | 0 986 479 346 | From 1.4 thousand rubles |
| MILES Brake disc VAZ 2110-2112 R14 front ventilated | K000075 | From 1 thousand rubles |
Change the disk or solve the problem differently
After the “diagnosis” has been made, the next dilemma should be resolved - try to restore the product or remove the old one and install a new one? Do not forget that grinding the product is possible only if a certain residual thickness of the working edge is preserved (at least 22 mm). The possibility of sharpening is especially important for ventilated products. It should be noted that most craftsmen still recommend removing the old structure and completely replacing it with a new one, rather than trying to restore the damaged one.
Of course, if it is not financially possible to remove the old one and replace the disk with a new one, provided that the old one still has some thickness left, you can try to restore it. Small scratches/chips and other minor flaws can be easily dealt with by turning the product using special equipment.
Theoretically, you can even make a groove with a file, but this method is not reliable and is not recommended for use. In general, manipulation involves removing a thin layer of coating from each side of the product, thereby creating a perfectly smooth surface. But do not forget that the more layers that need to be removed during the grinding process, the more the remaining service life of the restored part will be reduced. Usually 2 surface layers are removed, but in rare cases it may be necessary to remove 3.
It is not recommended to buy and use used or reconditioned brake discs, since in this case it is not possible to find out where and how they were used. However, using the above methods for checking the level of depreciation of this part, you can calculate its wear and understand whether its further operation is permissible or not.
We recommend
“The handbrake light is on: how to solve the problem” Read more
Before carrying out manipulations to restore the part, you should find and eliminate the cause that led to deformation/damage to the mechanism. If this is not done, then there is no point in “saving” the part - it can again be damaged in the same way. The most common cause of uneven wear on this product is incorrectly installed or simply poor-quality brake pads.
What rear brake discs can be installed on the Lada Priora?
Initially, in the stock version of the car with r14 wheels, there is a brake drum on the rear axle. But there are many dedicated rear wheel disc brake kits on the market. You can purchase them at any time. The installation process is quite complicated, but even an ordinary driver can do it. You need to stock up on special tools.
Original
Despite the lack of a standard, stock model with rear disc brakes, purchasing the originals will not be difficult. Since parts from other cars produced at the AvtoVAZ plant are suitable. it is possible to use the following:
| Name | vendor code | Cost, rubles |
| Lucas with ABS is the official supplier of AvtoVAZ | DF2586 | From 2 thousand rubles per pair |
Substitutes
There is a wide range of analogues on the market. Purchasing a suitable model is not difficult. It is only important to familiarize yourself with all the nuances of the choice in advance. Since the stock version of the car does not have such brakes. Particular attention should be paid to the dimensional parameters. If they do not match, it will simply be impossible to install them in place.
| Name | vendor code | Cost, rubles |
| N.K. | 202264 | From 2.7 thousand rubles per pair |
| Ferodo | DDF1096 | From 3.1 thousand rubles per pair |
| REMSA | 6144.10 | From 2.3 thousand rubles per pair |
Adjusting the handbrake of Lada Priora with your own hands
We turn the adjusting nut clockwise, thereby tightening the handbrake cables. The full stroke of the handbrake lever should be from 2 to 4 teeth (clicks). When the handbrake is adjusted correctly, with the handbrake lever lowered, the wheels should rotate freely. After adjustment, use the locknut to fix the adjusting nut.
This completes the replacement of the rear pads on the Priora and the adjustment of the handbrake. If you have any questions, ask them in the comments.
How to replace front and rear brake discs yourself
Replacing and installing new brake discs is a relatively simple process. But it has some subtleties and features. It is important to study all the nuances. And stock up on all the necessary tools.
Replacing front brake discs
Removing and reinstalling the front brake discs is not difficult. This algorithm includes the main stages:
- the car is raised on a jack or lift, the wheel must be removed;
- then the two caliper bolts are unscrewed so that it can be removed;
- two bolts are unscrewed using a Phillips screwdriver, after which the disk is removed from its seat;
- the new disk is installed and fixed;
- assembly is performed in reverse order.
Installing rear disc brakes
Selecting and installing rear disc brakes is not difficult. If you have no experience, you need to be well prepared. For example, watch a video. The installation process is as follows:
- the old brake mechanism is dismantled;
- a special shield is installed;
- a bearing and the rest of the mechanism are mounted on it and bolted;
- The brake disc is installed in its seat.
Installing disc brakes on the rear wheels can significantly improve handling and reduce braking distance by 1.5-2 times.
It is necessary to carefully consider the modification of the brake mechanisms on the rear axle. Making any mistakes is simply not acceptable. Otherwise, serious problems may arise on the road. It is advisable to purchase brake discs and pads from the same manufacturer. This will avoid installation problems and other difficulties. The composition of the friction linings is no less important. It is advisable to avoid purchasing pads that contain ceramics. Such pads can lead to premature wear of the brake disc.
There were bolts with non-standard star-shaped heads. I had to go to the broom and buy a spanner for it. This type of bolt has a different dimension! I bought it on 13. Be careful, look at your Priora for such a bolt or an old-style caliper.
I found the photo on the Internet, but I didn’t take a photo of mine.
Next we removed the brake disc, fortunately everything came off easily, we didn’t have to worry about anything)
We put on a new one, screwed the caliper back on and put new pads in there
Old pads compared to new ones -
We secured everything back, and did a similar procedure with the other front wheel)
Next came the matter of the drums -
They removed the wheel, removed the drum, removed all the springs and pads, only the brake cylinder remained -
Then we put the new springs back on, inserted all the plates and new pads
The next step was to attach the drum, problems arose with this, it did not want to fit on the pads. We pressed in the brake cylinder and loosened the handbrake as much as possible - it still won’t work.
There were two ways to solve the problem - either saw down the brake pads or the spacer plate. They did this and that, but with difficulty the drum fell into place.
Then they began to do a similar procedure on the other wheel and it became clear that one side of the brake cylinder simply did not work. And the other one is leaking. We decided to immediately change the brake cylinder on the spot, but were unable to unscrew the bolt that disconnects the brake fluid pipe. Tearing off the bolt was also not an option, so we postponed replacing the right brake cylinder until later and put an old brake pad on the non-functioning side.
Preparing to replace the AP
Having determined that the TD is faulty, you need to prepare to change them yourself. To do this, you first need to buy a new spare part from a car store.
When choosing brake discs for his car, the car owner must take into account his driving style. Does he like to accelerate sharply and actively maneuver? How often does he use the brakes? He drives a lot around the city or mostly intercity trips on the highway.
The spare part from which manufacturer you need to buy depends on these factors. Discs can be standard or sports.
- Standard TD - made of cast iron, the casting is processed on a milling machine. They are ventilated and non-ventilated. Without ventilation, it is a single disc that is pressed on both sides by brake pads. A disk with ventilation is easy to distinguish - it is two disks connected by bulkheads. Ventilation occurs during movement due to air entering between these pancakes. Some of the respected manufacturers of these products are Bosh, Zimmerman, ATE.
- Sports TD - made of durable and ultra-strong gray cast iron, as well as austenitic stainless steel. These are considered to be more durable products that can last much longer and with more aggressive driving. Such discs are produced by EBC, DBA, Brembo.
The driver must remember that when the front brake discs are replaced, they must be changed in pairs, even if one of them is suitable for further use in all respects. The same rule applies to rear brakes.
This rule is explained by the fact that unequal weight of the same type of spare part on the wheels of the same axle will lead to loss of directional stability.
Thus, for repairs, two or four TDs are purchased, but in no case one or three.
In the garage or at a special technical site, the tools and materials needed for repairs are prepared in advance.
- Jack and wheel wrench.
- Keys to "13" and "17".
- Ratchet wrench.
- Large flathead screwdriver.
- Thin flathead screwdriver.
- Clamp.
- A piece of wire to fix the stupor.
- Hammer.
- WD fluid to unscrew stuck fasteners.
- Brake fluid, in case of bleeding the brakes.
- Rags.
Place the machine in a hole or on a prepared level area. Decide in advance whether the rear brake discs need to be replaced or only the front ones need to be replaced. This determines how to jack up the car. Raise the entire side or just the front wheels.
After raising the car with a jack, remove the wheel using a balloon. Clean the released brake mechanism and the surface of the hub from dirt and oil using a brush and rag.
Replacing the front brake discs of Priora
You will need: remove the caliper and prepare a ring wrench “7”.
Procedure:
- Unscrew the two guide pins using a 7mm wrench.
- Remove the Priora brake disc with your own hands. If this cannot be done, then you should knock it down with a hammer.
Installation of brake discs is carried out in the reverse order.
The mating surfaces of the hub and disk should be cleaned of rust and scale. If a small particle of dirt gets between them, then it will cause the disc to run out and vibrate when braking. In order for the Priora brakes to work properly, when replacing brake discs, be sure to replace the brake pads with a new set.
Which brake discs are best for Priora?
Sooner or later, any part of the car wears out during its operation, first ceasing to efficiently perform its basic technical functions, and then completely requiring a complete replacement. In many cases, this process is also accelerated by our domestic roads, most of which, unfortunately, are in rather poor condition.
One of the most famous (in the negative sense of the word) parts of the Priora car in our country, which require frequent replacement, are its brake discs. Many auto mechanics cite dirt and dust on the roads as the main factor contributing to the frequent occurrence of this type of breakdown.
The fact is that dust, getting into the space around the parts and accumulating between the pads and the disc, interferes with the normal operation of the entire braking system of the car, which significantly accelerates the wear of its components. Therefore, replacing Priora brake discs is a fairly popular service in all car service centers in the country.
Do you know how to change the brake discs of your “iron horse” yourself, without using the services of auto mechanics and thus saving money? This is done according to fairly simple instructions, which you can read right now below.
Instructions for quickly and easily replacing Priora brake discs:
- We get rid of the support. Immediately before replacing the main elements of the car’s brake system, it is necessary to remove the caliper. The tools required for this action are a 17-size wrench.
Remove the two front wheels of the car and unscrew the shoe guide bolts that secure them using the above tool. Carefully remove the pads and their guide along with the bracket from the discs.
Carry out the process so that the brake hose is not stretched or twisted, otherwise it may be damaged, and you risk losing brake fluid in this situation.
Tie the caliper securely to the suspension spring. You need to put it back in place at the end of the job exactly the opposite.
We replace disks. To complete our main task, we need the “7” key. Using this tool, unscrew the two guide pins, allowing you to easily remove both brake rotors from your car. Installing new disks in place follows the same procedure, only in reverse order.
An important point: if you want to install old drives for further use, then you should definitely make sure that they are suitable for this. In addition, you will have to try hard to clean them of scale, dirt and rust. Therefore, it is best, for your own safety, to purchase new car parts and install them.
Brake discs on the Lada Priora were installed only in size R14 and ventilated. For them, the minimum thickness is 17.8 mm. If, when measuring with a caliper or other device, it turns out that the thickness is less than acceptable, the disks must be replaced, on both sides.
To perform this repair you will need the following tools:
- head for 17 mm and 7 mm
- ratchet and crank
- hammer
- copper grease
- calipers
Instructions for replacing brake discs on a Priora
So, the first step is to jack up the front of the car, and then remove the front wheel brake caliper.
After that, using a 7 mm socket and a wrench, unscrew the guide pins of the brake disc, as is clearly shown in the photo below.
To minimize the risk of breaking the studs, tap them with a hammer first without using excessive force. And only then unscrew it. Then you can tap the area where it contacts the hub with a hammer.
Now you can try to remove it with your hands, or with the help of special devices. If you can’t remove it by hand, and you don’t have a puller at hand, you can carefully knock it off from the back with a hammer, of course, using a special wooden spacer.
- We finally remove the Priora brake disc from the front wheel hub, which is clearly demonstrated in the photo below.
Before installing new discs on the Priora, it is necessary to clean the surface of the hub with a metal brush if there is rust or other formations on it. It is also worth applying copper grease to the contact area between the hub and the inside of the disk.
This procedure will reduce the occurrence of vibration and extraneous sound when braking, as well as reduce the temperature effects on the elements of the braking system. Replacement is carried out on both sides simultaneously. To ensure that the surface of the disc remains smooth and free of defects, it is necessary to use only high-quality pads, and it is advisable to replace them at the same time!
The price of a new brake disc on a Priora is from 900 rubles per piece. Of course, there are more expensive options, even up to 1500 per unit, but factory components for around 1000 rubles per unit are also quite good.
Preparatory operations
You can dismantle the old disk and install a new one yourself, even in a garage. You will first need to buy wheels suitable for your specific car model. This must be done carefully, since sometimes even the year of manufacture of the same car affects the parts being installed.
It is worth choosing a specific manufacturer of these spare parts based on your driving style. The required characteristics for a driver who uses an active style with frequent use of the brake pedal or for a driver who spends most of his time on a country road will be different.
It is customary to divide TDs into classic (standard) and sports (reinforced):
- The classic design uses malleable cast iron, machined to the desired dimensions. Non-ventilated and ventilated specimens are available. In the first case, the basis is a single disc, next to which a caliper with brake pads is installed. In the second case, a dual system of disks separated by ribs is used. Due to the entry of air between them, the unit is ventilated. Popular brands that manufacture these parts are ATE, Zimmerman, Bosh.
- In the production of reinforced discs, more durable grades of cast iron or high-alloy stainless steel are used. These elements provide longer service life under increased loads while driving. Well-known brands in this area offer more expensive products. Most often in auto stores you can find brands such as Brembo, DBA, EBC.
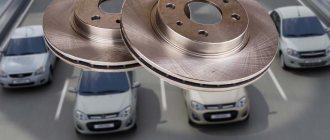
Brake discs must be replaced in pairs on both sides of the axle.
This will ensure proper operation of the entire braking system. Even if one of the sides is in satisfactory condition after visual inspection, and the other is significantly worn, it is recommended to replace both disks. If dismantling work is carried out on one side, then the discrepancy will lead to loss of directional stability. The rule applies to both the front and rear axles.
To carry out installation and dismantling work you will need the following tools:
- car jack (mechanical, hydraulic, pneumatic);
- clamp;
- a hammer with a wooden handle (a rubber or wooden mallet is allowed), in some cases a reverse hammer is used;
- a set of wrenches and screwdrivers;
- rust treatment fluids (WD-40 or analogues);
- brake fluid, if bleeding of the brakes is required;
- clean rags and personal protective equipment (work gloves, safety glasses, etc.);
- metal brush or power tool with a special attachment;
- torque wrench.
If the operation is carried out on all wheels, then it is customary to change the disks one by one on each axle.
Replacing brake discs
Brake discs are one of the main components of the braking mechanism. It is the discs that help to efficiently and quickly stop a car in emergency situations and perhaps even save a human life.
Some cars have high-quality ceramic wheels. This applies to expensive and fast cars in which it is necessary to brake quickly and effectively. As for middle-class civilian cars, the disks in such cars are made of cast iron.
Types of disks
On Lada cars, wheels come in several types, namely 13th and 14th radius. Recently, AvtoVAZ has been installing 14th wheels on its cars; they have a more modern structure. Ventilation appeared, which reduced the temperature load of the brake mechanism.
This is what a ventilated brake disc looks like
In earlier versions of Lada cars, regular 13-radius wheels were installed; they do not have holes for ventilation. The lack of ventilation holes resulted in overheating and rapid wear of the pads and discs.
This is what a brake disc looks like without ventilation
On average, discs can travel 100 thousand km. But the driving style and operation of each car is different, so wear may occur earlier.
When replacing front brake pads, the disc should be inspected. If its thickness is less than 17.8 mm, then it must be replaced.
Brake disc thickness measurement
Also, if, upon inspection of the disk, deep grooves, chips and cracks are found on it, it must also be replaced. Driving on such wheels is not safe.
Brake disc cracks
An indicator of faulty and overheated brakes is the steering wheel beating when braking. This happens because the disc becomes deformed after overheating and vibration occurs during braking when the pads compress it.
Which disks to choose
As a replacement for the standard ones, you can install brake discs with perforations and additional ventilation.
- Standard Lada wheels cost around 2 thousand rubles.
- Discs with notches cost around 2.5 thousand rubles.
- Discs with notches and additional ventilation cost around 3 thousand rubles.
Changing discs is quite easy; any driver who has ever held a wrench or hammer can handle it.
Required tool:
- Ratchet
- Head "17" or Torx E10
- Head "7" or key "10"
- Grease “WD – 40”
- Wood block
- Hammer
- Sandpaper
- Powerful screwdriver
- A piece of wire or rope
Snapshot
Through the caliper window we estimate the thickness of the brake pads.
Through the caliper window we estimate the thickness of the brake pads.
Through the caliper window we estimate the thickness of the brake pads.
We replace the brake pads of both front wheels if the thickness of the friction lining has reached the maximum permissible value - 1.5 mm. Rotating the brake disc, inspect its working surfaces on both sides. There should be no cracks or deep grooves on the working surfaces of the disc.
How to remove the Priora caliper
You will need: remove the front wheels and prepare a 17mm spanner. Procedure:
- Unscrew the two bolts securing the shoe guide to the steering knuckle using a 17mm wrench.
- Remove the pad guide from the disc along with the bracket and pads.
- Make sure that the brake hose is not stretched; to do this, tie the caliper to the suspension spring.
If you have to unscrew the working cylinder from the tip of the brake hose, then you should close the hole in the hose in any way so that the brake fluid does not leak out.
Installing the Priora caliper is done in the reverse order. Check that the brake hose is not kinked. After installation, do not forget to check the brake fluid level in the reservoir and remove air from the brake system.
Adjusting the brakes
After replacing parts, it is worth adjusting the handbrake using the adjusting screw, and also bleeding the brakes.
Additionally, inspect the integrity of the mechanism parts, oil seals and seals. If necessary, replace. Before driving on public roads, check the functionality of the system and remember that the car will slow down worse at first, because the pads need to get used to the drum.
Removal and installation process
- So, the first thing you need to do is tear off the front wheel mounting bolts, then jack up the car and finally unscrew them.
- Then remove the wheel completely.
- Then unscrew the two guide pins using a 7-mm socket and a wrench
- Knock off the brake disc using a hammer or a special puller from the hub
- During installation, it is advisable to apply copper grease to the contact points between the disk and the hub, thereby reducing future vibration and sticking of parts
You can see more detailed information on replacing brake discs on a Lada Priora in the video clip below.
Please note that in the video the caliper is dangling in a suspended state. Fortunately, it needs to be fixed so as not to damage the brake hose. In my case, all the parts will be disassembled, so the hose is not particularly valuable.
| Ventilated brake discs of the Lada Priora change as they wear out, when the thickness of one of the discs becomes less than the minimum allowable 17.8 mm. Do you know how to replace brake discs with new ones? |
Final operations
The assembled assembly must be checked for acceptable runout. To do this, a micrometer is mounted on the stationary part, and the disk is rotated. Each car model has an acceptable runout value. The indicator can usually be found in the car manual.
For high-quality brake discs, the runout should not be more than 0.05 mm.
Having installed the wheel in place, we lower the raised car with a jack. We press the brake several times from inside the car. At this time, the pads are in contact with the disc. If necessary, the brakes are bled or the parking brake is adjusted.
Source ktonaavto.ru
When the owner actively uses the car, especially in urban conditions, problems with the brakes may occur. There are situations when, in addition to changing the pads, you need to replace the brake discs.
Instructions for quickly and easily replacing Priora brake discs:
- We get rid of the support. Immediately before replacing the main elements of the car’s brake system, it is necessary to remove the caliper. The tools required for this action are a 17-size wrench.
Remove the two front wheels of the car and unscrew the shoe guide bolts that secure them using the above tool. Carefully remove the pads and their guide along with the bracket from the discs. Carry out the process so that the brake hose is not stretched or twisted, otherwise it may be damaged, and you risk losing brake fluid in this situation.
Tie the caliper securely to the suspension spring. You need to put it back in place at the end of the job exactly the opposite.
We replace disks. To complete our main task, we need the “7” key. Using this tool, unscrew the two guide pins, allowing you to easily remove both brake rotors from your car. Installing new disks in place follows the same procedure, only in reverse order.
An important point: if you want to install old drives for further use, then you should definitely make sure that they are suitable for this. In addition, you will have to try hard to clean them of scale, dirt and rust. Therefore, it is best, for your own safety, to purchase new car parts and install them.
Brake discs on the Lada Priora were installed only in size R14 and ventilated. For them, the minimum thickness is 17.8 mm. If, when measuring with a caliper or other device, it turns out that the thickness is less than acceptable, the disks must be replaced, on both sides.
To perform this repair you will need the following tools:
- head for 17 mm and 7 mm
- ratchet and crank
- hammer
- copper grease
- calipers
Main faults and signs of wear
You need to listen carefully to your suspension - sometimes it is the sounds that are the first signs of wear, and only after them is followed by “sluggishness” of braking and passing obstacles. Any extra sound is a reason to think carefully and start diagnosing. Don’t put off the problem - as soon as you have free time, try to inspect the chassis of your Priora.
Signs of wear on the VAZ-2170 brake discs may appear as follows:
- When braking hard (almost pressing the pedal to the floor), you can hear a sharp grinding or squeaking sound. This is not always normal behavior, but it can occur if the pads are installed incorrectly or simply do not fit the Priora. A grinding noise may occur if dirt or sand appears under the pad - upon contact, it will wear down the surface of the disc.
- The brake pedal feels soft, as if falling down, and feels bad.
- The car's braking distance has increased. It is measured, of course, during everyday travel, but it is advisable to compare its duration under equal weather conditions.
- Squealing pads. This sound clearly indicates that they have been erased - they, like a musical record, will produce a similar sound.
- When braking, you feel a bump in the steering wheel. If there were no bumps, it means that the pads “stumbled” in that sector of the discs, which was worn out and caused the pads to “sag” a little.
- Car skidding to the side when braking at speed. This is direct evidence of uneven wear. If it skids to the right, check the left brakes, and if it goes to the left, then check the right brakes.
- One side simply doesn't stop the wheel and it continues to roll.
- The brake pedal does not rise after being pressed. The pads are simply stuck to the wheel - the brakes will not work.
- One of the wheels is blocked. This is a serious enough problem that it is impossible to continue moving forward. A fairly wide crack can be found on the disk.
If you find one of these signs and then disassemble the front part of the chassis, you need to inspect the brake system. One part may interfere with the movement of another, and dirt may become clogged (after an off-road trip). Any malfunction should be corrected in a timely manner. The nature of these damages can indicate several facts:
- If the metal turns blue, it means it has oxidized;
- The surface should not be strewn with cracks, bumps, or pits. Riding with such brakes is dangerous for your life - the brakes can jam;
- Spin the rim after removing the wheel. If it moves in a figure eight, it means its fastening has become deformed.
Instructions for replacing brake discs on a Priora
So, the first step is to jack up the front of the car, and then remove the front wheel brake caliper.
After that, using a 7 mm socket and a wrench, unscrew the guide pins of the brake disc, as is clearly shown in the photo below.
To minimize the risk of breaking the studs, tap them with a hammer first without using excessive force. And only then unscrew it. Then you can tap the area where it contacts the hub with a hammer.
Now you can try to remove it with your hands, or with the help of special devices. If you can’t remove it by hand, and you don’t have a puller at hand, you can carefully knock it off from the back with a hammer, of course, using a special wooden spacer.
We finally remove the Priora brake disc from the front wheel hub, which is clearly demonstrated in the photo below.
Before installing new discs on the Priora, it is necessary to clean the surface of the hub with a metal brush if there is rust or other formations on it. It is also worth applying copper grease to the contact area between the hub and the inside of the disk.
This procedure will reduce the occurrence of vibration and extraneous sound when braking, as well as reduce the temperature effects on the elements of the braking system. Replacement is carried out on both sides simultaneously. To ensure that the surface of the disc remains smooth and free of defects, it is necessary to use only high-quality pads, and it is advisable to replace them at the same time!
The price of a new brake disc on a Priora is from 900 rubles per piece. Of course, there are more expensive options, even up to 1500 per unit, but factory components for around 1000 rubles per unit are also quite good.
Replacement process
The machine for repair work is installed on a straight, level surface. Use a jack to lift the required side and remove the wheel. In the opened space we free the disk for dismantling. Press the piston of the working cylinder to remove the caliper. First loosen the mounting bolts on it.
There is no need to disconnect the hydraulic pipes of the brake system; just move the unit to the side and pull it with a wire to any beam or rod. We unclench the brake pads and block them with a clamp.
In some assembly designs, dismantling is hindered by the caliper frame. It is enough to unscrew its fasteners and get rid of the obstacle. In most cases, the mounting bolt sticks and prevents removal from the hub. To weaken it, use WD-40 or brake fluid. Some machines have a pair of these bolts.
Having freed yourself from problematic hardware, you need to remove the stuck brake disc. Here you can also pre-use special fluids for corrosive areas. Then you need to apply one of the proven methods:
- Tapping with a wooden tip on the back side. This should be done with short sharp blows so as not to create problems.
- Using a wooden or rubber mallet, tap the reverse plane. This method is more gentle on the parts than using a heavier metal hammer.
- Apply a reverse hammer . To do this, you will need to buy or borrow this relatively rare but effective instrument.
- You can use a puller. However, you should feel the effort so as not to break the tool or disk, because in some cases stronger pullers can damage a heavily stuck part. Then you can forget about restoring the latter.
After getting rid of the old disk, we clean the surface from contaminants in the form of scale or dust. To do this, we use a metal brush or an attachment for power tools. Later we clean the surface with special liquids. If cleaning is not carried out, the new part may sit on the surface with large runout, which will lead to undesirable consequences.
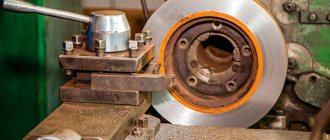
Using a reverse hammer
We install the restored or new brake disc in the free space. The bolts for fastening it will need to be tightened with a force of 20 Nm , which a torque wrench will help with. The caliper will require increased force, which should be in the range of 100...120 Nm . Do not over-tighten the fasteners to avoid radial runout of the hub. The remaining elements of the unit are assembled in the reverse order of disassembly. Be sure to check the position of the hoses so that they are in their proper places.
Perforated
These elements have a more complex structure. The design combines two thin metal disks 5 millimeters thick. Between them there are so-called channels through which air flows. Thanks to such ventilation, the operating temperature of the disk is reduced by one and a half to two times. And as we know, when braking, a friction force arises, which is converted into thermal energy. Disks require high-quality heat dissipation.
If it is not there, the metal will overheat. As a result, we get literally crooked disks, and possibly cracked ones. The braking distance is also reduced. Compared to non-ventilated analogues, it is 15 percent lower. In addition, the service life of the brake pads increases, since the friction material no longer operates under critical temperature loads.
Some useful tips:
- Whenever you replace pads or brake discs on a Priora, take the time to inspect the entire brake system, check the protective rubber covers of the guide pin, and the movement of the caliper relative to the brake pad guide. If the movement is tight, it is necessary to apply special grease to the guide pins.
- Replace protective covers if cracks or damage are found on their surface. It is recommended to use special lubricant - UNIOL-1, but if you don’t have one at hand, you can replace it with high-temperature lubricant.
- After replacing the brake pads, it is not recommended to actively use new parts or check the effectiveness of the brakes. The fact is that grinding in new pads to brake discs is not a matter of minutes; it takes time for everything to get in properly; it is impossible to say more precisely, because it all depends on the intensity of braking, the quality of the pads and the frequency of operation of the car. At first, you need to take into account the fact that the brakes do not work effectively enough, so constantly brake with a “reserve”.
- To speed up the process of grinding brake pads to discs, select a flat section of the road, preferably with a minimum number of road users, and perform several cycles: acceleration - smooth braking. Be careful and do not lose your vigilance, because it is very easy for new brake pads to overheat or “burn” (when the top layer of the linings becomes “mirror-like” and braking efficiency is reduced by 10-15%).
Original or analogue?
This is what AvtoVAZ writes about the original LADA brake discs.
Original brake discs meet high LADA standards and guarantee quality, for this:
- Each batch of brake discs undergoes random inspection and checks of the metal structure using special equipment, excluding porosity and other casting defects
- The disc is made from high-quality cast iron, which guarantees no warping effect during sudden braking or overheating.
- Brake discs undergo high-precision processing to ensure the absence of runout and imbalance
- All original LADA spare parts undergo numerous tests confirming the reliability and quality of each part.