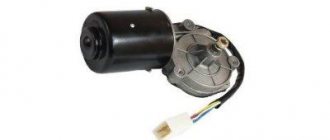
How to dub from a generator to a battery
What will it give?
How to correctly carry out such a procedure? What wire cross-section should it be? This is not worth doing. Because it won't do anything.
You just need to keep an eye on the standard wires, connections, and terminals.
And there are times when you need to turn off the “mass”. And either you forget to turn off the backup, or the car mechanic to whom you forget to tell this.
Which will be exclusively yours.
So it’s simply better to monitor the cleanliness of the contacts and terminals, and the integrity of the wires.
This article will be of interest not only to car audio enthusiasts, but also to ordinary amateur motorists. Many people are faced with this problem when, when they turn on the stove, headlights, air conditioning and other electrical consumers, the voltage in the network is loaded, the voltage decreases and there is a “drawdown”. The generator begins to wear out.
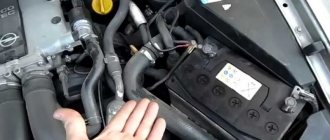
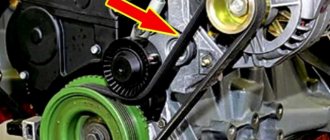
There is one very good way to help the generator - to power the backup wire from the generator to the battery. For some unknown reason, the original wires are thin, especially on domestic cars. When the load is high, these wires cannot supply a large amount of energy to the battery.
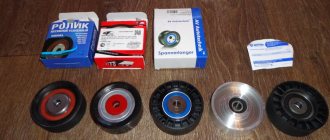
A wire with a cross-section of 25 squares is perfect.
KG markings (aka welding)
and PV3 (comes in different colors, usually yellow and blue)
Also, to the positive wire, as safety against short circuit (short circuit), you need to install an 80A fuse (with a cross section of 25 square meters)
If we duplicate the positive wire, then the negative wire requires similar duplication from the battery to the car body.
Sometimes such an installation increases the voltage by 0.7 volts
This will make the generator's work much easier.
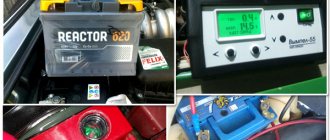
Turned on the heater, headlights, heated rear window:
It would be nice to protect the wires with cable corrugation.
Hi all;)
Today I’ll tell you about duplicating generator power wires and how effective it is. I’ll also tell you about installing a Chinese voltmeter.
I was tormented by severe drawdowns when pushing at full speed. The voltage on the monoblock dropped to 11 volts. This is certainly not good. I kept sinning on the security forces that go from the battery to the monoblock, but I wasted on thicker wires)).
Then the idea came to mind to duplicate the wires going from the gene to the battery, they were incredibly thin, especially the strange positive one, or rather there are several thin wires there.
Not long before this, my friend AnDRruXa changed the power cables in the car and at the same time duplicated the gene, the effect was clearly positive. He still had an old power Rapror 4Ga, which was used for dubbing in my car. The cable may not be the most fashionable, but for my purposes it’s just right! I think there’s no point in harping on how it’s done. The topic has been discussed enough, take it and do it. In a nutshell: -stretched the cable from the positive of the generator to the positive of the battery
-stretched the cable from the engine block to the negative of the battery -well, duplicating the mass from the negative of the battery to the body
The arrival was felt immediately! With the engine running, the voltage is 14.1 (for some reason it never rises again, maybe the voltage regulator). When playing music at maximum volume, which I turn up every day, it drops to 13.0-13.5 volts (Depending on the track, of course). Previously, when playing music, the voltage dropped to 11.5 V light! With full throttle on a sine wave of 50 Hz (without increasing impedance), the drawdown is up to 12.5 volts, at idle up to 11.9.
Features of installing a diode in a battery
Advice. This method is best suited for solving the problem of insufficient voltage in the on-board network. In order for the problem to be resolved as soon as possible, all actions should be performed sequentially.
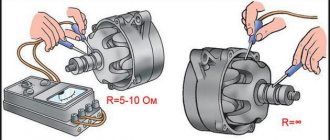
- First you need to remove the generator cover. This is extremely easy to do, so you don’t have to spend a lot of time on this operation;
This completes the first stage of work. It is necessary to check how accurately all procedures were performed. If any mistakes were made, they should be corrected immediately, otherwise any unpleasant consequences may occur.
When the verification is completed, you can move on to the second stage of work.
- Now you need to install a limiter for the female and male wires.
As a result, the voltage in a fully loaded network should be approximately 12.3 V. This will be quite enough for the normal operation of all devices installed in the car.
If a motorist needs increased voltage, which can reach 14 V, then you need to install a diode in circuit D. For this, any diode with a voltage of 20 V is suitable. The current strength of such a diode should reach 5 A.
To watch online, click on the video ⤵
How to duplicate a generator on a VAZ 2107? We crimp the wires incorrectly. We make drawdowns smaller. Read more
DUPLICATION FROM GENERATOR. WHAT DOES HE GIVE? IS IT WORTH DOING?More details
Duplicate generator for VAZ 2107 with measurementsRead more
COMPETENT DUPLICATIONS OF THE GENERATOR for the VAZ 2114! THE WAY TO THE SUB! / Vesta Gearbox and Handbrake! (Episode 28)Read more
INCREASING VOLTAGE ON VAZ / DUPLICATIONRead more
Negative wire on the car, correct connection.Read more
Duplication of wires from the VAZ generator. Will it help or not? Read more
#VAZ#CHARGING#DUPLICATIONVAZ 2107, current loss, weak charging, body weight duplicationRead more
Dubbings. A clear example of why they are neededRead more
Where is the generator located on the VAZ 2107
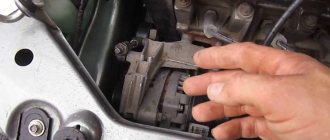
The generator on the VAZ 2107 functions in close connection with the battery. As with any other car, this device generates electricity to power all elements of the car. In this case, the generator performs its function only when the engine is running.
On the VAZ 2107 this mechanism is located directly on the surface of the power unit on its right side. This position is due to the fact that the generator is started by the movement of the crankshaft through the V-belt.
VAZ 21074 engine control system diagram
Wiring diagram of electrical connections of ECM VAZ 21074 - circuit elements. 1 – controller connector; 2 – mass air flow sensor; 3 – coolant temperature sensor; 4 – crankshaft position sensor; 5 – throttle position sensor; 6 – oxygen concentration sensor; 7 – speed sensor; 8 – ignition module; 9 – solenoid valve for purge of the adsorber; 10 – electric fan relay; 11 – electric fuel pump relay; 12 – main relay; 13 – fuse for the power circuit of the electric fuel pump relay: 14 – fuse for the power circuit of the main relay; 15 – fuse link; 16-fuse protecting the constant power supply circuit of the controller; 17 – diode; 18 – idle speed regulator; 19 – nozzles; X1 – diagnostic block; X2 – connection block to the vehicle electrical system.
How to replace the generator on a VAZ 2107
Replacing a generator set is required in cases where the device no longer produces the required amount of current for consumer systems. The most common reasons for replacing an installation are the following malfunctions and breakdowns:
- burnt winding;
- interturn short circuit;
- deformation of the generator housing;
- resource development.
It is almost always easier and more profitable to replace the generator with a new one than to repair it.
Tool preparation
To dismantle and subsequently install the generator on a VAZ 2107, you will need a standard set of tools, which every driver usually has in his garage:
- wrench 10;
- wrench 17;
- wrench 19;
- a pry bar or a special shovel for installation work.
No other devices or devices are required.
Dismantling works
It is recommended to remove the generator from the “seven” after the engine has cooled down. It is not recommended to work with vehicle components immediately after driving due to high temperatures and the risk of injury.
Immediately before removing the generator, you will need to remove the right front wheel, since the installation can only be reached from under the bottom of the car through the right fender.
It is imperative to securely fix the position of the car with a jack and auxiliary devices (hemp, stands) in order to eliminate the risk of the car falling during operation.
The progress of work comes down to the sequential implementation of the following actions:
- Find the generator housing in the mechanical structure of the car, feel for the bar that secures it to the engine.
- Using a wrench, unscrew the fastening nut halfway.
- Unscrew the nut on the bracket, but do not remove it from the stud.
- The generator housing can be pulled and moved in any direction - this will become possible due to the loose fastening.
- Remove the belt from the landing pulleys and remove it from the work area.
- Disconnect all incoming wires to the generator housing.
- Unscrew the fastening nuts completely.
- Pull the generator towards you and remove it from under the body.
Possible causes of malfunctions
There are several common reasons that require the driver to look under the hood of the “iron horse”:
- partial or complete combustion of the VAZ 2107 winding;
- cases of interturn short circuit;
- physical wear of parts;
- external physical influence;
- mechanical damage.
Inexperienced drivers of the VAZ 2108 or earlier modifications need to remember one nuance. When choosing lighting fixtures, you need to take into account their power. For example, if you decide to install fog lights, the power of which is 40-50 W each, you should look at the technical description of the VAZ 2106 or 07. Their installation is allowed only if the vehicle’s generator produces more than 55 A of current.
Failure to comply with this rule leads to dire consequences. The increased load of the VAZ generator leads to its rapid wear. The power of the unit gradually decreases, which is mistakenly perceived as a minor breakdown. That is why the total power of all voltage consumers should not exceed the maximum current level of VAZ 2107, 08 or 06.
The problem described above leads to another one - improper charging. The 2107 passenger car is designed in such a way that the generator is charged while driving. All electricity consumers are selected taking into account the power of the device. If individual elements are replaced without taking into account their power, the VAZ generator receives less energy than necessary.
Forced “starvation” leads to accelerated wear and failure. A great danger is posed by gadgets that significantly exceed the maximum level of current generated by the VAZ 2108. In this case, the “iron horse” risks stopping along the way. It will not be possible to revive a VAZ generator on site or even within the walls of a service station.
Alternator belt for VAZ 2107
"Seven" came off the assembly line of the Volzhsky Automobile Plant in the period from 1982 to 2012. Initially, the model was equipped with a drive belt of a currently outdated model, which had a smooth surface without any roughness. However, later VAZ 2107 began to be re-equipped to meet the requirements of the time, which led to the emergence of a new type of belt with teeth.
It should be emphasized that the most popular manufacturer of belt products for the domestic automotive industry is Bosch. For many years, the German manufacturer has been producing high-quality products that, both in size and service life, completely satisfy VAZ 2107 owners.
Alternator belt sizes
All parts used in the design of the car must have markings and manufacturer numbers. Design numbers and sizes of belts for the VAZ 2107 are specified in the operational documents for this model:
- 2101–1308020 (smooth surface), dimensions - 10.0x8.0x944.0 mm;
- 2107–1308020 (toothed surface), dimensions - 10.7x8.0x944.0 m.
Numbering, ratings and purpose of fuses
Each of the fuses in the VAZ 2107 can serve one or more electrical circuits of the car. If a fuse fails, a specific device or vehicle system (or several) will not receive power. As a result, a particular device becomes inoperable.
Fuse failure is not always the cause of a malfunction. In many cases, a blown fuse is the result of a component or system malfunction. Such cases include:
- short circuit in the car's electrical wiring;
- burning of contacts and connectors;
- wear of the fuel pump, electric motors of vehicle system drives (windshield wiper, fan);
- malfunction of the electronic engine control unit.
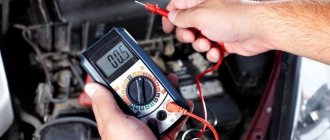
In the event of a failure of any of the vehicle systems, according to the table below and the fuse location diagram, determine the fuse number and its location in the block. If this fuse is responsible for several systems, you should check the functionality of the other system. If it works correctly, the fuse is most likely good and is not the problem. After this, using a multimeter or other measuring equipment, the functionality of the fuse is checked by measuring its resistance (continuity).
Testing the fuse should only be done on a dismantled (removed) fuse. The resistance of a good fuse is close to zero. In most types of fuses, the thread of its working area is visible through the light or is located outside the body part. You can check the fuse visually, but there are often cases of erroneous inspection when the working area has a microcrack.
Fuse box VAZ 2107
Table 1. Purpose of fuses VAZ 2107 (under-hood unit):
VAZ 2107 fuses, which one is responsible for what