You can adjust the wheel alignment angles of your car with your own hands using available tools and simple devices. In this material we will talk about how to do wheel alignment yourself at home, and what difficulties are most often encountered when adjusting wheel alignment angles.
Incorrect alignment adjustment can cause, for example, rapid wear of tires, or the fact that when driving in a straight line, the car will pull to the left or to the right.
At the end of this article you will find a video that explains and shows in detail everything you need to know about wheel alignment.
What is wheel alignment
Wheel camber.
The camber of automobile wheels is considered to be the angle between the vertical rotation of the wheel and its plane.
There are two types of camber: positive - the top of the car wheel is directed outward; and negative - here the direction of the upper part of the wheel inward is suggested.
Wheel alignment.
Wheel toe is considered to be the angle between the direction of movement and its rotation (the plane of the wheel). Typically, the toe-in of car wheels is determined immediately for the entire axle (that is, two wheels at the same time) using calculations in millimeters. However, some practice such measurements in degrees/minutes.
Sign 10: Loss of directional stability on rough roads
If the car pulls strongly to the side when it hits bumps, holes and other irregularities, this may be a sign of an incorrect wheel alignment angle. When a wheel hits an uneven surface, it “moves” towards the installation angle, so the car loses directional stability.
Other possible causes of the problem:
- failed steering parts;
- faulty shock absorbers.
What to do: go to a service station and check the shock absorbers, chassis and steering system. Or immediately diagnose the wheel alignment: if the shock absorbers and steering are in order, the reason lies there.
What is wheel alignment
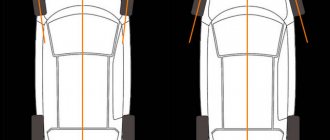
The wheels of the car must be positioned relative to the horizontal plane at a certain angle (camber), the same applies to the vertical plane (toe). This is required to achieve better tire traction and acceptable vehicle handling.
Correct setting of camber and toe angles ensures stable handling and stability of the vehicle
Convergence
This value can be either “plus” (when imaginary lines running parallel to the drive wheels will have an intersection point in front of the “nose” of the vehicle) or “minus” (when the intersection point is located behind). You need to understand that the closer the toe angle is to zero, the less resistance the vehicle has to the rolling effect.
A negative toe angle is bad. In this case, poor handling and poor response when turning the steering wheel will be observed. In addition, this will lead to the car yaw during travel (especially at high speed). The risk of an uncontrolled skid will increase significantly.
With “positive” toe-in of the front wheels, the vehicle is more responsive in handling, and it will be easier for the car enthusiast to take turns. It is also recommended to install the wheels of the rear axle with a positive toe value, then the car will become as stable as possible when driving straight.
If the convergence angles strongly differ from the factory settings, increased tire wear is observed:
- If positive - on its outer part;
- When negative – internal surfaces.
Therefore, it is not recommended to experiment with this angle.
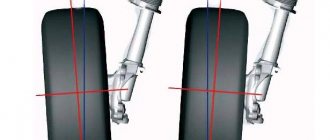
Camber
Camber is the angle between an imaginary vertical plane and the lateral plane of the wheel. If the upper parts of the wheels “look” towards the center of the car, the camber angle is considered negative, and if outward, then positive. A significant discrepancy between the camber angles and the parameters set by the manufacturer will lead to rapid tire wear. Moreover, the car will begin to “drag” towards the wheel that has the maximum camber angle.
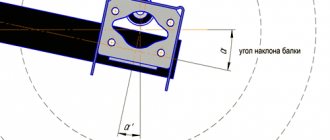
Custer
The behavior of a vehicle while driving is influenced by caster - the angle between an imaginary vertical and the axis of rotation of the wheels while turning the steering wheel.
Its meaning can have both positive and negative meanings. Because of this angle, the drive wheels will invariably return to their original (neutral) position. Its value determines the change in wheel camber when turning the steering wheel and the stabilization of the car while moving along an arc trajectory. The higher this value, the greater the stabilizing effect.
Caster angle - deviation of the angle of the longitudinal axis from an imaginary vertical line
The camber and toe angles should be constantly monitored, but the caster is set by the manufacturer during the development of the vehicle, and in most cases there is no need to change it.
It is important that the angles are the same on both sides of the vehicle. Otherwise, the car may behave unpredictably on the road - the car will “steer” to one side
Anti-roll bar
Modern sports cars have a fairly low suspension height and a low center of gravity. Accordingly, their body roll is usually barely noticeable. However, even in low-slung cars, body roll remains a problem because drivers like to corner without body roll, at high speeds, and with full vehicle control. As a first approximation, stiffer suspension springs are installed to reduce body roll. There is really no reason to use additional stabilizers, since the car is usually quite light and roll can only be dealt with by the correct choice of springs. The main argument against installing stabilizers is the partial loss of independent wheel suspension properties, and the stiffer the stabilizer, the greater the loss.
If the car is structurally equipped with a stabilizer bar (often due to the fact that the donor car has such a suspension design), there is no need to add stiffness to the stabilizer; select the stiffness of the suspension springs. On eco-vehicles with a high center of gravity, there is often no alternative to a stabilizer or other devices that reduce body roll.
When installing the stabilizer, you can use relatively soft suspension springs. However, you need to stay within the limits of good roll control when driving at high speed on winding roads. The stabilizer is made of spring steel and works like a torsion spring: the greater the car roll, the stronger the resistance of the stabilizer (naturally, within the strength of the material). Typically, the stabilizer is activated when the body rolls more than 3-4 degrees and prevents further growth of the roll, while the stabilizer only works when driving in corners and on uneven roads. In other words, in the absence of a stabilizer, due to the installation of medium or low stiffness springs, body roll can reach 7 degrees or more.
On cars with a low center of gravity, you can install relatively soft suspension springs and a lightweight stabilizer, but when braking, the front of the car will “dive” unless a special anti-dive suspension design is used. Remember, the front suspension springs should always be stiff enough to prevent excessive body dive when braking.
When installing a stabilizer, you need to ensure its rigidity so that it is minimally necessary to prevent body roll, or at least the roll is within acceptable limits (the stiffer the stabilizer, the more independence of the wheel suspension is lost).
Loose or worn stabilizer mounts will reduce the effectiveness of the stabilizer.
- Introduction
- Chapter 1. Chassis
- Chapter 2. Suspension height
- Chapter 3. Suspension geometry
- Chapter 4. Suspension springs and shock absorbers
- Chapter 5. Camber, longitudinal and transverse angle of inclination of the steering axis
- Chapter 6. Ackermann angles, wheel toe, “shock control” and anti-roll bars
- Chapter 7. Rear suspension
- Chapter 8. Brakes
- Chapter 9. Vehicle Settings
- Chapter 10. Testing and adjusting the vehicle
How to adjust camber and toe on a VAZ-2107 with your own hands.
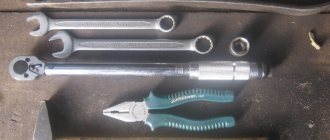
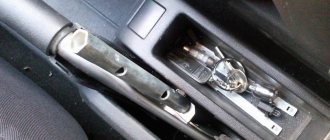
In order to set the camber and toe angles on your car without resorting to the services of a specialist, you will need the following tools:
- - standard set of wrenches;
- — sliding pliers;
- - caliper;
- — block 22 mm thick;
- — block 6 mm thick;
- - the twine is not long;
- - long string, with hooks at both ends.
Before you begin adjusting the wheels, the car should be prepared. Necessary:
- — install it on a level surface;
- — check the atmospheric pressure in all wheels;
- — remove the decorative caps from the disks;
- — provide a vehicle load of about 320 kg. The load must be distributed evenly. For example, you can simulate the presence of four passengers in all seats and an additional load weighing 50 kg in the trunk of a car.
- — check the fuel tank. The car must be fully fueled.
Now you need to check how much the camber angle differs from the standard one. To do this, you should align the wheels strictly straight, and then “squeeze” the front and rear suspension several times with a force of about 50 kg.
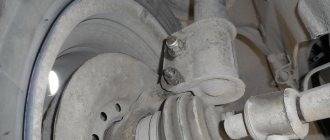
Next you need to tie a short string vertically, as shown in the figure:
Its adjustment is made using a bolt with an eccentric on the stand. You need to loosen its nut and adjust the degree with the bolt. The tension of the second knuckle bolt is released symmetrically.
To check the toe angle, you should take a long string with hooks. One end needs to hook it on the front plane of the front wheel, and the other on the opposite, rear plane of the rear wheel. The string must be stretched evenly, that is, the wheels should be perfectly aligned before taking measurements.
The design of the VAZ-2107 is such that the track of its rear wheels is somewhat narrower than the front. When the string is stretched, this is very clearly visible. It should be tensioned so that, with the front wheels standing level, it touches the rubber by 1-2 mm in two places, and is in the air at the back. This void must be compensated by placing a 22 mm thick block under the twine. Then you need to place a 6 mm block and check whether the string continues to touch both points of the front wheel. If not, then the toe needs to be adjusted.
To do this, it is necessary to loosen the coupling clamps on the outer tie rod; then use sliding pliers to rotate the coupling until the string touches two points on the tire at the same time. Having achieved the result, you need to carefully tighten the loose clamps of this coupling.
The exact same procedure is carried out with the opposite pair of wheels.
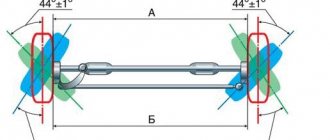
This table shows the required degrees of camber, toe and caster.
| Installation angles | Values |
| Camber | 0±30’+40’-20’, (0˚30±20)* |
| Convergence | 1-7 mm, (2-4)* |
| Longitudinal inclination of the king pin (caster) | 4˚+1˚-1˚30’, (4˚±30’)* |
*The ideal figures for an unloaded vehicle are given in parentheses.
It is not at all difficult to set the desired degree of camber and toe of wheels on a VAZ-2107 at home. In order to see the process with your own eyes, you can watch a video that shows in detail the entire procedure for adjusting the position of the wheels.
Sign 1: Diagonal dent in the tread
A diagonal dent in the tire tread is a sign of improper wheel alignment, which few people know about. It is typical for the rear wheels of front-wheel drive cars. A dent appears due to uneven distribution of load on the tire, especially if the car often carries cargo - for example, if you often transport vegetables from the dacha or transport passengers with luggage.
Other possible causes of the problem:
- insufficient wheel rotation interval;
- transportation of goods in the cabin or trunk, as a result of which the suspension geometry changes.
What to do: if you often transport cargo, there is a risk of suspension failure - have it checked at a service station. If you drive alone, together, or have recently checked your suspension, most likely the cause is wheel alignment: check it yourself or at a service station.
Basic parameters for installing wheels
If a motorist needs to do a wheel alignment with his own hands, he first needs to determine those connections in the suspension that affect the change in tire orientation. Many work on replacing suspension parts involves subsequent adjustment of the wheel alignment. For example, replacing a ball joint, steering rods and ends, and a shock absorber cannot be done without at least a simple check of the main dimensions. Then you will be able to save the tires until your next visit to the service station.
You should not install wheel angles if there are faults in the car’s suspension. Only after replacing all damaged parts and assemblies can you begin to adjust the wheel alignment.
Wheel alignment indicators
Camber and toe are two different parameters.
- Camber is usually called the angle connecting the plane of rotation of the wheel and its vertical. Positive camber occurs when the top of the wheel protrudes outward relative to the bottom. With negative camber, the top points towards the inside of the car.
- Wheel toe is the angle that connects the plane of rotation of the wheel and the direction of its movement. With correct toe-in, the wheels are parallel or the front of the wheel is slightly turned inward of the car.
What operations can you do yourself?
The only operation that cannot be done correctly on your own is fine adjustment of the castor. If the accident has not changed the geometry of the body, then symptomatic adjustment of the castor can be done. When the car does not listen well to the steering wheel, turns unsteadily and with a delay, you just need to increase the caster for 20–40 minutes. If, during sharp acceleration, the steering wheel begins to be pulled out of your hands, the castor needs to be reduced. It must be remembered that an increase in castor leads to an increase in wheel camber. You can also adjust the wheel alignment yourself. If the body is damaged as a result of an accident, which led to a violation of its geometry, then any adjustment of the suspension is pointless. You will spend a lot of time, and the result will be extremely doubtful. Therefore, after even a minor accident, be sure to check the body geometry on a special stand.
Wheel alignment technology
The adjustment occurs in two stages. First you need to set the camber angle, and then adjust the toe.
Setting the Camber Angle
To set the camber angle with your own hands, you need to install the car on a flat platform (preferably with an inspection hole), prepare accessories such as a ruler, a plumb line and chalk.
The technology for adjusting wheel camber is as follows.
- First, the wheels are aligned in a strictly straight direction.
- Make two marks with chalk on the top and bottom of the tire.
- A plumb cord is applied to the car fender, which should hang motionless parallel to the plane of the wheel.
- Now you need to measure the distance from the cord to the rim of the disc. The difference in measurement should not exceed 3mm.
- The next step is to move the car forward to rotate the marks at an angle of 90 degrees. After this, the measurement procedure is repeated. This will allow you to obtain more accurate arithmetic averages.
- To adjust the camber, you need to remove the wheel, loosen the bolts securing the steering knuckle and shock absorber strut.
- Now, depending on the measurement data, it is necessary to move the steering knuckle inward or outward.
- After this, the bolts are tightened, the wheel is installed in place and a control measurement is carried out.
Thanks to these actions, it will be possible to achieve the correct camber of the wheel. For rear-wheel drive cars, errors are allowed within the range of +1...+3 mm, and for front-wheel drive cars this figure is limited to the range of -1...+1 mm.
Wheel alignment installation
To adjust the toe angle, a telescopic ruler is required. A prerequisite is the presence of a flat surface and the straight position of the wheels.
- Work begins by placing chalk marks in the form of dots on the inside of both tires (front), close to the rim.
- The telescopic ruler is installed so that its ends touch the points on the tires, but the measuring tool does not touch the machine parts. In this position, the ruler is fixed and a measurement is taken.
- After this, the car rolls forward so that the telescopic device moves back without touching any suspension elements.
- Now all that remains is to check the readings obtained and compare them with the measurement in the front part.
- If the distance between the tires has decreased, the tie rods should be shortened. As the distance increases, it is necessary to lengthen the rods. To make adjustments, you must first loosen the locknuts located near the steering tips. After setting the toe angle, do not forget to tighten the nuts.
Carrying out simple adjustments with your own hands will allow you to approximately set the wheel alignment at home. If, after installing the wheels, the car pulls to one side while driving, bad “rolling” is observed, and the outer or inner side of the rubber wears out before your eyes, you should contact a service station for more precise adjustments.
Possible nuances
Do I need to adjust the toe-in for the rear axle? It is necessary if the car has an independent rear suspension. The angle is usually set to 0-0.5 degrees, that is, the wheels should be almost parallel. Only for some models this angle should be within 1.5 degrees. Try to take measurements as accurately as possible, with the machine standing on a completely level surface. The tires should be in good condition on all wheels; check the tire pressure. And don’t forget to first unload everything unnecessary from the car - if there are a couple of bags of cement lying around in the trunk, then the accuracy of the measurements will be poor and you won’t get a good result.