DUT VAZ 2115
FLS (fuel level sensor) is used to monitor the level of gasoline in the car tank so that the driver knows whether he can get to his destination or whether it’s time to refuel urgently. It is important to monitor its readings, otherwise you may find yourself with an empty tank a hundred kilometers from the nearest gas station, which will create a bunch of unnecessary problems for you. It is also important to monitor the readings of the device in order to promptly detect deviations in its readings and avoid troubles. The first signs that you need to replace the fuel sensor on a VAZ 2115 are the readings of an empty tank when you start the engine, and after you start driving, the fuel begins to splash and the readings change. You refuel, but the device does not respond, it still shows a low level. In the evening the tank is full, but in the morning it shows half or empty. Questions arise: is it worth going to a service station or doing the replacement yourself, replacing it, or is it still possible to repair the controller and move on? Our article will give you the answers.
Fuel level sensor does not work
FLS is an unreliable device that will not serve for decades. Therefore, the car owner should always be prepared to replace it.
According to the degree of unsuitability, the FLS can be divided into 3 parameters:
- Jumping incorrect values;
- When the tank is half full, an empty gas tank is displayed;
- The arrow is always at the zero level.
In the first two cases, everything is extremely simple. If the fuel indicators on the VAZ-2115 are incorrect, you can try to repair the injector and fuel injection system. To do this, you need to test the float movement yourself. If the spoke moves smoothly and does not stop, then the float is working properly. If the spoke stops or gets stuck in some positions, then it is necessary to eliminate the reasons for the interruption of smooth movement. After this, it is worth checking the contact group on the panel from the rear side. If necessary, tighten the fasteners to ensure good contact.
If the arrow displays incorrect data precisely in the final stages (full tank or zero tank), then depending on the final stage, it is necessary to bend the tabs. After bending the adjusting tab, the spoke will be able to move a little more than the extreme position.
If the indicators are always at zero, then it is necessary to replace the device.
Causes of FLS malfunction
There are several most common reasons:
- The float has leaked, it fills with fuel and sinks, as a result it does not show a full tank at all
- The second cause of the problem is erased contact tracks located on the FLS board
- They are erased from the friction of the runner
- Sometimes tucking the runner so that it can move above or below the worn parts of the tracks can temporarily help.
- However, the measure is temporary, and if the abrasions are large (deep), it definitely needs to be replaced
What is important to know when buying a new FLS
Before you buy a new gasoline (fuel) sensor, be sure to find out its markings:
- You should know that there are many types of such fuel sensors (more than eight)
- They are all very similar in appearance, differing only in resistance, each type of controller has its own
- To avoid further problems, it is necessary to purchase a sensor of similar markings
- Otherwise he will give false testimony
- And also, the older the model of your sensor, the more difficult it is to find it or its analogue
How to choose the right replacement sensor
If you don’t understand how to choose the right FLS for your car, our instructions will help you:
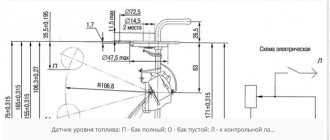
- Take a variable resistor with a resistance of 1 kilo Ohm, which you connect instead of the FLS
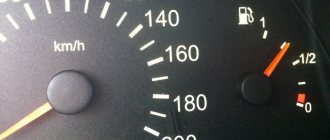
- Full tank value for VAZ 2115 6-7 Ohm
- Adjust the position of the empty tank on the indicator (located on the front panel) and measure the resistance on the resistor
- Knowing the resistance in the full and empty tank positions, select a new sensor with the same values (so that the resistance matches)
Replacement process
In order to replace the FLS, you will need a 7 key and a 17 socket. Before starting work, you should make sure that there is practically no fuel left in the tank. Relieve the fuel system pressure and turn off the power to the fuel pump. After that we start the car. The engine should idle until the fuel runs out and the car stalls on its own. When the fuel runs out, you can start disassembling it and be sure that it will not get into the car interior.
We use a Phillips screwdriver and unscrew the hatch cover in the car. The wires must be disconnected from the pump. Using a key set to “17”, unscrew the fuel line tube and put it away. It is necessary to check the ring that is located on the fitting; if it is damaged, replace it. Similarly, disconnect the drain tube.
We use a 7 socket to unscrew the bolts that secure the pump using a clamping ring. We disconnect the pump and inspect the rubber ring; if it is damaged, replace it. Afterwards we unfasten the screws and turn off the sensor. We install a new parting in the reverse order.
How to understand whether the temperature sensor is working or not
It happens that one component of the temperature recording system malfunctions, and the driver immediately blames the sensor; in fact, it may be quite serviceable. Therefore, do not rush to throw away the old sample, first check it for serviceability:
- Place the seized coolant in the container where the drained coolant is located.
- Carefully and gradually heat the antifreeze, note that the container must be resistant to high temperatures, otherwise it will simply melt.
- Armed with a thermometer and a multimeter set to ohmmeter mode, monitor the readings on these 2 devices simultaneously.
For convenience, we have presented what readings a working VAZ-2115 antifreeze temperature sensor should give in tabular form.
| Temperature on the thermometer, degrees | Resistance, Ohm |
| 20 | 3520 |
| 40 | 1459 |
| 60 | 667 |
| 80 | 332 |
| 100 | 177 |
If the readings you took from the sensor differ from the data in this table, it means that the device really needs to be replaced; it is not working correctly. Some car enthusiasts are trying in every way to repair the device, but experts are skeptical about such experiments, stating that the sensor that records the heating temperature of the antifreeze cannot be repaired, but only completely replaced with a new product.
Common problems
The fuel volume control system in the gas tank is susceptible to the following malfunctions:
- the pointer indicator lies at zero regardless of the amount of fuel remaining in the tank;
- the device does not display the fuel level correctly - it is lying up or down;
- the needle “jumps” or changes readings in a short period of time;
- The yellow minimum fuel indicator indicator does not light up.
Reference. In some domestic car models, the fuel sensor is lying from the factory. An example is the Chevrolet Niva SUV of the first releases, where the device greatly underestimates the actual level of gasoline. The driver, guided by the sign, pulled into a gas station, only to discover that the tank was full to the top.
There are several reasons why the needle drops to zero:
- Sticking or jamming of the lever.
- The float lost its seal and sank to the bottom.
- An electrical circuit is broken due to oxidized contacts or a wiring problem.
- Failure of the indicator itself or the lever sensor - potentiometer.
Typically, incorrect readings and “jumps” of the needle are a consequence of contamination of the rheostat and slider. On a car with high mileage, these parts can wear out - the thin layer on the plates wears away, causing contact to disappear between them and the runner.
The fuel level sensor in the tank sends conflicting signals that are reflected on the dashboard.
One of the reasons for the minimum level indicator not working is a burnt-out light bulb on the instrument panel. Less common are problems with the end contact located inside the tank, or a break in the electrical wiring. In the newest systems, the lamp even lights up at the command of the controller when the resistance of the lever potentiometer reaches a certain value.
Diagnostics and repair methods
To check and identify a malfunction, perform a number of preparatory work:
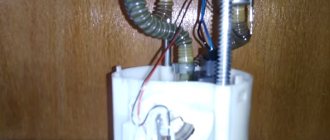
- Find a service hatch in the car that gives access to the electric fuel pump and float mechanism unit. Usually located under the rear sofa, where the fuel tank is installed.
- Unscrew the pressure flange and pull the assembly out through the hole. Clean all contacts and the rheostat plate, reinstall the unit.
- Prepare a “control” with a light bulb and a multimeter.
The first step is to accurately determine the “culprit” - check the sensor and pointer separately. The performance of the device is diagnosed as follows:
- Turn on the ignition and connect one terminal of the multimeter or test light to the ground of the car.
- Connect the second contact to the positive terminal of the wire going into the technological opening. The meter should show the voltage of the on-board network.
- Remove the positive terminal and short it to ground. If the instrument on the panel is working properly, the arrow will show a full tank. This means the fuel level sensor is not working.
- If there are 2 wires coming to the gas tank, connect them alternately to the vehicle ground. From one the control lamp should light up, from the second the pointer should move to maximum. If the listed symptoms are observed, change the sensor.
In the case when there is a voltage of 12 volts on the wires, but after a short to ground the pointer indicator does not respond, you will have to disassemble the dashboard and remove the device. Similar actions are taken when the minimum gasoline remaining indicator is not working.
It is somewhat more difficult to independently check the updated system installed in cars of recent years; simply shorting the terminals will not do anything. Using a multimeter, make sure that there is supply voltage on the wires, and then you need to connect another, working sensor to them. If the arrow on the instrument panel reacts when the float moves, the element should be replaced.
Thorough cleaning of the slider and rheostat turns helps in cases where the fuel level sensor simply lies. The moving contact can be carefully bent so that it passes along the unworn part of the turns. Clean the current-carrying strips of the potentiometer with a soft cloth soaked in alcohol to avoid damaging the surface of the element.
Some gasoline sensor malfunctions can be eliminated in a garage:
- a “sunken” float with a crack is replaced as an assembly with a lever or separately (depending on the make of the car);
- the torn conductors are connected using a conventional soldering iron;
- the damaged rheostat plate is replaced with a new one, provided that the spare part for your car is on sale.
At the moment, repairing the fuel level sensor is becoming irrelevant. Considering the cost of a new element, it is easier and more reliable to replace a non-working part.
If the indicator and the gas remaining meter are working properly, but the arrow of the device is lying, try making adjustments. Carefully bend the float rod in the desired direction and check the readings again. To achieve maximum accuracy, the operation will probably have to be repeated several times.
Didn't find the information you are looking for? on our forum.
How does the device work?
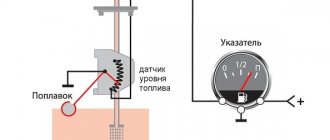
To understand the problem yourself, you need to understand how the fuel level is measured and information is transmitted to the device indicator. The circuit implemented in most vehicles includes the following main elements:
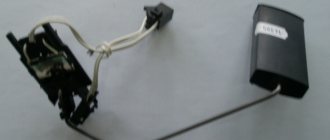
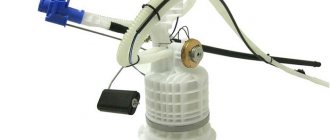
- a float made of lightweight polymer is immersed in the gas tank and is often combined with the pump block;
- gasoline sensor – lever-type potentiometer (otherwise known as rheostat);
- pointer arrow with scale;
- connecting wires.
In many modern cars, an electronic control unit is connected to the system.
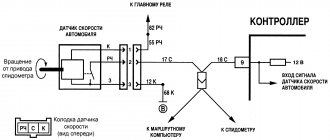
The classic rheostat is an open coil of high resistance wire. A lever equipped with a contact and attached to the float rises or falls with the level of fuel in the tank, and the contact moves along the turns of the winding. The classic scheme works simply:
- The rheostat and the pointer device are connected in series in the circuit, both are powered from the vehicle's on-board network.
- When moving the float with the lever, the resistance of the potentiometer changes.
- A change in resistance causes an increase or decrease in the current in the circuit, to which the indicator arrow reacts. The scale is graduated according to the resistance values corresponding to the filling of the gas tank.
The updated version of the system works with the participation of a controller. The fuel level arrow receives a processed digital signal from the electronic unit that supplies power to the potentiometer. The principle of operation does not change, but the circuit allows you to obtain more accurate readings.
Useful video
You can get more useful tips by watching the video below:
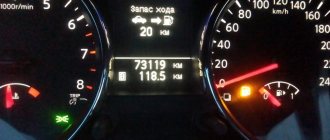
We find out about the amount of fuel remaining in the tank using the fuel level indicator. The indicator, in turn, is activated by a fuel level sensor, which is installed in the car’s gas tank and transmits information about the remaining fuel in the tank.
Currently, there are three types of such sensors. The first is a magnetic analog or rheostat, which was widely used until the 80s of the 20th century. The other two are digital and graphic, which recently began to be used on many cars and are gradually replacing their primitive counterparts.