The VAZ 2110 fuel level sensor is a measuring device that is very necessary when operating a car. After all, if you don’t know how much fuel is in the gas tank, it’s impossible to calculate the distance the car will travel before it stops, and it’s not always clear whether you need to refuel or can still drive. And if you decide to stop for refueling, then how much to fill? Therefore, when it is discovered that the fuel level sensor on a VAZ 2110 does not work, or it is simply “lying,” any car owner tries to fix this malfunction as quickly as possible.
What is a fuel sensor
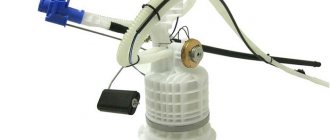
The fuel level sensor (FLS) is a control and measuring device that transmits information about the amount of fuel to the dashboard to the fuel level indicator (FLI), located on the dashboard next to the speedometer.
The operating principle of the FLS is simple: the fuel sensor is built into the gas tank system, consisting of a check valve, filter and fuel pump. A similar fuel supply and control system is used in injection engines. It is built into the gas tank cap and screws in with it.
This device is typical for diesel engines and is installed on the side as a separate unit. In this case, a float with a lever for tubular devices is placed inside the tank, and the movement of the latter determines the level of fuel in the tank.
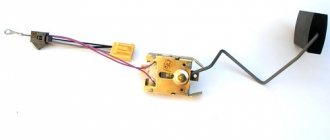
FLS device
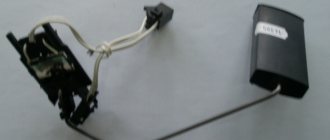
In modern cars, LENs are installed mainly of lever and tubular types. In general, their operating principle has a lot in common, although upon closer examination some differences can be found between them. The VAZ 2110 is equipped with proven lever sensors. They are reliable, give a small error, but periodically fail. Sometimes their service life can be extended with simple manipulations, but sooner or later it becomes necessary to completely replace the VAZ 2110 fuel level sensor.
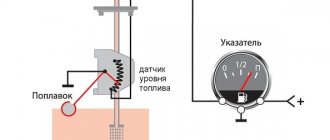
The figure shows a diagram of the VAZ 2110 fuel level sensor.
Replacement
You don't have to be a professional auto mechanic to replace a fuel sensor. It is enough to study the operating manual and understand the nuances of disassembling and assembling the unit.
Alas, this cannot be done without related work. In order to get to the sensor, you will first have to remove the fuel pump.
Before starting work, drain the fuel so that as little fuel remains in the tank as possible. Tools you will find useful:
- Spanners;
- Screwdrivers;
- Hammer, etc.
So, let's start removing the fuel pump:
- Remove the floor covering you have in the trunk;
- Remove the fastenings of the rectangular cover, which is made in black;
- Disconnect the negative terminal from the battery;
- Make marks on the gas pipeline tubes so that you can later figure out which one is intended for supply and which one is intended for return;
- The fitting is unscrewed with a 17mm wrench, after which the supply pipe is removed;
- The outlet pipe is removed in a similar way;
- Use a 7 mm socket wrench to unscrew the nuts securing the pressure rim;
- A hammer may be required here, since the hardware is often firmly attached. Place a flathead screwdriver on the ridged part of the nut and give the handle a light hammer blow;
- With the rim free, lift the assembly and remove the float from the fuel tank;
- Now you can remove the pump and, accordingly, the sensor.
Dismantling the sensor
This work is performed in the following sequence.
- Using a curved screwdriver, remove the two screws that hold the sensor to the pump.
- The fixing elements are unbent with a screwdriver and the guides are released from the pump body;
- The sensor is held on by bolts and nuts, so be sure to hold the back of the stud while unscrewing the fasteners;
- Carefully remove the pointer, after which you can replace it with new ones;
- Before reassembling, carefully examine the condition of all components and elements;
- It is important to pay attention to the wear of seals, pipes, and bushings. If the wear is severe, be sure to replace them with new ones. They are cheap, so you will not experience serious financial losses;
- When reassembling the bushings, treat them with the almighty WD40. And regardless of whether they are old or new.
The procedure really seems simple and easy to do with your own hands. This is partially true because you are dealing with gasoline, a highly flammable substance. Therefore, when replacing the fuel sensor yourself, be sure to follow all safety rules. Plus, you should definitely have a fire extinguisher on hand. It is strictly forbidden to start work without it. Any violation of safety rules entails rather dire consequences.
The principle of operation of the fuel level sensor on the VAZ-2110
So, a lever fuel level sensor is installed on the VAZ 2110. It belongs to the float type. The sensor consists of the following elements:
- potentiometer;
- a slider made in the form of a moving contact;
- lever element;
- float;
- gas intake.
These devices are also called potentiometric. The float is connected through a lever to a resistor, inside of which there is a slider, or dynamic contact. As the float lowers in the gas tank, the slider moves along the resistive track towards another, static contact, forming electrical resistance between them. Thanks to the conversion of alternating current, which is transmitted to the dashboard, the driver knows the amount of fuel in his gas tank. Therefore, when the contacts are oxidized, or the electrical conductivity of the elements is otherwise disrupted, the sensor readings become confused and become incorrect.
Mass air flow sensor
The power unit of the "tens" is controlled using the ECM - an electronic system. This system must always know how much air needs to be supplied for a certain volume of gasoline. These two parameters are closely related to each other, since with their help a combustible mixture with the required density is formed in the engine power unit. After the system determines the required volume of air, it begins to select the appropriate amount of gasoline. As for the regulator, it is responsible for the suction volumes.
Air controller for "ten"
This controller has certain disadvantages, in particular:
- its performance may be impaired if the controller is exposed to moisture;
- if the car is moving at lower speeds, the controller can produce higher readings;
- as practice shows, at idle the air regulator does not work entirely correctly;
- when starting the power unit, certain difficulties may arise;
- the power unit may stop abruptly for no reason after an increased power mode;
- Gasoline consumption during vehicle operation may increase.
We've dealt with the shortcomings, now let's talk about how the device functions:
- The controller design consists of several sensitive elements installed directly in the line itself through which the air flow passes. One of these components is designed to fix the temperature of the air flow, and the other two are always heated to the required parameters.
- To correctly determine the air flow rate, the principle of measuring electrical power is used to maintain the desired temperature level.
- The air regulator controller has a special mesh installed in the line, designed to filter the air flow.
- Thanks to this, the sensor can transmit the necessary data to other regulators designed to activate certain modes. Subsequently, these regulators either change or support the loads.
Signs of sensor malfunction: rules for self-diagnosis
The first and most obvious sign of a fuel sensor failure is a discrepancy between the readings of the fuel level indicator (fuel level indicator and the condition of the gas tank). True, another reason cannot be discounted: after all, the contact between the FLS and the control unit may well be broken or problems may arise in the dashboard. But this happens less frequently and is easily diagnosed.
The VAZ2110 fuel level sensor does not work correctly if the float is connected incorrectly or the float is installed incorrectly. If you correct the errors, the device will begin to give correct readings. But errors make themselves known immediately after an incorrect installation of the FLS, and if the device functioned correctly for a long time, and one day began to lie, it means that there are problems in its operation.
First, a visual inspection of the parts located outside is carried out. The presence of oxidation on connectors and terminals is detected immediately. If they are not significant, then the contacts are cleaned. The potentiometer can also be opened by prying off the cover with a thin screwdriver and inspecting the condition of the slider and resistive tracks.
Main causes of failure
Although the fuel sensor is not a consumable item, it also does not last forever. This device has a certain service life, which depends on:
- from the manufacturer;
- fuel quality;
- operating conditions and maintenance of the vehicle.
The reasons for sensor failure include the following:
- oxidation of contacts on the slider, lever element;
- wear of resistive tracks. Then the slider can be moved;
- sometimes, in order to correct the instrument panel readings, it is enough to bend the slider;
- resistor failure;
- broken wires. In this case, it may happen that the main two wires are connected securely, and the one that goes to ground may come off and, as a rule, is not visible.
On a note! If the wires are disconnected at the connection point, this is easily detected. If a break occurs on the wire connecting the FLS to the indicator on the dashboard, then such a breakdown will not immediately make itself known. In this case, its condition is checked with a multimeter.
It is worth remembering that repairing the fuel level sensor in a VAZ 2110 is not always able to extend the life of the device. Often it will have to be replaced anyway.
Crankshaft regulator
New crankshaft controller for the “ten” Depending on the type of car, on a 16- and 8-valve engine, the location of all controllers may be different.
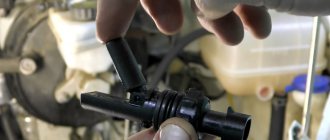
However, all of these devices combine into one functioning system, and the crankshaft adjuster is no exception. Thanks to this controller, the electronic engine management system of the “tens” can independently determine at what point to supply gasoline and a spark through the spark plugs in order to ignite the combustible mixture. In fact, the design of the device is a magnet, as well as a coil of thin wire. The crankshaft sensor has certain advantages:
- As practice shows, at “tens” this regulator can work for quite a long time. Its service life does not decrease even as a result of using the vehicle’s power unit under increased loads.
- The crankshaft adjuster works in conjunction with the crankshaft pulley.
- If the device fails, the engine may not be able to start. Or, if the regulator breaks down, the speed parameters will be reduced to 3.5 thousand per minute.
This controller is installed on the oil pump, actually at the very top of the shaft teeth. Or rather, one millimeter from the cloves. You can learn more about how to replace this controller yourself from the video below (the author of the video is the channel In Sandro’s Garage).
When is it necessary to change the sensor?
The fuel sensor must be replaced if at least one of the following reasons occurs:
- contacts are so destroyed that there is nothing left to protect;
- resistive tracks are worn to the limit;
- there is damage to the float. This is rare, but it happens. Ruptures lead to the fact that the latter fills with gasoline and sinks, showing an empty or half-empty tank,
- even when it is full;
- The slider itself is damaged.
In case of the above-mentioned defects, the FLS must be replaced.
Malfunctions in vehicle operation with a faulty FLS
If a faulty VAZ 2110 fuel level sensor is not repaired or replaced in a timely manner, this can damage the submersible fuel pump, for which hydrocarbons serve as a cooling medium. When the level of gasoline in the tank is below a critical level, this leads to the pump running dry, overheating and may fail. At the same time, the latter is not so bad. Overheating can cause a fire, and, accordingly, even greater damage to the car.
In addition, the filter meshes become clogged with dirt from the bottom of the gas tank, which also harms the gas pump.
