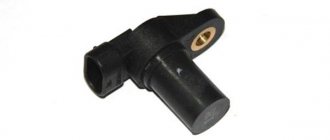
In this article we will look at the phase sensor using the example of Samara (VAZ 2114-2115). It is worth noting that the phase sensor is one of the main sensors with which the controller calculates the operating parameters of the engine on Russian-made injection engines.
The phase sensor, or as it is called, the camshaft position sensor, is installed on eight and sixteen valve domestically produced cars with Euro-3 environmental standards.
What is a phase sensor used for and how does it work?
The camshaft position sensor determines the operating cycles of the internal combustion engine. The camshaft cams drive the valves, and the DF determines which valve is open. This is an integrated control unit, that is, it includes a sensitive element and a signal conversion system. There is a Hall element there - data is taken based on changes in the magnetic field.
The converter has a bridge circuit, a converter block, and an output stage. The work is that the DF determines the intake and exhaust phases of the 1st cylinder.
For carburetor engines it is not needed because the spark is supplied at the moment of compression and at the end of the exhaust gases. DPKV is sufficient for this.
Roughly speaking, the VAZ 2114, 2115 phase sensor functions as a fuel injection system. If it breaks down, the work of sparking falls on the crankshaft position sensor. The designs that are used on 16-valve cars differ from eight-valve ones.
Now let's try to explain in simple words how the phased injection system works. It turns out something like this: the DF gives a signal to the electronic engine control system (ECM), and it, in turn, gives a command to inject fuel, while the intake valve begins to open, and after it has opened, air is sucked in and mixed with gasoline to form a mixture.
Symptoms of a problem
The phase sensor of the VAZ-2115 car is the main component in determining the ignition timing. It is responsible for the precise timing of fuel injection.
If this node malfunctions, the following happens:
- fuel consumption increases;
- problems arise when starting a cold engine;
- dynamics and acceleration from a standstill disappear;
- stability of idle speed disappears.
The dashboard can confirm a malfunction of the DPRV by notifying you with an error code:
- 0340 means no signal from the DPRV. The cause may be a malfunction of the sensor itself or the electrical wiring.
- 0343 means an increased signal supplied by the ECU. The cause may be oxidation or damage to one terminal.
In order to operate the car to the fullest of its capabilities, it is necessary to clearly monitor the condition of the components responsible for ignition and fuel supply.
How to check phase sensor 2114
You can check the sensor using a voltmeter. Below are several options for checking phase sensors.
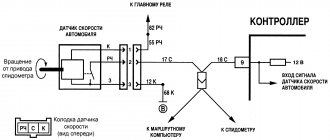
Checking the phase sensor 21110-3706040
It is necessary to set the voltage on the voltmeter V1 on the power supply E to 13.5 ± 0.5 V, the voltage at contact “B” of the sensor must be at least 0.9 Up.
Next, we bring the plate to the end of the sensor and look at the operation of the sensor. It should work. This can be determined on contact B. When the sensor is triggered, the voltage on contact “B” should be no more than 0.4V.
We remove the steel plate from the end of the sensor and measure the voltage again, it should change to a value of at least 0.9 Up.
Checking the phase sensor 21120-3706040
Set the voltage at voltmeter V2 on power supply E to 13.5±0.5V, the voltage at contact “B” should be no more than 0.4V.
Bring a steel plate made of soft magnetic material with a width of at least 20 mm, a length of at least 80 mm and a thickness of 0.5 mm to the end of the sensor as shown in the figure, placing it in the slot of the housing. The voltage at contact “B” of the sensor must change and be at least 0.9 Up.
Remove the steel plate, and the voltage at contact “B” of the sensor should change to a value of no more than 0.4V
Verification methods
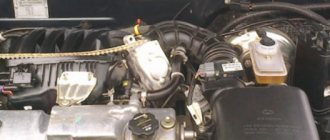
The DPRV of the VAZ-2115 car is located under the air filter, installed near the cylinder head. In order to check its functionality, it is necessary to remove the power socket and dismantle the part.
Visual inspection
The first way to check the performance of the DPRV is a routine external inspection. The causes of the malfunction are the following:
- Cracks and chips on the body can cause penetration. A complete replacement of the part is required.
- Oxidation or breakage of contacts in the connecting socket is the reason for the lack of connection between the DPRV and the ECU. Cleaning the contacts will fix the problem.
Checking with a multimeter
In order to check the phase sensor with a multimeter, you must:
- Dismantle the part.
- Connect the multimeter terminals to terminals 1 and 3 of the sensor.
- Place the device in the resistance determination position.
- Apply a metal screwdriver or knife to the tip of the DPRV.
The device should react to metal, and the multimeter should show the working resistance of the part. Lack of response indicates damage.
Checking with a voltmeter
To check you need:
- Dismantle the part without removing the current-carrying socket.
- Turn on the ignition.
- Connect the voltmeter terminals to terminals 1–3.
- Bring a metal object to the tip of the part.
A working part should react to metal and produce a voltage of 0.7 to 0.9 V. High readings or their complete absence indicate damage.
How much does a phase sensor cost?
Depending on the manufacturer, the cost of the sensor varies. Before you think about replacing the sensor, you need to remove and see which sensor you have installed from the factory.
- Phase sensor /2110/ (distribution) 8 cells. (v 1.5) (Autoelectronics Kaluga) from 250 rub.
- Phase sensor /2110/ (distribution) 8 cells. (v 1.5) (BAUTLER) price from 300 rub.
- Phase sensor /2112/ (distribution) 16 cells. (v 1.6) (Autoelectronics Kaluga) from 300 rub.
- Phase sensor /2112/ (distribution) 16 cells. (v 1.6) (BAUTLER) price from 250 rub.
Replacement
Replacing a damaged camshaft position sensor is very simple. To do this you will need:
- Allow the engine to cool for an hour.
- Remove the “−” terminal from the battery.
- Remove the power socket.
- Unscrew the mounting bolt.
- Remove the sensor from the hole.
Installation of the new part should be carried out in reverse order. After completing the replacement, you need to start the engine, warm it up, and perform a test run of the car.
Long-term and reliable operation of the vehicle can only be ensured by original spare parts. The original phase sensors for the VAZ-2115 car have the factory part number 550488 (for 8 valve models).
How to replace a phase sensor with your own hands
If you are absolutely sure that the phase sensor is faulty, you can replace it yourself. It is located at the end of the cylinder head next to the air filter.
Replacing the phase sensor begins by disconnecting the power from the battery. In this case, the control unit memory will be reset.
If this is not done, it will continue to operate in the same mode as with a faulty phase sensor. Normal operation will begin after a few engine starts.
The tool that will be needed is just a ten key and sealant. Next, disconnect the wires from the phase sensor and remove it using a key.
The new sensor needs to be coated with sealant, the layer should be small, and it should be left for about five minutes before installation. We install it on the seat and connect the wires.
Next, connect the battery, start the engine and see if the check engine light comes on. If it no longer lights up, then the sensor is installed correctly.
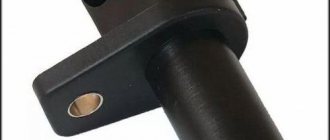
Camshaft sensor
DPRV is otherwise called a phase sensor. The main task of this part is to accurately determine the position of the shaft when the engine is running. The definition is based on the interaction with the engine flywheel gear. The flywheel is missing 2 teeth on the outer edge. It is this gap that the DPRV is responding to. Having passed the moment of rupture, the sensor sends a signal to the control unit. The ECU interprets the signal as determining the exact position of the crankshaft, as well as the piston group, and injects fuel into the combustion chamber.
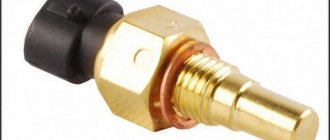
Description of the knock sensor
Now let's talk about the knock sensor. Let's start with the location and purpose of the controller.
Location, purpose and device
The DD in the Four is one of the main elements that determine the correct operation of the power unit. The main design element of the knock sensor is the piezo mechanism. When a load is applied to the knock sensor, the device generates an electrical pulse that is sent to the control module. The block detects the occurrence of detonation in engine operation, according to which it changes the ignition timing.
As for the location, in the VAZ 2114 the DD is located on the engine cylinder block, between cylinders numbered 2 and 3. If your car is equipped with an 8-valve engine, then you will immediately see the controller when you open the hood. As for 16-valve internal combustion engines, in this case it will be more difficult to find the sensor, since the view is blocked by the cylinder head.
Possible malfunctions and ways to eliminate them
What signs can be used to identify problems with the detonation controller:
- a significant drop in power, which is especially evident during acceleration;
- a Check icon appeared on the instrument panel;
- when you sharply press the gas pedal, detonation may be heard - a metallic knock, as experts say - “fingers” knocking;
- In some cases, the engine may overheat.
Controller failure is usually caused by regular use of low-quality fuel.
Instructions for diagnosing and replacing the controller
The diagnostic procedure can be carried out either using a tester or using an ohmmeter. When using a tester, the device itself will need to be connected to the connector for testing and diagnostics of performance. If you only have an ohmmeter, then you will need to measure the voltage between the controller contacts.
How to check the functionality of the DD:
- First, the measuring limit of 200 mV is set on the voltmeter.
- Then it is necessary to connect the probes of the diagnostic device to the contacts of the regulator.
- After this, try lightly tapping the controller body with a screwdriver or other similar tool. When you tap on the case, the voltage value on the tester display should increase to 20-40 mV, in this case it all depends on the force of the blow. If there are no changes as a result of the impact, then you need to change the DD to a new one (the author of the video is Alexander Dmitriev).
To perform the replacement you will need to do the following:
- Prepare standard plumbing tools - wrenches and screwdrivers; you will also need sandpaper or a steel brush. Turn off the power unit and turn off the ignition, and then open the hood.
- Then you will need to find the DD, press the latch and disconnect the wiring connector from the knock regulator.
- Using a wrench of the appropriate size, you need to unscrew the nut with the stud (if your car has a two-pin DD). If a resonant type controller is installed on the engine, then you need to remove the piezo element.
- After this, the contacts on the connectors will need to be cleaned with sandpaper or a wire brush - remove all dirt and oxidation. If this is not done, problems may arise in signal transmission - the pulse will not be accurate. When the cleaning is complete, install a new one instead of the old one.
Lada › Logbook › 22. Replacing the camshaft sensor
Good day!
Today I got around to replacing this phase sensor) It all started in the summer, the “Check” started to light up periodically and I thought of buying a BC so as not to spend money on diagnostics, after buying the BC I found out that the phase sensor was rosining the brains.
Phase sensor
, this is a thing that, if it malfunctions,
increases fuel consumption by 10-15%
of normal.
Catalog number of the sensor for the 1.5 8v engine 2111-3706040-00
the last 2 digits are the manufacturer.
I decided that it was time to change it, otherwise the burning “check” was already annoying, and the passengers hesitated to ask what was wrong with the engine))
Actually, there are no problems with replacement, the work lasts for 5-10 minutes maximum
.
At the moment my consumption was 9.6, I had already driven more than 100 km and the consumption remained the same. (consumption in the city)
Replacing the sensor:
1)
Remove the terminal from the battery
2)
Remove the contact from the sensor itself
3)
Unscrew the bolt from the sensor
4)
Pull out the sensor
Reassemble in reverse order
Well, no way without photos)
And a couple of photos with BC data
And as usual, he was seen with a traffic violation. Not only is it basically impossible to turn there, he’s also in the oncoming lane and on a double solid road) when he passed the intersection, I saw in the mirror that he drove there then)
Any questions?) ask)
Price: 285 ₽ Mileage: 65,909 km
Is it possible to replace it yourself or prefer a service station?
The first possible solution is to completely replace the sensor.
This is the cheapest option, because the device costs only 270 rubles. This type of work is done by home craftsmen themselves.
But sometimes it happens that replacing the sensor does not solve the problem. This rarely happens. For example, when a controlled gear moves. In this case, you cannot do without the help of professionals. Incorrect installation of the timing belt is another cause of serious malfunctions. The cost of work for specialists varies, it all depends on the specific problem and the location of the repair. But it’s unlikely to cost more than a thousand rubles.
Detailed replacement instructions
If any malfunctions are detected, it is recommended to replace the part immediately. However, the procedure is slightly different for engines with 8 and 16 valves. Let's consider both options.
If the engine is 8 valve
- In this case, the sensor itself is often mounted using only one bolt. It is easy to unscrew using a 10mm wrench.
- After unscrewing the bolt, you can completely dismantle the device. It is necessary to close the connector where it was installed. This will protect against dirt and dust getting inside.
- The last stage is diagnostics of the regulator. If there are traces of dirt on the surface, you need to get rid of them by wiping the surface dry. After this, you can put the device back in place and start the engine again.
If the indicated measures do not help, a complete replacement is carried out. Photo: ytclone.com
About the features of 16-valve engines
The process of removal and replacement in this case has certain differences:
- The sensor is installed under the air manifold and is located next to the camshaft itself. Removing the radiator grille under such circumstances simplifies the job.
- A wrench or socket extension will also become indispensable assistants. You need to unscrew the two main screws that secure the installation position.
- Now you can proceed to checking the functionality of the device. It is cleaned if necessary. Then it is installed in its place. If the problem does not go away, then you should proceed with replacement.
- It is prohibited to use sealants when installing a new device. After all, it always operates in an aggressive environment. At the same time, the temperature on the cylinder head is constantly changing. Because of this, replacement when using a 16-valve engine is slower, although the actions remain approximately the same.
Sensor layout
The sensors under the hood of the VAZ 2115 are located as follows.
1. Phase sensor; 2. Coolant temperature sensor; 3. Knock sensor; 4. Oil pressure sensor; 5. Oxygen sensor; 6. Crankshaft position sensor; 7. Speed sensor; 8. Idle speed sensor; 9. Mass air flow sensor; 10-11. Gasoline level sensor; 12. Antifreeze level sensor; 13. Throttle position sensor
DF ERRORS
If the VAZ 2114 is equipped with an on-board computer, if the device malfunctions, it will display one of the errors with code 0340 or 0343. Let’s analyze each of them in more detail.
- FAZ sensor error 0340 - indicates the absence of a DF signal. The cause of this error can be anything from oxidized contacts to mechanical damage to the device. Solved by replacing the part with a new one.
- Error 0343 - high signal level of the phase sensor. Its cause, as a rule, is damage to the wiring itself or the terminals in the contact block, or their loose/oxidized connection.
Errors in the VAZ 2115 phase sensor are completely similar to the errors that occur on the fourteenth.
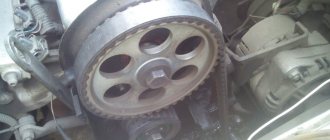
It is worth noting that in addition to a malfunction of the DF itself, the cause of errors may be a slipped timing belt or a loose crankshaft gear.
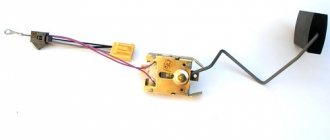
Camshaft sensor VAZ 2115
The main purpose of the camshaft position sensor is to collect information and transmit data to the engine control unit - based on the obtained indicators, the system calculates the ignition timing and also forms the optimal air-fuel mixture ratio for injection.
The camshaft sensor on the VAZ 2115 is the main control and measuring device, without which the proper functioning of the power unit is impossible.
If the camshaft sensor stops working correctly, the engine may either not start completely, or the fuel intake system will begin to transfer mixture to 2 cylinders simultaneously.
In any case, this negatively affects the resource of the power unit, therefore, after initial signs of malfunction of this element appear, the sensor must be sent for diagnostics or completely replaced.
Typical malfunctions of the camshaft position indicator are as follows:
- There is a significant increase in fuel consumption;
- The engine idle speed is not self-regulated; the speed fluctuates noticeably;
- The dynamics of the power unit decreases, the speed increase time increases;
- The engine self-diagnosis mode does not work;
- After starting the power unit, a check mark lights up on the dashboard and disappears after a few seconds.
Note! A camshaft position sensor for a VAZ 2115 costs no more than 450 rubles. Do not neglect to replace a part if it has problems with its performance - timely replacement of the indicating device will prevent premature engine wear, as well as protect against damage to the engine electronic system and reduce fuel consumption.