According to the manufacturer's recommendation, replacing a grenade on a Priora means installing a new front wheel drive assembly - 2 CV joints and an axle shaft on each side. Since a new unit costs a lot of money, the cost of the work is too large. Therefore, in practice, only the worn part of a given unit is replaced - the outer or inner grenade, or even both at once. If you know how to change these parts yourself, you can save a lot on car service costs.
When is replacement required?
The hinge mechanisms of the Lada Priora, which transmit rotation from the engine to the front wheels, are considered quite reliable and in some cases last 100-150 thousand km. Grenades should be replaced in the following cases:
- The car's mileage is more than 100 thousand km;
- the parts of the unit have become unusable, as evidenced by crunching sounds when turning the front wheels.
The first type of replacement is preventative. Recommended for motorists for whom a car is a tool for making money, which must be constantly in combat readiness and serve without fail. Replacement due to wear is a more common option; it is practiced by most Priora owners.
In order to change expensive CV joint parts as rarely as possible, it is important to promptly detect torn boots, through which dirt and dust enter the mechanism. Grenades cannot be repaired; they only need to be replaced. It is much easier and cheaper to replace leaky anthers so that the assembly lasts as long as possible.
Causes of failure
Knowing the main reasons for the failure of the internal grenade, you can prevent this situation at least partially, since in most cases the driver himself is to blame. Here is a list of the most common problems that cause mechanism failure:
- There must be a certain amount of special lubricant inside the part. Poor quality lubrication or its absence leads to increased wear of internal surfaces.
- Low quality metal, fake components were used in the assembly.
- Damaged boot and untimely replacement. As a result, dust, debris or moisture may get inside the grenade.
- Poor quality of roads, aggressive damage to the car due to constant driving on them.
- Late replacement of spare parts for CV joints.
Preparing for work
To replace the grenades, you need a car lift or an inspection ditch, since some of the disassembly work is performed from below. The following tools and devices will be required:
- standard set of socket heads with a knob;
- mount;
- open-end wrenches;
- metalworking tools, which include screwdrivers, hammer and pliers;
- a device that helps press the steering rod ball pin out of its socket in the strut.
If you don’t have a steering rod puller, then it’s easy to find one from fellow car enthusiasts or just buy one; it’s inexpensive. This is a steel cylinder with a slot and a bottom into which an extrusion bolt is screwed. To carry out the replacement in the inspection hole, you will also need a jack with a wheel wrench to lift the car. To completely disassemble the unit, it is advisable to have a vice and purchase CV joint-4 thick lubricant.
Lada Priora Hatchback › Logbook › We’ll crunch the returns from drives or CV joints...
It all started with the fact that there was an unpleasant dull click when starting off. Rarely, once a month it happened. Then I installed the rear engine mount, which connects the box and the body, but since the factory side cushions were tired, the engine hung slightly below its level and I had to put washers in order to screw the rear cushion to the body at the same level as the engine. Six months later, I changed all the side and top airbags, the engine became taller, removed the washers from under the rear airbag, and away we go... There is a click when starting, and a click when turning all the way in any direction. The search for sounds began. Thanks video
I discovered that the crunching noise was coming from the inner left grenade. It was decided to change. I purchased a Trialli tripoid internal grenade. Day off - replacement - torment with clamps, because I had to buy non-original clamps, since the grenade included clamps and stoppers (there is a complete set on the label, the sellers do not admit it). I didn’t bother to get involved, but now the Tolyatti AvtoVAZ store is taboo for me. As the play progressed, it became clear that the drive boots on the right side were cracked. It was decided to take the drive assembly. About two months passed and here they are with the Belmag drive (well, that’s what I wanted, that’s what my soul asked for).
Replacement process (work was carried out without a pit, without a lift, on the ground): Warm up the engine to operating temperature. Loosen the wheel bolts and use a 30mm socket with a large lever to remove the hub nut. First we deal with one side (disassemble and assemble) then the other. We jack up the left side (secure it with a support). We unscrew the drain plug in the box with a 17mm head and drain the oil while it is warm. Drain the oil for five minutes. Screw the plug back in
Next, we unscrew the two bolts securing the ball joint with a 17mm head and unscrew the hub nut completely, remove the washer from the hub, turn the steering wheel all the way to the side so that the steering tip moves away from the engine compartment in the opposite direction, this makes it easier to release the outer CV joint and carry out further actions with the drive .
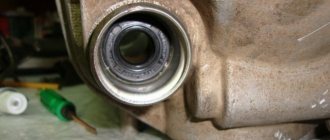
In order to pull the internal grenade out of the box, we put a spatula or chisel and press it against the oil drain bolt from the box and hit with a hammer on the place where I have the red electrical tape (two or three sharp blows and the CV joint will come out)
We take out the old CV joint and insert a new one. I used an old hub nut to hammer the inner CV joint into place. I screwed it back onto the outer CV joint and, with sharp blows of a hammer, the inner CV joint went into the box all the way.
We insert the outer CV joint into the hub and align the wheels. We put on the washer and attach a new hub nut. Tighten the ball joint bolts. We insert a screwdriver between the caliper and the brake disc and tighten the hub nut completely on the lever. Counter the nut.
We put on the wheel and tighten the bolts. There is one side ready. We do the same with the second one.
Disassembly procedure
The first operation is not removing the wheel, but unscrewing the large wheel bearing nut. It is caulked, so it will be much more difficult to loosen when the car is raised. After this, the wheel bolts are loosened and the car is raised with a jack.
Do not forget to place reliable supports under the rear wheels to secure the car.
If the Priora has a metal sump protection installed, then it also needs to be removed in advance. In addition, it does not hurt to partially empty the gearbox oil sump to avoid liquid lubricant leaking through the open hole after removing the drive.
Further steps are carried out according to the following algorithm:
- Disconnect the steering rod from the rack using a puller. To do this, you need to unscrew the ball pin and put a squeezing device on it. Pressing out is done by tightening the bolt on the puller.
- Unscrew the 2 bolts holding the ball joint. You can turn the steering wheel all the way so that the hub is in a comfortable position.
- Use a sharp object to mark the axle shaft on the gearbox side, and then pull it out of the spline joint, holding the brake disc with your hands on both sides.
- Place a small container under the gearbox in case of oil leakage and remove the internal grenade from the splines. This is done using a mount whose blade rests on the gearbox housing. If manual pressure on the mount is not enough, then you can give it several gentle blows with a hammer to move the assembly from its place.
When the drive assembly is removed from the car, it must be completely disassembled and worn elements, including anthers, must be replaced. Disassembly begins with them, for which it is necessary to loosen the fastening clamps and move the rubber boot, and then clamp the axle shaft in a vice closer to the end with which work will be carried out.
When it is known that the grenade needs to be replaced, there is no need to stand on ceremony with it and you just need to knock it off the slots with a hammer, holding it with your hand at the other end, and then remove the boot. The second grenade is dismantled in the same way, only the axle shaft must be moved in a vice and clamped closer to the hinge. If, for various reasons, the grenade needs to be kept in normal condition, then it must be knocked down carefully, using a wooden handle.
Selection of motor oil
The Gazelle 3302 gearbox needs to be filled with fresh oil much less frequently than the power unit. The manufacturer recommends that drivers change the gearbox oil at least once every four to five years or every seventy-five thousand kilometers (whichever comes first). Owners of Gazelles claim that the oil in the box needs to be changed at least once every sixty thousand kilometers. In reality, transmission oil loses its characteristics much earlier.
While driving, the car experiences high loads. The transmission in particular suffers greatly. The situation gets worse if the driver pours low-quality or unsuitable oil into the gearbox.
Which car oil to choose for the Gazelle? The answer to this question is probably of interest to any Gazelle driver. It's sad, but the car manufacturer does not give specific recommendations regarding what kind of oil to pour into the box. The only thing that is indicated in the operating manual is that the viscosity of the lubricant should be SAE 75W.
When selecting a petroleum product, it is necessary to take into account:
- manufacturer's recommendations. They cannot be ignored;
- lubricant resistance to low temperatures. Even if the oil is frozen, the crankshaft will be able to turn the gearbox shaft, but the transmission itself will definitely not be able to turn the axle.
Most car owners use Castrol 75w140 and Total 75w80 in their cars. The latter brand of lubricant is most often used to change the oil in the Gazelle box. It is considered a mineral water and has the following performance indicators:
- viscosity at a temperature of one hundred degrees – 8 sq. mm/s;
- viscosity at a temperature of forty degrees – 49 sq. mm/s;
- density at a temperature of fifteen degrees – 877 kg/cu. m;
- freezing temperature - minus forty-five degrees;
- flash point - two hundred eight degrees.
We recommend: How to make a heated windshield with your own hands
Installation of new hinges
After disassembling the drive, it is necessary to install new parts and reassemble the transmission in the reverse order. Replacement is done as follows:
- The small clamp is put on the axle shaft first, followed by a new boot. The clamp must be placed around the end of the casing and tightened. It is better to turn the boot in the other direction so as not to interfere with the installation of the hinge.
- Add SHRUS-4 lubricant to the hinge mechanism. According to the instructions, there should be at least 40 cm³ in the outer grenade, and 80 cm³ of thick lubricant in the inner grenade.
- Place the grenade on the shaft, making sure the splines match. Using a wooden adapter, press it as far as possible with gentle hammer blows.
- Pull the boot onto the grenade, apply a large clamp and tighten it. In the same order, the operation is performed on the other side of the axle shaft.
Now the drive assembly can be put into place. In order not to confuse the hinges, you should follow the mark placed on the axle during disassembly. The assembly is mounted into place from the inspection ditch, the splined part of the internal grenade being inserted first. To seat it in the slots all the way, you will have to rest the axle on the lower lever and apply several blows with a hammer through a piece of wood from the other side. Further assembly proceeds in reverse order.
CV joint diagnostics
As mentioned above, the internal CV joint is one of the main mechanisms of a car transmission and it is for this reason that all elements of this unit must be made from high-quality materials. As a rule, the shelf life of the elements is long. But, as practice shows, this mechanism, for various reasons, wears out prematurely. This happens even with cars that have recently left the assembly shops. The reasons for this may be different:
- Poor quality or complete absence of lubricants on the elements;
- Absolutely low quality of the material from which the CV joint is made, as well as the use of fakes and defective spare parts;
- Entry of various debris and water into the mechanism due to damage to the boot;
- The terrible road surface of our roads, aggressive driving of a vehicle on these roads;
- Late purchase and replacement of spare parts. Failure to comply with the rules for using the vehicle specified in the operating instructions.
Well, if you have a breakdown and you need to diagnose or repair CV joints, then you have found what you were looking for. Let's look at how diagnostics are carried out and how to repair a damaged internal CV joint
It is important to understand that the cause of the breakdown may not be in the CV joint itself, so diagnostics of the entire system in this case is simply necessary
There is a primary and detailed diagnosis of the constant velocity joint. Primary diagnosis includes a superficial examination of the mechanism. In this way, you can determine whether the boot is broken and the presence of a characteristic sound (crackling sound). To carry out a more detailed diagnosis, the constant velocity joint must be disassembled. A hole or a high overpass is well suited for performing such diagnostics, but in those, as practice has shown, not in rare cases when they are not there, you can use a jack. Diagnosing CV joints yourself is not particularly difficult.
Before diagnosing the constant velocity joint, it is necessary to disconnect the entire structure from the vehicle. To do this, you need to unscrew all the mounting bolts (there are 6-8 of them). After the bolts are twisted, the CV joint must be removed from its seat using a large screwdriver or pry bar. Next, unfasten the retaining ring and clamps to disconnect the CV joint from the shaft. When removed from the shaft, the protective cover is held in place or turned to the side. As a rule, you cannot remove the joint from the shaft by hand, so use a hammer. After removal, the hinge must be rinsed with clean water.
Before disassembling the product, it is advisable to note the relative positions of the parts so that you do not get confused during assembly. You can use paint or a touchstone to mark.
A metalworker's cleave will be useful for this work, since the hinge must be secured somewhere in order to knock the balls out of it. Next you need to remove all the balls from the separator. This can be done with a screwdriver that is made of soft metal. When disassembling the separator and cage, the separator windows play an important role. So, in order to get the separator with the holder, you need to rotate it to such a position that the elongated windows are against the protrusions of the body. The cage is removed only after its protrusions are placed in the separator window.
So, in front of you is a disassembled hinge; now you need to thoroughly rinse each part so that you can inspect it. The condition of each part must be carefully checked. If grooves or depressions larger than 1 millimeter are found, the “grenade” must be replaced. Also, if areas with small spots of chipped metal particles or chips on the ball grooves are found, there is no question of further use of this hinge. What about the separator? The most important thing during inspection is the presence or absence of cracks and chips between the end and the window.
If further diagnostics show that there are no violations, then the inner CV joint can be assembled. To ensure proper operation of the CV joint in the future, it is necessary to introduce a certain amount of lubricant into it. Next, a separator with a cage is installed, into which the balls are then driven. In this way, you can carry out a complete diagnosis of the CV joint, resorting to its complete disassembly. Of course, cars of different brands have different internal CV joints. But the diagnostic method is the same for everyone.
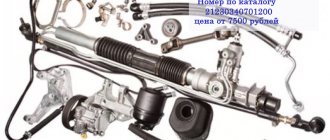
Choosing an outer CV joint for the Lada Granta
There are enough hinges from different manufacturers on sale, it’s bad that sellers treat them like all Zhiguli spare parts - everything is the same. In practice, for the first generation Grants there are two types of external (and internal) CV joints - for cars with manual transmission and for Grants with automatic transmission. In a word, grenade 2215012-00 (21 teeth) is suitable for such vehicles.
For Lada Granta with a manual transmission there is a CV joint with catalog number 2215012-86. In order not to be confused with numbers, let’s look at the differences between CV joints for Grants with automatic transmission and manual transmission:
- The spline connection in the outer hinge has changed in size, the number of teeth is 21. A CV joint with 22 splines is suitable for a manual transmission.
- The geometric dimensions of the body have also been changed.
- The length of the outer spline part for manual transmission is 76.5 mm, for automatic transmission - 77 mm.
- Case height (without spline) 55 mm for automatic and 52.2 mm for manual.
- The number of teeth for the ABS ring does not change and remains 43.
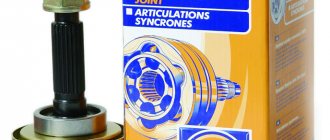
Therefore, before purchasing an outer CV joint, we first look at the number of splines on the inside of the joint body. Among the manufacturers on the market, AvtoVAZ, Belmag and Triall dominate. The price of an outer CV joint on a Lada Granta is around $20.
It is important that the kit includes a locking ring, molybdenum disulfide-based lubricant and a neoprene boot. It shouldn’t be too hard, but a boot that’s too thin won’t last long.
Emergency repairs
Every motorist who cares about his own vehicle is simply obliged to know how wheel alignment is performed. This largely prevents a number of problems during operation.
If they didn’t pay attention, or the breakdown occurred unexpectedly, the driver felt the steering wheel creaking when rotating, or other characteristic signs of a violation of the integrity of the boot appeared, repairs need to be carried out.
An emergency repair method is relevant if trouble catches you on the road. But it is only suitable as a temporary measure.
The idea is to wrap the boot with film and secure it with electrical tape or a clamp. The film can be seen with a bag or rubber glove. This is no longer fundamentally important.
There are drivers who have traveled thousands of kilometers using a similar life hack.
If the boot ruptures, water, dirt, dust and sand probably managed to get inside.
Therefore, in the very near future the CV joint will begin to suffer greatly. The best solution in this situation would be to remove, wash, add lubricant, and install a new boot.