The temperature sensor of a VAZ-2112 car is one of the important engine parts. The purpose of the controller is to warn the driver in time about the threat of antifreeze boiling and turn on the radiator fan. At the same time, the coolant temperature sensor itself may break. You need to know how to check its functionality, and if it fails, replace the part with a new device.
Cooling system controllers:
What functions does the sensor perform?
This device performs a lot of tasks. Based on its readings, the fuel mixture is prepared and the ignition timing is changed. The element also gives commands to turn on the fan in case of overheating.
Enrichment of the mixture is always associated with increased temperatures in the power plant. The lower the engine temperature, the richer the mixture needs to be fed into it. Any electronic control unit works on this principle. And the domestic top ten is no exception.
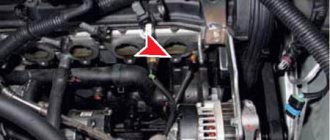
Triple
If the engine is shaking, even just a little, it is worth measuring the compression in each of the cylinders using a special device. If there is none, then you will need a vacuum compression gauge and an assistant who will start the engine. But it’s still better to contact a qualified specialist at the nearest service center and carry out computer diagnostics. This way the fault can be found faster and with greater accuracy.
If you measured the compression yourself and it turned out to be normal, then you should pay attention to the ignition coil, high-voltage wires and spark plugs. And in case of malfunction, replace them
It is worth noting that it is better to change the spark plugs as a complete set, and change the wires to silicone ones.
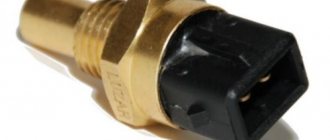
Sensor device
At the dawn of the automotive industry, simple thermal relays were used as coolant temperature sensors (hereinafter referred to as coolant temperature sensors) - they were installed on most internal combustion engines. These sensors can now be found on K-Jetronic single-injection systems and the like. These were used on old Mercedes from the 80s and 90s. How it works? When the relay contact is in the open position, the engine warms up. When the contact is closed, the electronic control unit understands that the engine has heated up to operating temperatures. The concentration and composition of the mixture changes.
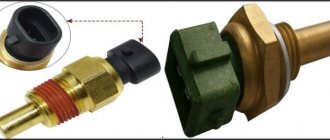
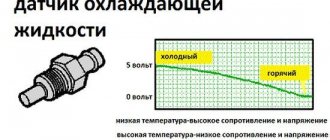
Nowadays, thermistors are used as DTOZ. These are resistors that change resistance depending on the temperature of the environment. In the VAZ-2110 car, the coolant temperature sensor is of this type. Heating is monitored continuously, without interruption. Thermistors for these sensors are made from nickel oxide or cobalt oxide. These alloys have a peculiarity: as the temperature rises, the number of free electrons in them increases, due to which the resistance decreases.
The thermistor located inside the DTOZH has a negative temperature coefficient. The maximum resistance level is achieved when the engine is cold. A voltage of +5 V comes to the temperature sensor and as the engine heats up, it decreases. The ECU records the slightest changes in voltage, and thus the coolant temperature is determined.
Sensors with positive temperature coefficients can be installed on engines from Renault and some other power units. They are arranged similarly. However, as the antifreeze temperature increases, the resistance on the sensor does not fall, but increases.
Diagnosis of VAZ 2112 16 valves with your own hands. Why pay extra?
In addition, despite modern equipment, the level of diagnostics in services is practically not growing. Not everywhere there are specialists who can correctly assess the condition of the car. Therefore, in most cases, self-diagnosis will be the best option.
True, special devices may be needed to carry it out, but their purchase will more than pay off in savings on trips to a car service center. It should be noted that the tenth VAZ family has the same microcontroller installed. Therefore, instrument diagnostics are performed here in the same way.
Visually. Do-it-yourself diagnostics of a VAZ 2112 16 valves begins with an inspection of the car. Carefully inspect all components
Pay special attention to the suspension and steering. Parts must not have cracks or other damage
The brakes and body are also inspected. All these design elements are important for the normal operation of the car. However, many of their faults can be seen with the naked eye.
The twelfth model uses the January-4
" This device constantly diagnoses the condition of the vehicle. All detected faults are stored in the controller’s memory and remain there until they are erased. The source of the problem can be determined by the two-digit code. Codes from 12 to 61 inclusive are used here.
For timely detection of errors and diagnostics, there is a “CHECK ENGINE” light on the dashboard; in common parlance it is referred to as a “check”. This lamp is connected to a microcontroller. And when a malfunction occurs, it lights up. Signaling the need for an urgent check of all engine systems.
When the ignition is turned on, the light comes on and all engine systems are checked. If there are no breakdowns, the “check” goes out when the engine is started. If the malfunction is intermittent, then “CHECK ENGINE” will light up and go out. Please note that intermittent problem codes are also stored in memory and may interfere with diagnostics or, conversely, provide clues about the true cause of the failure.
To read error codes, you will have to use the connector located at the bottom left of the dashboard. Diagnostics can be carried out in two ways:
- Diagnostic scanner (let’s just say EML 327 is not suitable);
- Counting the "check" flashes.
To check for errors using a lamp, connect output “B” of the diagnostic block to the “minus” of the machine. The easiest way to do this is to connect this output to output “A”, which is “ground”. After this, the key is turned to the “ignition” position. You need to carefully monitor the behavior of “CHECK ENGINE”. To begin with, the light will display the diagnostic system operating code. It will look like a flash, pause, flash, flash. This means - 12. This code is repeated three times. After it, the system issues fault codes.
It's easy to decipher them
. The first part of the flashes means dozens, then there is a pause and another one to nine flashes occur. This is what makes up the fault code. If there is no code “12” the problem is in the controller itself. All codes will be displayed 3 times.
You cannot disconnect contacts immediately after completing the diagnostics. This may damage the diagnostic device. First the ignition is turned off. Only after 10 seconds should the contacts be opened.
It is much easier to diagnose using a scanner. If it is not available, you can use a laptop. Just download the test program and get a USB adapter (K-Line adapter). The majority of programs evaluate a large number of parameters in addition to errors. You can view and evaluate all the main indicators of the motor. This option will be the most optimal.
Reset errors
. The controller remembers errors and will show them even after the fault has been eliminated. Therefore they need to be reset. This is the only way to ensure that the problem is corrected correctly. To reset, turn off the power to the device for 15 seconds. To do this, simply remove the negative terminal from the battery. Do not perform this action with the ignition on. This may damage the controller.
Conclusion
. Any car owner wants to control its condition. Constantly going to the service center to check is quite expensive. Therefore, diagnosing the VAZ 2112 16 valves yourself is the most optimal solution. The great thing is that you can do it at any convenient time.
- Diagnosis of HBO 4th generation with your own hands. When it makes no sense to pay a service station
- Do-it-yourself diagnostics of the Gazelle 405 engine. Not interesting for long
- DIY diagnostics of VAZ 2114 and 2115. Find out everything that's broken
- DIY Ford Focus 2 diagnostics. Learning to avoid service stations
Operating principle of DTOZH
The VAZ-2110 temperature sensor works as follows. The thermistor located inside the sensor is an electronic device with a negative indicator of heating modes. The mode of temperature values up to 130 degrees reduces the resistance within 70 Ohms, and the lower limits at -40° increase the resistance to 107 kOhms.
The detector supplies +5 V to the temperature sensor through a constant resistor located inside it. The element determines the heating level of the antifreeze thanks to the potential difference across a thermistor with variable resistance.
Where is it located?
Owners of cars of this model are well aware of various problems associated with this device. Often the device requires replacement. Beginners do not always know where the temperature sensor is located on the VAZ-2110. In cars, this element can be installed in a variety of places.
So, in classic models the thermistor is located directly in the cylinder block. And in AvtoVAZ models of the tenth family you can find DTOZH in the thermostat. By the way, on the VAZ-2110 there is not one temperature sensor - there are two, but the second one does not perform any important tasks. It is connected only to the instrument panel bottom temperature indicator.
When is replacement required?
Checking with your own hands and replacing the temperature sensor on a VAZ 2112 with an injection 16-valve engine is not difficult. Repair of this part is not advisable. If problems arise, you must purchase a new part. A faulty temperature sensor can cause serious problems.
First of all, the engine overheats. If incorrect data is sent to the ECU, the cooling fan will not turn on on time. Consequently:
- antifreeze will boil away;
- the radiator or other components of the cooling system may burst;
- the engine will overheat.
Therefore, it is advisable to replace it at the first sign of a malfunction of the temperature sensor. Main symptoms of failure:
- The radiator does not turn on - it starts only at the “command” of the temperature sensor;
- problems when starting the engine - this is especially acute during the first cold weather;
- when the engine is not warmed up - poor exhaust;
- the appearance of steam from the engine - this indicates overheating of the unit;
- Fuel consumption has increased significantly when outside temperatures are above zero.
The price of a temperature sensor is no more than a few hundred rubles. Therefore, it is advisable to purchase a spare one in advance. This will avoid problems associated with finding the part. If you suspect that the sensor is not working, you should replace it immediately. The part is not repairable.C
Sensor malfunctions
As you know, the ratio of fuel and air in the combustible mixture depends on the readings of the device. All owners have already encountered or will continue to encounter various problems that the temperature sensor creates. It also determines whether the fan will start when overheated or not.
You can suspect a malfunction of the coolant sensor on a VAZ-2110 based on the following symptoms. So, the first signs are problems starting the engine on a cold frosty morning. You may also experience poor exhaust and fuel consumption will be significantly increased.
These symptoms do not necessarily indicate that the sensor needs to be replaced. Sometimes it is enough to clean the contacts and clean the sensor itself from corrosion. If a visual inspection fails to identify problems, then you need to check the element.
We check the mass air flow sensor on a VAZ-2110 with a multimeter
The sensor block, the first wire may not be there - this is normal.
To do this, we need to understand the pinout and the sensor connection diagram. As you can see, the block has only five wires:
- + 12 Volt.
- + 5 Volts.
- Total ground (green wire).
- Air temperature output signal.
- Air flow signal output (yellow wire).
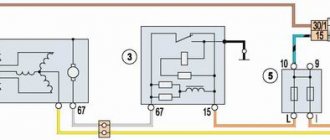
Electrical diagram for connecting the mass air flow sensor.
The pinout may differ in different firmware versions and on different sensors. Everything is clear with the first two contacts - take a multimeter and check the presence of voltage when the ignition is on. If there is no signal, we look for the cause either in broken wires or in poor contact. Now we check the main indicator - the accuracy and magnitude of the air flow signal. By the way, this can be checked without a multimeter, using the on-board computer, if one is installed:
- We go to the menu, look for sensor parameters.
- Find the voltage Udmrv.
- The rating for all of the above modifications is from 0.996 to 1.01 V.
The platinum thread gets tired over time and distorts the impulse upward. A change of even one hundredth of a Volt is unacceptable. If the computer is not installed, we use a multimeter. We check the voltage between 3 and 5 (minus) contacts, setting the measurement limits on the multimeter to 2 V. Turn on the ignition, but do not start the engine.
The scale shows 1.00 - the sensor is in excellent condition.
On a scale of 1.26 – the sensor is “dead”.
Check table
We evaluate the result using this table:
| 0.99-1.02 V | The condition of the air flow sensor is excellent, close to new |
| 1.02-1.03 V | Sensor in good condition |
| 1.04-1.05 V | The platinum thread is worn out, you need to think about replacing the sensor |
| More than 1.05 V | The sensor does not work, urgent replacement is necessary |
Sensor diagnostics
All car owners should know how to check the temperature sensor on a VAZ-2110. By checking, you can save on the cost of a new device, although its price is not entirely high.
You can test the element by heating it. You need a suitable container. It could be a glass or a teapot. Hot water is poured into it. The water should be heated to approximately 100 degrees - the heating should be monitored with a thermometer. Next, the working part of the device is lowered into water. However, it is precisely the part of the temperature sensor that is located in the motor that needs to be lowered. Contacts must not be in water. Then a multimeter is connected to the contacts and the resistance is measured.
A working sensor at a liquid temperature of 100 degrees has a resistance of 177 ohms. At +50 degrees the resistance is 973 Ohms. If the values do not correspond to the norm, then the faulty element should be replaced. If the indicators are within these norms, then everything is in perfect order.
Location and service life of the controller
Description of the electrical equipment diagram of the VAZ-2112
On a VAZ-2112 with engines with 16 valves, the measuring device is located at the exhaust pipe, between the exhaust manifold and the coupling. To replace the device, you must gain access to the underbody of the vehicle body. For the best convenience, you need to drive the car into a garage with a pit or drive onto an overpass located near the highway.
The service life of the oxygen sensor may vary. If a motorist uses a high-quality fuel mixture, the service life will be up to 110 thousand kilometers. In the case when a low-quality mixture is used, the service life is reduced to 85 thousand kilometers.
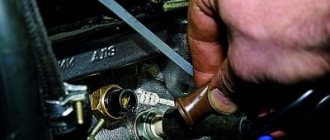
How to remove
First of all, they look at what is preventing you from getting to the thermostat and sensor. The air filter housing is in the way - it needs to be removed. Next, it is recommended to drain the antifreeze from the engine, but this is not always necessary. When replacing, only a little fluid will spill, and you can always top it up to the level.
Then, after draining the liquid, remove the terminal from the battery, select the desired sensor and remove everything connected to it. After disconnecting, the element is simply unscrewed, holding its edges with your hands or a key. After this, the device can be removed.
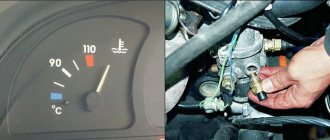
Operating temperature and causes of engine overheating
Under normal conditions, coolant circulation ensures a temperature of 86-90 °C. During hot periods, the indicator may lag, then after turning on the fan, the temperature stops at 94-108 °C. A frequent question from car enthusiasts: what is the temperature in winter when it’s cold? The first 10-15 kilometers the indicator may be below 80 °C, but after this point it should rise to 85-90 °C. These data are suitable for VAZ 2110 injector.
Now you know what the normal operating temperature of the VAZ 2110 is, so it’s time to study the reasons for its excess. If the “culprit” of the overestimated indicator is not the DTOZH, then the following actions should be taken:
- Check the outer part of the radiator for contamination.
- Replace the thermostat in the VAZ 2110 injector.
- Check the coolant level in the expansion tank; if it becomes low, add it to the required level.
- Adjust the ignition timing.
- Check that the fan is turned on.
Installing a new coolant sensor
The new coolant temperature sensor on the VAZ-2110 is installed in the reverse order. Experienced motorists recommend lubricating the threads of the element with sealant.
Sometimes coolant leaks are observed from under the new sensor. The replacement process is extremely simple and even beginners who just got behind the wheel and didn’t know anything about cars can handle it without difficulty.
Replacement
Fuses and relays VAZ 2114. location. description
The check showed that the sensor was to blame. Therefore, you have no choice but to replace it with a new one. For this:
- The coolant is drained. It is better to drain the maximum amount. Especially if the coolant has long been due for replacement;
- Disconnect the terminals from the battery;
- To make it more convenient to work, remove the air filter from its seat;
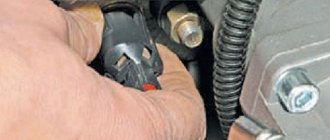
- Turn off the ignition and remove the sensor connector;
- Use a 19mm wrench to remove the sensor. The sealing ring must be removed along with it;
- A new seal ring is taken and a new, high-quality coolant sensor, suitable for the VAZ 2110 model, is mounted in place of the old one;
- The entire assembly process is performed in reverse order.
The coolant temperature sensor for the VAZ 2110 plays an important role. The owners of this model know very well that its failure is not a rare situation. The good news is that the replacement procedure is not complicated and can be carried out by any driver, even whose driving experience does not exceed several days.
As for the cost of self-repair, you only need to purchase a new O-ring and the sensor itself, of course. Today, a good quality device for a “ten” costs about 200 rubles. The tools are only the most standard ones, so you won’t have to buy anything or spend any extra money.
A professional will do the work at the auto repair shop, but the cost of the repair will be appropriate. Plus, many service stations use cunning moves, trying to force the car owner to perform a number of additional measures. Sometimes they are really useful, but sometimes they are just an attempt to get more money out of you.
Decide for yourself whether it’s worth taking the car to a service center to replace the TOZ sensor, or whether you can calmly complete the entire procedure yourself in an hour, but save a decent amount of money.
Loading …