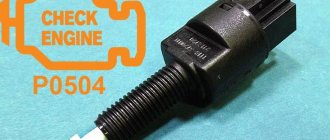
Owners of LADA cars with an electronic gas pedal may encounter error P0504 (mismatch of brake pedal sensors). Along with it, malfunctions in the engine may appear (stalls, speed fluctuates, does not start, etc.). Most often the cause is the brake pedal position sensor (brake light sensor or frog).
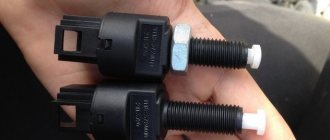
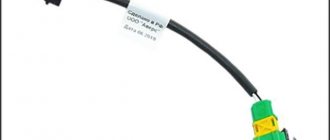
The brake pedal position sensor and brake light switch are mounted in one housing. Most often, the cause of its malfunction is a broken spring. In this case, you can repair the sensor yourself by replacing the spring with a new one. Or replace the sensor with a new one.
What are the reasons that cause sensor failure?
A detailed examination of the essence of the problem that arose, when error code 0504 appeared, will allow us to determine the list of reasons. This refers to the disassembly of the ill-fated sensor in the LADA Granta car. Three clips serve as an obstacle to this noble procedure, preventing the component from being easily disassembled. After overcoming this “barrier”, it becomes possible to observe the real reasons that caused the breakdown:
- deformation of the smaller (of 2) springs located on the rod;
- different heights of the contacts of the designated sensor;
- poor material (steel) used for the manufacture of terminals;
- presence of play on the floating contact element.
“Ringing” can be used as the initial stage of diagnosis. Each of the contacts must be subjected to this action separately, and then in pairs (“2nd” with “3rd”). The experience of LADA Granta owners indicates the presence of a dull tone during ringing, which confirms the malfunction of the contact group. Serviceable contacts are characterized by a distinct ringing “squeak”.
How to replace the sensor?
If you have received error code 0504, to perform this simple procedure you will need to provide access to the pedal bracket on the Lada Granta, on which our “ill-fated” sensor is actually present, or rather, above the pedal assembly. A well-carried out replacement will guarantee long-term operation.
- Remove the negative terminal from the battery terminal.
- We press out the plastic retainer (use a screwdriver).
- Next, remove the block with wires.
- Turn the sensor in a clockwise direction.
- We remove the faulty part.
We install the new component on a Lada Granta car in the reverse order. Don’t forget to first release the pedal to be able to insert the new product into its socket. We turn the component against the direction of the arrow until the corresponding click appears.
conclusions
If you often experience this error, then the brake pedal sensor is to blame. You should get a new element in the store (or contact an official dealer, since this malfunction is a warranty case if the car’s warranty has not yet expired), since on the automotive goods market this spare part costs about 200 rubles. And install it in a certified service center, an official dealer, or if you have a certain skill, you can perform the operations yourself.
About alternative sensor options
Since domestic “devices” for the Lada Granta car are not able to prevent an unpleasant situation, it is possible to use other devices that act as analogues. Such a component could be a brake light switch from Volkswagen, or more precisely: “FACET 7.1126”. This switch is slightly more expensive than the “native” one (560 rubles) and has the following features:
- four contacts;
- threaded leg with a similar diameter of 12 mm.
To successfully install the indicated analogue, you will need to acquire an adapter for the terminals.
Owners of LADA cars with an electronic gas pedal may encounter error P0504 (mismatch of brake pedal sensors). Along with it, malfunctions in the engine may appear (stalls, speed fluctuates, does not start, etc.). Most often the cause is the brake pedal position sensor (brake light sensor or frog).
The brake pedal position sensor and brake light switch are mounted in one housing. Most often, the cause of its malfunction is a broken spring. In this case, you can repair the sensor yourself by replacing the spring with a new one. Or replace the sensor with a new one.
Malfunction of the lights themselves
If during the check from the fuse box to the limit switch no problems are found, then you should move on. Now you should test the wiring from the second limit switch connector to the stop connectors with a tester. If it is working, then you need to check the board. The printed circuit board on which the taillights are mounted is not ideal, and is one of the biggest problems of all VAZ cars.
Its tracks often burn out or peel off, causing the lights to stop working. This problem can be solved in two ways - either re-solder the tracks (which can be done with a regular soldering iron, although not in road conditions) or replace the board with a new one (most motorists choose the second option).
Another reason why the VAZ 2114 brake lights do not work may be oxidation of the lamp sockets. In order to eliminate this problem, it is enough to clean all contacts from oxides that have appeared on them.
This is best done in one of the following ways:
- small grit sandpaper;
- WD-40 solution;
- kerosene;
- purified gasoline (“galosh”).
You should absolutely not use gasoline or other solvents to clean contacts.
The last option for faulty stops is the light bulbs themselves. It makes no sense to give any detailed advice here - you just need to replace the burnt out light bulbs with new ones.
By following all the tips listed above, the car enthusiast gets the opportunity to check the entire electrical circuit of the brake lights, starting from the fuse box and ending with the bulbs in the lamps. Thanks to this, the guarantee that the fault will be accurately detected and eliminated is 100%.
How to remove and install
Disconnect the negative terminal of the battery. Move the driver's seat as far back as possible, lift the steering column up, and remove the carpet. The sensor is located near the brake pedal, to remove it you need to remove the block with wires (by snapping the latches), and then:
- (Priora, Kalina, Granta, Niva 4x4) loosen the lock nut and unscrew the sensor.
- (Largus, Vesta, XRAY) turn the sensor counterclockwise 90 degrees and remove it from the bracket.
Installation of the brake pedal sensor is carried out in reverse order. Adjust it if necessary. We tighten the sensor until the pedal goes down. Then turn it out a little (counterclockwise 90 degrees) and secure with a lock nut. It should be so that when the brake pedal is released, the switch rod is completely “recessed”, and when the pedal is pressed, the rod should completely come out of the switch body. The process of removing and installing the sensor is also shown in the video:
Leveling up
First, open the hood of the VAZ-2115. The brake fluid reservoir (TF) is located here. Remove the cap from it and check if it is filled properly. If the level does not reach the “max” mark, then add the missing volume.
- unscrew the cap covering the fitting on the rear wheel brake cylinder;
- pour a little TJ into a transparent jar;
- Pull the hose onto the fitting (it should fit as tightly as possible);
- Immerse the other end of the tube in the container so that it is below the liquid level.
Source
How to check
Turn on the ignition and press the brake pedal, the brake lights should light up. After releasing the pedal they should go out. If the lamps do not light up, check the brake pedal sensor and the voltage supply from the battery to the wiring harness block.
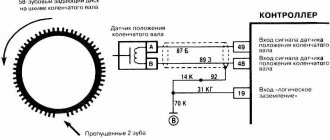
(Largus, Vesta, XRAY) Move the rod lock to the right position using a screwdriver. We check the brake pedal sensor using a multimeter in ohmmeter mode. Circuit 3-4 should be closed (resistance value is close to zero), and circuit 1-2 should be open (resistance should tend to infinity). After pressing the rod, circuit 3-4 should open, and circuit 1-2 should close. Before installation, move the rod to the left position.
(Priora, Kalina, Granta, Niva 4x4) Circuit 1-4 should be closed, and circuit 2-3 should be open. After pressing the rod, circuit 2-3 will close, and circuit 1-4 will open.
Hi all. Today we'll talk about the brake pedal sensor, or brake pedal position sensor to be precise. You will learn about the weak points of this device, as well as how to repair the brake pedal sensor or replace it on a Lada Granta.
Plant technological instructions
P0504 - Brake pedal A/B switches, signal mismatch
Using the Lada Vesta as an example:
Code P0504 is entered if:
- the brake pedal limit switch signals “3-4/1-2” are mismatched for more than 200 seconds with the engine running in idle mode;
- or the number of presses on the brake pedal, determined by the signals of two limit switches “3-4/1-2”, differs by the value of the diagnostic threshold on a moving vehicle.
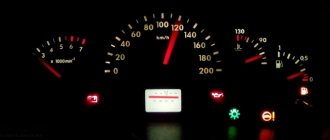
The malfunction indicator lights up on the 3rd trip after a permanent malfunction occurs.
Description of checks
The sequence corresponds to the numbers on the card.
- It checks whether code P0504 is active at the time of the request.
- Electrical circuits are being checked.
- Check the installation of the brake pedal switch.
Diagnostic information
The scan tool in Signal Monitor mode displays the pin status bit 3-4 (Brake Pedal Switch 1 parameter) and the pin status bit 1-2 (Brake Pedal Switch 2 parameter) of the brake pedal switch. The status of contacts “1-2” can also be monitored using the brake light lamps.
If a mismatch in the signals from the “1-4/2-3” switches is detected, the engine control system will operate in emergency mode until the end of the current trip.
After repair, start the engine, reset the codes and make sure there is no malfunction.
Using the Lada Granta/Kalina as an example:
Code P0504 is entered if:
- the brake pedal limit switch signals “1-4/2-3” are mismatched for more than 200 seconds with the engine running in idle mode;
- or the number of presses on the brake pedal, determined by the signals of two limit switches “1-4/2-3”, differs by the value of the diagnostic threshold on a moving vehicle.
The malfunction indicator lights up on the 3rd trip after a permanent malfunction occurs.
Description of checks
The sequence corresponds to the numbers on the card.
- It checks whether code P0504 is active at the time of the request.
- Electrical circuits are being checked.
- Adjust the brake pedal switch clearance.
Diagnostic information
The diagnostic device is in mode “1 - Parameters; 1 - General View” shows the status bit B_BREMS of contacts “2-3” of the brake pedal switch.
Monitor the state of contacts “1-4” using the brake light lamps.
If a mismatch in the signals from the “1-4/2-3” switches is detected, the engine control system will operate in emergency mode until the end of the current trip.
After repair, start the engine, reset the codes and make sure there is no malfunction.
By the way, the brake pedal position sensor can be repaired.
Keywords: lada xray sensors | Lada Vesta sensors | Lada Largus sensors | Lada Granta sensors | Lada Priora sensors | Lada Kalina sensors | 4x4 sensors | pedals lada xray | fret vesta pedals | fret largus pedals | fret pedals granta | Lada Priora pedals | fret Kalina pedals | 4x4 pedals | ECM Lada Vesta | ECM Lada XRAY | ECM Lada Largus | ECM Lada Granta | ECM Lada Kalina | ECM Lada Priora | ECM 4x4 | Niva sensors | Niva pedals | esud niva | AvtoVAZ order | universal article
1 0 0 0 0 1
Share on social networks:
Removing and repairing the brake pedal position sensor
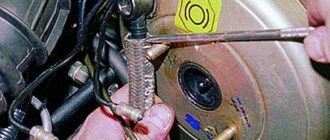
1. To diagnose the problem, it is necessary to remove the brake pedal sensor. This is done using the key at “19”. Move the driver's seat back and find the desired sensor. Then loosen the nut, turn off the power and remove the brake pedal sensor.
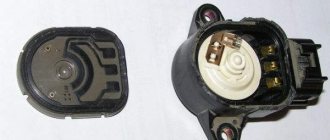
2. Then we disassemble it. Disassembly is quite simple; the sensor consists of two parts and is held on by latches. There is a spring inside the sensor, which most often causes a malfunction.
3. Replacing a spring with a suitable size and number of turns in most cases solves the problem. Also look at the condition of the contacts; there should be no oxides on them, and they should not be burnt.
4. After repairing the brake pedal position sensor, assemble it in the reverse order. And we install it in place.
5. Next, you need to adjust the sensor; for this there are two nuts on it at the top and bottom. The top one adjusts the gap, which determines the correct stroke of the button. The challenge is to find the “sweet spot” and adjust the gap so that the button moves freely.
6. Now that the Grant brake pedal sensor has been repaired, installed and adjusted, you can check its operation, but before that you should reset the error.
7. Then we start the engine and let it run, it may take about 10-15 minutes, if during this time the ECU does not generate an error, then the repair was not in vain. If the error appears again, it means something is wrong with the sensor, or it is incorrectly adjusted. If after all the manipulations you still have not managed to solve the problem with error P0504, most likely you will have to buy a new brake pedal position sensor and install it.
«>
Diagnostics
Before buying a new sensor, it is necessary to diagnose the DPT. It happens that the sensor nuts are unscrewed due to vibration and thereby its adjustment is disrupted, which can result in an error on the dashboard.
Check sequence:
- Press the brake pedal by hand and release, make sure that the sensor stop returns to its original position, thereby confirming that the return mechanism spring is working.
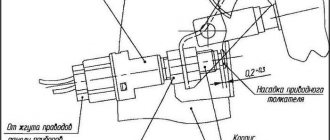
- Check the adjustment and tightening of the locknuts; with the brake pedal free, there should be a distance of no more than 0.5-1 mm from the sensor stop to the housing.
If any of these points are not met, you need to start replacing and adjusting the brake pedal sensor on the Lada Granta.