This diagnostic trouble code (DTC) is a generic powertrain code. The P0504 code is considered a common code because it applies to all makes and models of vehicles. Although the specific repair steps may vary slightly depending on the model.
Your vehicle's powertrain control module (ECU) issues a P0504 code in response to a recognized failure in the brake light circuit. The vehicle's computer monitors all circuits for abnormalities such as no voltage or out of range conditions.
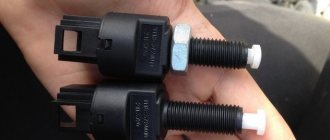
The brake light switch is tied to several circuits, each of which can lead to a dangerous situation. The brake light switch itself consists of two signal outputs, and if the switch is faulty, the problem is detected and this code appears.
This is not a costly failure in terms of parts cost or labor involved in replacement. But for your safety, it is necessary to carry out repairs as soon as possible.
How to Troubleshoot or Reset Trouble Code P0504
Some suggested steps to troubleshoot and fix error code P0504:
Diagnosis and problem solving
The main problem is considered to be a discrepancy between the data in the PCM and the brake pedal sensor. Therefore, let's take a closer look and describe some suggested steps to troubleshoot and fix error code P0504.
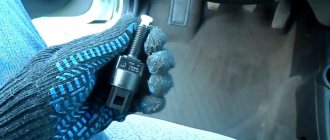
The brake light switch is located under the instrument panel at the top of the brake pedal lever. The brake booster raises the pedal to the fully extended position. The brake light switch is mounted on a crossbar support bracket directly behind the brake pedal mounting bracket.
The only way to access the switch is to move the front seat back, lie on the backrest and look up under the dash. You will see a bracket with a switch near the top of the brake pedal lever. The switch will have four or six wires.
The switch rests on the bracket so that its drive rod is in contact with the brake pedal lever when the pedal is fully extended. At this moment, the switch is pressed on the brake pedal lever, cutting off the voltage supply.
When you press the brake pedal, the lever extends to engage the switch and turn on the brake lights. After releasing the pedal, the lever presses the bar again, turning off the brake lights.
Therefore, with a high degree of probability, we can say that replacing this sensor will eliminate problems with error P0504.
Diagnostic procedure when error P0504 appears
To carry out some diagnostic operations when error P0504 appears, a multimeter or test lamp . If you do not have an assistant to check the operation of the limit switch and the condition of the brake lamps, you can drive up to the wall so that the brake lights are visible in the mirrors.
- Check the brake lights by pressing and releasing the brake pedal several times. The lamps should light up when the brake pedal is depressed 2–3 cm and go out when released. Flashing or flickering indicates poor contact, while intermittent failure indicates incorrect adjustment or wear of the limit switch.
- If the lamps do not illuminate when the pedal is depressed, check that the brake light circuit fuse has not blown.
- Inspect the limit switch connector, make sure it is fixed and there is no external damage.
- Check the brake light limit switch and its adjustment. The verification procedure is discussed in detail in the next section.
- Check the power supply to the sensor using a multimeter or test lamp. One of the terminals must be supplied with 12 V power at all times. Use the vehicle's electrical diagram to determine the appropriate terminal. If there is no power, check the corresponding circuit in sequence.
- If there is power and the sensor is working, check the receipt of signals when the pedal is pressed and released to the corresponding contacts of the computer using a multimeter. Their presence indicates a controller malfunction.
If error P0504 appears after replacing brake light bulbs with LED ones, first of all try installing back the standard halogen ones. Most likely this is the problem.
End switch connection diagram, click to enlarge
On which cars is this problem most common?
The problem with code P0504 can occur on different machines, but there are always statistics on which brands this error occurs more often. Here is a list of some of them:
With fault code P0504, you can sometimes encounter other errors. The most common ones are: P0016, P0019, P0098, P0121, P0171, P0422, P0432, P0455, P0500, P0571, P0700, P0716, P0732, P0733, P0734, P0746, P0842, P2714, C1241, U040 5.
Hi all! I would like to tell you a little about the M74 ECU and the common error “P0504 Incorrect signal from the brake pedal switches.” In connection with the transition to new toxicity standards, AVTOVAZ engineers and designers have developed a new line of M74 and M17.9.7 ECUs. The ECUs can be said to be normal, but have not yet been fully tested. After all, cars on these ECUs are very much “strangled” by toxicity standards and therefore, without reprog and installing firmware e2 or lower, you can’t drive the car in any way, but this action is not all available now, since the protocol, pads and the reprog algorithm itself have changed with the ECU, in Therefore, it is necessary to have an additional module for the programmer. Diagnostics of ECU data is already available, since all major companies have taken care of their customers and have released software updates.
Well, okay, I’ll start right away with the story of how to get rid of the error “P0504 Incorrect signal from the brake pedal switches.” Due to the fact that the ECUs were changed, AVTOVAZ began installing new sensors and IMs. There are also 2 new sensors on the brake pedal, just don’t be alarmed if you suddenly find only one. AVTOVAZ designers and engineers managed to combine 2 sensors in 1 housing, that is, only one sensor is installed on the brake pedal, but this is not so, inside the housing there is the brake pedal sensor itself and another sensor, which is popularly called “frog”. Error “P0504 Incorrect signal from the brake pedal switches” appears because the sensors are not adjusted properly from the factory. If suddenly a car with M74 or M17.9.7 came to you and the scanner produced such an error, then you can safely take the keys and adjust the sensor gap, since it is not adjusted. The sensor is adjusted in a simple way and is not difficult. There are two nuts on the sensor body. One secures the sensor to the mount from above, and the other from below. The nut that is on top regulates the sensor gap, so loosen the bottom nut a little, and then tighten the top one a little, thereby adjusting the sensor gap. In my case, the sensor was set from the factory so that the button was pressed only halfway, now I made it press almost completely. I say almost due to the fact that I left a small reserve of travel for the button, about 2 mm, so that when the brake pedal is suddenly released, the button does not get too clogged into the sensor. When you adjust the gap, then start the car, having first reset the error, and let it run for a while, since the error is not registered immediately, but after a certain period of 5-10 minutes. If the error is not registered, then you can safely take money from the client and say goodbye to him. Also, on some cars, a clutch pedal sensor is installed; it also needs adjustment, because if it is not adjusted, the car begins to stall, as it were, since the ECU thinks that the clutch pedal is depressed. I guess I'll finish here. If new information appears on the ECU data, I will post it on this forum, since it is the best.
This error often occurs on new cars, since in my opinion our cars are made through... and there is no good quality control department, since cars with such bugs are passed through.
2 years ago AutoTime 0
The power transmission control module (PCM stores error code P0504) when a malfunction is detected in the brake light switch of a VAZ vehicle. A warning light comes on on the dashboard.
When a fault occurs in the brake light circuit, a number of problems can arise. To prevent the vehicle from getting into a dangerous situation, this error will be recorded and the error warning indicator will remain on until the cause is corrected and the code is cleared from the PCM.
Reasons for the error
The causes of error P0504 VAZ are quite simple and easy to diagnose. These include:
Symptoms of error P0504 VAZ
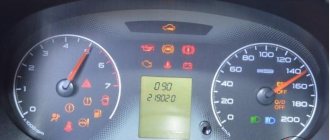
The first sign of an error will be an illuminated “Check Engine” light. In addition, you may notice other symptoms, including:
Diagnosis of error P0504 VAZ
After determining the error code using an OBD-II scanner, it is cleared. All possible causes must be checked. From simple to more complex. You need to start with fuses and light bulbs. If the problem persists, you need to check the brake light switch, wiring, and connectors.
Common diagnostic errors
Often, when the brake light comes on, it is not the driver who assumes that the problem is a burnt out bulb. Replacing the light bulb may not solve the problem, because the source could be the wiring or switch. If the fault is in the switch, then replacing the fuse will do nothing. The new one will also burn out.
How serious is the P0504 code?
It is very dangerous when the brake lights do not work. The car driving behind you cannot correctly assess the situation and your actions, which can lead to an accident. Likewise, if pressing the brake pedal does not disengage the cruise control system, the consequences can be very dire.
What needs to be repaired for error P0504 VAZ?
In most cases, fixing the cause of the P0504 code is quite simple. Here are some of the most typical situations:
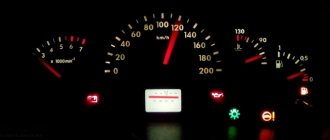
During operation of a modern car, defects in engine operation may appear: failures, short-term lack of response of the gas pedal, etc. At the same time, the “Check Engine” icon lights up on the instrument cluster panel, which translated from English sounds like “check the engine.” The car owner goes for diagnostics, where a computer connected to the car detects error P0504. The brake pedal position sensor (frog) is responsible for this failure in the system. Next, we will tell you where the sensor is installed, how to check, repair and replace it.
Replacing the brake signal switch
The brake signal switch is part of the brake pedal assembly (Fig. 1.1-09) and is designed to send appropriate signals to the ECM when the driver presses/releases the brake pedal. In throttle-by-wire (E-throttle) systems, the brake pedal switch signals play an important role because they are used by the safety function of the ECM software. For this reason, it is very important to ensure that the brake light switch is always in working order. In the event of a malfunction in the electrical circuits of the switch, the car engine may go into emergency operation with a forcibly reduced power. The brake light switch has two groups of contacts, the first of which switches voltage from Cl. 15, and the second is voltage with Cl. 30, supplied to the brake light lamp. Both of these signals are sent to the ECM. When the brake pedal is released, the contacts of the first group should be normally closed, and the contacts of the second group should be normally open.
Rice. 1.1-09. Location of the brake signal switch and the clutch pedal position signal switch in the interior of cars of the LADA VESTA family: 1 - brake signal switch; 2 — clutch pedal position signal switch
To do this you will need a flat blade screwdriver.
1. Disconnect the wire from the negative terminal of the battery.
2. Remove the lower decorative panel of the instrument panel.
3. Press the lock of the brake light switch wiring harness block and disconnect the block from the switch.
4. Turn the switch counterclockwise 90°.
5. . and remove it from the hole in the bracket.
6. Before installation, pull out the switch rod ensuring dimension A (Fig. 6.7) - (10±0.2) mm (a little force will be required and clicks will be heard).
Rice. 6.7. Brake light switch installation size
7. Install the brake light switch into the hole in the bracket and turn it clockwise until it stops.
ATTENTION When installing the brake light switch, the brake pedal must be in the up position.
8. Check the operation of the brake lights: when the pedal is released, the brake lights should not light up. Select free pedal travel. The brake lights should light up when the pedal moves within its free travel.
Video
Source
Causes and symptoms of malfunction
Most often, error P0504 worries owners of Lada: Grant, Priora, Kalina and other VAZ cars with an ECU. Often a defect appears on GAZ cars, for example, GAZelle NEXT. But owners of foreign cars are less likely to contact the service to eliminate error p0504 and replace the sensor (frog). Most likely, the quality of foreign spare parts is much better. What symptoms indicate that the brake pedal sensor is faulty:
The cause of incorrect operation of the “frog” can be: mechanical damage, oxidation of contacts or wire breakage. Sometimes a failure occurs due to the burnout of both brake light bulbs. Due to the listed defects, an error appears in the system under code p0504. It can be removed, but it will appear again soon.
Basic faults
The main malfunctions of the parking brake system include:
- Reduced brake efficiency (the handbrake has to be pulled harder, higher, to lock the car in place on a slope);
- Failure to release the handbrake (manifests itself when the driver releases the handbrake lever, but the car is still held in place);
- Spontaneous release of the brake when the parking system is engaged (this is really scary, but the raised lever of the mechanism can let the driver down - the car will start to roll away).
It is worth noting that the cause of such breakdowns is not always the parking brake system assembly - it interacts with other components and assemblies of the car, so there are problems:
- Drum wear (Lada Vesta has drum brakes);
- Oily or worn pad linings.
As for the mechanism itself, the cause of the above breakdowns may be:
- Lengthening (stretching) the cable;
- Wear of drive parts, latch teeth, combs of the mechanism assembly;
- Sticky cable.
How to change
The sensor is located slightly above the brake pedal lever. To find it, you need to look under the torpedo. On Lada Priora, Grant and Kalina, a 19 mm open-end wrench will be required for dismantling. The replacement process looks like this:
The old sensor is quite repairable. In most cases, the cause of the malfunction is a broken spring. If you disassemble the body and install a new spring, the “frog” will work again.
Car owner's comment: On my Lada Grant, a spring broke in the sensor and began to close the contacts of the limit switches. When I left the car overnight, the ignition did not seem to turn off, which is why the battery ran out completely several times. I bought a new battery, but the problem did not go away until I made diagnostics and replaced the sensor. At the same time, the Check Engine did not light up.
Old style sensor
On Lada Granta, Kalina, Priora and Lada 4×4 cars with E-Gas, a brake pedal position sensor with article number 1118-3720010 is used.
- Screw the sensor until the pedal goes down.
- Turn the sensor slightly (counterclockwise 90 degrees) and secure with a lock nut.
As a result, when the brake pedal is released, the switch rod should be completely “recessed”, and when the pedal is pressed, it should completely come out of the switch body. Details in the video:
Which one to buy
Experts and service workshop specialists recommend purchasing an original brake sensor. It is of better quality and lasts longer.
Table 1. Price of brake pedal position sensor
| Manufacturer | Code | Cost, rub. |
| AvtoVAZ | 11183720010 | 170 |
| Avar | 2113720 | 180 |
| AMY | 11183720010 | 95 |
Before changing the “frog”, you can “ring” it with a tester to make sure the part is working.
Handbrake: removal and installation
If tightening the parking brake does not solve the problem, Vesta still rolls away, you will have to resort to heavy artillery. Having prepared to remove and install the handbrake, perform the following operations:
- Drive the car onto the car lift. Release the parking brake, shift into gear, and turn off the ignition. Dismantle the tunnel in the cabin - it will be easier to work;
- Remove the wiring harness block;
- Loosen the handbrake limit nut under the plug using the “tenth” key;
- Loosen the nut that regulates the degree of tension of the cable responsible for the equation of the lever, and then remove the cable fastenings;
- Use a screwdriver and pliers to carefully remove the cable ends. Don't put them off too far;
- Carefully remove both rear wheels;
- Proceed to dismantle the body floor. To do this, remove the three nuts with head number 24 and the fasteners. Use a screwdriver (preferably a flat one) to pry up the cables and remove them from under the brackets attached to the body;
- Remove the brake pads. To do this, first remove the tension springs, guide brackets, spacer bar (only assembled with an automatic adjustment mechanism), and then the brake pads themselves. All operations must be carried out strictly in the designated order;
- Use pliers and a screwdriver to remove the cables from the levers, and then remove the cable tips from the guide holes of the brake shield;
- Remove the cables from the lever brackets and the attachment of these levers to the body;
- Take out the cables;
- Place the new cables in the brackets - instead of the old ones, in the guide holes;
- Insert the tips into the brake shields;
- Then insert the tips into the tunnel into the corresponding holes, and secure the cables themselves under the brackets that are attached to the body;
- Put the pads back in place. To do this, clean the drums from dirt. Apply lithol to the threads of the spacer strip;
- Place the brake pads on the brake shield, and then the tension springs. Using pliers and a screwdriver, install the guide pad brackets. Then spread the brake pads with pliers, place a spacer bar between them and set the outer diameter of the pads using the spacer bar nut;
- Place the drum, then press the brake pedal about 10 times, bringing the mechanism into working position;
- Put the wheels in place;
- Connect the cables to the equalizer of the hand brake lever;
- Perform adjustment (“tightening”) of the parking brake lever;
- Check the operation of the parking brake system. After this, you can install the tunnel and plugs.
Source
How to Troubleshoot or Reset Trouble Code P0504
Some suggested steps to troubleshoot and fix error code P0504:
Diagnosis and problem solving
The main problem is considered to be a discrepancy between the data in the PCM and the brake pedal sensor. Therefore, let's take a closer look and describe some suggested steps to troubleshoot and fix error code P0504.
The brake light switch is located under the instrument panel at the top of the brake pedal lever. The brake booster raises the pedal to the fully extended position. The brake light switch is mounted on a crossbar support bracket directly behind the brake pedal mounting bracket.
The only way to access the switch is to move the front seat back, lie on the backrest and look up under the dash. You will see a bracket with a switch near the top of the brake pedal lever. The switch will have four or six wires.
The switch rests on the bracket so that its drive rod is in contact with the brake pedal lever when the pedal is fully extended. At this moment, the switch is pressed on the brake pedal lever, cutting off the voltage supply.
When you press the brake pedal, the lever extends to engage the switch and turn on the brake lights. After releasing the pedal, the lever presses the bar again, turning off the brake lights.
Therefore, with a high degree of probability, we can say that replacing this sensor will eliminate problems with error P0504.
Execution Sequence
Comment. To check the brake light switch, turn on the ignition and press the brake pedal by hand to the amount of free play (the brake lights should light up). Release the brake pedal (the brake lights should go off). If the brake lights do not light up, check the switch and the voltage supply from the battery to the wiring harness block.
2. Turn the sensor counterclockwise 90° and remove it from the bracket.
3. Press the latch and disconnect the wiring harness block from the sensor.
4. To check the sensor, use a thin slotted screwdriver to move the rod lock to the right position.
5. Connect the multimeter in ohmmeter mode to the sensor terminals. Circuit 3-4 should be closed (resistance value is close to zero), circuit 1-2 should be open (resistance value should tend to infinity).
6. We press the sensor rod, circuit 1-2 should open (the resistance value should tend to infinity), and circuit 3-4 should close (the resistance value should be close to zero). Otherwise, the sensor must be replaced.
7. Before installation, move the rod lock to the left position. We connect the wiring harness block to the sensor. Install the sensor into the hole in the pedal bracket and turn it clockwise 90°. The brake pedal should be in its highest position.
Source
On which cars is this problem most common?
The problem with code P0504 can occur on different machines, but there are always statistics on which brands this error occurs more often. Here is a list of some of them:
With fault code P0504, you can sometimes encounter other errors. The most common ones are: P0016, P0019, P0098, P0121, P0171, P0422, P0432, P0455, P0500, P0571, P0700, P0716, P0732, P0733, P0734, P0746, P0842, P2714, C1241, U040 5.
Hi all! I would like to tell you a little about the M74 ECU and the common error “P0504 Incorrect signal from the brake pedal switches.” In connection with the transition to new toxicity standards, AVTOVAZ engineers and designers have developed a new line of M74 and M17.9.7 ECUs. The ECUs can be said to be normal, but have not yet been fully tested. After all, cars on these ECUs are very much “strangled” by toxicity standards and therefore, without reprog and installing firmware e2 or lower, you can’t drive the car in any way, but this action is not all available now, since the protocol, pads and the reprog algorithm itself have changed with the ECU, in Therefore, it is necessary to have an additional module for the programmer. Diagnostics of ECU data is already available, since all major companies have taken care of their customers and have released software updates.
Well, okay, I’ll start right away with the story of how to get rid of the error “P0504 Incorrect signal from the brake pedal switches.” Due to the fact that the ECUs were changed, AVTOVAZ began installing new sensors and IMs. There are also 2 new sensors on the brake pedal, just don’t be alarmed if you suddenly find only one. AVTOVAZ designers and engineers managed to combine 2 sensors in 1 housing, that is, only one sensor is installed on the brake pedal, but this is not so, inside the housing there is the brake pedal sensor itself and another sensor, which is popularly called “frog”. Error “P0504 Incorrect signal from the brake pedal switches” appears because the sensors are not adjusted properly from the factory. If suddenly a car with M74 or M17.9.7 came to you and the scanner produced such an error, then you can safely take the keys and adjust the sensor gap, since it is not adjusted. The sensor is adjusted in a simple way and is not difficult. There are two nuts on the sensor body. One secures the sensor to the mount from above, and the other from below. The nut that is on top regulates the sensor gap, so loosen the bottom nut a little, and then tighten the top one a little, thereby adjusting the sensor gap. In my case, the sensor was set from the factory so that the button was pressed only halfway, now I made it press almost completely. I say almost due to the fact that I left a small reserve of travel for the button, about 2 mm, so that when the brake pedal is suddenly released, the button does not get too clogged into the sensor. When you adjust the gap, then start the car, having first reset the error, and let it run for a while, since the error is not registered immediately, but after a certain period of 5-10 minutes. If the error is not registered, then you can safely take money from the client and say goodbye to him. Also, on some cars, a clutch pedal sensor is installed; it also needs adjustment, because if it is not adjusted, the car begins to stall, as it were, since the ECU thinks that the clutch pedal is depressed. I guess I'll finish here. If new information appears on the ECU data, I will post it on this forum, since it is the best.
This error often occurs on new cars, since in my opinion our cars are made through... and there is no good quality control department, since cars with such bugs are passed through.
2 years ago AutoTime 0
The power transmission control module (PCM stores error code P0504) when a malfunction is detected in the brake light switch of a VAZ vehicle. A warning light comes on on the dashboard.
When a fault occurs in the brake light circuit, a number of problems can arise. To prevent the vehicle from getting into a dangerous situation, this error will be recorded and the error warning indicator will remain on until the cause is corrected and the code is cleared from the PCM.
Reasons for the error
The causes of error P0504 VAZ are quite simple and easy to diagnose. These include:
Symptoms of error P0504 VAZ
The first sign of an error will be an illuminated “Check Engine” light. In addition, you may notice other symptoms, including:
Diagnosis of error P0504 VAZ
After determining the error code using an OBD-II scanner, it is cleared. All possible causes must be checked. From simple to more complex. You need to start with fuses and light bulbs. If the problem persists, you need to check the brake light switch, wiring, and connectors.
Common diagnostic errors
Often, when the brake light comes on, it is not the driver who assumes that the problem is a burnt out bulb. Replacing the light bulb may not solve the problem, because the source could be the wiring or switch. If the fault is in the switch, then replacing the fuse will do nothing. The new one will also burn out.
How serious is the P0504 code?
It is very dangerous when the brake lights do not work. The car driving behind you cannot correctly assess the situation and your actions, which can lead to an accident. Likewise, if pressing the brake pedal does not disengage the cruise control system, the consequences can be very dire.
What needs to be repaired for error P0504 VAZ?
In most cases, fixing the cause of the P0504 code is quite simple. Here are some of the most typical situations:
During operation of a modern car, defects in engine operation may appear: failures, short-term lack of response of the gas pedal, etc. At the same time, the “Check Engine” icon lights up on the instrument cluster panel, which translated from English sounds like “check the engine.” The car owner goes for diagnostics, where a computer connected to the car detects error P0504. The brake pedal position sensor (frog) is responsible for this failure in the system. Next, we will tell you where the sensor is installed, how to check, repair and replace it.
Checking, repairing and adjusting the brake light switch on cars of different brands
Inside the four-pin brake switch there are two pairs of contacts, the state of which depends on the position of the rod: when fully recessed and fully extended, one pair is always closed - the resistance is close to zero, the other is open - the resistance is several kOhms or more. If for some reason the contact group does not work properly, error P0504 occurs.
Checking the brake light switch
Checking the brake light switch comes down to testing the terminals of a pair of contacts in the normal position - with the rod extended and when it is retracted, simulating pressing the brake pedal. The normal state of the contacts of a working switch for some popular models is shown in the table below.
| Model | Contact status | |
| The rod is recessed | The rod is extended | |
| Toyota Rav4 | 3–4 closed 1–2 open | 3–4 open 1–2 closed |
| Lada (Priora, Kalina and Granta, 4x4) Datsun (on-DO, mi-DO) Gazelle Next, Business | 1–4 open 2–3 closed | 1–4 closed 2–3 open |
| Lada (Largus, Vesta, XRAY)Renault (Logan, Duster) | 3–4 open 1–2 closed | 3–4 closed 1–2 open |
If the test shows that the contacts close and open properly, error P0504 may be due to either incorrect adjustment of the brake light switch (not required on all models) or faulty wiring and other reasons listed above. If the multimeter readings do not match the parameters of a working switch, it must be replaced or repaired.
Repair of brake pedal limit switch
Diagnostics and repair of brake light switch: video
The two main reasons for the failure of the brake light limit switch are oxidized or burnt contacts and a broken or weakened spring. An indirect sign of the second problem is a small stroke of the rod compared to a good one or its free motion.
For repairs, the limit switch must be dismantled. To do this, first of all, disconnect the connector by releasing the latch. In some cars, for example, Lada Kalina and Granta, this requires unscrewing the fastening nut, in others, for example, Lada Largus and Vesta, it is enough to turn its body counterclockwise 90 degrees and remove it from the hole.
Next, you should disassemble the sensor housing, which is secured with latches, and then inspect the condition of the spring and contacts. Oxidized or burnt contacts can be cleaned with sandpaper and treated with a degreaser. The broken spring needs to be replaced with a new one of the same length (for the switch 1118-3720010 installed on Lada cars, a spring with a diameter and height of 6–8 mm is suitable), and you can try to stretch the weakened one, but this will only help for a while.
Repairing the brake pedal end switch is more of a temporary measure in case it was not possible to quickly find and purchase a replacement part. Usually, soon the restored switch begins to work incorrectly again. Therefore, if possible, it is better to install a new switch immediately.
Replacing and adjusting the limit switch: video
Causes and symptoms of malfunction
Most often, error P0504 worries owners of Lada: Grant, Priora, Kalina and other VAZ cars with an ECU. Often a defect appears on GAZ cars, for example, GAZelle NEXT. But owners of foreign cars are less likely to contact the service to eliminate error p0504 and replace the sensor (frog). Most likely, the quality of foreign spare parts is much better. What symptoms indicate that the brake pedal sensor is faulty:
The cause of incorrect operation of the “frog” can be: mechanical damage, oxidation of contacts or wire breakage. Sometimes a failure occurs due to the burnout of both brake light bulbs. Due to the listed defects, an error appears in the system under code p0504. It can be removed, but it will appear again soon.
Handbrake tightening - instructions
On the Lada Vesta, adjusting the handbrake is much more convenient than previously in older AvtoVAZ models - now this can be done while sitting inside the car in the driver's seat. According to the manufacturer's regulations, the tightening should be done every 30,000 km, or better yet, a little earlier.
The Lada Vesta handbrake is tightened as follows:
- Raise the rear of the car so that you can manually turn the rear wheels. Fully lift and release the handbrake lever several times - this will bring the mechanism into working condition. Fully tighten the handbrake.
- Remove the plastic plug under the brake lever. Lift the rubber plug and you will see a nut on the end of the handbrake.
- Using a number 10 wrench, loosen the nut slightly and move the lever to about the second tooth.
- Tighten the nut until the rear wheels are firmly seated and cannot be turned by hand.
- Raise and lower the lever several times.
How to change
The sensor is located slightly above the brake pedal lever. To find it, you need to look under the torpedo. On Lada Priora, Grant and Kalina, a 19 mm open-end wrench will be required for dismantling. The replacement process looks like this:
The old sensor is quite repairable. In most cases, the cause of the malfunction is a broken spring. If you disassemble the body and install a new spring, the “frog” will work again.
Car owner's comment: On my Lada Grant, a spring broke in the sensor and began to close the contacts of the limit switches. When I left the car overnight, the ignition did not seem to turn off, which is why the battery ran out completely several times. I bought a new battery, but the problem did not go away until I made diagnostics and replaced the sensor. At the same time, the Check Engine did not light up.
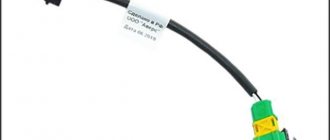
Brake pedal sensor VAZ-2170, VESTA RENAULT 8200168238—B
Delivery by transport companies
- Delivery times depend on the distance from Tolyatti.
- Delivery cost: from 250 rubles, depending on weight, dimensions and distance.
- Convenient, safe and fast delivery method, suitable for sending goods of any size.
- The exact cost and delivery time of a specific product can be found out from the manager by calling or sending a message, indicating the code, article or name of the product; region where you need to deliver. Our manager will quickly select and offer the most convenient options for you.
How is delivery carried out:
- Delivery is carried out by the shopping center of your choice, which has a representative office in your city.
- After sending your order, you will be sent a tracking number by email, by which you can track the movement of the cargo on the website of the selected shopping center.
- After the cargo arrives in your city, TC will notify you by calling the phone number specified in the order.
- To receive the goods, you must present your passport and pay the delivery cost.
Transport companies we work with:
| TC Business Lines Track your order and calculate delivery on the website: www.dellin.ru |
| TK PEK Track your order and calculate delivery on the website: pecom.ru |
| TC SDEK Track your order and calculate delivery on the website: www.cdek.ru |
| TC DPD Track your order and calculate delivery on the website: www.dpd.ru |
| TK KIT / GTD Track your order and calculate delivery on the website: tk-kit.ru |
| TK Baikal Service Track your order and calculate delivery on the website: www.baikalsr.ru |
| TK Energy Track your order and calculate delivery on the website: nrg-tk.ru |
Important!
- TK orders are dispatched only after 100% payment of the order, delivery costs are paid upon receipt.
- If you are using the services of the selected shipping company for the first time, you will need a series and passport number for shipment, and the cargo will be issued to you using this document.
Post office
Delivery by Russian Post (ordinary parcel)
- Delivery time: 3-14 days, depending on the distance of shipment from Tolyatti.
- Delivery cost: from 220 rub. Depending on weight and distance. And also if the order is sent by cash on delivery, then the amount of the declared value of the parcel.
- Payment for the order upon receipt is possible.
- The exact cost and delivery time of a specific product can be found out from the manager by calling or sending a message, indicating the code, article or name of the product; region where you need to deliver. Our manager will quickly select and offer the most convenient options for you.
How is delivery carried out:
- After sending your order, you will be sent a tracking number by email, using which you can track the parcel on the Russian Post website www.pochta.ru.
- To receive the parcel you must present a passport, notice or track number. Pay if the order was sent with cash on delivery.
- Weight restrictions, no more than 20 kg
Delivery by Russian Post (1st class delivery)
- Delivery time: 2-14 days, depending on the distance of shipment from Tolyatti
- Delivery cost: from 260 rub.
- Payment for the order upon receipt is possible.
- The exact cost and delivery time of a specific product can be found out from the manager by calling or sending a message, indicating the code, article or name of the product; region where you need to deliver. Our manager will quickly select and offer the most convenient options for you.
How is delivery carried out:
- After sending your order, you will be sent a tracking number by email, which you can use to track your parcel on the Russian Post website www.pochta.ru.
- To receive the parcel you must present a passport, notice or track number. Pay if the order was sent with cash on delivery.
- Weight restrictions, no more than 2.5 kg
Express delivery
Delivery by SDEK courier
- Delivery times range from 1-7 days, depending on the distance of transportation from Togliatti.
- Delivery cost: from 310 rubles, depending on weight, dimensions and transportation distance from Tolyatti.
- Payment for the order upon receipt is possible.
- The exact cost and delivery time of a specific product can be found out from the manager by calling or sending a message, indicating the code, article or name of the product; region where you need to deliver. Our manager will quickly select and offer the most convenient options for you.
How is delivery carried out:
- An SMS with information about the movement of your order will be sent to the specified phone number.
- The courier will call the recipient to agree on a convenient delivery time.
- Products weighing more than 10 kg. delivered to the entrance.
Delivery by Russian Post courier (EMS).
- Delivery times range from 1-7 days, depending on the distance of transportation from Togliatti.
- Delivery cost: from 430 rubles, depending on weight, dimensions and transportation distance from Tolyatti.
- Payment for the order upon receipt is possible.
- The exact cost and delivery time of a specific product can be found out from the manager by calling or sending a message, indicating the code, article or name of the product; region where you need to deliver. Our manager will quickly select and offer the most convenient options for you.
How is delivery carried out:
- After sending your order, you will be sent a tracking number by email, which you can use to track your parcel on the Russian Post website www.pochta.ru.
- The courier will call the recipient to agree on a convenient delivery time.
- Weight restrictions, no more than 20 kg
Delivery by courier in Togliatti
- Delivery time from 1 hour
- Delivery cost: free in the Avtozavodsky district, in Central, Komsomolsky and Shlyuzovoy - 100 rubles.
- Payment for the order upon receipt is possible.
How is delivery carried out:
- After placing your order, a manager will contact you to coordinate delivery time.
Pickup from our pick-up points in Tolyatti
The manager will inform you about the time of delivery of the finished order after placing the order.
What you need to receive your order:
- If the order has already been paid for, then upon delivery you will only need to present an identification document.
Pickup points:
- Address: Central district, st. Novozavodskaya 2B, trade pavilion No. 1, 1/23 Opening hours: Mon-Tue from 7:00 to 14:30, Thu-closed, Wed, Fri from 9:00 to 12:30
- Address: Avtozavodsky district, st. Leva Yashin 14, Madagascar shopping center (20th quarter), 1st floor island department with goods for the holiday, opposite the Rive Gauche department Opening hours: daily 10:00-21:00
- Address: Avtozavodsky district, Primorsky Boulevard, building 55, office No. 204, working hours: Mon-Fri from 10:00-17:00
Important!
- A completed order is stored at the point of delivery for no more than 3 days; if you need to extend the storage period of a finished order, please inform your manager.
Rules
During delivery, along with the goods, you will be given the necessary documents: a receipt and a warranty card. If you are a legal entity, then you will be given: an invoice and a delivery note, which will need to be stamped and signed. The prices in the documents are final, the courier has no right to adjust them.
Attention! Please check all technical and consumer properties of the product with the manager in advance before receiving your order. It is also not the responsibility of the courier to provide consultations on the purchased product.
When the product is delivered to you, check its integrity and appearance, quantity and contents. Claims based on these parameters will be accepted immediately and will not be considered in the future.
In case of questions, complaints or wishes, please use our contacts.
Which one to buy
Experts and service workshop specialists recommend purchasing an original brake sensor. It is of better quality and lasts longer.
Table 1. Price of brake pedal position sensor
| Manufacturer | Code | Cost, rub. |
| AvtoVAZ | 11183720010 | 170 |
| Avar | 2113720 | 180 |
| AMY | 11183720010 | 95 |
Before changing the “frog”, you can “ring” it with a tester to make sure the part is working.
Replacing the clutch pedal position sensor
On Lada Vesta, XRAY and Largus cars, removal and installation of the sensor is performed in the same way. It is located in the area of the clutch pedal, next to the steering shaft:
Procedure:
- Disconnect the block with wires (green) by pressing the latch.
- Remove the sensor by turning it counterclockwise 90°.
Installation is carried out in the reverse order, with the brake pedal in its highest position.
Checking the clutch pedal position sensor
Vesta, Largus and XRAY got the sensor from Renault (part numbers for Vesta/Largus 253250007R and for XRAY 253255192R). To check it, you will need a multimeter (in ohmmeter mode).
Procedure:
- Move the rod lock to the right position using a flat-head screwdriver.
- Connect the multimeter probes to sensor terminals No. 3 and No. 4.
- When the rod is in the free position, the circuit should be open (the resistance value approaches infinity).
- When you press the rod, the circuit should close (the resistance value is close to zero).
Source