Heating and ventilation of the interior remain an integral part of comfortable driving. The interior temperature sensor of the VAZ 2110 is one of the consumables that requires frequent replacement, since the heating system of the VAZ 2110 has a mileage of 20,000 km. starts working intermittently. How to check the part, repair and replace the controller.
Functional Features
The operating principle of the interior temperature control system for the VAZ 2110 and related models of the line is based on monitoring the signals that the controller transmits to the vehicle's ECU. The measuring element is based on a semiconductor thermistor; its operation is based on the relationship between the external air temperature and the resistance of the sensing element.
The working sensor is configured for a medium temperature range of 16–30 degrees Celsius. The higher the ambient temperature, the higher the resistance of the element, and a corresponding impulse is sent to the ECU. After processing the signal, the control unit issues a command to open/close the air dampers and increase/decrease the heat supply to the cabin.
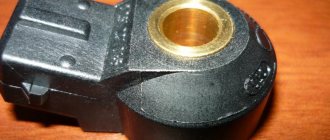
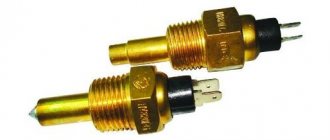
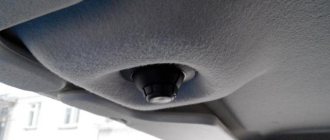
A faulty temperature sensor in the cabin of a VAZ 2110 has an increased resistance on the winding and sends incorrect signals to the computer. The element is located in the ceiling trim block, next to the interior lighting.
Outdoor temperature sensor
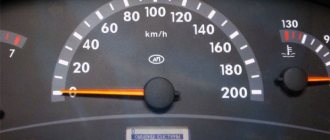
On “Dozens” of later releases with a VDO dashboard with two displays and a trip computer, an outside air temperature sensor was installed. When the engine was turned on, the temperature readings outside the VAZ 2110 were displayed on the instrument panel screen.
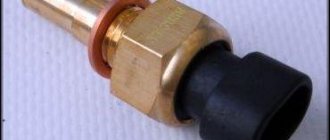
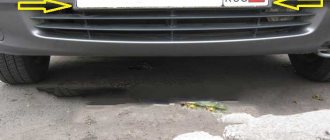
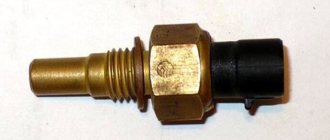
The sensor is located inside the front bumper, next to the front fog lamp. The installation side of the device in each specific case may be different (on the driver’s side or on the passenger side). If the temperature sensor was installed by the owner himself, then most often it was taped with electrical tape to the base of the towing eye.
Catalog number of the original temperature sensor: 2115-3828210-03, its approximate price is about 250 rubles.
If the outside air temperature sensor does not work, remove the plastic protection of the left or right front wheel arch (depending on the location of the sensor), disconnect the wiring connector and remove the sensor from the holder in the front bumper. Installing a new part is performed in the reverse order.
Signs and causes of malfunction
Structurally, the temperature sensor consists of a sensitive element, which is located on the electric motor board, which turns on the controller fan. A fan is needed to track the temperature of the environment with an error of 1–2 degrees. Since the sensor is a component of the car's electrical circuit, its operation is affected by the condition of the wiring, terminals, and connector integrity. Characteristic signs of controller failure.
- The device is buzzing. The fan in the controller unit is broken.
- The signal from the sensor does not reach the ECU. Broken wiring, worn chip wires.
- The sensor transmits an incorrect signal; the temperature in the cabin corresponds to the transmitted parameters. The board is dirty, the input voltage or output resistance is not normal.
Symptoms of sensor failure
Despite the simplicity of the design of this element, the part still periodically fails. A sensor malfunction can be determined by the following symptoms:
- When the air supply temperature on the panel changes, the sensor begins to buzz. This indicates a breakdown of the fan in the sensor.
- The absence of a signal from the sensor is a clear sign of a break in the wiring to it. It is enough to visually inspect the connection points of the wires and identify the location of the break.
- Transmission of an incorrect signal is another sign of sensor failure. With such a breakdown, the stove does not maintain the set temperature parameters in the cabin.
Trying to repair a faulty sensor is a long and pointless task. The cost of a new unit for determining the temperature in the cabin is low, so it is much easier to read the instructions for replacing the sensor and carry out the work yourself.
Checking settings
Before replacing, you need to check the settings in the interior heating and ventilation system. In 20% of cases, incorrect set parameters are the reason that the air conditioner in the car does not work well in the summer, and the stove does not work well in the winter.
To do this, you need to close the doors and windows in the car and set a certain temperature in the cabin, for example 25 degrees. Place a thermometer near the sensor. After 15 minutes, check the thermometer reading. If the difference is more than 1 degree, adjust the sensor through the adjustment screw on the device. Scrolling clockwise will increase the range, counterclockwise will decrease the maximum temperature threshold.
How does the DTV work?
The heating system in a car of this brand operates from impulses coming from the electronic unit. The unit itself receives information from the fuel combustion engine and compares these indicators with the heating intensity. There are certain temperature limits, the crossing of which is a trigger for the system to operate and the motor to turn on. There is a change in air flow and fan speed. All this serves to timely warm up the glass and the interior.
The sensor itself is a regular thermistor or semiconductor resistor. The relationship between resistance and heat is captured and sent to the vehicle's ECU as a specific measurement.
In addition to the obvious problems in measurements associated with a defect in the meter, there are a number of other malfunctions that one has to deal with:
- electrical wiring fault;
- mechanical damage to the sensor;
- operation outside acceptable limits.
Electrical wiring can be easily repaired by cleaning the contacts or reconnecting them more reliably. It happens that a break may not occur in the sensor itself, but somewhere along the line. Any malfunctions with the device itself are a reason to replace it, since repairing such a device is usually ineffective and more expensive than buying a new device.
How to replace
For VAZ 2110, the element is mounted to the ceiling trim using four latches. Dismantling process step by step.
- Unclip the outer cover.
- Remove the wire block, disconnect the connector and check the integrity of the cables.
- Check the cleanliness of the board, remove dirt with a soft brush.
If the sensor is buzzing, it is not practical to repair the equipment; the controller is replaced with a new one. If after a visual inspection no breakdown is found, all contacts are clean, the wiring is normal, check the sensor with a multimeter. The tester is switched to resistance measurement mode and the signal from pins 1 and 2 is monitored.
Zero resistance indicates that the element is not working. If the device shows a resistance of 0.2 Ohm, the sensor must be placed in the freezer for 5 minutes. Repeated measurement of the resistance on the working sensor will be in the range of 2–3 ohms, that is, it will increase at least 10 times.
Replacement of consumables is carried out independently and requires 5 minutes. The only tool you need is a flat blade screwdriver. The cost of the controller is quite budgetary, from 300 rubles. The service life is from 1 year, so the element is not repaired.
Do-it-yourself replacement – there’s nothing better
VAZ 2110 interior temperature sensor
If the driver decides to entrust the work of replacing this sensor to a professional, he needs to have a certain amount of money in his pocket and, upon the first request of the service station workers, pay for the work done. After the replacement work and payment for the service are completed, the car can be used again. To carry out independent repairs, you need to perform several simple operations.
Dismantling
Removal principle
To install a new interior temperature element, you will first have to remove the old one. It can be removed quite simply:
- Four clamps, presented in the form of springs, are used as clamps;
- Be sure to park the car on a level surface and turn on the handbrake;
- For your own safety and comfort, do not forget to remove the negative cable from the battery;
- Using a slotted screwdriver, move the box slightly from its seat;
- Dismantling begins from the top of the sensor, which makes work more convenient;
- After removing the device from its fasteners, do not jerk it sharply. The fact is that it is connected to two wire blocks. They are the ones that connect the sensor to the car’s electronic system. Carefully disconnect the wires, after which the dismantling can be considered complete.
Messages 5
1 Topic from mars.rus 2015-01-04 20:04:53
- mars.rus
- New member
- Inactive
- Registration: 2013-12-12
- Messages: 25 Thanks : 3
- Car: VAZ 21102
Topic: How to check the interior temperature sensor?
Hello. The heater in my car was not working properly. Car 2001 8kl. In general, from the max position, when switching back to the direction of decreasing temperature, the damper began to rotate only when the handle reached the 20-degree position. And the damper immediately lowered to the end. And the same in the opposite direction. And before that, in general, the damper only moved either all the way down or up when switching from max or min. Between these intervals, when switching, it did not react at all. As a result, by disconnecting the contacts from the ceiling sensor, everything began to be regulated. I blame the ceiling sensor. Although it works, it buzzes in all positions of the handle except min or max. Maybe someone else can confirm my guesses or give a different opinion, maybe there’s something else I need to look at? Thank you.
The main malfunctions of the VAZ-2110 climate control
Since a full-fledged climate control system contains many additional components and parts, it is not surprising that the reliability of such a complex system by default should be no more than that of the heater or air conditioner itself. In other words, to the problems with the functioning of the heating and air conditioning system are added those malfunctions that are characteristic of the operation of the climate system controller itself. The climate control scheme of the VAZ-2110 provides for the presence of an electronic control unit and a damper drive that regulates the mixing of warm and cold air flows to ensure the optimal temperature of the air flow entering the air ducts.
Climate control operating modes
Before using the unit, you must calibrate the climate control by pressing the A/C button and, without releasing it, turn on the ignition. As soon as three horizontally oriented bars appear on the display, the button can be released. Calibration will be performed automatically, and its duration is about 5 – 10 seconds. If, during operation of the climate control, it is discovered that the position of the air damper does not correlate well with the entered value, it is necessary to recalibrate using the same algorithm. As already noted, climate control operates in three modes: automatic, manual and “Semi-automatic” mode.
When manual mode is selected (which will be indicated by a non-lit LED located above the AUTO button), the damper is controlled manually using the corresponding regulator. On the display, the left scale in the form of stripes is responsible for displaying the position of the damper. The rotation speed of the furnace fan is controlled by pressing the regulator handle and then rotating in the desired direction (clockwise - increase the speed, counterclockwise - decrease). After a five-second time interval has passed, the fan speed control mode is switched off, and the regulator returns to the damper climate system control mode.
To switch the QC operation to automatic mode, just press the AUTO button. At the same time, the corresponding LED lights up, and with the adjustment handle you can set the temperature required for a comfortable stay in the car. In the future, the VAZ-2110 climate control unit will independently control the operation of the air conditioner and heater to ensure the required temperature conditions. Semi-automatic mode is activated as soon as the user tries to change the fan speed using the appropriate control. In this case, the climate control damper will still be controlled automatically, unlike the furnace fan mode. To switch to automatic operating mode, press the AUTO button twice quickly.
The rightmost key with the inscription INJ is responsible for turning on the mode of monitoring and indicating the voltage of the vehicle's electrical network, the operating temperature of the power unit and displaying ECM error codes (if there are problems with the engine). The display of each of the listed parameters is selected by successively pressing the key. For the button to work, it is necessary to connect the VAZ-2110 diagnostic circuit to the climate control control unit.
The second button from the right is responsible for turning on the display on the air temperature measured by the internal sensor. The key located in the middle turns on the mode for displaying the air temperature outside the car. Both of these keys require the installation of appropriate sensors and their connection to the control unit. The leftmost A/C button is the air conditioning on/off switch (if equipped in the car). Maintaining the set temperature when the air conditioner is turned on is carried out in the same way - by controlling the damper that regulates the supply of warm and cooled air.
As befits an air conditioning system, the main parameters of its operation (including the temperature inside the car, the rotation speed of the furnace fan, the operating mode of the electronic control unit) are stored in the internal memory of the controller when the ignition is turned off or the on-board power supply is completely de-energized. When you turn on the ignition, the air conditioning system turns on with some delay so as not to interfere with starting the engine. After this artificial delay, the climate control begins to function in accordance with the saved user preferences that were working at the time the ignition was turned off.