The dashboard is the driver’s first indicator of the car’s health, as well as a way to control various on-board systems. During the day, by and large, the instrument lighting is not needed, but at night it is a necessary component for safe driving. Thus, a malfunction of the backlight can even lead to an accident, so if a malfunction occurs, it must be eliminated as soon as possible.
The instrument panel backlight has disappeared, what should I do?
The dashboard going out is a nightmare for any driver, since with the disappearance of the light, other malfunctions may follow, such as non-functioning speedometer and other indicators.
Therefore, it is worth understanding that if the instrument panel does not light up, then this problem must be eliminated immediately , but not all car enthusiasts are capable of this.
It is worth understanding that if the backlight disappears, then the problem lies somewhere in the electrical circuits. This is where you need to look for the problem. This will require design knowledge of the vehicle's on-board circuit, a tester and related tools, such as electrical tape, a soldering iron or more. Of course, it is not always possible to eliminate the problem locally, and faulty products have to be replaced completely.
Causes of malfunction
Where does the problem lie? As mentioned earlier, it is worth looking for problems in electrical circuits. Let's look at the main locations where problems may be hiding:
- Fuse.
- Backlight bulbs and their electrical circuit.
- Wiring.
- There is a fault in the fuse box.
- Damage to the board.
Solutions
So, when all the main reasons are, so to speak, “in the face,” you can try to determine the exact location of the breakdown, and also fix it yourself. As always, it is worth noting that if a motorist does not know the design of the car or is not confident in his abilities, then it is recommended to contact a specialist car service center.
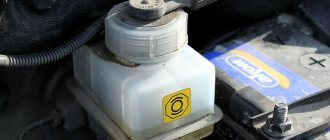
Fuse
General view of a blown fuse
Probably the first cause of all electrical circuit malfunctions is the notorious fuse.
This is where you should start troubleshooting. To find out which fuse is responsible for the instrument lighting, as well as its location in the mounting block, you should refer to the technical documentation. Also, on the fuse cover it is written which element should be checked. If the fuse is found and replaced, but the problem does not go away, then you should look for the source in another place.
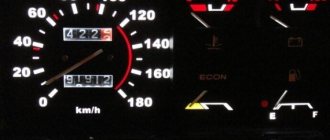
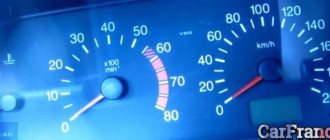
If you look at the dashboards of cars that were produced 60-70 years ago, you can see a very simple combination of them. This is a speedometer, indicators for coolant temperature, oil pressure, fuel in the tank, ammeter and 2-3 warning lights.
Today everything has changed dramatically. Modern cars are equipped with powerful engines and reach high speeds, so designers equip cars with a large number of passive and active safety systems. Their operation is monitored by indicator lamps installed on the instrument panel, and on some models by LEDs or LED strips.
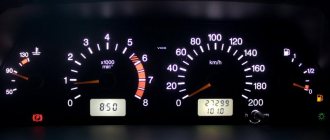
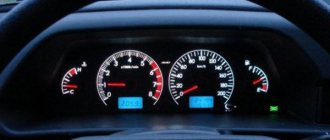
Instrument panel for VAZ 2114, 2115, 2113
VAZ 2114 AND ITS INSTRUMENT PANEL
On this car, as well as on the VAZ 2113 model, an electronic instrument cluster from the VAZ 2115 is installed. In addition to instruments for monitoring the operation of the engine and its systems, indicator lamps are additionally installed, in the amount of 12 pieces and 6 bulbs that illuminate the scales of the control devices .
It became clear how many light bulbs are in the dashboard of the VAZ 2114; a few words should be said about their purpose:
- Turn signal, separately for left and right sides;
- Minimum fuel level in the tank;
- Turning on the side lights;
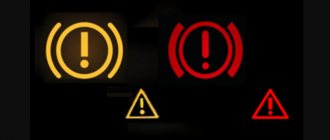
- Emergency condition of the brake system;
- Turning on the high beam headlights;
- Engine control warning lamp;
- Turn on the alarm;
- A lamp indicating the discharge of the vehicle;
- Signaling of the applied handbrake;
- Emergency drop in oil pressure;
- Choke opening lamp, except for models with electronic fuel injection.
Light bulbs are also installed to illuminate the instrument scales. All indicators signaling the emergency state of one or another system have red filters, the rest are green or orange. You can often hear the expression that the instrument panel on a VAZ 2114 does not work; this is an incorrect definition of a malfunction. This is only possible in one case, when it is not connected at all in the car. One or more devices may fail, there may be burnt out lamps, but something will remain operational. Most often, lamps burn out, so let’s take a closer look at the option with burnt out lamps.
ONE OR MORE LIGHTS ARE NOT BURNING
In this case, there can be two situations:
- The backlight of the VAZ 2114 instrument panel does not light up;
- One or more warning lamps are not working.
Let's consider the first variant of malfunctions, when the backlight of the VAZ 2114 instrument panel does not work. You must begin checking the functionality of the backlight by checking the serviceability of the fuse in this circuit. This only applies when all the backlights are off.
The fuse box on this model, as well as on the VAZ 2113 and VAZ 2115, is located in the engine compartment on the driver's side. You need to remove its cover and find the fuse responsible for the backlight, this is F10. It is designed for a current of 7.5 A. If it burns out, replace it with a new one and check the operation of the backlight paws.
Further events can develop as follows: either everything works or it doesn’t. If the instrument panel backlight works, the test ends here, otherwise it is necessary to continue troubleshooting. It may be due to poor contact of the connectors or an open circuit in the power supply of the backlight lamps.
To find and eliminate these problems, you need to remember the basic concepts of the laws of electrical engineering, and have a car LED electrical circuit tester, tester or voltmeter. If there is neither one nor the other, then it is better to seek help from an auto electrician.
The situation is much simpler when one or more, but not all, backlights are off. Burnt out light bulbs are simply replaced with known good ones. From the practice of auto electricians, we can conclude that in most cases a fuse or light bulb blows. It rarely comes to troubleshooting using instruments, but sometimes it happens. You should be aware that if a replacement (new) fuse blows repeatedly, you should look for a short circuit in the electrical circuit.
In the second case, they do approximately the same, but take into account that there are no fuses for each indicator lamp. They try to replace the light bulb with a new one, if it doesn’t light up again, then the contacts need to be checked. As a rule, this is enough to troubleshoot problems. Otherwise, it is better to ask a specialist for help, because the sensor that works in conjunction with this warning lamp may be the culprit.
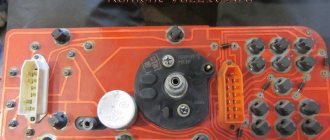
Dashboard lamps
Malfunctions
On modern VAZ models, fully electronic instrument panels are installed. When you start the engine, all indicator lights light up, and after 2-3 seconds they go out (if all systems are working properly). If, when you turn on the ignition, one or several light bulbs do not work, then you need to find out the reason by performing a number of characteristic actions.
If one or more lamps do not light, the first step is to replace the lamps themselves. All indicators of the VAZ 2114, like the backlight, are illuminated by LEDs, and during prolonged use they tend to burn out.
If replacing the lamps does not help, then the situation is much more serious. As you know, each indicator is responsible for some kind of system, and in the case when it does not work, the cause may be any element associated with the indicator light in one circuit. For example, if the battery charge sensor does not work, you need to check the entire circuit using a voltmeter, starting with the battery itself and ending with the terminals, high-voltage wires, etc. In the event that a short circuit or breakage of contacts occurs in the system, the corresponding light also does not light up.
Very often, a situation occurs when all indicators stop working at the same time. The reason for this failure is obvious - failure of the corresponding fuse. When you replace it, everything will fall into place.
If the speedometer or tachometer on your VAZ 2114 has stopped working, then there are not many options either. The first of them is a failure in the electrical system itself. To eliminate it, you need to remove the terminals from the battery for 10-15 minutes and install it back. Thus, the system crashes and reboots. If after these steps the device still does not work, then the reason is clearly not in the instrument panel.
Also, sometimes such a problem occurs - the panel backlight does not light up. In order to correct the current situation, you need to decide: how many lamps are not working - one, several, or all.
Installing diodes in the instrument cluster
If one or several lamps do not light, the reason is in the diodes themselves, and they should simply be replaced. If all the lamps do not light up, then the problem may be in the wiring itself. To detect this malfunction, you need to check the entire circuit using a voltmeter.
REMOVAL OF THE INSTRUMENT PANEL AND REPLACEMENT OF BULB
To remove the tidy, you need to have a Phillips screwdriver and “dexterous hands”. Replacing light bulbs in the dashboard of a VAZ 2114 is only possible with the panel removed.
To do this, remove the decorative cover of the radio that is connected to it. To do this, use a screwdriver. You need to start from the bottom edge, you need to do everything very carefully so as not to damage the fragile plastic parts. When it moves a little, you should pull it towards you a little and you can release the upper part.
Next, the procedure will be as follows:
- You need to disconnect the wire from the cigarette lighter;
- The panel cover is removed in much the same way as for a radio, with the difference that there are also two screws and latches;
- Again, you need to disconnect all the wires going to the panel;
- Four screws are unscrewed and the panel can be removed from its place. This must be done carefully and accurately.
The question of how to change the light bulbs on the instrument panel is not very difficult; even novice drivers can cope with it. You need to find the burnt out light bulb and carefully remove it from the socket. It is removed along with the cartridge. To do this, you need to turn it counterclockwise and pull it out.
After replacing the burnt-out lamp, the socket is installed in the socket, again very carefully. After this, the panel can be put in its place. Installation occurs in reverse order. To avoid the fact that the VAZ 2114 dashboard does not work, do not forget to connect all previously removed wires and connectors to their places.
VAZ 2114 – why doesn’t the dashboard work?
Why does the VAZ 2114 dashboard not work? There can actually be many reasons, here are some of them:
- Blown fuse
- Burnt tracks on the board cannot be repaired. In this situation, everything can be solved by installing a new circuit. You shouldn’t be afraid of this, its cost is not high, and you can replace it yourself.
- A break in the electrical wiring can be called the most complex, unpleasant and difficult to identify type of breakdown. In this case, power is not supplied to the instrument panel or one of the indicators, and it stops working. The fault is determined using a multimeter. The required wire is called back, the location of the break or poor contact is determined and, if necessary, replaced or cleaned.
Hard case
Until now, situations have been sorted out when the torpedo still showed some signs of life. If non-working power windows, turn signals, and windshield wipers have been added to the devices, the issue is no longer a matter of relays and fuses.
There may be 2 options:
- The contacts on the ignition switch are burnt. In principle, after installing the relay (even on the VAZ-2109 version), this problem rarely arises. However, the possibility remains. The lock is removed, the contacts are checked and, if necessary, cleaned;
- Mounting block. There may be burnt tracks on its board. The only thing that will save you is replacing it with a new one. However, the cost is by no means astronomical, and the installation is available as a standalone option.
The dashboard of the VAZ 2114 is out of order, what should I do?
If on a VAZ-2114 car on the instrument panel none of the indicators installed on it work (speedometer, odometer, tachometer, fuel level and coolant temperature indicators), then the first thing the driver will have to do is check the integrity of fuse F3, which is located in the mounting block. If it has burned out, then before replacing it, you need to find the reason why it burned out, otherwise the newly installed new fuse will have the same fate as the previous one. Most often, fuses burn as a result of a short circuit.
Even if the fuse is intact, then do not be lazy to take it out and check the condition of the contacts. There are cases when the contacts oxidize, and the electrical circuit in this place is interrupted. After making sure that the fuse is intact, the next step is to check the ignition relay, which is located inside the car to the left of the steering column. It is attached to a pin upside down. In the block where this relay is inserted, you can try to short-circuit the power wires using a jumper. If the instrument panel comes to life, the ignition relay will have to be replaced.
If the ignition relay is working properly, there are only two possible reasons for the instrument panel not working: the ignition switch and the mounting block. Before installing the ignition relay on the VAZ-2109 car, the lock contacts burned quite often, and they had to be cleaned by disconnecting the contact group from the lock itself. After changes were made to the principle of supplying voltage to the ignition switch, its contacts began to burn very rarely, but the likelihood of this phenomenon still remained. On the mounting block, in its board, tracks may burn out; in order to see this, the mounting block will have to be removed from the car.
In addition to the reasons listed above, which can lead to failure of the instrument panel, it is also necessary to check the reliability of fastening the ground wire.
Private situations
General signs do not always indicate specific breakdowns. There may be exceptions.
If individual devices refuse to work, it is quite possible that this is their personal problem. You'll have to parse the specific pointer. It may have a cracked gear that needs to be replaced.
Also, why doesn’t the instrument panel of the VAZ 2114 work? If the fuel gauge and tachometer are capricious (either they function, or they don’t react at all), the contacts and the mounting block are normal - you need to do a small check.
Reset is pressed and held, and the ignition is turned on at the same time. Raised arrows indicate the need for further searches. Lifeless - that microcracks have appeared in the shield itself. You will have to remove it and examine all soldering and traces under a magnifying glass. In principle, these are all the main options. If calling all the listed components and parts did not lead to the revival of the instrument panel, your case is individual, and you will have to determine the situation in the company of an experienced auto mechanic.
If you find an error, please select a piece of text and press Ctrl+Enter.
Dashboard VAZ 2114 – autotest
Some VAZ cars have a “dashboard check” function, which allows the arrows to make a full turn from start to finish. Such an auto-test of the tidy when the ignition is turned on is available on some foreign cars (Nissan, Subaru). In this article we will tell you how to do an automatic test of the instrument panel on a VAZ. Let's start with the fact that it is not possible to implement the function of checking the tidy when you turn on the ignition on every model. If you turn on the ignition while holding the mileage reset button and the arrows describe an arc, then this panel will work. As a rule, such calibration of the instrument arrows is available on AutoPribor models with one window (single-line), but again not on all versions. To modify the instrument panel you will need:
- Electromagnetic relay, small-sized (12V). For example, Tianbo HJR 1-2C.
- Transistor KT 503. Can be replaced with almost any npn structure.
- Capacitor 100uF, electrolytic (16V).
- Resistors for 1koma, 6.8koma, 22koma.
Main conclusions
If the dashboard backlight on a VAZ 2114 car does not turn on, then most likely the light bulb has burned out or the LEDs have failed. However, there are several other possible causes for this problem:
- Wiring is damaged.
- Oxides are formed at points of contact.
- The security side has failed.
- The connection circuit has burned out.
To establish the exact reason why the backlight does not turn on, you must, following the instructions, carefully disassemble the dashboard and sequentially call the entire circuit through the tester. The detected defective element, depending on the degree of damage, must be repaired or replaced with a new one.
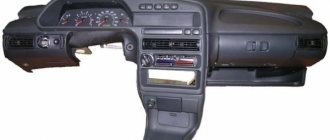
How to disassemble the dashboard of a VAZ 2114
Before embarking on this complex process, the driver must carefully familiarize himself with the design and arrangement of the instrument panel on his car. When disassembled down to the cogs, it looks like this:
If you carefully study this diagram, it becomes clear how to remove the panel on a VAZ 2114. Having determined the order for yourself, you can begin the process.
- Using a Phillips screwdriver, you need to unscrew the three screws holding the left console screen. For convenience, when doing this work, it is better to use a screwdriver with a short handle and blade.
- When removing the screen, carefully remove the lower edge of the trim from the body bracket.
- The right console screen is secured with five self-tapping screws. Using a Phillips screwdriver, carefully unscrew all the screws while holding the trim with your hand.
- Remove the screen without allowing it to get caught in the wiring harnesses that are hidden behind it.
- Disconnect the ground from the battery by disconnecting the connectors. If your car has a radio, disconnect it from the main bundle of wires by pulling out the connecting connector. If there is no radio installed on the car, then simply pull the wires out of the panel; they should be closed with a plug. Be sure to turn off the cigarette lighter and remove the socket with the ashtray light bulb.
- Remove the handles from the heater damper control levers. To make the process easier, pry them off with a flat-head screwdriver.
- Despite the apparent simplicity of this item, removing the handles from the levers can take a lot of time. To do this, a clear example is given of how this should be done on a removed unit.
- Remove the electric heater fan handle by simply pulling it towards you.
- Unscrew the cross-head screws securing the instrument panel to the brackets on the right and left with a screwdriver
- In the window on the instrument panel, where the instrument unit is located, there are two self-tapping screws at the top and two at the bottom - under the window. It is necessary to turn them out, loosening the cover (2) and the shield (8).
- Pull out the plug and unscrew the screw located behind it
- Remove the two screws from the bottom that hold the trim and remove it.
- Having marked the wires suitable for the switches, disconnect them.
- Remove the bolts from the steering wheel bracket
- Using the “8” key, unscrew the screws of the lower bracket fastening.
- Unscrew the self-tapping screw and remove the light guide.
- Remove the fasteners from the heating control unit and remove the cartridges from the back of the unit.
- remove the decorative insert, removing all external parts.
- Unscrew the nuts with a key set to “21”.
- Remove the hydraulic corrector illumination.
- Unscrew the upper and lower fastenings of the panel, and remove the fastening to the cross member on the left side.
- Now you can remove the VAZ 2114 torpedo.
- Installation is in the reverse order.
In order to clearly see the whole process in motion, you can watch a video on how to remove the dashboard on a VAZ 2114.