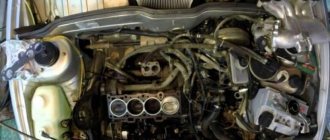
Hello everyone, again))
The bearings were humming, more precisely the rear left one. I installed the previous ones at the service center, it was unplanned, and I bought the bearings in the intercom mode, which ones they had - AFA
*
They didn't travel much, 10-15 thousand, although in some places they walked on very crappy roads, but I still don't think it's enough. At the service center a year ago, they charged me 1200 for replacing them; when I saw what the master was doing, I thought the green creature would strangle me to death))
*
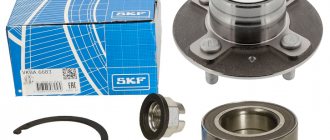
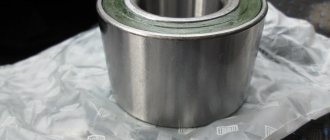
I purchased it after reading reviews of
NTN-SNR art.
R153.07 set consists of cone bearings L.45449/410 and LM11749/710 oil seal and cotter pin Here in this box
Before starting the replacement, I read the ABCs and off we went. Photos on the phone, because... changed it at night at work. There are new rules at work, cars can only be parked in the parking lot and driving around the premises is prohibited. That’s why everything happened right in the parking lot - it was dark and the mosquitoes were biting. *
I won’t describe everything, everything is clear there, a 24mm head, a hammer and a mandrel. In the process, discrepancies with the alphabet were found; a puller was not needed, and they would not really catch. Everything is simpler, put a screwdriver as in the photo, 1 hit with a hammer and you're done.
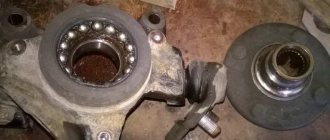
Diagnostics of the rear bearing, signs of failure
Before you begin repairs, be sure that it is the wheel bearing assembly that has failed; the signs of this are as follows:
- Chassis play, felt by hand;
- Noise and hum of the rear wheel increases as speed increases;
- Leakage of lubricant from oil seals;
- Grinding and squeaking occurs when the raceways are destroyed, the cage is deformed, and the rollers fall out.
The front wheel bearing has similar signs of failure.
Procedure for checking the Daewoo Nexia wheel bearing:
- Raise the rear of the car with a jack;
- Rotate the chassis and listen to the sound of rotation;
- Check the play by moving the wheel axially.
- The video shows the process of diagnosing and checking rear wheel bearings.
Rear bearing diagnostics
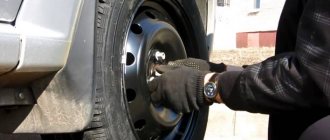
How to tighten a hub nut without a torque wrench
When repairing their car, many motorists consider it inappropriate to purchase torque wrenches or other specialized devices (pullers, etc.). There is a good way to tighten the fastener to the correct torque without using a dynamometer. The following tools are required: 1. Ratchet with lock nut head; 2. Tube for extending the ratchet to the required “arm”; 3. Roulette; 4. Marker; 5. A load that can be hung on the “shoulder” (for example, weight 32 kg).
The essence of the method is to calculate the moment using the formula for elementary physics classes:
P is the applied force, N; l - distance from the hub to the point of application of force - “shoulder”, m. The finished formula for our case will be as follows:
P1 = (M2 • 100) / (M1 • 10) (• 10 (or • 9.8) - in Newtons), where
P1 is the distance at which the load is attached to the “shoulder” relative to the torsion point, cm; M1—cargo mass, kg; M2—required torque, N • m.
Calculation example for a Ford Focus 2 car
P1 = (M2 • 100) / (M1 • 10) (• 10 (or • 9.8) = (45 • 100) / (32 • 10) = 4500/320 = 14 cm. Conclusion: to ensure a tightening torque of 45 N • m requires a 32 kg load placed on the pipe at a distance of 14 cm.
- Pre-tighten the locknut and tighten slightly.
- Mark a distance of 14 cm where the push should hang;
- We hold the ratchet with one hand and hang the roller with the other, thereby tightening the support;
- The operation continues until the fastening under the load stops tightening, which means we have reached the required force. Accuracy +/- 5%.
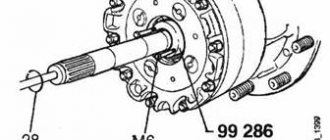
How to change the rear wheel bearing on Nexia 1.5-2.0 (8 valves, 16 valves, n150)
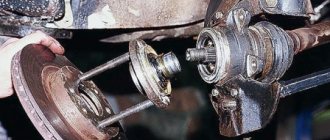
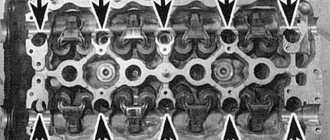
The photo shows a diagram of the rear suspension and hub of the car:
Required set of tools for repair:
- Jack, wheel chocks;
- Ratchet wrenches and sockets (30, 27, 17);
- Impact screwdriver;
- Pliers;
- Hammer.
Removing the brake drum and dismantling the old wheel bearings
Place the car on a level surface, remove the brakes and place supports under the front chassis.
- Loosen the wheel bolts, then jack up the car.
- Remove the wheel, then remove the wheel nut protective cap.
- We take out the cotter pin of the hub lock nut, which we unscrew. The nut must be unscrewed by hand if the thread is not damaged. Otherwise, we use a 30mm head.
- Now remove the drum along with the hub, use a screwdriver.
- Next, remove the cage with the rollers of the outer hub bearing.
- The hub is attached to the back of the brake disc, remove the rubber seal and the inner element race from it.
- Next, you can disconnect the hub from the drum for ease of pressing out the bearing, or leave the structure assembled. In our case, the repair will be carried out on the hub assembly with the brake flange.
How hard should you tighten the wheel nut on your car?
For each car, torque standards are established, since the tightening force of the lock nut depends on the following factors: - Bearing size; — Adjusted axial play; — Diameter and thread pitch; The force indicators for properly tightening the nut are shown below. The database will be gradually replenished.
Tightening torques for the front wheel bearing on a VAZ (LADA)
| p/p | Automobile model | Force, N • m | Hub nut diameter/thread size |
| A | B | IN | GRAM |
| 1 | VAZ 2101 - 2107, OKA | 196–199 | 18x1.5 |
| 2 | NIVA VAZ 21213 and 21214 | 196–199 | |
| 3 | Kalina, Granta, Priora, Largus, Vesta | 226-247 | 20x1.5 |
| 4 | VAZ 2108, VAZ 2109 - 2110, 2111 - 2115 | 226-247 |
Tightening torques for the front wheel bearing on Ford
| A | B | IN | GRAM |
| 1 | Focus 1 | 45 (then tighten another 90 degrees) | M18x1.5 |
| 2 | Focus 2 | ||
| 3 | Focus 3 | ||
| 4 | Mondeo | 35 (then tighten another 90 degrees) | |
| 5 | Merger | 35 (then tighten another 90 degrees) | |
| 6 | Transit | 53 | M20x1.5 |
Tightening torques for the front wheel bearing on a Chevrolet
| A | B | IN | GRAM |
| 1 | NIVA | 191 — 195 | 18x1.5 |
| 2 | Lanos | 184 - 204 (then loosens and tightens 15.3 - 18.4) | 20x1.5 |
| 3 | Aveo | ||
| 4 | Lacetti | 254–300 |
Tightening torques for the front wheel bearing for Renault
| A | B | IN | GRAM |
| 1 | Logan | 175 | 20x1.5 |
| 2 | Megan 1, Megan 2 | 280 | |
| 3 | Sandero | ||
| 4 | 4x4 boot | 280 | |
| 5 | 4×2 boot | 175 |
Tightening torques for the front wheel bearing on Daewoo
| A | B | IN | GRAM |
| 1 | Nexia | 100 | 20x1.5 |
| 2 | Matiz | 210 | 18x1.5 |
| 3 | Daewoo Lanos | 100 | 20x1.5 |
Tightening torques for the front wheel bearing on Opel
| A | B | IN | GRAM |
| 1 | Astra N | 150 (then unscrew 45˚ and tighten to a torque of 250 Nm) | M22x1.5 |
| 2 | Astra G | ||
| 3 | Astra J |
Adjusting the rear wheel bearings of Daewoo Nexia (8/16 valves sedan and hatchback, n150)
Proper adjustment is an important criterion for wheel bearing life. The only correct method of adjustment from a mechanical point of view and according to official operating instructions is to tighten the nut to the specified torque using a torque wrench.
Step-by-step adjustment instructions
- After screwing on the locknut, tighten it by hand until it stops.
- Without putting on the cotter pin, roll the drum in both directions to distribute the lubricant.
- Using a torque wrench, tighten the locknut to 2.5 N*M.
- Roll the drum in both directions
- Unscrew the locknut 180 degrees.
- Retighten the locknut to 2.5 N*M.
- The bearing assembly is now adjusted correctly. Be sure to install the cotter pin. The whole process is also shown in the video.
Adjusting the rear wheel bearing
Wheel bearing tightening
Wheel bearing torque is generally referred to as the actual force with which the wheel nut is tightened. Force is measured in N/m or kg/m, depending on the value and conversion activity.
Each bearing has low end play in its design. This is necessary for the correct functioning of the mechanism, namely:
- to prevent lateral displacement;
- reduce the effective friction force;
- uniform distribution of thermal expansion;
- voltage distribution;
- increasing the contact area.
Table of tightening torques for threaded connections
When choosing a torque wrench, the required tightening torque should be 25-30% less
than the maximum for your key. Otherwise, working under maximum load, the key will quickly lose accuracy and fail.
Screw tightening table
| Bolt nut | Thread | Strength class | ||
| 8.8 | 10.9 | 12.9 | ||
| 22 | M 14 | 138 Nm | 194 Nm | 235 Nm |
| 24 | M 16 | 211 Nm | 299 Nm | 358 Nm |
| 27 | M 18 | 289 Nm | 412 Nm | 490 Nm |
| 30 | M 20 | 412 Nm | 579 Nm | 696 Nm |
| 32 | M 22 | 559 Nm | 785 Nm | 941 Nm |
| 36 | M 24 | 711 Nm | 1000 Nm | 1196 Nm |
| 41 | M 27 | 1049 Nm | 1481 Nm | 1775 Nm |
| 46 | M 30 | 1422 Nm | 2010 Nm | 2403 Nm |
| 50 | M 33 | 1932 Nm | 2716 Nm | 3266 Nm |
| 55 | M 36 | 2481 Nm | 3491 Nm | 4197 Nm |
| 60 | M 39 | 3226 Nm | 4531 Nm | 5443 Nm |
| 65 | M 42 | 3991 Nm | 5609 Nm | 6727 Nm |
| 70 | M 45 | 4992 Nm | 7012 Nm | 8414 Nm |
| 75 | M 48 | 6021 Nm | 8473 Nm | 10150 Nm |
| 80 | M 52 | 7747 Nm | 10885 Nm | 13092 Nm |
| 85 | M 56 | 9650 Nm | 13582 Nm | 16279 Nm |
| 90 | M 60 | 11964 Nm | 16867 Nm | 20202 Nm |
| 95 | M 64 | 14416 Nm | 20300 Nm | 24320 Nm |
| 100 | M 68 | 17615 Nm | 24771 Nm | 29725 Nm |
| 105 | M 72 | 21081 Nm | 29645 Nm | 35575 Nm |
| 110 | M 76 | 24973 Nm | 35118 Nm | 42141 Nm |
| 115 | M 80 | 29314 Nm | 41222 Nm | 49467 Nm |
| 130 | M 90 | 42525 Nm | 59801 Nm | 71761 Nm |
| 145 | M 100 | 59200 Nm | 83250 Nm | 99900 Nm |
The strength class marking is indicated on the bolt heads.
For products made of carbon steel of strength class - 2, numbers are indicated on the bolt head through a dot. Example: 3.6, 4.6, 8.8, 10.9, etc. The first number indicates 1/100 of the nominal tensile strength, measured in MPa. For example, if the bolt head is marked 10.9, the first number 10 means 10 x 100 = 1000 MPa. The second number is the ratio of the yield strength to the tensile strength, multiplied by 10. In the above example, 9 is the yield strength / 10 x 10. Hence, Yield strength = 9 x 10 x 10 = 900 MPa.
The yield strength is the maximum working load of the bolt!
For stainless steel products, the steel marking is applied - A2 or A4 - and the tensile strength - 50, 60, 70, 80, for example: A2-50, A4-80.
The number in this marking means 1/10 of the tensile strength of carbon steel.
Conversion of units of measurement: 1 Pa = 1N/m2; 1 MPa = 1 N/mm2 = 10 kgf/cm2. Limit tightening torques for bolts (nuts).
Table of bolt/stud diameters
| English measurement system ( inches ) | Metric ( mm ) | ||
| Bolt nut) | Thread | Bolt | Hairpin |
| 1.1/4“ | 3/4“ | 32 | M 22 |
| 1.5/16“ | 7/8“ | ||
| 1.3/8“ | 13/16“ | ||
| 1.7/16“ | 7/8“ | 36 | M 24 |
| 1.1/2“ | 1“ | ||
| 1.5/8“ | 1“ | 41 | M 27 |
| 1.11/16“ | 1.1/8“ | ||
| 1.3/4“ | |||
| 1.13/16“ | 1.1/8“ | 46 | M 30 |
| 1.7/8“ | 1.1/4“ | ||
| 2“ | 1.1/4“ | 50 | M 33 |
| 2.1/16“ | 1.3/8“ | ||
| 2.3/16“ | 1.3/8“ | 55 | M 36 |
| 2.1/4“ | 1.1/2“ | ||
| 2.3/8“ | 1.1/2“ | 60 | M 39 |
| 2.7/16“ | 1.5/8“ | ||
| 2.9/16“ | 1.5/8“ | 65 | M 42 |
| 2.5/8“ | 1.3/4“ | ||
| 2.3/4“ | 1.3/4“ | 70 | M 45 |
| 2.13/16“ | 1.7/8“ | 75 | M 48 |
| 3“ | 2“ | ||
| 3.1/8“ | 2“ | 80 | M 52 |
| 3.3/8“ | 2.1/4“ | 85 | M 56 |
| 3.1/2“ | 2.1/4“ | 90 | M 60 |
| 3.3/4“ | 2.1/2“ | 95 | M 64 |
| 3.7/8“ | 2.1/2“ | ||
| 100 | M 68 | ||
| 4.1/8“ | 2.3/4“ | 105 | M 72 |
| 4.1/4“ | 2.3/4“ | 110 | M 76 |
| 4.1/2“ | 3“ | 115 | M 80 |
| 4.5/8“ | 3“ | ||
| 4.7/8“ | 3.1/4“ | ||
| 5“ | 3.1/4“ | ||
| 5.1/4“ | 3.1/2“ | 130 | M 90 |
| 5.3/8“ | 3.1/2“ | ||
| 5.5/8“ | 3.3/4“ | ||
| 5.3/4“ | 3.3/4“ | 145 | M 100 |
| 6“ | 4“ | 150 | M 105 |
| 6.1/8“ | 4“ | 155 | M 110 |
| 165 | M 115 |
Recommendations for further use
Careful driving can extend the life of the wheel bearing. Avoid driving over potholes and other obstacles at high speed. It is also not recommended to sharply increase speed unless necessary and install wheel rims with a diameter different from the factory version. The optimal tire sizes are written on the bottom of the driver's door.
When the car is operated on bad roads, it is necessary to diagnose the chassis more often at service stations. Specialists will identify and fix the problem, which will prevent a possible accident.
General rules for using the tool
Wheel bearing Lada granta, kalina, priora, which one is better to choose
The tool itself is a rod with a handle at one end and an indicator mechanism at the other. At the working end of the handle, a socket head or a connecting socket for a horn attachment (wrench or union attachment) is installed.
The keys are equipped with indicator and adjustment mechanisms, both with and without overtightening protection.
Next, we will consider the types of torque wrenches that are most often used in work.
Click type
Often motorists purchase just such a key because of the high measurement accuracy, durability and the presence of a convenient scale with adjustment. It is impossible to tighten the thread with such a wrench, since a fuse is provided.
The main thing is to know how to properly work with a product of this type. The bottom line is that it is necessary to set the required value of the maximum force (tightening torque) in advance.
Next, the connection (bolt or nut) is tightened as usual until a clearly audible click appears. This sound signals that the required parameter has been reached. It is noteworthy that the device will then go into the “slip” mode and it will not be possible to tighten the connection.
Video: “How to use a click key”
How to use the scale:
Torsion bar type with pointer arrow
Such keys have a characteristic feature - large overall dimensions. Directly at the handle itself there is a scale on which the necessary measurements are made. It is not possible to pre-set this wrench; the tightening result is achieved after the fact.
Recommended for use only in machines and mechanisms where an average level of tightening accuracy is provided.
When using a pointer tool, the handle moves relative to the scale in the direction of application of force. The arrow remains motionless.
To make measurements as accurately as possible, you must perform the following steps step by step:
- Find in advance the place on the scale that the shooter should reach at the moment of applying maximum effort;
- Tighten smoothly and consistently, reaching the specified position on the scale;
- If additional force is necessary, the tool is removed, tightened with a regular wrench and checked again.
Video: “How to use an arrow key”
vazoved
I drive a LADA VESTA CROSS, Moscow
Then there will simply be no one to pay the fines! This is a Korean 7 in 1 car tablet video recorder for Android..
I forgot about fines and Yandex Navigator.
There is FULL HD shooting, radar detector and GPS with 32 satellites. I got it at a reasonable price for just a few thousand here >>>> MORE...
Torque electronic device
The use of this tool is justified when assembling equipment that requires high tightening accuracy. Information is displayed on the LCD display (tightening torque in Nm). The advantage of the models is the ability to save settings during operation.
Data installation is carried out according to the instructions using special buttons. It’s convenient and quite simple, and the time savings are huge. It is beneficial to use such devices on an assembly line when it is necessary to perform a repetitive operation many times.
Signals when the specified tightening torque has been reached with high accuracy. There are also special electronic adapters that are installed on the ratchet wrench.
I found out how to choose the right clearance in a pair - tapered bearing + hub, now I only do this
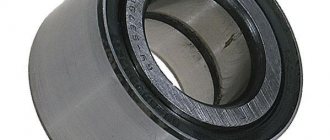
All wheel bearings are structurally divided into several groups.
This node connection reacts especially sharply to the road surface and the owner’s natural driving style, therefore it experiences enormous loads and quickly fails if the gap does not match.
You can feel the play immediately after deterioration in car control, namely:
- with a clearly discernible presence of bearing noise;
- knocking of the hub pair - bearing + hub.
It is this pair that is subject to special requirements when choosing the right play or gap in order to avoid an emergency situation on the road.
Bearing noise can be determined as follows.
I jack up the car so that the wheel rises above the floor surface.
Then, with noticeable effort, I swing the raised wheel in the horizontal and vertical planes to check for play.
To understand the picture with the bearing, I spin the wheel.
What do I do to select the backlash in a pair - tapered bearing + hub?
I tighten the adjusting nut on the wheel axle with an open-end wrench to select all the fit gaps. Then I slowly unscrew the nut until radial play appears on the wheel. Feeling the gap, I slowly tighten the nut until the runout in the pair - cone bearing + hub - begins to disappear and, finally, I lock the nut. Share your ways of choosing the gap in this pair. Click "thumbs up" and subscribe to the channel " Dunno and Repair"
».
Source
How to properly tighten tapered wheel bearings
Comrades, experienced trailer operators and simply craftsmen. Tell me how to properly adjust the clearance in hubs with tapered bearings? I have a ZIL trailer, ’90, one hub was a little loose, the second rotated with effort and got hot. Approximately this design msk.forum.motolodka.ru/att/club/338013_36321.jpg Yesterday I took it apart with great difficulty. Inside there is the original thick lubricant, already dark, it needs to be changed (What to wash off the old one with, gasoline?). The loose hub was sorted out well, the inside is clean and there are no signs of damage. Do bearings need to be replaced? The mileage is small, I think no more than 5,000 km. The second hub jammed, the bearing with a larger landing diameter, which is external, could not be removed from the axle and had to be knocked out of the bushing using a barbaric method. How to determine the degree of wear of the axle, bushing and bearings?