Home Ravon nexia Nexia: ignition switch, its design and installation
- Ravon nexia
6605
Egnition lock
- Installation of contact group
- Contact group repair
- Analogue or original
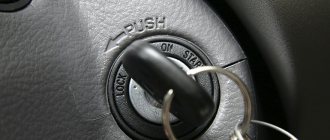
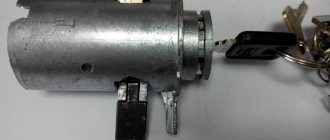
The movement of any car begins with the ignition switch. And if, when you insert and turn the key, nothing happens (the starter does not turn), then the contact group has burned out. Unfortunately, this is not uncommon for Nexia.
Replacing the contact group will solve the problem. The contact tends to melt under prolonged loads. This happens because an increased electric current passes through the contact responsible for power from the battery. Periodic replacement of the contact group will not bring much success. The best solution to a recurring problem would be to modify the electrical circuit, which will unload some of the current from one contact to the other.
Replacing the ignition lock cylinder for Daewoo Nexia
Installation of contact group
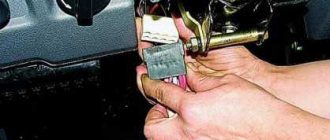
- First you need to remove the steering casing by unscrewing four screws.
- Release the ignition switch from the rings.
- Next, turn the steering wheel first to the right, unscrew one screw, then to the left - another one. Now the casing can be easily removed, opening access to the lock.
- The contact group is disconnected by unscrewing the screw that secures it.
- The next step is done using available material, such as a nail. Insert it into the opened screw hole and press it while turning the key. Unblocking has occurred.
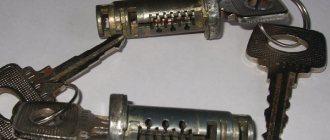
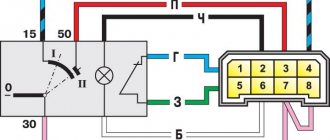
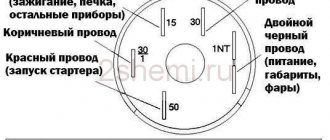
- Now all attention to the ignition contact group. On Daewoo Nexia it has 5 contacts, each with a specific purpose.
- Power supply from battery – “30”
- Ignition – “15”
- Furnace fan operation – “15a”
- Starter – “50”
- Audio system – “Kb” or “Ka”
The principle of operation is simple: turn the key - the contacts are connected. The problem is the resulting load, which goes from “30” to “15” contact, and at the moment the starter is turned on, to “50”, increasing the current power. We can conclude that the largest amount of current passes through the “30” contact, which overheats and melts. Thus, in order to avoid overload, it is advisable to install an additional relay on the groups involved: “30 – 15” and “30 – 50”. Contact “15a” in this case remains “out of use”, since its task is a stove fan, the three speeds of which it can handle quite well. A separate relay provides the fan with 4th speed.
Installation of the Daewoo Nexia ignition switch contact group
Features of the ignition switch Nexia and Matiz: theoretical part
Before removing, repairing or changing the ignition switch on a Matiz or Nexia, read the possible list of causes and signs of device failure.
Causes of malfunction
- ZZ overload is one of the most common causes. Overload occurs due to the installation of additional devices and devices that consume high power. The problem manifests itself as a result of the fact that high voltage passes through the contact group, for which it is not suitable. The mechanism can get very hot and eventually it will simply fail.
- Manufacturing defects. If the starter contact ZZ is made poorly, such a device will not work for a long time.
- Moisture getting into the structure. Of course, for this reason the unit cannot become stuck, but, nevertheless, moisture getting inside the device has a detrimental effect on its functionality.
- Short circuit in the electrical component of the car. This problem does not happen often, but if high power current damages the contacts of the mechanism, it will cause it to break.
- Over time, the mechanism may wear out the contact tracks or the group itself. This is normal, since wear and tear is typical for any automotive mechanism. Due to wear, grooves will appear on the metal components of the structure.
- Mechanical damage or broken contacts, as well as other components of the group. It will not be possible to repair such a fault; the only best option would be to replace it.
Signs of failure
Now briefly about the signs:
- Several devices refuse to work at once, which, as it may seem at first glance, are in no way connected with each other. Inside the mechanism, one or more voltage consumers are connected to each contact. For example, these are optics, turning lights, audio system, video recorders, parking sensors, interior lights, etc. If one of the contacts wears out, it will no longer be able to power the equipment connected to it.
- Inoperability of the starter unit. If you try to start the engine with the starter not working, you will not hear the relay click. If there is no click, we can conclude that no voltage is passing through the device cylinder.
- If a piece of equipment does not work, but then suddenly activates if the driver moves the key in the lock (the author of the video about replacing the mechanism yourself is the CarDan Tv channel).
Contact group repair
Having come to the decision of repair, buy:
- Relay for 30 or 50 amperes (from VAZ 2108 or 2110)
- Relay block
- Terminals
- Red and black wires 0.5 m each
- Insulation tape
The price of preparatory work is about 150 rubles.
First of all, reconnect the wiring with the terminals from connector 15 to 87, and from 30 to 30. Now extend the 30th wire by soldering an additional 25 cm to it. We insert the extended contact using a terminal into the socket of the contact group (connector 30). Crimp the remaining 25 cm of wire with terminals on both sides and insert opposite ends into the 85 relay and into the 15 connector. For the manipulations performed, a red wire was used. It's black's turn. Also, crimp it with terminals on both sides, and hook one end to the 85 relay, and the other to the car body.
Wrap the wires as tightly as possible with insulating tape. Place the relays under the panel in an accessible place so that, if necessary, they can be removed. To complete the work, attach the KG lock connector to the group itself.
What is the essence of this method: the incoming electric current will pass through the relay, thereby reducing the load on the entire contact group. Which is what was required initially.
Installing a new contact group on the ignition switch
How to replace a contact group with your own hands:
- First, open the hood and disconnect the battery.
- Then, as in the case of the cylinder, you will need to unscrew the bolts securing the casing to the steering wheel. Remove and set it aside.
- Now you will need a flat blade screwdriver. With its help, you need to disconnect the plug, and then dismantle the upper casing on the steering column.
- Having done this, you can remove the O-ring, which is located on the lower casing. Before doing this, you will need to remove four bolts.
- After this, you will need to disconnect the block with the wiring that is located on the plug. Having done this, you need to install the key in the 3Z and then turn the mechanism to position 2.
- After completing these steps, you will need to unscrew the screw that secures the mechanism, after which you need to remove the contact group from the device. When the group is dismantled, a new one is installed. The assembly procedure is carried out in reverse order.
Analogue or original
The contact group for Daewoo Nexia goes under the code 530395 in the online store Exist.ru. You can also purchase an analogue consisting of 6 contacts (additional - “R”) under code number 93741069. The price is around 600 rubles.
The price of a new ignition switch complete with CG, but without a cylinder, ranges from 1650 to 2000 rubles. It all depends on the build. The larva is purchased separately. There are no analogues specifically for the Daewoo Nexia lock. Original numbers: GM 531318 and 530379, which are suitable for both old and new generation Nexia.
Ignition switch (housing) GM 531318 for Daewoo Nexia
Replacing the ignition switch on a Daewoo Nexia - how to remove and change the ignition switch on a Daewoo Nexia
The Nexia model is perhaps one of the most common types of cars on Russian roads. The Daewoo company produces economy-class cars with fairly wide functionality and inexpensive auto parts, which is beneficial for driving on Russian roads. A problem of such a nature as a breakdown or replacement of the Nexia ignition switch is not common. Even taking into account that the electrics of these cars are the most problematic area. Replacement does not require special skills, only attentiveness and concentration are important. The average car owner is quite capable of performing repairs on his own, without resorting to the services of qualified auto mechanics.
Key moment! Before replacing the ignition switch on a Daewoo Nexia, it is important to determine the cause of the breakdown. The cause may be a failed electrical mechanism cylinder or its contact group.
The above spare parts can be replaced and are inexpensive, so you don’t have to worry about repairs. The design has very small parts that are easy to lose; The issue should be approached by first preparing the necessary tools and a well-lit area.
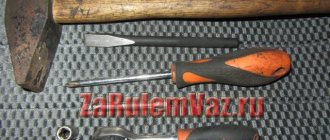
During the repair you will need:
- flat, Phillips screwdrivers;
- straight thin knitting needle or thick needle;
- wrenches 10mm, 12mm.
Dismantling
First, you need to remove the old lock in order to install a technically sound one. This is done in several stages:
- Start the work by removing the terminal from the battery using a ten key. Use a Phillips screwdriver to unscrew the screws securing the steering column casing. To access the top screws, turn the steering wheel. You can remove the steering wheel completely, but this is not necessary.
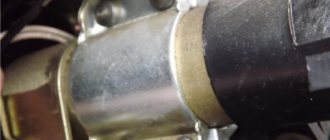
- After removing the steering column trim, access to the electrical mechanism we need opens up. Before removing the ignition switch on the Daewoo Nexia, you should disconnect the contact group from it. Using a Phillips screwdriver, unscrew the fastening screw and, as carefully as possible, remove the contact group, which looks like two small rings.
- Dismantle the cylinder: unscrew the fastening bolts from the lock using a screwdriver, knock it down with gentle blows.
- When disassembling the structure, it is necessary to check the condition of the contact group, since the cause of the malfunction may be in it. In this case, replace the element.
When the faulty mechanism is removed, proceed to install the new one.
Installation
Having established the cause of the breakdown, go shopping. Remember: for cars of different years of manufacture or assembled in different countries, certain lock options are provided. We recommend using the VIN number to determine the type of mechanism. Be sure to purchase new screws to secure the pieces as they are permanent.
To insert a new lock on a Daewoo Nexia, you will have to perform a series of actions as during dismantling, but in the reverse order.
- We install the lock on the seat and securely fix the bolts.
- We connect the contact group to the lock using a screw.
- We fix the steering column trim. Access to the upper holes of the mounting screws is possible by turning the steering wheel.
- Screw on the battery terminal.
Summary
Before changing the ignition switch on a Daewoo Nexia, it is worth considering that some inconveniences may arise. It is impossible to use the same key to start the engine and open the doors or trunk. The old one will perform the function of opening the doors and trunk, and the new one will start the car. If you are not ready to use two different keys, then you should change all the locking mechanisms at once. This can also be done without outside intervention because the remaining locks are easier to dismantle.
The option of replacing the secret of a new lock is not always suitable. To do this, you need to be careful, and perhaps have technical knowledge: there is a high probability that during the dismantling process the plastic decorative ring will be damaged and the metal protective ring that secures the cylinder in the structure will be scratched.
The procedure is carried out as follows:
- The key is inserted into the keyhole, turned as it unlocks, and pressed into the hole with a wire or knitting needle. When the larva reaches 5mm, remove it using improvised means. If you mix up the secrets, the electric mechanism will stop working.
- The larva itself has a cotter pin secured by a spring. To pull it out, you need to press down and turn the key towards the ignition. The cotter pin is released from the clamps and flies out, as the spring acts on it.
- It is now possible to configure the secret to match the old lock.
PS
On a Daewoo Nexia, the ignition key opens the doors and trunk. Accordingly, when replacing the mechanism, this function will be lost. The driver will have to use two keys, which is not very convenient and often leads to confusion. The problem can be solved in two ways:
- Purchasing a new set of cylinders for the ignition switch, doors and trunks and installing them in place of the old ones.
- Replacing the damaged core (plug) of the lock with a new one while maintaining the old security mechanism.
The second option is possible if you can purchase original spare parts; the Chinese-made larvae are not included in the body, and it will not be possible to fit them. Sequence of actions for replacing the ignition switch:
- Insert the key and turn it clockwise until it stops.
- Using a screwdriver, a knitting needle or a piece of wire of a suitable size, we recess the latch; this will allow the cylinder to come out of the body by about 5 mm. When performing this action, you should be careful so that the spring-loaded part does not “fly out” of the socket and get lost.
- We remove the core with the secrecy mechanism from the housing with extreme care.
- Using the described method, we disassemble the new larva.
Now it is necessary to change in the new core all the figured frames and springs that make up the ignition switch security mechanism. This can only be done if their number and external dimensions match. When performing manipulations with devices, you need to be very careful and careful. You should not completely disassemble both mechanisms and try to assemble one from two units. Experts recommend doing this:
- We remove the plate from the outermost slot of the new lock and set it aside.
- We take out the part from the seat with a similar position of the old unit.
- Now it needs to be inserted into the vacated slot of the new housing until it stops.
- Now it needs to be inserted into the vacated slot of the new housing until it stops.
Warning! Any mistake when replacing the plates in the new ignition switch mechanism will make it impossible to use. If everything is done correctly, then we reassemble the unit in the reverse order. The latch is carefully pressed out with a suitable object, and the sorted larva is inserted into the body until it stops.
To ensure smooth operation of the unit, apply a small amount of silicone grease to it. After assembling the ignition switch, turn the mechanism until it stops and back several times; there should be no jams when performing this action. Now it can be installed in place and the driver will use the old key to open the doors and trunk of the Daewoo Nexia, as well as to start the engine.
This article is for informational purposes only and is not an ignition switch repair manual and is not endorsed by the vehicle manufacturer. If a unit malfunctions, you must immediately contact a certified car service center to receive qualified technical assistance.
We recommend subscribing to our autoblog's RSS feed to stay up to date with current materials.
Daewoo Nexia Golden Sand › Logbook › Unloading the ignition switch contact group
It all started with the fact that she slowly began to live her life. Once I stop, turn the key, the car should turn off and it works, all the instruments have gone out, everything has gone out, only the charging light comes on and the car works, I turn the key back, everything turns on as it should be, I turn off the same system again, the car works, and after turning the key back and forth five times, it’s still working still stalled. I restart it and everything works fine. And this story was repeated five times at different intervals. Then one fine day I arrived, turned off the car, started to start it, but the starter wouldn’t turn, the ignition would turn on. It was somewhere around 65,000 thousand mileage. I removed the contact group and saw the following.
I bought a new one, bought two relays with unloading blocks for 70 amps for the ignition and 50 amps for the starter, did everything according to this diagram, installed thick wires on all the terminals, crimped them with special tools. Heat-shrink the wires with a tool and solder everything together without any twists.
After that everything looked like this
Next, I will give measurements of the current strength; the multimeter is connected to the ignition switch gap
Finally I got to what I wanted to do for a long time. Last time I installed two unloading relays on the contact group. The group stopped warming up, but because of the relay that began to break it, it almost became red hot, so I drove with it during the day on the dimensions, didn’t turn on the fogs, and completely forgot about the high-range one, it was already scary to turn it on. This time in addition to those relays I redid the wires as Ingener73 advises. (I took the photo from him, I hope he doesn’t mind) I found a relay on the fuse block that is responsible for the headlights, took out contact 30 from it, from contact 86 I bit off a jumper that goes to the adjacent relay and put there the wire that was on 30 contact I took a thicker wire, crimped the terminal, inserted it where contact 30 was and soldered the other end to the permanent positive that comes from the battery in the braid. I insulated everything and assembled it. Yesterday I tried to drive with low beams, the relay that cuts the ignition stopped heating up. But now the relay in the fuse block has become very hot, I can’t say which one exactly; I tried it by touch, most likely one is getting hot and the two adjacent ones are heating up. I just don’t know what else can be done. Who has rebuilt it the same way as you did after the rework?
Article: 662276more, additional articles: 93741069hide
Order code: 713373
In stock Available for order – >10 pcs. Data updated: 05/29/2021 at 18:30
Order code
713373 Articles 662276, 93741069 Manufacturer ERA Number of connections 6 For article No. 662276
Product reviews
Certificates
Reviews
There are no reviews for this product yet.
Write a review
Articles about the product
- Ignition switch contact group DAEWOO Nexia ERA Article: 662276, 93741069 Order code: 713373 531 ₽ or place an order by calling 8 800 6006 966
Availability of goods in warehouses and stores, as well as the price of the goods is indicated on
29.05.2021 18:30
.
Prices and availability of goods in all stores and warehouses are updated once an hour.
If there is a sufficient quantity of goods in the store you need, you can buy it without pre-ordering. Internet price
– valid when ordering on the website or through a call center operator by phone
8-800-600-69-66
. Subject to sufficient quantity of goods at the time of order.
Price in stores
– retail price of goods in store sales areas without pre-order.
The period for moving goods from a remote warehouse to the warehouse of an online store.
The parts data presented on this page is for informational purposes only.
a15b38aadcd2ff13698ac3099af3061d
Add to cart
Available to order:
Order quantity:
Product successfully added to cart
!
Eliminating the cause of burnout
It should be noted that replacing the contact group with a working one helps for a while. For high-quality repairs, it is necessary to eliminate the cause of burnout: reduce the current load on the contacts. You can strengthen the weak point of the Daewoo Nexia by installing additional relays according to the diagram:
When using two relays, the load on a group of contacts is halved
This method will help extend the service life of the contact group by more than 2 times. Anyone can improve the electrical ignition circuit of a Korean car.
Video: Replacing the contact group on the Daewoo Nexia
To fully understand the process of replacing a group of contacts in the Daewoo Nexia, watch the video:
Repairing the contact group on a Daewoo Nexia car yourself will not be particularly difficult. Additional difficulties will arise if the wiring needs to be replaced. The wires going to contacts “30” and “50” often melt. If possible, relieve the contact group. This will protect the car from fire and extend the life of the part.
- Author: Alexander
Rate this article: (16 votes, average: 4.5 out of 5)