Replacing the Oil Pressure Sensor Gazelle Business 4216
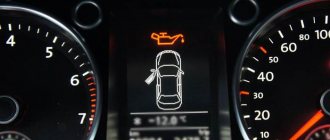
The instrument panel shows low oil pressure.
This problem arose when purchasing a used Gazelle Farmer car. The old style dashboard has a gauge that shows oil pressure. In the new panel, the indication is displayed as a numerical value in the electronic display window. When starting a cold engine, the oil is usually thick and the pressure is about four units. In my case, the arrow rarely crossed the first mark. If it were a mechanical sensor, then you can safely panic - the engine is faulty. But in the case of an electrical sensor, there is a high probability that simply over time, a worn-out unit began to give incorrect readings.
Location of sensors on gazelle business
Pressure in the lubrication system is necessary for the movement of oil and its supply to consumers. The practical performance of a serviceable motor is influenced by the following factors:
- oil viscosity,
- engine temperature,
- ambient temperature,
- crankshaft rotation speed,
- load,
- presence of an oil cooler.
Cars produced by the Gorky plant are equipped with different engines. The permissible pressure values in the engine lubrication system are given in the table.
The construction of the Nizhny Novgorod Automobile Plant (NAZ) was included in the number of priority construction projects of the first five-year plan and, although not without serious problems, was completed in just 18 months.
Alexander Klimnov
Truck Press
Table: pressure indicators of GAZ car engines
| Engine | Automobile | Pressure value (kgf/cm2) | Conditions |
| ZMZ-406 | "Volga" "Gazelle" | 2–4 | driving 50 km/h |
| 4,5 | cold engine | ||
| 1,5 | heat | ||
| 1 | fault criterion | ||
| ZMZ-402 | "Volga" "Gazelle" | 2–4 | driving 50 km/h |
| 4,5 | cold engine | ||
| 1,5 | heat | ||
| 1 | malfunction criterion at medium speeds in motion | ||
| 0,5 | idle speed fault criterion | ||
| ZMZ-405 | "Gazelle" | 4,6 | filter bypass valve activation |
| 6 | maximum permissible | ||
| 0,4–0,8 | activation of the alarm system | ||
| GAZ-560 | "Volga" "Gazelle" | >1 | idling 850 rpm, 80–85 °C |
| 5–7 | 3800 rpm, normal | ||
| 4 | 3800 rpm, short-term permissible | ||
| UMZ-421 | "Gazelle" | >1,3 | 80 °C, 700 rpm, oil cooler off |
| >3,5 | 80 °C, 2000 rpm, oil cooler off | ||
| >0,8 | 80 °C, 700 rpm, oil cooler on | ||
| >2,5 | 80 °C, 2000 rpm, oil cooler on |
Pressure indicators of GAZ car engines
Pressure in the lubrication system is necessary for the movement of oil and its supply to consumers. The practical performance of a serviceable motor is influenced by the following factors:
- oil viscosity,
- engine temperature,
- ambient temperature,
- crankshaft rotation speed,
- load,
- presence of an oil cooler.
Cars produced by the Gorky plant are equipped with different engines. The permissible pressure values in the engine lubrication system are given in the table.
- We bring the oil pressure sensor back to life on a KAMAZ vehicle: diagnostics, replacement, tips
The construction of the Nizhny Novgorod Automobile Plant (NAZ) was included in the number of priority construction projects of the first five-year plan and, although not without serious problems, was completed in just 18 months.
Alexander Klimnov
Truck Press
Table: pressure indicators of GAZ car engines
| Engine | Automobile | Pressure value (kgf/cm 2) | Conditions |
| ZMZ-406 | "Volga" "Gazelle" | 2–4 | driving 50 km/h |
| 4,5 | cold engine | ||
| 1,5 | heat | ||
| 1 | fault criterion | ||
| ZMZ-402 | "Volga" "Gazelle" | 2–4 | driving 50 km/h |
| 4,5 | cold engine | ||
| 1,5 | heat | ||
| 1 | malfunction criterion at medium speeds in motion | ||
| 0,5 | idle speed fault criterion | ||
| ZMZ-405 | "Gazelle" | 4,6 | filter bypass valve activation |
| 6 | maximum permissible | ||
| 0,4–0,8 | activation of the alarm system | ||
| GAZ-560 | "Volga" "Gazelle" | >1 | idling 850 rpm, 80–85 °C |
| 5–7 | 3800 rpm, normal | ||
| 4 | 3800 rpm, short-term permissible | ||
| UMZ-421 | "Gazelle" | >1,3 | 80 °C, 700 rpm, oil cooler off |
| >3,5 | 80 °C, 2000 rpm, oil cooler off | ||
| >0,8 | 80 °C, 700 rpm, oil cooler on | ||
| >2,5 | 80 °C, 2000 rpm, oil cooler on |
Engine UMZ 421
The UMZ-421 engine replaced the 417 engine, which has established itself as a reliable and simple engine. The 421 uses an original design of an aluminum frame, in which dry liners with thin, cast-iron walls are filled. This made it possible to increase the cross-section of the chambers to 100 mm and leave the same size between the cylinders of 116 mm. The solution had a positive effect on the service life, since rigidity increased and the tendency of the cylinders to become “oval” during operation decreased.
Initially, in the engine of the first version 4218.10, antifreeze penetrated through the pores of the aluminum casting of the cylinder block into the oil. The leak was irreparable, replacing the cylinder head gasket did not help, so the manufacturer impregnated the block with resin using aircraft manufacturing technology, changed the shape of the intake tract, and named the engine 421.10.
Specifications
* - for engines UMZ-4218.10, UMZ-421.10, UMZ-4215.10-10 ** - for engines UMZ-4216.10, UMZ-42161.10, UMZ-42164.10, UMZ-421647.10, UMZ-42167.10
Modifications of UMZ-421
The main engine was 4218.10 for Euro-1, 98 hp, compression ratio 7:1.
- 4218.10-10 – carburetor, to adapt to AI-92 gasoline, the compression ratio is increased to 8.2, power is increased to 103 hp;
- 421.10 – carburetor, new exhaust tract design;
- 421.10-30 – carburetor, exhaust manifold of a different design;
- 4213.10-40 – injector for UAZ, Euro-3, power 117 hp;
- 4213.10-50 – injector for UAZ, Euro-4;
- 4215.10-10 – carburetor for A-76;
- 4215.10-30 – carburetor, for AI-92;
- 4216.10 – injection, for AI-92 for Gazelles, Euro-3, compression ratio 8.8, power 123 hp;
- 42164.10 – injector for Gazelle, power 99 hp;
- 42164.10 – injection, for Gazelle, Euro-4, power 125 hp, new camshaft;
- 421647.10 – gas-gasoline version with a power of 100 hp;
- 42167.10 – gas-gasoline version with a power of 123 hp.
Maintenance regulations UMZ-421
The engine can cover the declared mileage of 250,000 km only if the replacement periods for consumables and parts are observed (for gasoline engines):
- 10,000 km – removable oil filter and engine oil;
- 15,000 mileage – valve clearance adjustment;
- 20,000 km – exhaust manifold assembly, fuel line and ramp, attachment belt and battery, spark plugs;
- 30,000 mileage – air filter and crankcase ventilation;
- 40,000 km – antifreeze and fuel filter;
- 60,000 mileage - oxygen sensor.
Specifics and indicators of the sensor on GAZ cars
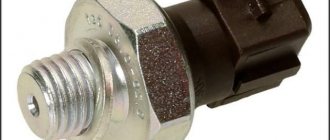
In cars of the GAZ family, one type of mechanical sensors of this type is used. Its marking is MM358. As additional equipment, this device comes with an indicator that informs the driver about the current state of the lubrication system. The indicator can be installed both in the cabin and in the engine compartment.
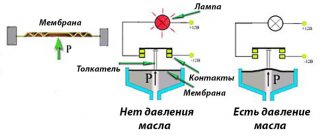
The specificity of the MM358 device is its design: the membrane is fixed together with the pusher. The sensitive element is a rheostat, the winding of which is made of nichrome thread. Oil pressure puts pressure on the membrane, and therefore the pressure on the sliders, which closely interact with the rheostat winding, also changes. Depending on the pressure characteristics in the system, the slider creeps up or down (the data is immediately transmitted to the pointer), but if the pressure is critical, an indicator lamp in the form of a red oil can lights up in the cabin.
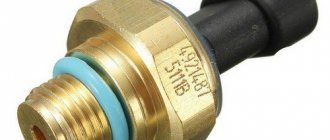
Oil pressure sensor, which is used on all GAZ car models
MM358 sensors in GAZ have the following performance indicators:
power supply voltage - 12 V;
current strength is not higher than 0.15 A;
operating pressure range of the device is from 0 to 6 kg/cm;
output resistance in the absence of operating pressure - from 159 to 173 Ohms;
- We bring the oil pressure sensor back to life on a KAMAZ vehicle: diagnostics, replacement, tips
mounting thread ¼ inch;
connection via screw M.
Warning light
If the control light comes on, you need to pay attention to it. Every time this light comes on, even if you already know that the meter is damaged, you need to check everything. If the dipstick shows that the level is normal and the engine runs silently and without problems, then the indicator is faulty, probably the result of a faulty sensor:
- If the level is good but you hear a loud noise from the engine, this may indicate that the oil pump is not working and the engine should not be restarted until the pump is repaired.
- If a low level is detected, there may be a lack of pressure from a leaking hose or gasket. In this case, you must definitely stop driving until the problem is resolved.
- Periodic flashing of the indicator is probably the clearest signal that the meter itself is failing.
- Always check the oil level and make sure there are no unusual noises before continuing work.
Wrong viscosity
Perhaps when replacing you did not pay attention to its viscosity, it is either too liquid, then the pump simply cannot create the required pressure, or it has thickened, which often happens in winter from the cold. For the summer period, the viscosity was sufficient, but in winter the oil thickens and the pump is not able to pump it through the system, which is why the light comes on.
Be careful when changing the lubricant to prevent this from happening. This “misunderstanding” will cost too much. Inconsistency in viscosity destroys the engine, since the oil must create a protective film on the parts, preventing them from overheating and rubbing against each other. If its parameters do not correspond to the required ones, then it will not provide the necessary protection, which means the motor will quickly become unusable.
Functions performed by the sensor in a vehicle
Inside a car engine, motor oil has three important functions: lubrication, cooling, and cleaning. A problem with any of these three components can have serious consequences for the engine.
For this to work, the oil must be under pressure. It can't just move through the engine at its own leisurely pace; it must move quickly.
Keeping the oil under pressure provides the resistance needed to lubricate moving parts. The pressure prevents the lubricant from being moved by engine forces that try to force these components together.
Installation locations of sensors on GAZ car engines
The practical layout of engines varies, but, as a rule, the position of the oil pressure sensors (OPS) in the lubrication system is the same, after the filter. Where exactly is not so important, since the pressure throughout the entire line is the same.
- We bring the oil pressure sensor back to life on a KAMAZ vehicle: diagnostics, replacement, tips
The pressure in the entire oil line is the same
On engines of the ZMZ-406 family, both sensors - emergency and control - are installed on the left side of the block in the upper part of the head.
On engines of the ZMZ-406 family, both sensors - emergency and control - are installed on the left side of the block in the upper part of the head
Two sensors can also be installed on the ZMZ-402, but their locations are on different sides of the motor. The emergency one is located on the left under the oil filter. Control - on the opposite side at the level of the water pump pulley.
Two sensors can also be installed on the ZMZ-402, but their places are on different sides of the motor
On ZMZ-405 the position of the sensors is the same as on 406 engines.
On ZMZ-405 the position of the sensors is the same as on 406 engines
The location of the DDM on the GAZ-560 diesel engine is above the oil filter.
The location of the DDM on the GAZ-560 diesel engine is above the oil filter
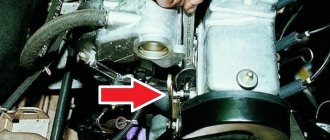
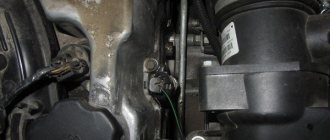
The UMZ-421 engine sensors are installed in front on the right at the level of the lower edge of the generator.
UMZ-421 engine sensors are installed in front on the right at the level of the lower edge of the generator
The main reasons for the oil pressure warning light to come on
So, the warning light usually lights up after starting the engine or when it is idling. There may be several reasons for this phenomenon, but the main thing is to understand and accept for yourself that this should be a signal that there is some kind of malfunction. Therefore, you need to take appropriate measures so as not to worsen the situation. In any case, if the lamp blinks, it means that you need to identify the malfunction and do everything to eliminate it as soon as possible.
Among the main reasons for the indicator to light up are the following:
- Reduced lubricant pressure in the system. This is one of the most common reasons, but even today there are owners who stubbornly do not notice signs of oil leakage or do not look into the engine compartment. Why does pressure drop, you ask? Because the oil gradually leaves the system. Therefore, you should pay attention to any stains on the engine or under the car where it is parked. Do not forget that by simply adding lubricant to the system, you do not solve the problem, but only forget about it for a while.
- Another reason for the warning light to blink is due to the use of low-quality oil filters. Some of the lubricant remains in them even when you stop the engine. If the filter is of dubious quality, then it does not retain oil, but it directly flows into the crankcase. Thus, a periodic drop in pressure occurs.
- Lack of lubrication may be associated with failure of the pressure relief valve. It should be in the closed position if the pressure level in the system is insufficient. However, when the valve fails or gets stuck, the pressure generated is not enough, which causes the warning light to light up.
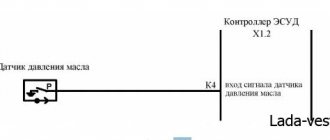
- Another reason is a faulty pressure sensor. It is directly related to the operation of the control indicator, since it is connected to it by the same wire. As soon as the pressure returns to normal, the contacts should open, as a result of which the indicator should go out. This will not happen if the sensor itself has become faulty.
- The indicator also starts blinking if the oil pump screen is clogged. It acts as an obstacle to particles of dirt, metal, dust and any other unwanted elements that lead to wear on the pump. If the oil is not dirty, but of normal quality, then it freely penetrates through the mesh. When it is contaminated, the required pressure is not created in the system, which leads to the warning lamp coming on. Most often, this reason manifests itself on a cold engine, because as it warms up, the lubricant becomes more liquid and passes through the mesh much more easily.
- The oil pump itself may also fail. It is this that creates an acceptable level of pressure in the entire system. If this does not happen, the sensor contacts close, which leads to the appearance of a signal indicator on the panel. Therefore, in this case, you will have to dismantle the oil pan and pump to eliminate the problem.
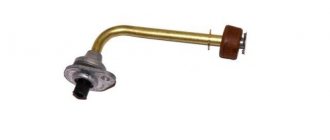
Location of DDM in Gazelles and other cars of this family
In cars of the GAZ family, it is quite easy to find the DDM due to the specifics of its connection. If you open the hood and look at the mechanisms from above, then at the top right you can see the DDM directly above the engine cylinder head.
GAZ sometimes uses two types of devices: one shows the current pressure in the system, and the other performs the function of transmitting a signal to the cabin about a critical pressure condition. Two sensors for the display meter and for the lamp are screwed into a tee, which is connected to the cylinder head. The unit is installed immediately after the thermostat.
Thanks to its convenient placement, dismantling and installation work will be very simple
Site about off-road vehicles, SUVs, off-road vehicles
The UMZ-4216 engine lubrication system is combined: under pressure and splashing. Oil is sucked through the oil receiver by the oil pump and fed into the oil line through a full-flow oil filter.
UMZ-4216 engine lubrication system, composition, design, maintenance, oil pressure in the lubrication system, part numbers.
A pressure reducing valve is installed on the oil pump, which bypasses the oil into the line bypassing the filter element in case of high resistance (clogging, cold engine start). The bypass valve opens when the pressure difference at the inlet and outlet of the filter is 58-73 kPa (0.60-0.75 kgf/cm2). When the ambient temperature is above plus 5 degrees, it is necessary to open the oil radiator tap. The faucet is open when its lever is directed along the hose.
A limit valve is installed in front of the oil radiator tap, allowing oil to enter the radiator only at a pressure of more than 70-90 kPa (0.7-0.9 kgf/cm2). All lubrication system valves are adjusted at the factory and should not be adjusted during operation.
The oil filter is installed on the cylinder block on the right side of the engine. The filter is removed by rotating it counterclockwise. When installing a new filter on the engine, you need to make sure that the sealing rubber gasket is in good condition, lubricate it with engine oil and screw the filter in by hand until the gasket touches the plane on the cylinder block, then tighten the filter 3/4 of a turn.
After installing the filter and filling the engine with engine oil, start the engine for 30-40 seconds and stop. Make sure there is no oil leakage from under the gasket and check the oil level.
Oil cooler for the UMZ-4216 engine lubrication system.
The oil cooler of the UMZ-4216 engine lubrication system is a coil made of an aluminum tube and serves for additional cooling of the oil. The oil cooler is fixed by means of brackets on the radiator trim panel and connected to the engine oil line with a rubber hose through a shut-off valve and a safety valve. The oil from the radiator is drained through a hose into the oil sump.
Problems with the filter
Prolonged burning of the lamp at idle, followed by extinguishing, indicates a poor-quality oil filter. The filter must retain lubricant inside its housing after stopping the motor, so that when starting, the motor does not rotate dry.
It turns out that the filter does not hold grease, it flows into the pan. When starting the engine, the lamp lights up until the pump fills the filter and lubrication system, this is not good for the engine, change the filter immediately.
The reason may also be a clogged filter, when they forgot to replace it, during the next lubricant change, or when the oil has not been changed for a long time, but was only added according to the level.
Do you remember the last time the filter on your car was changed? And when was the last lubricant change? A clogged filter prevents the pump from pumping lubricant at the required speed and pressure, so the lamp lights up. This is harmful for the motor parts, and the pump will quickly break due to overload.
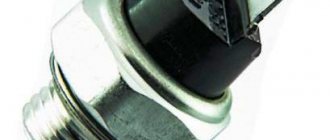
Location in power units ZMZ 405, 406, 409
In ZMZ motors, the location of both sensors is identical. You will find them in the upper left part of the cylinder head (as viewed from the interior) above the exhaust manifold. And while the emergency sensor may not be immediately visible, the oil pressure sensor is instantly identified by its barrel-shaped body.
Pressure and emergency oil pressure sensors are located in the upper left part of the cylinder head
Both sensors are screwed into one forked fitting (tee), which is screwed into the cylinder head and connected to one of the oil channels of the lubrication system. Power wires are connected to the sensors.
Pressure indicator
Consistently high readings may indicate a sensor failure. This could be an internal short in the sensor, or the signal path could be completely destroyed.
Again, it is important to relieve really low pressure by running the dipstick and listening to the engine. Too much grease can cause low pressure due to foaming, which is also not suitable for the car, so don't overfill it.
Damage to the sensor is not only a nuisance, but also a danger. You have to stop every time you feel like something is not right, and it gets boring quickly.
You can also blame a bad sensor for everything, when, in fact, a problem has arisen, and a faulty meter is not able to warn about it. A broken meter requires immediate replacement. This will save you hassle and possible damage to your car in the long run.
Sensor malfunctions and ways to eliminate them
When the dashboard light comes on, it only means there is an oil problem. However, it is likely that this light will not come on if the oil level drops suddenly, which would result in a fault being detected in the sensor or any other device in the engine oil measuring system.
It is necessary to familiarize yourself with the malfunctions and solutions associated with the oil pressure sensor
Low oil pressure
This is the main reason why the dashboard light comes on. The sensor determined that not enough oil was pumped into all parts of the engine.
If this is the case, the friction of the parts pulling against each other will cause extreme heat and abrasion inside the engine, causing permanent damage. The only possible solution to this problem is to look at why the oil pressure is dropping at such an alarming rate.
Defects in the oil pump
Low engine oil pressure can also be the result of a failing oil pump. If this pump is damaged, the pressure will be drastically reduced, causing the meter to detect the drain and alert through the panel.
The only viable solution to this problem is to replace the entire oil pump.
Very low oil level
Typically, low oil level is not the direct cause of sensor failure. You need to check the oil circulation through the engine and measure its proper pressure. Reasons why the gauge detects low oil level:
- Due to leaks in the distribution system.
- If debris gets into the oil pan.
- If the oil filter is replaced incorrectly.
When faced with this problem, it is necessary to determine the real cause of the low oil level and solve it as quickly as possible.
Faulty sensor
From time to time, the sensor may become obstructed, especially if the vehicle's engine is not properly maintained. As a result, the meter gives false readings and turns on the warning lights unnecessarily, which can lead to misunderstandings and damage the very dynamics of the car.
Therefore, in order to solve this problem, you need to check the following possible causes:
- The sensor is indeed damaged.
- The cable connecting the meter and the warning lamp is damaged.
- The oil pump did not retain air in the suction port.
- The pressure control valve was stuck and would not open.
- Therefore, it is best to replace the meter with a new one that is in perfect condition.
How does the oil sensor work and why can it fail?
Now let's consider the situation if you are on the road and the low pressure indicator has triggered. The very first thing you need to do is stop the vehicle and turn off the engine. As soon as it cools down, you will have to check the lubricant level in the system. There is a special dipstick under the hood for this purpose. It is wiped dry and immersed in its original place. It is quite possible that the level will be below the minimum level. This means that somewhere there is a leak or depressurization of connections. You can set off again only after adding oil to the engine. If the lamp continues to light after starting and does not go out subsequently, it makes sense to think about towing the car to the nearest service station or to a trusted auto mechanic. The matter may turn out to be quite serious, so it is advisable to conduct the examination in a calm environment.
Since we have already said that the causes of low pressure may be associated with a faulty sensor, it would be useful to understand the principle of operation of this device. There are certain contacts inside it. Until the ignition is turned on, there is no pressure in the system, so the contacts are closed. When you turn the key and turn on the ignition, but before the starter starts, the warning lamp should be on. If this does not happen, then there may be some kind of malfunction. Maybe the light bulb itself simply burned out, or maybe the contacts were broken or the sensor itself failed. As soon as we start the engine, the contacts open, leading to the light bulb going out.
How to independently replace ZMZ 405, 406, 409 engines
- slotted screwdriver;
- keys for 17 and 22;
- automotive sealant;
- dry rag;
- marker.
- Disconnect the ground wire from the battery.
- Using a slotted screwdriver, unscrew the screw that presses the tip of the pressure sensor power wire. Disconnect the wire. The screw securing the wire tip is unscrewed with a slotted screwdriver.
- If you decide to replace both sensors, use the same tool to unscrew the fastening of the emergency sensor power wire. The fastening screw is unscrewed with a screwdriver
- To avoid mixing up the wires, mark them with a marker.
- Using a 17mm wrench, unscrew the oil pressure sensor. Let's put it aside. The pressure sensor is unscrewed with a 17 key
- Using a 22 wrench, unscrew the emergency oil pressure sensor. The emergency oil pressure sensor is unscrewed with a 22mm wrench
- Carefully wipe the sensor seats and remove any remaining old sealant.
- Lubricate the sensor fittings with a thin layer of automotive sealant. Let it dry a little (30 s).
- We screw in the new sensors using keys 17 and 22.
- Connect the power wires.
- We connect the ground to the battery.
- We check the operation of the sensors.
Video: replacing the oil pressure sensor on a Gazelle car
Whether you decide to independently diagnose and replace sensors, or resort to the help of specialists, it doesn’t matter. The main thing is to be sure that the lubrication system is operating normally and have confirmation of this in the form of normal indicators of the relevant devices, rather than counting on the fact that everything will work out.
Self-replacement of DDM of GAZ cars
Replacing sensors usually does not cause problems. For ease of operation and access to the device, you may need to first remove some parts. Both sensors - control and emergency - are dismantled using the same method.
Be careful not to install a sensor other than the standard one without making sure that the parameters match. High or low internal resistance distorts the indicator readings on the instrument panel.
To work, you will need the tools included with the car.
- Before work, disconnect the on-board power supply by turning off the ignition and disconnecting the battery.
- If necessary, remove individual parts to gain access.
- Disconnect the wires from the sensor.
- Unscrew the old sensor.
- Install the correct one. When twisting, do not apply much force.
- Restore the wiring.
- Start the engine and check the operation of the engine.
- After a few minutes of operation, inspect the sensor. If oil oozes, tighten the connection with a wrench. Do not overdo it, otherwise the sensor may “stick” next time.
Photo gallery: replacing the DDM of the Gazelle car
Install the sensor, connect the wiring
Disconnect the wire, unscrew the old sensor
Do not install a sensor other than the standard one without making sure that the parameters match.
Video: replacing the DDM of a Gazelle car
Checking the serviceability and replacing oil pressure sensors of GAZ vehicles does not require special knowledge and skills. A simple operation that any car enthusiast can do.
Self-diagnosis and replacement of the fuel pump VAZ 2114/2115
Self-diagnosis and replacement of the water pump of a KIA Spectra
Table: malfunctions of oil pressure sensors
The most reliable way to check sensor readings is to measure pressure using an external test pressure gauge. It is connected in a convenient place instead of any (control or emergency) standard meter.
The resistance of the sensor strictly corresponds to the pressure at the inlet. The possibility of using the sensor for its intended purpose is assessed by checking the resistance and inlet pressure measured by the tester with the passport data. According to the memoirs of plant veterans, Nizhny Novgorod residents came running to look at the first, still experienced copies of the Gazelle, as if it were an unheard-of techno wonder . I couldn’t believe that it was made at my own factory.
Checking the functionality of the sensors
DDMs provide very important information about the condition of the engine. A responsible driver treats them with great care, and rightly so. You can’t drive “without pressure,” but you also shouldn’t disassemble the engine every time the warning light turns on.
Although pressure sensors - both emergency and control - are reliable devices, they, like all car parts, may well break. Their common “diseases” are shown in the table.
Table: malfunctions of oil pressure sensors
| Type of oil pressure sensor | Malfunction | Manifestation |
| Emergency | break or increase in contact resistance | The warning light does not light up |
| sticking of contact electrodes | The warning light is constantly on | |
| violation of the integrity of the diaphragm | low sensitivity of the sensor, the warning light goes out only at high speeds | |
| sensor leakage | oil leakage from the sensor | |
| Control | rheostat break | no pressure indicator readings |
| increase in moving contact resistance | low blood pressure readings | |
| violation of the integrity of the diaphragm | no readings or low blood pressure readings | |
| sensor leakage | oil leakage from the sensor |
The most reliable way to check sensor readings is to measure pressure using an external test pressure gauge. It is connected in a convenient place to replace any (control or emergency) standard meter.
The most reliable way to check sensor readings is to measure pressure using an external control pressure gauge
Video: checking oil pressure with a pressure gauge
GAZ-3302 became the first domestic car designed using the world-leading method of end-to-end computer technology for production design using CAD-CAM technology, analytical calculations of dies and molds using the CATIA computer program and many others.
Oleg Filimonov
Truck Press
Using a mechanical pressure gauge as a reference device eliminates doubts about the serviceability of the bearings, crankshaft and rings. But you can evaluate DDM without it.
GAZ car engines use one or two DDMs. The alarm gives a signal (turns on the lamp) when the pressure value drops below the permissible value. The control controls the readings of the pressure indicator installed on the dashboard, which indicates the current value of the parameter.
Diagnostics of emergency DDM
The emergency sensor has two “troubles”: a break and a short circuit. In the event of a break, the pressure lamp on the dashboard does not light up. In the event of a short circuit, it lights up constantly.
If the ignition is on, the engine is not running, but the light is not on, disconnect the wire from the sensor and touch the body, clearing the contact area of any dirt.
Did the light come on? This means that the pressure sensor needs to be changed; it is faulty. If the alarm still does not turn on, the problem may be a broken wiring or a faulty lamp.
If the wire from the sensor is disconnected, but the oil light still lights up when the ignition is turned on, the wiring is most likely shorted to the housing.
The serviceability of the emergency DDM removed from the engine can be checked with a tester or using a car light bulb and battery.
The serviceability of the emergency DDM removed from the engine can be checked with a tester
The resistance of a working sensor is very small, about zero. If you connect a light bulb to a battery through the sensor, it will light up.
If you connect a light bulb to a battery through the sensor, it will light up
Without turning off the avometer, press the hose of a pump or compressor to inflate the tires to the sensor fitting and create pressure. The tester should respond to this by increasing the readings. If you used a light bulb, it will go out. Otherwise, the sensor can no longer be used.
Oil leaks from the sensor indicate a leak in the seal. To check the assumption, cover the sensor with soapy foam or immerse it in water, connect the fitting to the pump and pump it. Bubbles will indicate the location of the damage.
In the same way, check the tightness of the control sensor.
Video: checking emergency DDM
Checking the control DDM
There is a variable resistor inside the control sensor. Its resistance changes under pressure, which is reflected in the indicator readings on the instrument panel.
There is a variable resistor inside the control sensor
When the instrument needle goes off scale, remove the wire from the sensor without turning off the ignition. The arrow will either return to the zero mark or remain in place at the right limit. The arrow has reacted - throw away the sensor. Left in place - look for a short circuit in the wiring.
If the readings are zero, remove the wire from the sensor and connect it to the body, turn on the ignition. If after this the indicator needle goes off scale, it means that the sensor has worked. Otherwise, most likely the wiring is broken or the pointer is faulty.
When the engine is running, the resistance value of a serviceable control DDM measured by the tester responds to revolutions and should be approximately 100–300 Ohms. Exact numbers can be found in the technical documentation.
To evaluate the functioning of the control sensor at home, you will need a tester and a compressor or pump with a pressure gauge.
The resistance of the sensor strictly corresponds to the inlet pressure. Tables or graphs for each DDM model are in the technical specifications and reference books.
The sensor resistance strictly corresponds to the inlet pressure
The possibility of using the sensor for its intended purpose is assessed by checking the resistance and inlet pressure measured by the tester with the passport data.
According to the recollections of plant veterans, Nizhny Novgorod residents came running to see the first, still experimental copies of the Gazelle, as if they were an unprecedented technical wonder. I couldn’t believe that it was made at my own enterprise. Drivers of large and power-hungry trucks literally chased after it to find out where and for how much the new product could be bought.
Alexander Klimnov
Truck Press