30.05.2013
Oxygen sensor
The oxygen sensor (OS) is installed on injection VAZs (except for the first models with a Bosch 1.5.4 controller).
This is an integral part of the engine power system. This sensor is designed to assess the condition of the exhaust (the presence of oxygen in the exhaust). In other words, based on the amount of oxygen in the exhaust, it regulates the working mixture.
DC also has a second, but no less popular name: “lambda probe”. That is, it is one and the same.
Types of sensors and operating principle
The lambda probe is installed in the exhaust system. Sensors are divided into two types: two-point and broadband.
The two-point sensor consists of ceramics, the elements of which are coated with zirconium dioxide on both sides. Installed in front of or behind the catalytic converter.
The principle of operation is to measure the level of oxygen concentration in the environment and exhaust gases. If the level changes and becomes different, a voltage is created at the ends of the sensor elements, from low to high. Low voltage is created if there is excess oxygen in the system.
Otherwise, if the system does not have the required level of oxygen, high voltage will be created. These signals are sent to the engine control unit, which distinguishes them by current strength.
The wideband sensor is a more modern design. It also has two ceramic elements. One of them can be called “pumping”. It is responsible for activating the process of pumping or removing air from the system.
The second element can be conventionally called “two-point”. The principle of operation is based on the fact that as long as there is the required amount of oxygen in the mixture, the current strength on the “pumping” element does not change and is transferred to the “two-point” element.
It, in turn, receiving a constant current from the “pumping” element, maintains a constant voltage between its elements and is inactive.
As soon as the oxygen level changes, the "pumping" element supplies the changed voltage to the "two-point". This, in turn, ensures either pumping air into the system or pumping it back.
Why do you need a catalyst?
Usually, when it comes to a catalyst, most motorists only think of a muffler, or rather a can or pipe. In fact, the exhaust system of a car includes several elements: connecting pipes, muffler, resonator, corrugation, catalyst, etc. So:
- The catalytic converter, as the catalyst is called, is a fairly important element of the car and the entire exhaust system.
- One of the main functions assigned to it is the purification of exhaust gases that flow through the pipe. The latest Euro 2 standards require the presence of a catalyst in the exhaust system of the car and a special oxygen sensor.
- The neutralizer itself, despite the fact that it is made of metal and a massive body, is a rather fragile element. He is afraid of severe mechanical damage, and is also quite sensitive to low-quality fuel. Impurities and various dirt residues contained in low-quality gasoline remain on the walls of the catalyst, gradually accumulate there and lead to damage to the part. In Russian conditions, the catalyst fails very quickly. And if, usually, it is designed for 200,000 km of run, then if it comes into daily contact with Russian fuel, it will not withstand even 30,000 km of run.
How much do ball joints cost for a VAZ 2107 price?
It is useful to know what a catalytic converter is made of. And find out how this part works.
As was said, it reduces the amount of harmful substances and impurities that any car with an internal combustion engine emits into the surrounding atmosphere. These are substances dangerous to human health, such as carbon monoxide, nitrogen oxide, etc.
For example, carbon monoxide is a real gas that has neither color nor odor. But it is precisely this that contributes to the appearance of cardiac colic and headaches in people.
As for the design of the catalyst, it consists of a ceramic or often metal honeycomb part. Why honeycombs?
Yes, because the design resembles a honeycomb. On top of these same honeycombs, special precious metals, most often platinum, are sprayed.
Although palladium catalysts are often used in the automotive industry of developed countries.
Repair and replacement of the neutralizer
Replacing the catalyst in a VAZ 2115 is carried out only after analyzing the peculiar sounds emitted by the exhaust system. It may also be an unusual smell or color of the exhaust gas.
Common symptoms of a faulty catalytic converter include a rattling sound, like scraping metal, coming from underneath the car.
In such cases, it is urgently necessary to replace it with a new catalytic converter or a homemade flame arrester, which copes well with the basic functions of the factory catalyst.
The right tool
For work we will need a set of tools:
Attention: The inspection hole is a mandatory element of the work process, onto which the car should be raised. Although in some cases drivers use a regular lift.
Removing the catalyst
- lift the car onto a pit or jack;
- unscrew the bolts securing the converter to the exhaust pipe;
- remove the bolts together with the springs, using a 13mm wrench;
- take a screwdriver with a wide blade and pry off the graphite-containing O-ring;
- remove it;
- proceed to unscrewing the rear mounting bolts (there are also two of them);
- to unscrew, use a 17mm wrench;
- when unscrewing and removing the nuts, hold the bolt from turning with another 17 wrench;
- remove the neutralizer.
Consequences of oil overflow into a car engine
In this video you can see everything with your own eyes
Making a homemade flame arrester
DIY flame arrester
The catalyst has been removed. Now it's time to think about what to replace it with. It is clear that all technical parameters of the system and environmentally friendly exhaust must be retained. By removing the faulty catalyst from the system, we maintain normal dynamics and save approximately two liters of fuel per hundred kilometers.
But this is the case, everything will work if you put something instead of the catalyst. And humanity has not yet come up with anything better than a homemade flame arrester (photo above) (a new catalyst is expensive, and as was said, on Russian roads it behaves like an English gentleman in a white tailcoat).
Making a flame extinguisher with your own hands is no longer a novelty. Even a novice motorist can handle this task; he just needs to follow these step-by-step instructions. If you don’t want to get dirty or waste time, then any car service will undertake to make the flame arrester that is needed but, of course, will charge a good price for it.
In order to begin work on the manufacture of a flame arrester, it is useful to learn a little about the principle of its operation.
In general terms, according to the instructions, it is similar to the operation of the catalyst itself, but the only difference lies in the direct-flow design that distinguishes the flame arrester. Flows of exhaust gases do not linger in it, thereby preventing impurities, which are rich in low-quality fuel, from settling.
Flame arrestors are also sold in stores, but finding one that would be ideal for your car will not be easy. And the price for them is not cheap. Therefore, doing it yourself will come in handy.
We prepare the necessary tools and parts:
- welding machine;
- two metal pipes having different cross-sectional diameters;
- metal brush and sponge - 10 pieces.
- take a pipe that matches the size of the exhaust;
- we make small holes in it along the entire length (about 5-6 millimeters);
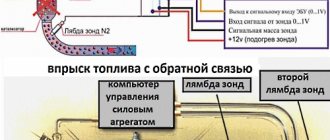
Lambda probe on VAZ cars
VAZs use several types of sensors:
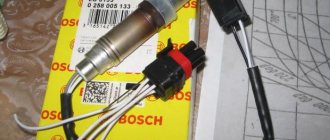
1. Bosch No. 0 258 005 133, Euro standard – 2. Installed on outdated models with an engine capacity of 1.5 liters. On later models with Euro 3 standard, this sensor was used as the first one, and was installed before the catalyst.
The second sensor was installed, which has a “return connector”. But you can find two identical sensors installed
2. Bosch No. 0 258 006537 was installed on cars manufactured since October 2004. They have a heating element in their structure.
Lambda probes produced are interchangeable with zirconium sensors of similar structure. Please note that a non-heated sensor can be replaced with a heated sensor. Not the other way around.
Where to buy car accessories
Spare parts and other products for the car are easily available for purchase at auto stores in your city. But there is another option that has recently received significant improvements. You no longer need to wait a long time for a parcel from China: the AliExpress online store now offers the opportunity to ship from transshipment warehouses located in various countries. For example, when ordering, you can specify the “Delivery from the Russian Federation” option.
Follow the links and choose:
Oxygen sensor malfunctions and error codes
Among the possible breakdowns of the lambda probe, the following can be distinguished: loss of sensitivity, non-working heating. As a rule, the on-board computer will not show you a breakdown if the problem is loss of sensitivity. It’s another matter if the heating circuit breaks, then the malfunction will be recorded.
- Error P1115 - a breakdown has occurred in the heating circuit
- Error P1102 - low resistance on the oxygen heater
- Error P0141 - the heater has broken down on the second sensor
- Error P0140 – sensor number two has broken
- Error P0138 - the second sensor indicates an excessive signal level
- Error P0137 - the second sensor indicates a reduced signal level
- Error P0136 – there is a short circuit to ground of the second sensor
- Error P0135 - the heater on the first sensor has failed
- Error P0134 – the first sensor has no signal
- Error P0133 - the first sensor responds slowly to the request
- Error P0132 – there is little oxygen in the system, the signal is high at the first sensor
- Error P0131 – there is a lot of oxygen in the system, the signal is low at the first sensor
- Error P0130 - the first sensor sends incorrect signals
Causes of failure and their symptoms
Although during normal operation the service life of the sensor is determined by a mileage of 60,000-80,000 kilometers (according to the “manual”), it can be damaged ahead of time if:
- Periodically and constantly use leaded or low-quality fuel (the lead contained in gasoline is dangerous);
- When installing a lambda probe, use a sealant that is not heat-resistant or contains silicone;
- For some reason (incorrectly adjusted ignition timing, interruptions in it, “rich” air-fuel mixture) the sensor overheats;
- “Flooding” the engine through repeated and unsuccessful attempts to start it (the danger of igniting fuel in the exhaust system with subsequent detonation);
- Oil and coolant will get into the exhaust system (poor condition of the valve stem seals (see Replacing valve stem seals) and “breakdown” of the cylinder head gasket);
- The exhaust system is depressurized;
- There will be an open, short to ground, or even poor contact in the sensor output circuit.
Well, since in the event of a lambda probe failure, the electronic control unit contains average readings, according to which the air-fuel mixture will be formed (different from the ideal ratio). We will be able to “read” information about the failure of the oxygen sensor based on the following signs of engine operation:
- Fuel consumption is significantly increased;
- The car's dynamics have deteriorated;
- At low speeds (idling), the engine is unstable;
- Increased heating of the sensor itself, which is accompanied by crackling of the exhaust pipe after stopping the engine.
And, of course:
- The “CHECK” warning light on the instrument panel lights up.
Attention! In most cases, the failure of the oxygen sensor is not detected by the on-board electronics, except in cases where there is a break in the heating circuit. Therefore, if the mileage of your car is more than 100,000 kilometers, then replacing the lambda is a resolved issue, since its price is much lower than the costs that will appear with the increased appetite of the car.
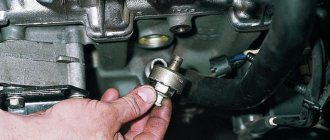
Replacing the oxygen sensor
If any damage occurs, the sensor must be replaced. You can try to do this yourself. Let's consider the situation of replacing a lambda probe on a VAZ 2114:
- We put the car on an overpass or drive it into a pit and remove the motor protection (to replace the sensor with the neutralizer).
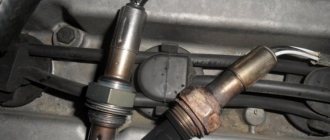
- We are looking for the wires from the oxygen sensor, and follow them to the sensors themselves, they are located on the catalyst (the first before the converter, the second after).
- We cut the clamps and disconnect the connectors.
- Let the system cool down.
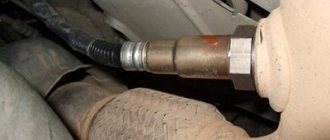
- We take a wrench for “22” or special. head and unscrew the sensor.
- We take a new sensor and install it in place of the old one. We tighten the nuts.
- We connect the wires to the connectors.
- Use new clamps to secure the wires to the cooling system (do not allow contact with the exhaust pipe).
- Install the protection in reverse order.
On other car models, replacing the sensor will be identical.
Replacement problems
When replacing, the old sensor may stick to the pipe. In this case, proceed like this:
- Apply wd-40 generously and try to unscrew
- Turn on the engine, heat the exhaust system and unscrew the sensor
- We try to heat (being careful) the sensor itself and unscrew it
- Tap lightly with a hammer and try to unscrew it again
- If that doesn't help, try thermal shock. Pour cold water onto the well-heated sensor. Try unscrewing it again.
Oxygen sensor price
The price of an oxygen sensor will vary by region and model. It ranges from 1000 to 3000 rubles . Buy a lambda probe in specialized stores and only with a guarantee.
Causes of oxygen sensor failure
- Coolant or brake fluid has come into contact with the sensor housing.
- The fuel used has a high lead content
- Severe overheating of the sensor caused by unclean fuel (clogged cleaning filters)
- The sensor has simply expired
- Mechanical damage to the sensor while the vehicle is moving.
A failed sensor will affect the operation of the vehicle as a whole and lead to additional problems. But using them you can immediately determine a possible breakdown of the sensor and replace it in a timely manner.
Related problems when the oxygen sensor fails
- The car began to consume more fuel than usual
- The car began to move jerkily
- The engine became unstable
- The normal operation of the catalyst is disrupted
- When testing for exhaust gas toxicity, the result gives inflated values.
In conclusion, I would like to give advice: in order to avoid the problems described above in the future, monitor the performance of the lambda probe. Check its condition every five to ten thousand kilometers.
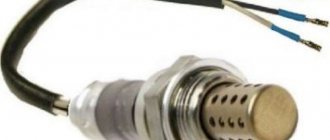
Installed in the exhaust pipe of the exhaust gas system. The oxygen contained in the exhaust gases creates a potential difference at the sensor output, varying from approximately 0.1 V (a lot of oxygen - a lean mixture) to 0.9 V (a little oxygen - a rich mixture). Based on a signal from the oxygen sensor, the controller adjusts the fuel supply to the injectors so that the composition of the exhaust gases is optimal for the efficient operation of the converter (oxygen sensor voltage is about 0.5 V). For normal operation, the oxygen sensor must have a temperature of at least 360°C, so for quick warm-up after starting the engine, a heating element is built into it. The controller constantly supplies a stabilized reference voltage of 0.45 ± 0.10 V to the oxygen sensor circuit. Until the sensor warms up, the reference voltage remains unchanged. In this case, the controller controls the injection system without taking into account the voltage at the sensor. As soon as the sensor warms up, it begins to change the reference voltage. Then the controller turns off the heating of the sensor and begins to take into account the signal from the oxygen sensor.
Let's sum it up
- Do not confuse a malfunctioning ECM (electronic engine control system) with a malfunctioning lambda probe.
- Diagnostics of the oxygen sensor is possible by monitoring the voltage at its signal output using a scanner or the signal output of a motor tester.
- A deliberately lean or enriched mixture allows you to monitor the reaction of the probe, which can tell a lot about its serviceability or malfunction.
- The steepness of the voltage transition graph from “low” to “high” and vice versa allows us to draw a conclusion about the performance of the lambda probe, as well as how long it works and how much is left...
- And lastly, errors generated by the ECU and the lambda probe itself are far from a reason to draw a final conclusion about its malfunction.
Where is the oxygen sensor located on the VAZ 2115
In a VAZ 2115 car, the oxygen sensor is located on the exhaust pipe, in the area from the exhaust manifold coupling to the resonator. Access to equipment from under the bottom of the machine.
For ease of repair (prevention), use an inspection hole, a roadside overpass, or a hydraulic lifting mechanism.
The operating life of the controller is 85 – 110 thousand km. If refueled with high-quality fuel, the service life of the equipment reaches 120,000 km.
Debugg
Wiring repair
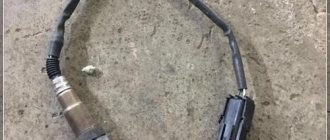
In case of mechanical damage or violation of the integrity of the wiring, the damaged area is repaired or the electrical wiring of the oxygen sensor is replaced.
If the connection of the wires to the sensor is broken or it is oxidized, you should clean and recheck the operation. However, if the electrical wiring connector is damaged, replacement of the wires is also necessary.
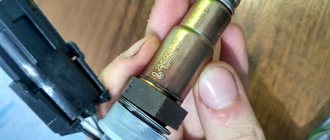
Cleaning the sensor
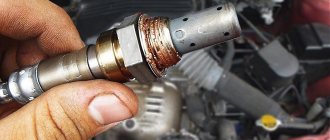
A malfunction of the lambda probe is sometimes associated with an accumulated layer of soot on the protective casing and the internal electrode. In order to clean the oxygen sensor on a VAZ 2110 in an effective way, you need to soak it in orthophosphoric acid (or in a rust converter).
The VAZ oxygen sensor is turned off and dismantled in advance. The protective casing of the outer electrode is removed or sawed off. The device is then immersed in the cleaning agent for 20 minutes. In this case, the accumulated layer should independently detach from the sensor surface. Cleaning with a brush made of soft material is allowed.
The protective cover must then be reinstalled using spot welding or soldering.
After cleaning, the 2110 oxygen sensor must be washed, allowed to dry, installed in the exhaust manifold and the test repeated.
Replacement
If during diagnostics a faulty VAZ 2110 oxygen sensor was identified and its replacement is required, you must:
- turn off the car and turn off the ignition;
- cool the engine to an acceptable temperature that will allow contact with its exhaust manifold;
- disconnect the lambda probe wiring;
- remove the oxygen sensor using a suitable wrench;
- install a working VAZ oxygen sensor that has the appropriate markings for a specific engine model;
- connecting contact wires;
- starting the engine and rechecking its operation.
Oxygen sensor for VAZ 2115: original, analogues, price, articles
| Catalog article/marking | Price in rubles |
| BOSCH 0258005133 (original) 8 and 16 valves | From 2400 |
| 0258005247 (analog) | From 1900-2100 |
| 21120385001030 (analog) | From 1900-2100 |
| *prices are as of May 2022 | |
The VAZ 2115 is equipped with a lambda probe from the German concern Bosch. The cost of a part of 2,500 rubles is not always affordable for many car owners, as a result of which they choose cheaper analogues.
Note to the driver. Service station specialists recommend purchasing original parts in order to prevent unstable operation of the equipment.
How to check if the sensor is working properly
Checking the sensor is usually carried out with the engine running. There are several ways to check the serviceability of the sensor, suitable for the VAZ-2115 car:
- Using a tester (in this case, it is necessary to determine the voltage, as well as the resistance; the probes must be connected to the connecting terminals and measurements must be taken in different operating modes of the internal combustion engine).
- Using a diagnostic tool or ELM 327 scanner with the OpenDiag program installed on a smartphone.
- An oscilloscope (The advantage of this test is that it allows you to determine the rate of change of voltage, which in a working device should not exceed 0.2-0.3 seconds.)
If the measurement result of at least one of the instruments shows a significant deviation from the norm, then the oxygen sensor must be cleaned or replaced.
Signs of a malfunctioning oxygen sensor on a VAZ 2115 car
The symptoms are in many ways similar to other breakdowns, so it is important to correctly identify the breakdown at the initial stage.
- Difficulty starting the engine “cold” or “hot”;
- Increased fuel consumption;
- Power reduction;
- Passive acceleration dynamics;
- The engine is not running properly;
- An indicator on the instrument panel indicates the presence of system errors in the electronic control unit (P0137, P0578, P1457, P4630, P7215);
- Periodic shooting sounds are heard from the exhaust pipe, which indicates an enrichment (leanness) of the combustible mixture;
- Blue, gray, black smoke from the exhaust pipe.
If one or more signs are detected, immediately contact a service station specialist for a comprehensive diagnosis.
Reading errors
Checking the VAZ 2114 oxygen sensor may be limited to simply reading errors from the board, here are the most common ones related to lambda:
- Error P0131 is a problem with the signal level coming from the device; it is too low, indicating that the mixture is concentrated.
- Error P0132 is a similar problem with the signal, only in the case of errors, the signal is high, indicating a lean fuel mixture.
The errors issued are not a panacea; they relate more to the fuel system, and not to fixing problems with the lambda probe. Therefore, we saw errors - look at what’s wrong with the fuel pressure indicator and whether there is any air leakage from the atmosphere. Then do diagnostics of the sensor itself.
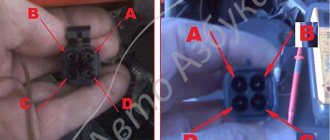
The voltage on the oxygen sensor is one of the stages of checking its functionality. Before replacing or repairing a lambda probe with your own hands, you need to carefully check whether the device is receiving the necessary power and what the condition of the contact circuits is. To do this process, you need to open the hood of your fourteenth and remove the sensor (its connector is secured with a small clamp on the cooling system pipe). We will look at two circuits - the heating element of the device and the oxygen reading element on the sensor body.
- To look at the circuit of the heating element, you need to take a multimeter, connect its negative terminal to the engine, and the positive terminal to wire B. Turn the key in the ignition, look at the numbers on the multimeter: if 12 V, then good, less - this is a discharged battery (in a rare case ), open circuit of contacts (most likely). Another option is to blame the electronic control unit, but here the on-board computer usually gives an error.
- To check the circuit of the sensitive element, you need to measure the voltage between wires A and C. We put the negative terminal of the multimeter on wire C, the positive terminal on wire A. We look at the indicator on the screen: if 0.45 V, then everything is in order. If there is no number or it fluctuates within 0.02 V, the problem is in the power circuit. Again, the option is to blame the ECU, but it is not common.
Reasons for reducing the service life of equipment
- Violation of vehicle operating conditions, failure to comply with scheduled technical inspection deadlines;
- Filling the car with low-quality fuel;
- Purchase and subsequent installation of non-original parts;
- Violation of installation technology;
- Defective parts during manufacturing;
- Damage due to an accident, collision, impact;
- Incorrect operation of the firmware of the electronic control unit.
What can the electronic control unit tell you?
If a warning light comes on on the dashboard, indicating errors in engine operation, and its lighting is accompanied by the above problems, it is advisable to test the controller. Today this can be done both at a service station and at home. Of course, if you have a special tester and a laptop (tablet, smartphone) with the appropriate software. When connected, this device will give you codes for possible problems.
For VAZ-2114 vehicles, a malfunctioning lambda probe may indicate its malfunction with the following errors:
- P0130 – incorrect sensor signal;
- P0131 – excessive oxygen level in the exhaust gases;
- P0132 – oxygen content too low;
- P0133 – weak or slow sensor signal;
- P0134 – lack of sensor signal.
Do-it-yourself controller diagnostics on a VAZ 2115
To check the equipment we use a multimeter. Most motorists have the device in their garage. The sequence of actions is as follows:
- We place the car above the inspection hole;
- Remove the block with wires from the oxygen sensor;
- Connect the multimeter terminals;
- We activate the device to the “Resistance measurement” position;
- We analyze the received data.
If the arrow tends to infinity, the lambda probe is working; if the arrow drops to zero, the part is faulty, replace it with a new one. Remember that the controller is non-separable and cannot be prevented.
Checking the sensor power supply (voltage on DC)
Before replacing the sensor, you need to make sure that it is receiving power and that all circuits are working properly. To do this, open the hood and disconnect the sensor connector (it is attached with a clamp to the cooling system pipe).
- Check the heating element circuit. We take the tester and connect its “minus” to the engine, and attach the “plus” to contact “B”. We turn on the ignition and look at the tester readings: it should show 12 V. If the tester readings are less than 12 V or are absent at all, then either the battery is discharged (which is unlikely) or the power circuit is open (we eliminate the malfunction). The ECU may also be faulty, but, as a rule, the on-board computer immediately indicates this error.
- We check the circuit of the sensitive element. We measure the voltage between contacts “A” and “C”. Minus - on "C", plus - on "A". The voltage should be 0.45 V. If the voltage is absent or differs by 0.02 V or more, then the power circuit is faulty (needs to be found and repaired) or the ECU is faulty (which is also unlikely).
You can fully check the sensor for functionality only with the help of an oscilloscope, which most car enthusiasts do not have, so I see no point in describing this situation. I will only say that to check it you will need to artificially lean and enrich the fuel mixture and look at the instrument readings. If the sensor has already traveled a lot - more than 100,000 km, then it can be safely replaced. Because even if it is working, the sensitivity has noticeably deteriorated, which can lead to extra costs for gasoline.
There are so-called “lambda probe simulators”. I will say right away that they will not fit our cars, because the ECU does not read their signals.
You should accurately understand the principle of operation of the lambda probe. Please note the following errors.
| Error P0131 | Low signal level DC 1 |
| Error P0132 | Crankshaft sensor 1 signal high |
A low signal level means the mixture is too rich.
High level - mixture is too lean.
These errors indicate the state of the fuel mixture and do not indicate a sensor malfunction. Therefore, if errors occur, you first need to look at the fuel pressure and the presence of air leaks in the intake system, and only then check the sensor itself.
Source
Ways to deceive the electronic control unit
There are three more ways to restore the engine to its former performance without buying a new oxygen sensor. Without a doubt, they were invented by our craftsmen. And they consist in the fact that it is necessary to mislead the electronic control unit so that it does not notice errors in the operation of the sensor.
The first method is mechanical. To implement this, a special spacer (bushing) is screwed in between the lambda probe and the manifold body (intake pipe). Its use allows you to distance the sensor contacts from the exhaust gases. Thus, the amount of oxygen between them artificially increases, and the electronic control unit “remains satisfied” with the result obtained.
A similar VAZ 2114 lambda probe costs about 500 rubles. And if you have a lathe, you can make it yourself.
The next way to deceive the ECU is electronic. Its essence is to install a primitive converter in the sensor circuit, consisting of one resistor (1 MΩ) soldered into the gap in the blue wire of the connector and one capacitor (1 μF) connected between the blue and white wires. As a result of such a simple deception, the electronic control unit will constantly receive a signal of the required voltage and perceive the operation of the lambda probe as proper.
Alternatively, you can also reflash the controller by changing its software. But it is better to entrust such manipulations with the “brain” of the engine to specialists.