Even taking into account the fact that the gearbox, unlike the engine, does not have high loads and heat, and the oil is not supplied under high pressure (with the exception of hydromechanical automatic transmissions), the gearbox in some cases can still leak. In this case, oil leakage from the gearbox is a serious malfunction, since a decrease in the gearbox oil level will lead to accelerated wear and/or critical breakdown of the gearbox.
As a rule, owners of cars with a manual transmission, as well as with an automatic transmission, a variator or a robot, face a problem when gearbox oil leaks. If we consider a manual transmission, which is very common in the CIS, gearbox oil leaks often occur due to leaking gearbox seals. Next, we will look at how to change the oil seal on the box yourself.
Why is an automatic transmission drive oil seal needed?
The cuff - drive oil seal - is a sealing part made in the form of a ring with a U-shaped profile. This is a consumable item that cannot be repaired if it fails.
The purpose of the automatic transmission drive oil seal in the Volkswagen Polo is as follows:
- prevents oil leakage from the box body;
- prevents dirt, dust and moisture from entering the internal mechanisms of the gearbox;
- protects ATP from pollution by exhaust gases.
Replacing an automatic transmission oil seal on a Volkswagen Polo
The task of sealing the box can only be achieved by a complete, fully functional seal.
Why replace it at a car service center?
Repairing at home on your own will take a lot of time, although the result will be the emergence of new faults.
By contacting the MT-AVTO car service, you save yourself from problems:
- Before starting work, diagnostics are carried out. CV joint seals are consumables. Dismantled parts cannot be reused.
- After making sure that the cause of the oil leak is a faulty seal, the technicians dismantle it and advise on the choice of new materials.
- Each stage of work involves the use of special equipment. During installation, a professional tool allows you to perform the operation as accurately as possible without damaging the new spare parts.
Therefore, along with the repaired car, clients of the MT-AVTO car service receive a guarantee of the quality of the services provided.
Why does it fail
Consumables don't last forever. The gearbox drive seals work under difficult conditions, being between the external environment, where the contamination comes from, and the box, where the hot liquid moves.
The elements experience heavy loads, suffer from overheating, temperature changes, and dirty transmission fluid. Wear products from automatic transmission clutches move in the ATP flow: the abrasive eats away all elements of the unit, including seals.
The cuffs age at the end of the service life of the spare parts precisely calculated by the manufacturer. The process is accelerated by worn shafts. The sealing layer may lose functionality: then the gearbox seal of the Volkswagen Polo sedan must be replaced.
Wear of the sealing elements progresses as the fastenings of the connecting and protective parts of the gearbox are loosened. The exact cause of early wear of the cuffs is difficult to determine due to limited access to the part.
Symptoms of a problem
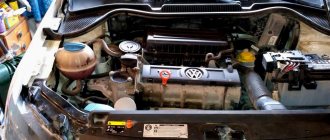
Even in automatic transmissions without a torque converter, where there is no high pressure and strong heating of the components, the drive seals fail and leak. This is evidenced by oil stains on the unit body: they can be detected by opening the hood or inspecting the box from below, from the pit. A leak is especially obvious from grease stains on the ground under the front of the car after a long period of parking.
However, next to the box there is a motor in which lubrication also works. Engine oil may leak due to an incorrectly installed filter or other reasons.
With some experience, you can distinguish two types of lubricants by smell. But, if you cannot do this, conduct an experiment: drop a little of the leaked substance into a puddle or container of water. ATP will spread over the surface in a thin iridescent film, while the motor oil will remain a solid drop.
Replacing the right-hand drive oil seal of a Volkswagen Polo automatic transmission
The problem of transmission fluid leakage is accompanied by changes in the operation of the gearbox: an attentive driver will notice crunching noises, extraneous noise and grinding noises in the area of the gearbox. If there is an oil shortage, gear shifting will also become difficult.
Transmission leakage due to worn out seals is a dangerous phenomenon. The onset of oil starvation ends with an unexpected breakdown of the entire unit at the most inopportune time and expensive automatic transmission repairs.
To prevent or delay transmission restoration, check the oil level in the unit more often.
Types of CV joints
Based on their location on the drive, hinges are divided into external and internal. The division is not purely geometric; the nature of the operation of these CV joints is very different, which is why they are constructed differently.
If the external one is almost always a six-ball “grenade” of impressive size, then the internal ones are often a three-pin joint of the “tripoid” type with needle bearings.
An example of the operation of an outer CV joint.
How does the internal CV joint work?
But such differences have little effect on the replacement method; the insides of the CV joint will not affect the progress of work. The presence of balls will require greater care; they can easily be lost if handled carelessly.
How to change
Before you begin the repair, you need to determine exactly which seal is leaking: the gearbox rod seal, the CV joint seal, or the input shaft. The latter case cannot be accomplished without dismantling the gearbox, which is difficult in a garage environment.
Stock up on a set of keys and sockets of different sizes. Prepare a flathead screwdriver, hammer, and pliers. You will need 2 jacks, a torque wrench with a tightening torque of 70-210 Nm, a pry bar or crowbar. The work will require a retaining ring remover, a mandrel for pressing, side cutters, a bit, and a mounting spatula.
Preparation
Replacing the drive seal of the Polo sedan automatic transmission is preceded by a preparatory stage. First you need to get to the internal grenade - CV joint (constant velocity joint). On cars with front-wheel drive or all-wheel drive, a pair of such joints are installed: an external one, which transmits force to the wheel hub from the drive axle shaft, and an internal one, which is responsible for rotating the shaft from the gearbox. The location of these elements is between the axle shafts and wheels. The inner CV joint is attached to the lever.
To get to the inner hinge you need to do the following:
- Place the car over an inspection hole or on an overpass.
- Drain the transmission fluid from the box (follow the technology).
- Place the selector in the “Parking” position – P.
- Loosen the wheel bolts.
- Place the front of the car on jacks and place wheel chocks under the rear wheels. Two lifts are needed for ease of operation: this way you will relax the anti-roll bar link and the lower arm will be in a free state.
- Protect your car from falling with unnecessary tires under the car body.
- Remove the wheel from the side where you will change the gearbox drive seal.
- Unscrew the lower ball joints (held on by two bolts).
You have reached the internal hinge, which you will later dismantle. The technology is the same for all German Volkswagen cars: the path to the internal constant velocity joint lies through removing the wheel.
Suspension analysis
The next step in replacing the automatic transmission drive oil seal on a Polo is to disassemble the suspension - releasing the drive shaft. There are two of them in the car: right and left.
With the front of the vehicle raised and the front axle unloaded, do the following:
- Remove the self-locking 12-point hub nut.
- Find the shield on the wishbone of the suspension and disconnect it.
- The drive shaft flanges are attached to the gearbox housing with bolts - unscrew the fasteners with a 12-sided socket screwdriver with a diameter of 8 mm. Do not forget to clean the elements with a wire brush and rags before doing this. The left and right flanges have different lengths and markings - the left one is shorter.
- Disconnect the shaft by rocking it from side to side from the gearbox and lift it above the box
- To remove the right shaft, disconnect the lambda probe to avoid damage when removing the drive.
- Next, the axle shaft is pressed out of the wheel hub. The device for this is screwed on from the outside. Or, if you are working with a drift, install it on the axle shaft from the wheel hub side. Lightly tap the hammer until the part moves out of place.
- Pull out the axle shaft from the inside.
Maintenance and replacement of automatic transmission oil seal
If you remove both drives, install suitable mandrels (plugs) in their places.
Removing the internal grenade
The next obstacle on the way to the final goal - the gearbox drive oil seal - is the internal CV joint.
The hinge, with some dexterity and experience, can be pulled out using a crowbar or pry bar. There is a protrusion on the grenade, which, if caught, can be dismantled.
It may not work the first time: the locking ring is in the way. Rotate the grenade until the ring is positioned with the slot facing up. Try again.
It’s even easier to work with a backup: you are in the pit, your friend is on the surface. Drive a soft wedge between the grenade and the box body - the locking ring will disengage. At this moment, the double pulls the stand, and you take the grant out of the box, holding it by the body. You cannot pull the shaft - there is a risk that it will jump out of the housing and the balls will scatter and fall from the cage into the boot.
Move the hinge to the side. Now you see the defective seal: insert a screwdriver into the damaged area, press it against the flange coming out of the box and remove the element. If you can't find a hole, punch it with a sharp object.
Another way to remove the oil seal: take an awl, stick it into the cuff, and pull. Instead of an awl, you can screw in a regular self-tapping screw and proceed in the same way.
Choosing a new oil seal
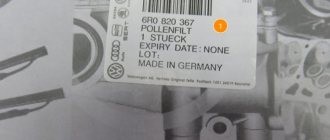
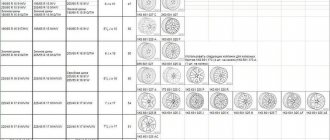
Articles of original consumables for Volkswagen Polo Sedan: VAG09G301189, VAG084409189B, VAG02T409189K.
For the types of 6-speed automatic transmission PLS, MFZ / QAW, analogue spare parts with catalog numbers 19033885B (manufacturer CORTECO), or a product from the Febi company with article number 106943 (external size - 61 mm, internal - 44 mm) are suitable.
Parts from other brands of cars can be installed, but observe the parameters: internal and external diameters, oil seal thickness must match the original spare parts.
Installing the oil seal
Before installing a new element, the seat is thoroughly cleaned and lubricated with sealant. The cuff fits in smoothly, but you need to make sure that there are no distortions: use a mandrel of a suitable size (it can be cut from the cap of a plastic bottle). You can gently tap with a hammer (preferably a wooden mallet) on diametrically opposite sides of the consumable.
Machine assembly
After replacing the drive seal of the Polo sedan automatic transmission, reassemble the car in the reverse order of dismantling.
Observe the nuances:
- when inserting the SHURS shaft into the box, ask a friend to press on the hub until the locking ring engages, and you observe the alignment of the grenade shaft with the hole;
- the cut of the retaining ring on the shaft should be at the top;
- Clean the splines and shaft threads from paint, dirt and rust, lubricate the splines;
- push the shaft through the hub as far as possible: the threaded end should come out;
- always replace the self-locking 12-point nut with a new one;
- observe the tightening torque: hinge – 35 Nm, drive shaft – 45 Nm, 12-point nut – 50 Nm (the car must be on the ground);
- Fill the box with new oil.
Instructions for replacing the automatic transmission oil seal
After replacing the drive cuff, the gearbox selector settings shift, so additional adjustments need to be made at the final stage.