You can leave your wife, your job, your homeland, but don’t you dare leave the clutch!
The clutch system is a fairly simple mechanism that not only serves as a transmission link between the engine and gearbox, but also removes excess load from both of these units. Of course, such work is not in vain for the clutch system itself, but that’s why it contains consumables, so that you can spend money on replacing them, and not on a global car repair.
The clutch system's job is to mechanically connect the engine to the manual transmission when needed, and disconnect them when it is necessary to change gears. In essence, the task of the clutch does not change, whether it is a clutch on a VAZ 2107 or a Lexus, only the technical details differ.
Clutch device VAZ 2107
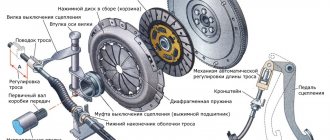
The clutch is controlled by a pedal inside the cabin. When you press it, the clutch is disconnected from the gearbox, and when you press it, it engages. This ensures a smooth start of the car from a standstill and silent gear shifting. The node itself consists of a large number of elements interacting with each other. The VAZ 2107 is equipped with a single-disc clutch with a central spring .
Clutch basket
The clutch consists of two discs and a release bearing. The clutch used on the VAZ 2107 is simple and reliable. The pressure (drive disk) is installed on the flywheel. Inside the basket there is a driven disk connected to the gearbox input shaft with special splines.
The clutch can be single-disc or multi-disc. The first is considered more reliable. The clutch functions as follows. When you press the pedal, the release bearing mounted on the input shaft pulls the petals of the basket towards the engine block. As a result, the basket and driven disk are disengaged, and it becomes possible to change speeds.
For the VAZ 2107, wheels from the VAZ 2103 (for engines up to 1.5 liters) and VAZ 2121 (for engines up to 1.7 liters) are suitable. Externally they are very similar and have a diameter of 200 mm. These discs can be distinguished by the width of the linings (29 and 35 mm, respectively) and the presence of a 6 mm mark in one of the grooves of the VAZ 2121 damper.
Clutch disc
The driven disc is sometimes called a drum. There are pads glued to it on both sides. To increase elasticity, special slots are made on the disk during the manufacturing process. In addition, the drum is equipped with eight springs located in the plane of the disk. These springs reduce the frequency of torsional vibrations and reduce dynamic loads.
The drum is connected to the gearbox, and the basket is connected to the engine. During movement, they are pressed tightly against each other, rotating in the same direction.
The single-disk scheme used on the VAZ 2107 is distinguished by its reliability, comparative cheapness and ease of maintenance. This clutch is easy to remove and repair.
The driven disk for a 1.5 liter engine has dimensions of 200x140 mm. It can also be installed on a VAZ 2103, 2106. Sometimes a drum from a Niva (VAZ 2121) is installed on a VAZ 2107, differing in size (200x130 mm), a reinforced damper system and a large number of rivets.
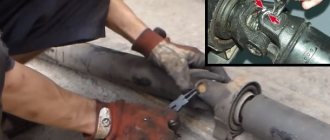
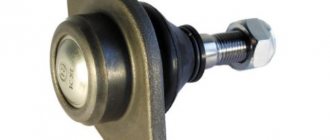
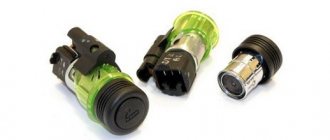
Release bearing
The release bearing, being the most vulnerable element of the clutch, turns the rotation gear on and off. It is located in the middle of the disc and is rigidly connected to the pedal through a fork. Each press of the clutch pedal loads the bearing and shortens the bearing's life. Do not press the pedal unnecessarily. A bearing is installed on the gearbox drive shaft guide.
In the clutch kit, the release bearing is designated 2101. A bearing from a VAZ 2121, designed for high loads and having an increased service life, is also suitable. However, in this case, you will also need to replace the basket, since pressing the pedal will require great effort.
Clutch fork
The fork is designed to disengage the clutch when the clutch pedal is pressed. It moves the release bearing and, as a result, the inner edge of the spring.
Most often, if the fork is faulty, it becomes impossible to disengage the clutch. However, sometimes it continues to malfunction. If you do not replace the fork right away, you will have to replace the entire clutch assembly later.
Clutch selection
When purchasing a new clutch kit for the VAZ 2107, experts recommend being guided by the following criteria. When assessing the driven disk:
- the surface of the linings must be smooth and uniform, without scoring, cracks or chips;
- all rivets on the disk must be the same size and located at an equal distance from each other;
- there should be no oil stains on the disc;
- there should be no play in the places where the linings and springs are attached;
- The manufacturer's logo must be applied to the product in one way or another.
When choosing a basket, you should pay attention to the following points:
- the casing must be stamped, without cuts or scratches;
- the surface of the disk must be smooth and uniform, without cracks or chips;
- the rivets must be identical and strong.
The most popular brands are the following.
- Valeo (France), specializing in the production of excellent quality brake system elements. The characteristic features of the Valeo clutch are soft operation with a clear engagement moment, reliability, and long service life (more than 150 thousand kilometers). However, such a clutch is not cheap.
The choice of clutch should be approached comprehensively and the choice should be made after examining the product and receiving expert advice.
Choose the best
The last point in the question of which clutch is best to install on a VAZ 2107 car will be a short review of the most famous clutch kits for classic cars. Differences in brand products lie in reliability and behavior during operation.
Valeo
The well-known company from France is also known for its high-quality brake pads. Judging by the reviews of car owners, the clutch is characterized by soft operation with a clear engagement moment.
Many note the reliability of the new Valeo kits, which often operate without breakdowns for more than 150,000 km. The disadvantage is the high cost.
World famous German manufacturer of friction clutches. The products have always been distinguished by advanced design solutions. For example, the use of a torsional vibration damper on the pressure and driven discs significantly dampens vibrations, which contributes to comfort. LuK couplings are the best choice in terms of price-quality ratio, however, there are many fakes on sale, so you need to be careful when purchasing.
Kraft
The German brand has been known for 20 years, but recently products under this brand are increasingly being produced in Turkey, which, naturally, makes them cheaper. However, clutches have a lot of positive reviews, including:
- soft squeeze;
- no overheating during heavy duty operation;
- The flywheel has virtually no wear.
Sachs
The German manufacturer has extensive experience in the production of transmission parts. All coupling models are equipped with asbestos-free linings, and they provide:
- Optimal torque transmission.
- Resistant to increased loads.
- No maintenance required.
A domestic enterprise that supplies original products for Lada cars. The design of the coupling was developed by engineers from Tolyatti, but the components used in production are mainly imported. Most car owners, when deciding which clutch is best to install on the classic VAZ 2107, choose this manufacturer. The reason for this choice is the low price and acceptable quality.
Kraft tech
Turkish products licensed from the German company Kraft. The set is characterized by soft operation and is adapted to Russian working conditions. Some of the negative reviews relate to the fragility of the release bearing.
Trial
Another domestic manufacturer that guarantees up to two million load cycles for its disks without loss of performance properties. The average mileage of the kit parts is 80,000 km. Some motorists complain about cracks appearing on the driven disk in the area of the springs, causing them to fly out. However, it is worth noting that such problems arose after two or three years of operation.
Source
The design of the VAZ 2107 clutch mechanism
The seven uses a wet clutch mechanism. It consists of:
- directly the pedal, brought into the salon;
- master cylinder;
- pressure pipes;
- working cylinder;
- clutch fork;
- release bearing;
- clutch basket and disc.
Some car enthusiasts modify the mechanism by discarding the hydraulics and installing a dry drive. The process is justified by the greater accuracy of the modification and the absence of the need for frequent maintenance.
How to replace?
If you have no idea what a VPS is or what a clutch disc looks like, then entrust bearing repair work to professionals. If you think that you can cope with this, then we suggest that you familiarize yourself with our car repair manual.
Which to choose?
Selecting an IPS is the first point that must be completed if you decide to replace an element.
There is nothing difficult in choosing an element. Classic VAZ models (2010 - 2107) are equipped with a release bearing of the same type. Just buy the appropriate part at a car store or market, indicating the model of your vehicle. To make it more clear to you what the UPS looks like, you can look at it in the photo below.
Clutch replacement procedure
Changing the clutch of a VAZ 2107, the price of a set of which is about 2000 rubles, does not take long. Most of the time is spent removing and installing the gearbox. When removing the gearbox, try not to damage the clutch basket. After all, it changes much less frequently than the disk and bearing. But in any case, you will need to install new bolts. The fact is that during operation, the threads on old ones are slightly deformed, and it is possible that they will not be able to provide a reliable connection.
Both when removing the basket and when installing it, it is necessary to screw in/unscrew the bolts diagonally. This will ensure even tightening. Don't forget to change the release bearing and carefully inspect the condition of the fork. If it is defective, replace it. Also, do not deprive your attention of the flywheel crown. If its teeth are worn out, you will need to either turn it over or install a new one. Installation of the basket and disk must be carried out only after alignment using a tube (or a piece of the gearbox input shaft).
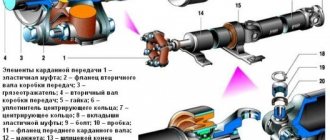
How the clutch works
Now a few words about the structure of the mechanism. The seven, like all Tolyatti cars, has a dry single-plate clutch, the diagram of which is clearly shown below. The fork drive is hydraulic, in front-wheel drive VAZs it is cable drive. Under the hood there is a master cylinder, which is controlled by a rod from the pedal, and a slave cylinder is screwed to the gearbox housing, which sets the fork in motion.
The fork presses through the release bearing onto the heel of the clutch basket and separates the drive and driven clutch discs, interrupting the supply of torque to the input shaft of the gearbox.
To avoid problems with gear shifting, the discs must be completely disconnected from each other, and in order for the torque to be transmitted to the gearbox as much as possible and without losses due to slipping or slipping of the discs, they must be pressed as tightly as possible. To find a balance between these extreme positions, it is necessary to adjust the clutch on the VAZ 2107.
Basic faults
It should be noted right away that the driven disk and release bearing are consumables, the long service of which should not be counted on. The integrity of the flywheel is much more important; its price is much higher and replacement is more difficult.
The main clutch malfunctions on a VAZ:
- Difficulty changing gears;
- Clutch slips;
- Jerks during operation;
- Vibration during operation;
- Creaking and other extraneous sounds during operation;
- The clutch doesn't work.
Difficult gear shifting means that the clutch does not disengage completely, that is, the driven disc continues to turn when the pedal is pressed. There may be several reasons for this situation:
- There is a problem with the driven disk: it began to jam on the splines of the input shaft, or the fixing rivets began to come out of their seats and cling to the flywheel and pressure plate, or the damping springs failed;
- Problem with the release bearing: it is too far from the clutch basket, as a result it does not press it with enough force;
- Hydraulic problem: low fluid or air lock.
Once the cause has been found, you can solve the problem: replace the driven disk, troubleshoot the input shaft, install the release bearing at the required distance from the clutch basket, add hydraulic fluid and bleed the system.
Clutch slipping is the asynchronous movement of the flywheel and driven disk when the clutch is fully engaged (when the pedal is not pressed). Causes:
- Oil has got onto the working surface of the driven disk;
- The problem is with the release bearing: it fits against the clutch basket and presses on the spring;
- The clutch drive requires adjustment;
- The bypass channel in the master cylinder is clogged;
- The clutch pedal does not move back.
Depending on the problem, the solution will be appropriate: checking and replacing oil seals from which oil may leak, adjusting the clutch, repairing and cleaning the master cylinder.
Jerking and vibration when the clutch operates is a rather unpleasant sign. Possible causes of jerking when moving:
- The disc is jammed on the gearbox shaft splines. In this case, it cannot move freely along them, which means there will be no “soft docking” with the flywheel;
- Problem with the basket and drive disk. With prolonged use, the springs wear out and the drive disk becomes deformed;
- The driven disk is worn;
- The drive requires adjustment.
With such a problem, diagnostics is needed. In the best case, everything can be done by replacing the driven disk; in the worst case, the entire clutch will have to be changed.
If, when engaging or disengaging the clutch, you hear grinding, rattling, knocking and other sounds that should not be there, this may be a manifestation of the following problems:
- The bearings are jammed - pressure or drive shaft. This may be due to wear and tear over time or lack of lubrication. In this case, the sound appears when the clutch is engaged;
- There is a problem with the driven disk - the springs or splines connecting to the gearbox shaft are worn out. Knocking and rattling noises appear when you press the pedal;
- The clutch fork return spring does not work.
After diagnosis, broken parts must be replaced with new ones. If the problem is in the spline connection of the driven disk, it is necessary to check the condition of the gearbox shaft.
And finally, if you release the pedal and the clutch does not engage, the reason must be sought in the hydraulics:
- Airlock;
- Insufficient hydraulic fluid;
- The clutch cylinder seals are worn out.
The easiest way is to add fluid to the reservoir and bleed the clutch system. If the problem is not solved, it is necessary to dismantle the master and slave cylinders and replace the repair kits.
When to adjust the clutch drive
The standard adjustment procedure is required as routine maintenance or emergency repairs. Usually the reason for performing the operation is such problems.
- Gear shift violation - positions are engaged with knocking, crackling or extraneous sounds.
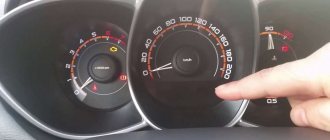
- The clutch switch response threshold has been violated. A dip of 25 to 35 mm is considered optimal.
- Increased fuel consumption. If the mechanism is faulty, excess gasoline consumption can be up to 20% of the reference value.
- Knocking out positions. During acceleration of the vehicle, the gears “fly out”.
- Dissonance when revving the engine. When you press the gas pedal, the internal combustion engine spins up, and the car lags behind.
- Clutch lever failures, this also includes an increase or absence of operating play in the system.
- Early or late operation of the mechanism when the pedal is pressed.
Diagnosis of clutch faults VAZ 2107
There are a number of breakdowns that indicate that the car requires urgent repairs.
Clutch slipping
This occurs during sudden acceleration. The engine steadily picks up speed, but the car is “late” in accelerating. The process may also be accompanied by jerking, jerking and extraneous noise.
The situation greatly wears out the friction disc and negatively affects fuel consumption.
Clutch leads
This is caused by improper adjustment or airing of the system. The friction linings do not move completely away from the basket and gears are difficult to engage.
Jerks when starting and changing gears
It requires pumping and adjustment of the mechanism, when the car jerks when you put it in gear. The disc may slip at the start or rapid acceleration due to its wear.
Noise when clutch is disengaged
When the car vibrates slightly and an extraneous sound comes out when the pedal is fully depressed, the clutch basket and clutch disc do not completely separate.
This occurs when the device settings fail.
Noise when clutch engaged
The cause and consequences are the same as above.
Pedal failure and lack of clutch
Here the matter is more serious. The pedal can only fail if the mechanism is severely damaged. In 90% of cases, the cause is hidden in the head cylinder or basket. Operating a car with such a problem is strictly prohibited.
The clutch disengages, but the pedal does not return to its original position
This malfunction is often solved in a trivially simple way - the return spring may fly off or burst. The hydraulic system in the VAZ 2107 is a design where there are no return devices, except for mechanical parts.
Everything is solved by replacing the damaged element.
Tight grip
Some car enthusiasts complain that the clutch pedal is pressed extremely hard. In addition to the hydraulic system, movement difficulties are caused by souring of the moving joints and jamming of the release bearing. To fix the problem, you must completely disassemble the entire system.
The clutch disengages at the beginning or end of the pedal stroke
In this case, everything is quite simple - the system requires adjustment. The procedure is primitive and is completed in 20-30 minutes. The only caveat is that you will need an assistant.
Do-it-yourself VAZ 2101 clutch replacement
As we said, to replace any of the clutch elements (except for the fork), you need to remove the gearbox. You can do it alone, but it’s better to have an assistant. To dismantle the gearbox, you need to install the car on an inspection hole; there is no need to drain the oil from the gearbox. We carry out the work in the following order:
- Disconnect the negative terminal from the battery.
- Remove the gear shift lever from the interior.
We remove the muffler hangers and unscrew the traverse mounting the gearbox to the body.
Without turning it off, remove the starter and move it to the side.
Unscrew the gearbox mount to the cylinder block.
We move the box as far back as possible so that you can get to the clutch basket.
We screw one of the bolts securing the gearbox to the block into place and, resting the mounting blade against it, block the flywheel.
Remove the release bearing by unlocking the lock with a screwdriver. If necessary, remove the plug.
- After checking the condition of the basket, release plate, and driven disk, we replace it.
- We install the basket and driven disk ( the hub protrusion should face the gearbox ), without clamping the mounting bolts.
Using a mandrel, we center the driven disk with the flywheel support bearing. The mandrel is the outer part of the gearbox input shaft. You can use either a part of the old shaft or a special mandrel, which is sold in stores. - We clamp the basket mounting bolts with a force of 20-30 Nm.
- Apply grease to the splined part of the gearbox input shaft and put on the release bearing.
We fix it on the fork. Assembling and installing the gearbox is carried out in the reverse order.
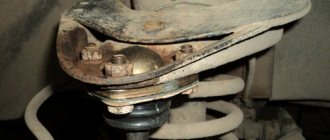
Replacing the clutch basket
Replacing the basket is done less frequently than replacing the driven disk. The basket needs to be changed if the drive disk overheats (then colored spots appear on it), breakage or wear of the diaphragm blades and springs. To access the clutch, you need to remove the gearbox.
Procedure:
- In the engine compartment, remove the “-” terminal from the battery and unscrew the starter bolts;
Removing the terminals from the battery - In the cabin, remove the gearshift knob;
Removing the gear knob - Remove the exhaust pipe from the hole;
Removing the exhaust pipe from the exhaust manifold - Unscrew the propeller shaft from the main gear, mark the connection points on the flanges;
Unscrew the driveshaft - Unscrew the cross member of the rear gearbox support;
Unscrew the gearbox cross member - Unscrew the gearbox mounting bolts (4 pieces);
- Disconnect the wire from the reverse gear sensor;
- Unscrew the speedometer cable;
Unscrew the speedometer cable - Unscrew the clutch slave cylinder;
- Pull the gearbox out until the shaft is completely out of the clutch and remove it.
Removing the gearbox
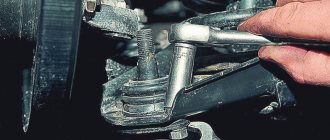
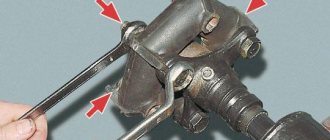
When dismantling the clutch itself, you need to unscrew the basket bolts from the flywheel. To distribute the load evenly, the bolts are unscrewed 1-2 turns in turn. After removal, the basket must be inspected for wear of the disk, integrity of the springs, and diaphragm.
How to finally adjust the clutch on a VAZ 2107
After all manipulations, it is necessary to check the functionality of the system. To do this, you need to start the engine and let it warm up. Then, with the engine running, you need to depress the clutch and, without accelerating, engage the rear rocker position. In this case, the presence of extraneous sounds and rattles is not allowed. The position is turned on easily - without additional effort.
Next, you can start moving at first speed and then increase the position to maximum (5). When driving, the presence of extraneous sounds or grinding noises is strictly unacceptable; the pedal is pressed evenly, without dips or jerks.
The last stage is acceleration at each gearbox speed, while the set of engine speeds fully corresponds to the acceleration of the car. If there is dissonance, the clutch disc slips and recalibration is required.
The difference between classic clutch discs
- To the beginning of the forum
- Forum Rules
- Old design
- FAQ
- Search
- Users
Is it possible to install a Sachs clutch from 2101 or noun on a 2106 engine? this clutch is on 2106
Is it possible to install a Sachs clutch from 2101 or noun on a 2106 engine? this clutch is on 2106
is different. The 1600 cc engine has a reinforced clutch with a larger lining width on the clutch disc. Exactly the same thing is on the old Niva (not the Chevrolet one). Both clutches are interchangeable but only assembled. For a penny, if you install a six-clutch, it will only be a plus - it will last longer and provide better torque. Accordingly, if you install a cheap clutch on a 1600 engine, it will go bad faster.
The devil arrived here in an old Niva - a year old. He says the clutch fell apart after 2 weeks, they opened it - it turned out that the 01st was put in at the factory.
Why and how to bleed the clutch on a VAZ 2107 in your garage
The reason for bleeding the clutch is air in the hydraulic system. Air bubbles tend to shrink, which reduces the performance of the device. It’s easy to bleed the clutch in a VAZ 2107 at home. To do this, it is enough to have a set of primitive tools and a little patience.
Motorists prefer to do their own repairs because the procedure is expensive, and performing the entire process on your own is not difficult.
Preparing to bleed the clutch system
To bleed the line and do it correctly, preparation must be done.
- Drive the car onto a viewing hole, overpass or lift, where you secure it.
Clean the expansion tank cap and fitting from dirt. Garbage entering the system is unacceptable.
Stages of the clutch bleeding process
The procedure is performed in a certain sequence.
- Brake fluid is also poured into the expansion tank to the maximum mark.
- Next, the assistant gets into the car and presses the pedal several times; during the last push, you should press the lever to the floor and hold it.
- After this, use wrench No. 8 to unscrew the fitting on the working cylinder and the waste with air bubbles is squeezed out into the bottle. After the pressure has dropped (the pedal has failed), the valve must be closed.
- The procedure is repeated until the air is completely removed from the system.
Adjustment
Clutch adjustment on a VAZ 2107 is carried out by adjusting the clutch drive, or rather, the adjusting bolt, which is located at the end of the cable in the engine compartment. Incorrect adjustment causes the clutch to slip.
- The car is installed on an overpass or inspection hole.
- In the cabin, the free play of the clutch pedal is checked and, if necessary, adjustments are made. To do this, use a 10mm wrench to loosen the locking nut of the pedal stop and set the required gap, approximately 0.4-2 mm.
- The pusher is cleaned of dirt and a penetrating lubricant is applied.
- The working cylinder is checked for free play of the pusher, on which the free play of the release bearing depends. To do this, push the clutch fork back by hand until it stops, while the free play of the pusher should be within 4-5 mm.
- Adjustment of the free play of the pusher is done with a 17 wrench, which will keep the adjusting nut from turning, and with a 13 wrench, loosen the tightening of the lock nut.
- The pusher is held with a key at 8, at the same time with a key at 17
- The adjusting nut is loosened and the required free play of the pusher is set, this is approximately 4-5 mm.
- The locknut is tightened by holding the pusher adjusting nut.
- Inside the car, the total free play of the clutch is checked, which should be approximately 25-30 mm. from the top position of the pedal to the start of switching on. If necessary, the entire operation is repeated several times until it is felt that the clutch is no longer slipping.
Replacing the master and slave cylinders
The master cylinder creates pressure in the hydraulic system, transmitting force from the pedal pusher to the working cylinder rod. It lasts a long time, and the repair kit often requires replacement, rather than the cylinder itself. The slave cylinder serves to transmit force to the clutch fork pusher. Hydraulic fluid from the master cylinder presses against the piston in the slave cylinder and operates the fork.
Their malfunctions are manifested by dips or tight movement of the clutch pedal, difficult operation of the gearbox (gears are switched with a crunching sound, vibration). Visually, a problem with the main or working cylinder can be seen by fluid leaks.
The clutch cylinder is replaced if the “mirror” of the cylinder or its other elements are damaged, which happens quite rarely. Replacement parts wear out much more often, and then you can simply install a new repair kit.
Replacing the master cylinder, video
The master cylinder is located next to the brake booster, below the brake reservoir. Its dismantling is done in the following order:
- Pump out the liquid from the cylinder expansion tank (with a rubber bulb or a syringe with a hose);
- When there is no liquid left in the expansion tank, remove it from the cylinder (disconnect the rubber fasteners);
- Unscrew the nut that secures the pipeline to the cylinder, hose pipeline to the side;
- Loosen the clamp that secures the hose to the cylinder and remove the hose;
- Unscrew the nuts that secure the cylinder, remove it, and pour out the remaining liquid.
After dismantling, you need to inspect the cylinder for wear of metal parts and rubber gaskets. If necessary, replace the repair kit or install a new cylinder. Installation is done in reverse order.
Replacing the working cylinder, video.
The slave cylinder is located next to the gearbox, on the clutch housing. It can be accessed both from below and from the engine compartment. Dismantling procedure:
- Loosen the nut that secures the hose to the cylinder. Do not remove the nut completely, do not disconnect the hose;
- Use pliers to remove the tension spring;
- Using pliers, straighten and remove the restrictive cotter pin from the pusher;
- Remove the bolts that secure the cylinder to the clutch housing;
- Remove the bracket that was attached to the cylinder with these bolts and to which the tension spring was attached;
- Remove the cylinder by sliding the pusher out of the hole in the clutch fork;
- Now you can completely unscrew the nut and remove the hose from the cylinder. As with the master cylinder, installation is done in the reverse order.
Often, problems with the drive are caused by low-quality hydraulic fluid. When working, pay attention to its color and consistency. Often wear products accumulate in the liquid and they begin to act as an abrasive.
Leveling up
To bleed, you will need brake fluid and a container for draining it, as well as a transparent hose with a diameter of 5mm. and an assistant who will have to press the clutch pedal until heaviness appears in it. After this, it must be clamped, and at this time a second person must unscrew the fitting and drain all the brake fluid. Air bubbles will be visible in the hose. The procedure should be repeated until these same bubbles disappear. Also, do not forget about the fluid level in the expansion tank.
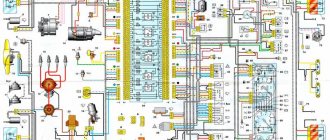
VAZ 2107 clutch diagram
Source