Any modern car, including Chevrolet Lanos, has a generator, which is a source of current and ensures the operation of all consumers. The stability of the vehicle operation depends on the proper condition of the device, and if electricity is not generated in the required quantity, it will be impossible to operate the car.
When charging is lost, the Lanos generator needs to be repaired, but first you need to find out the cause of the malfunction.
Replacement procedure
No one is stopping you from taking an alternative route by removing the compressor and, on the dismantled device, carrying out all the necessary work to repair or replace components, including the bearing itself.
But the majority of motorists who own a frankly good and repairable Chevrolet Lanos prefer just such a scheme. There is no need to remove the compressor, but the part is relatively easy to replace.
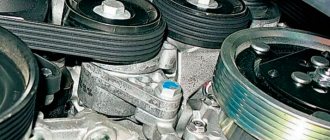
By observing a certain amount of caution, following the instructions and not forgetting about personal safety, you can cope with the task. Car air conditioner compressor bearing
Car air conditioner compressor bearing
To work on replacing the bearing of the air conditioning system of a Chevrolet Lanos car, it is better to choose a garage with a flat floor
It is important that the surface is horizontal without slopes. Install wheel chocks under the rear wheels of the vehicle. Or just shoes
This is required for your own safety. Using the appropriate tool, loosen the tension on the wheel nuts. There is no need to unscrew them completely. Using a reliable jack and safety stands, lift the front right side of your Chevrolet Lanos. Now the front right wheel can be removed completely. Set it aside for now. Next, unscrew the fasteners and remove the fender liner. This way you can gain access to the protective cover of the engine compartment, which on Chevrolet Lanos is made of plastic. Experienced motorists advise additionally removing the air resonator. This will significantly simplify access to the protective casing. On this side the protective cover is held in place by 3 fasteners. To remove it, you will need to unscrew all 3 fasteners. To perform this task, you need a 10mm wrench. By removing the protective plastic casing from its place, you will have access to the air conditioning compressor itself. Using a 13 mm socket wrench, you will need to carefully unscrew the main nut of the device's pressure plate. When unscrewing the fastener, be sure to hold the plate itself with your second hand or a convenient tool. Next comes the universal puller. He will help you remove the pressure plate from the air conditioning compressor structure of a Chevrolet Lanos car. Now in front of you is the compressor pulley. A puller will also come in handy here. Having installed it on the open pulley, begin to gradually unscrew it. It will take some time, but everything will definitely work out. There is a bearing retaining ring on the pulley. It should be knocked down carefully. Just do not apply sharp and inaccurate blows, otherwise you can provoke other breakdowns. Next, take a hammer and a mandrel of the appropriate size. They will help you remove, or rather knock out, the air conditioning compressor bearing on a Chevrolet Lanos that is already worn out and unsuitable for further use. Do not rush to throw the old bearing into the trash. This is a great tool to help press the new piece into place. Substituting the old bearing, press in the new part. You can first compare them by size to make sure your purchase is correct. Using a hammer and flat-blade screwdriver, carefully install the new retaining ring, which will be located along the edges of the pulley. Although sometimes an old ring remains in excellent condition. Here, act according to the circumstances. Assembly is performed in reverse order.
You can clearly see that there is nothing complicated about replacing the air conditioning compressor bearing on a Chevrolet Lanos car. Everything can be done with your own hands and can be completed in literally 1-2 hours.
But be careful when you get to the pulley. If there are signs of damage or wear, simply replacing the bearing alone will do nothing and the air conditioner will continue to operate with obvious problems, if at all.
The only correct solution would be to remove the old pulley and install in its place a new element, inside of which there is already a working bearing.
It is only important to purchase quality spare parts. Original or not, decide for yourself
The original pulley from GM is relatively inexpensive, so there is little point in looking for cheaper analogues. They may be of poor quality.
About the car
The car does not spoil the owner with an abundance of cool bells and whistles; a standard set of instruments, levers, and switches is installed. The interior has rounded shapes that follow the contour of the body. The upholstery inside the cabin is made of both fabric and plastic, in approximately equal proportions. This ratio does not allow for good insulation from noise, so the operation of the engine at high speeds can be clearly heard in the cabin. The car belongs to the budget class, so the factory did not pay much attention to this.
The Lanos engine runs on AI-95 gasoline; the power system uses an injector. The cylinder head is cast from an aluminum alloy and contains 8 valves driven by a single camshaft. The valve mechanism is driven by a timing belt.
If you carry out scheduled maintenance work on this car in a timely manner and with high quality, it will please its owner for a long time.
In what cases is it necessary to replace or tighten the belt?
It is necessary to learn how to properly replace and tension the air conditioning belt on a Chevrolet Lanos because it may be required in many cases. For example, replacing the timing belt or alternator belt is impossible without removing the air conditioning belt.
Chevrolet Lanos
The fact that it's time to replace or tighten the air conditioning belt can be signaled by specific squeaking sounds from under the hood. In most cases, the culprit for this phenomenon is the air conditioner tension roller bearing. Usually when the roller is replaced, the belt also changes. There is no point in delaying repairs in the hope that this sound will subside on its own; it will only intensify over time.
The air conditioner belt must be replaced if cracking, delamination or other damage is detected during a visual inspection. Also, according to the instructions that come with the Lanos car, the belt should be replaced every 60 thousand kilometers. Belt catalog number 96486813 or 96182007. Size 1.3 by 82.5 centimeters. The current price is about 1000 rubles. The code for the air conditioner tension roller for Lanos is 96208428, the price of the branded one is a little more than 1000 rubles.
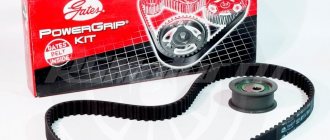
Replacement kit
Domestic bearings 1GPZ 6301 also have a good reputation; their quality is no worse than the original Korean one, but costs three times less.
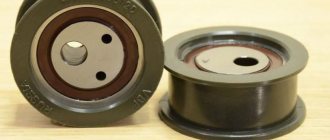
Lubrication in the bearing Roller with a bearing pressed into it
Many drivers still recommend opening the bearing with an awl and seeing if there is enough lubricant in it.
If it seems to you that it is not enough, then add Litol-24. The bookmark must be made on both sides. Next, we press in the bearing, using a hammer and some kind of punch, which can be a 10mm bolt. Work carefully and apply force only to the outer race, tapping in a circle.
Working principle of the timing belt
For the operation of the engine, it is important to ensure the supply of a fuel-air mixture to the cylinders, as well as the removal of exhaust gases. This is what the gas distribution mechanism, consisting of many elements, which is driven by the shaft, is responsible for. The force on the timing shaft is transmitted from the crankshaft using a timing belt. However, power transmission is not the only function assigned to the belt drive.
In addition to transmitting force between two engine components, the belt drive is also responsible for the synchronous operation of the cylinder-piston group and the distribution mechanism. In simple words, it is thanks to it that the cylinder valves in which the fuel assemblies are ignited alternately open and close. If the synchronization is disturbed, which manifests itself even when several teeth of the belt are displaced, the engine will operate unstably or will not start at all.
We make the replacement ourselves
The replacement process is simple and does not require dismantling large units and complex systems. There is also no need for special tools.
A quick way to replace only the drive
- If there is no hole or lift, then use a jack to raise the car.
- Remove the front right wheel.
- Unscrew the plastic protection from the mudguard. Removing the protection
- Let's move it a little to the side.
- Using the opened gap, release the tensioner.
- We remove the belt.
- We install a new belt.
- We install the protection and the wheel in place.
This option is suitable if your problems started on the road or far from the garage. There is another method, which is more labor-intensive and also involves replacing the roller. In this case, it is difficult to do without an overpass.
Replacing the belt and roller
If our goal is to replace only the air conditioner drive, then we should not remove other components and parts. Do everything in the strict sequence we suggest.
- The first step is to unscrew the crankcase protection securing bolts from the front. There is no point in completely dismantling it. The resulting opening is absolutely enough.
- Unscrew the nuts that secure the motor protection.
- We free up space by moving it towards the wheel for work.
- Next, you need to disassemble the tensioner mechanism.
- We carefully inspect it for defects and damage.
- We clean it of dirt.
- Having installed a spacer washer under the pulley, we begin assembling the mechanism. Start of assembly
- Install the video.
- Install the disc washer.
- Next you need to tighten the nut.
- Putting on the belt. New belt installed
- Using the adjusting bolt, we tighten it so that when pressing on the upper branch with a force of ten kgf, it bends no more than 5-8 millimeters.
- Next, tightly tighten the nut securing the tension roller.
We start the car and check how the system works. If no extraneous noise is heard and the air conditioner works as expected, then the work can be considered complete.
Are you changing the air conditioner belt?
Survey
- On one's own
- At the service station
- A friend helped
- Never changed it yet
Loading …
Preparatory operations
So, for replacement, we purchased a timing belt and a tension roller, a pump, two shawarmas and coffee.
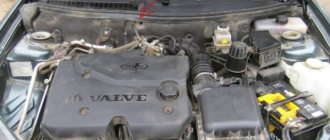
Actually, the patient himself looked like this before the replacement.
Drain the antifreeze. Remove the air filter along with the housing and all pipes. To do this, unscrew three 10 bolts securing the body and loosen several clamps.
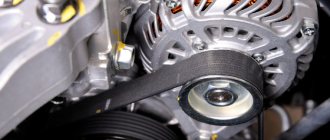
While the attachment belts have not been removed, we loosen, but do not unscrew, the three bolts securing the power steering pump pulley.
We loosen the tension of the generator belt by unscrewing the nut to thirteen, after which we move the generator closer to the engine.
At the bottom, loosen the locking nut of the tension roller and turn the tension bolt to loosen the air conditioner belt. Remove both belts.
With the help of an assistant, unscrew the crankshaft pulley bolt. The sequence of actions is as follows: the assistant in the car turns on the fifth speed and presses the brakes; with a slight movement of your hand, you unscrew the bolt from the outside through the pipe.
Unscrew the four bolts of the timing belt protective cover. You will not remove the cover until you unscrew the power steering pump.
We unscrew the two bolts securing the power steering pump, having first removed the pulley.
Unscrew the three bolts of the lower timing belt protective cover.
Set the top dead center
Turn the crankshaft clockwise until the marks on the camshaft match.
Next, unscrew the timing belt tension pulley bolt and remove the belt along with it. Having locked the camshaft sprocket, unscrew the bolt and dismantle it. There are two small ten-point bolts hidden under it; we turn them out.
Having removed the protective cover, we see a miracle: it turns out that the thermostat housing is leaking.
Once you open it, we'll replace the thermostat itself. Unscrew the two bolts and remove the thermostat housing.
Replacing the pump
We unscrew the three bolts with a five-point hexagon and remove the pump, remembering how it stood.
We install a new pump and thermostat, lightly lubricating them with sealants.
And here is the new pump itself, along with a special key for 41.
We screw the thermostat housing tightly, but we just tighten the pump so that we can turn it.
We put the protective plastic, the camshaft sprocket, and the tension roller in place.
What is a generator on a car and its purpose?
Many people are interested in the question of whether it is possible to drive a car if the generator has failed. You can easily answer this question if you know the purpose of the device. To do this, let’s find out what a generator is. It is a device that generates electrical energy that powers electrical devices on the car. The unit generates current that goes to the battery, so the battery is charged while the internal combustion engine is running.
This is interesting! When starting the engine, the starter consumes a lot of current, so the battery needs to be charged. If the battery does not charge, it will run out in 2 hours at best, and in 10-15 minutes at worst.
Structurally, the generator on Lanos, Sense and Chance is an electric motor that does not consume electricity, but, on the contrary, produces it. To do this, the device pulley is connected to the crankshaft, and thereby the rotor is driven. When the rotor rotates, the stator winding of the generator is excited, and thus an alternating current is generated. This current needs to be rectified (from alternating current to direct current), so the generator design includes a diode bridge (rectifier unit). Knowing the structure of the unit, it should be noted that during operation the generator may fail, and the reasons for this are very different.
Main causes of breakdowns
Under no circumstances should you attempt to repair a Chevrolet Lanos generator yourself; you may only permanently break it. Even changing the brushes of a Chevrolet Lanos generator is best done by specialists. The main causes of breakdowns include:
- corrosion and service life. The generator can last up to 6 years. If you want to prolong its work, you need to do maintenance on it at least once every three days.
- Generator bearing failure. The bearings of a Chevrolet Lanos generator should be replaced at least once every 3 years.
- Using a low-quality or expired battery.
- Frequent driving in high humidity.
- Installing powerful equipment on a car that consumes too much electricity.
- Trying to fix the generator yourself.
The maximum we recommend doing yourself is to remove the generator and take it for repairs, or put a new one in place of the old one.
Replacing the air conditioning compressor belt for Ford Focus 2 Duratec HE - Repair and Spare Parts Ford
https://www.melcom-ural.ru/compressors/s-dizelnym-dvigatelem/ — diesel air compressor Replacing Ford belts > How to replace the air conditioning compressor belt Ford Focus 2 Duratec HE
| Removal NOTICE: The A/C compressor belt cannot be reused as it is designed to only stretch once when placed on the pulleys. Failure to follow this instruction may result in premature belt failure. To remove the compressor belt, you must remove the compressor cover. Failure to follow this instruction may result in damage to the compressor. |
|
|
Installation
NOTE: Install a new compressor belt.
|
|
|
|
|
|
|
|
If the compressor belt is positioned correctly, discard the installation tool. |
|
|
|
|
How to determine the need to replace the timing belt
First of all, you need to rely on recommendations from the manufacturer of a specific car brand. For Lanos and Chance cars, the timing belt should be replaced no later than every 60 thousand kilometers (not 90, as many people think) or after 4-5 years. However, replacement may be necessary earlier, which often depends on such important factors as the quality of the product, the absence of exposure to negative factors (for example, oil and antifreeze should not get in), correct installation (tension), and the nature of the ride. All this directly affects the life of the timing belt.
The need to immediately check the condition of the timing belt and replace it also arises in the following cases:
- Product age. This means not only the mileage, but also how many years the belt has been operating on the car. If the vehicle is not used often, and over 10 years the mileage on the odometer is no more than 50 thousand km, then you should not delay replacing the belt drive. Over time, temperature changes cause the condition of the part to deteriorate, and it can break at any moment. That is why in the regulations the manufacturer indicates the timing belt replacement interval not only in the form of vehicle mileage, but also the age of operation.
- Belt damage. To inspect the product, you will need to remove the timing case cover. However, in this case it will be possible to inspect only the outside. And its ideal condition does not always indicate the serviceability of the product. To assess the condition of the transmission device, it is necessary to inspect its inner side, on which the teeth are located. Cracks, chips, abrasion or missing teeth are all the main signs that the belt has become unusable and needs to be replaced.
- The engine does not start. This phenomenon occurs when the starter idles without load. In this case, you should make sure that the timing belt is intact, and also check that the marks on the camshaft and crankshaft match.
In addition to the timing belt breaking, it may slip. This happens due to its stretching, as well as when the tension is incorrectly installed or the tensioner roller is faulty. In any case, if the timing belt shows signs of even the slightest unsuitability (even if it has not reached the end of its service life), it is necessary to immediately replace it. It is not recommended to wait for a break, as in this case repairs will be expensive and time-consuming.
This is interesting! When the timing belt breaks, not only the valve timing is disrupted, but also the valves are bent due to their collision with the pistons.
We make the replacement ourselves
The replacement process is simple and does not require dismantling large units and complex systems. There is also no need for special tools.
Tools
- a set of keys;
- jack;
- rags;
- belt;
- bearing;
- hammer.
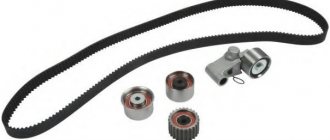
Depending on whether the bearing needs to be replaced along with the belt or not, there are two replacement methods.
A quick way to replace only the drive
- If there is no hole or lift, then use a jack to raise the car.
- Remove the front right wheel.
- Unscrew the plastic protection from the mudguard.
Removing the protection
Move it a little to the side. Using the opened gap, release the tensioner. We remove the belt. We install a new belt. We install the protection and the wheel in place.
This option is suitable if your problems started on the road or far from the garage. There is another method, which is more labor-intensive and also involves replacing the roller. In this case, it is difficult to do without an overpass.
Replacing the belt and roller
If our goal is to replace only the air conditioner drive, then we should not remove other components and parts. Do everything in the strict sequence we suggest.
- The first step is to unscrew the crankcase protection securing bolts from the front. There is no point in completely dismantling it. The resulting opening is absolutely enough.
- Unscrew the nuts that secure the motor protection.
- We free up space by moving it towards the wheel for work.
- Next, you need to disassemble the tensioner mechanism.
- We carefully inspect it for defects and damage.
- We clean it of dirt.
- Having installed a spacer washer under the pulley, we begin assembling the mechanism.
Start of assembly
Install the roller. Install the disc washer. Next you need to tighten the nut. We put on the belt.
Installed new belt
Using the adjusting bolt, we tighten it so that when pressing on the upper branch with a force of ten kgf, it bends no more than 5-8 millimeters. Next, tightly tighten the nut securing the tension roller.
We start the car and check how the system works. If no extraneous noise is heard and the air conditioner works as expected, then the work can be considered complete.
Replacing and adjusting the tension of the alternator belt and power steering pump
How often should you change the belt?
The manufacturer recommends changing the alternator belt every 60,000 km or 6 years of operation.
Checking the belt
Check the condition of the drive belts and their tension every 25 thousand km.
• Check the belt for signs of shine or cracks. A shiny belt will slip, while a good belt will have a faintly visible factory texture. Cracks usually start at the inside corner and spread outward. Replace the belt if the belt shows signs of cracking or is highly shiny.
• The belt tension should be without gaps or sagging. When pressing with your thumb on the belt in the middle of the two pulleys, a belt deflection of 8 mm is allowed. If any of the belts flex more than this amount, the belt tension should be adjusted. Incorrect tension will cause slippage and wear; excessive tension will cause bearing failure, belt cracking and chafing.
Typical belt problems
Cracking and erosion . There are deep cracks on the belt that cause kinks. Too much bending leads to overheating and premature wear. Cracks may be the result of using the wrong size belt on a pulley. The belt notch is designed for a smaller diameter pulley.
Softening (oiling). Oil and grease on the belt cause the material to soften and separate from the cord that strengthens the belt. The belt first slips, then fails altogether.
Shine. The shine is the result of belt slippage. A slipping belt can lead to undercharging of the battery, overheating, or poor performance of other systems. The more the belt slips, the more shine there will be on the surface of the belt. If the shine is not strong, tighten the belt.
Worn surface. The surface of the belt is worn and flaking. The belt cord begins to break down, causing the belt to break. If the belt surface deteriorates quickly or becomes nicked, check the pulley groove for nicks.
Delamination. This belt is on the verge of breaking and twisting. The belt layers separate and the belt cord breaks. You should not wait until the rupture is complete.
Wear of V-belts . V-shaped belts are very important for the engine - they drive various units. They require little maintenance (occasional tightening), but they don't last forever. A slipping or damaged belt will cause the engine to overheat and also cause a whistling noise.
Removal and installation
You will need two 12mm wrenches.
2. Slightly loosen the bolt securing the generator to the tension bar...
3. ...and two nuts on the bolts securing the generator to the engine cylinder block (photo taken from below for clarity)
4. Slide the generator towards the cylinder block. This will loosen the belt tension.
5. Remove the belt
6. Install a new alternator belt and adjust its tension.
7. Reinstall the air conditioning compressor belt.
Adjusting the tension of the generator and power steering belts
When pressed with a force of 100 N (10 kgf), the belt deflection should be 10–15 mm.
Control the tension with your thumb.
To adjust the tension of the generator drive belt, loosen the joint and the generator mounting bolts.
And
Using a wooden hammer handle, a stick or even a pry bar as leverage, turn the generator one way or the other until the desired tension (10 - 15 mm) is achieved.
Carefully tighten the mounting bolts. If a new belt was installed, check the tension again after 300 km.
Source
Payment via Yandex Cashier
After selecting payment via Yandex, the Yandex Cashier payment system will launch, where you need to select a convenient payment method (bank card, QIWI, Yandex Money account, etc.)
After specifying payment details and confirming payment, payment for the goods will occur.
If you have a bank card in a currency other than the ruble, then the money will be debited from the card at the rate of the Central Bank of Russia at the time of the purchase.
This payment method is optimal for residents of Russia, Kazakhstan and Belarus.
We make the replacement ourselves
The replacement process is simple and does not require dismantling large units and complex systems. There is also no need for special tools.
A quick way to replace only the drive
- If there is no hole or lift, then use a jack to raise the car.
- Remove the front right wheel.
- Unscrew the plastic protection from the mudguard.
Dismantling the protection - Let's move it a little to the side.
- Using the opened gap, release the tensioner.
- We remove the belt.
- We install a new belt.
- We install the protection and the wheel in place.
This option is suitable if your problems started on the road or far from the garage. There is another method, which is more labor-intensive and also involves replacing the roller. In this case, it is difficult to do without an overpass.
Replacing the belt and roller
If our goal is to replace only the air conditioner drive, then we should not remove other components and parts. Do everything in the strict sequence we suggest.
- The first step is to unscrew the crankcase protection securing bolts from the front. There is no point in completely dismantling it. The resulting opening is absolutely enough.
- Unscrew the nuts that secure the motor protection.
- We free up space by moving it towards the wheel for work.
- Next, you need to disassemble the tensioner mechanism.
- We carefully inspect it for defects and damage.
- We clean it of dirt.
- Having installed a spacer washer under the pulley, we begin assembling the mechanism.
Start of assembly - Install the video.
- Install the disc washer.
- Next you need to tighten the nut.
- We put on the belt.
Installed new belt - Using the adjusting bolt, we tighten it so that when pressing on the upper branch with a force of ten kgf, it bends no more than 5-8 millimeters.
- Next, tightly tighten the nut securing the tension roller.
We start the car and check how the system works. If no extraneous noise is heard and the air conditioner works as expected, then the work can be considered complete.
Do I need to change the roller and pump?
The “useability” of these consumables depends on many factors. These include the quality of the spare parts used, the operating conditions of the vehicle, and the region in which the vehicle is used. It is almost impossible to check their technical condition without removing the belt. A pump malfunction can be detected by the presence of traces of antifreeze, or by loud noise after the destruction of the bearing assembly. The tension roller is usually replaced the second time the belt is replaced.
Experts recommend changing the timing belt after a mileage of 60 thousand km. There are known cases when the pump and tension roller work when the total mileage of the car is more than 120 thousand km.
What beeps in Lanos: four versions of a car mechanic
In most cases, a loud squeak that turns into a high-frequency whistle is produced by the belt drive of the engine attachment. But which one, because often under the hood there are several drive belts that spin the pulleys of the generator, power steering pump, air conditioning compressor, plus tension rollers. In order to determine what is squeaking in Lanos and not change all the mentioned components at random, you can check all possible causes one by one.
Check tension
Whistling is the result of improper contact of the pulley with the working surface of the belt, or more precisely, the mutual slipping of their surfaces in one direction. Tightening the belt can change the nature of the contact - of course, within the permissible force, because excessive tension leads to accelerated wear of the belt, pulleys and bearings on which the shafts involved in the drive rotate.
Replace the belt
It is possible that the abnormal nature of the contact between the pulley and the belt is due to wear of the latter. Perhaps the wedge part of the belt profile reaches the bottom of the pulley groove, which causes the squeak. Replace the belt. Even if it soon turns out that this is not the problem, the spare part will remain safely in your garage until the scheduled replacement date.
Replace the pulley
In Lanos, it happens that the reason for the squeaking of the belt drive is a worn-out pulley (primarily the generator). The mechanics of the phenomenon are the same - due to the wear of the streams (in the air conditioner drive - stream) of the pulley, the belt wedges reach their bottom, causing an abnormal sound. When figuring out what is squeaking, it is better to contact a service station that specializes in repairing electrical equipment - generators, starters, electric drives regarding the problem pulley. If the wear of the pulleys is not obvious, then you can install known-good pulleys from the exchange fund for testing, so as not to pay money for a relatively expensive part in vain.
Check bearings
The reason for the engine compartment squeak in Lanos may be wear of the generator bearings, primarily those closest to the pulley. By causing shaft misalignment, the bearing provokes a violation of the angle of entry of the belt into the pulley grooves, which is accompanied by an unpleasant sound when the engine is running. The bearing(s) will have to be replaced.
In conclusion, we note that some auto mechanics, in order to eliminate the whistling noise under the hood in Lanos, suggest treating the belt with a special aerosol that increases the coefficient of friction in the pulley-belt pair. Sometimes this helps, but this measure is temporary - you will still have to change this or that part soon.
If you find an error, please select a piece of text and press Ctrl+Enter.
We replace or tighten the air conditioning belt on a Chevrolet Lanos with our own hands
In order to ensure that the air in the cabin of your car is always clean and fresh, you need to pay at least a little attention to the air conditioning system from time to time. No special knowledge is required here and it is often enough to monitor the condition of the filter and know how to tighten the air conditioning belt on Lanos. In some cases it may need to be replaced.
It just so happens that a domestic car enthusiast, before going to a service station, will definitely try to do this or that work on his own. This makes sense, because in this way you can save quite a decent amount. Replacing the air conditioner belt is exactly the case when there is no need for the services of a service station, and you can do it yourself.
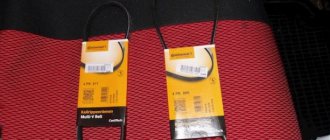
Which timing belt to install on Lanos and Chance
As for manufacturers, belt drives are produced by various companies Dayco, KAP, Flennor, Dongil, AE, Dongshin and others. Naturally, preference should be given to the original
GM, which has serial number 96352407, as well as the Gates analogue with number 5310 XS.
It is important to note that the timing belt size for a Lanos 1.5 8 valve car is 17 mm wide and consists of 117 teeth.
Lanos with a volume of 1.6 have two camshafts, so the timing belt for them is correspondingly longer in length. The original belt for Lanos 1.6 from GM has code 96814098. Its width is 25 mm and the number of teeth is 127. The recommended analogue of the timing belt for Lanos 1.6 from Gates is number 5419XS.
It is not recommended to choose Contitech brand products, since, according to car owners, the quality of this brand’s products has significantly decreased. Preference should be given to Bosch brand products. The company values its reputation and produces high-quality products, albeit at high prices.
This is interesting! When choosing a timing belt, consider not only the brand name, but also the cost. High-quality products will not be cheap, and even if you come across devices priced below 800-1000 rubles, then avoid them. A high-quality belt for Lanos costs at least 1000 rubles or more than 400 hryvnia.