There was a slight vibration at speed. I started digging into this matter. I got to the diff and it turned out that it had play((The time has come to replace the bearings. I naturally grabbed my head, imagining HOW MUCH the spare parts would cost(I come home, get into the existential situation and fall into a stupor. Differential bearings, ORIGINAL, 2 pieces cost 1400 rubles O_o. Plus non-original filter RUB 500. Nice)) I ordered everything, and then I went to remove the box)
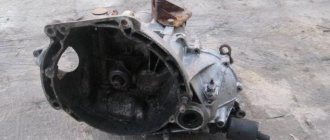
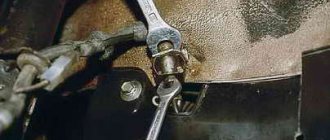
We unhook everything we can from the box. We drain the ATP. We hang the engine. Unscrew the box from it and remove it)
Having unscrewed a shitty cloud of bolts in a circle, we cut the box in half. Do this VERY carefully! There are no gaskets there! Everything is sealed! It is very easy to damage the mating surface! After unscrewing the bolts, the box should lie on its side with the bolts facing up! Having removed one half, we see another 2-3 liters of ATP inside.
I didn’t know about this((I definitely spilled a liter(
Well, I finally had some time to post a report on replacing the diff bearings; I carried out the replacement during the New Year holidays, but I didn’t have time to show you to my friends.
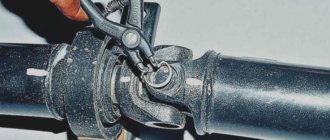
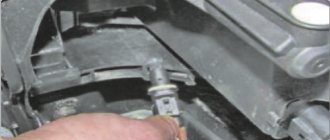
So a little theory. If a noise appears from the front while the car is moving, it increases when accelerating and decreases when stopping, no matter what gear or neutral. These are either wheel bearings or differential bearings. The first thing you need to do is check the wheel bearings with this phonendoscope. We hang up the front wheels one by one, secure the car with the handbrake and rollbacks, with the help of an assistant we accelerate to those speeds at which the hum appears, and listen to each bearing from the pit. Attention: when one of the drive wheels is raised, the differential will not allow the car to start moving, but will only rotate the wheel that is lifted off the ground. You just need to secure the car well so that it doesn’t jump off the jack.
.
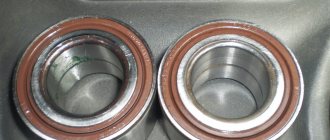
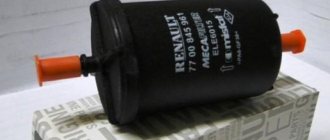
If none of the wheel bearings are humming, then only the diff bearings remain; they can also be listened to in the manner described above. Well, in my case the differential bearings were damaged. Spare parts were ordered in advance. What is needed to replace bearings Lanos A15SMS gearbox F16: 1. Bearings 2 pcs code 96335754
2. Drive oil seals 2 pcs
code 25187787
3. O-rings (left and right, different)
code 96243158 (left), 96243159 (right)
4. Gearbox pan gasket
code 96179241
5. Thread lock 6. New gearbox oil is desirable As Murzilka writes, the bearings are adjusted on a disassembled box, with the secondary shaft gear (main pair) removed, with a preload of 2 kg. That is, you need to disassemble the box and tighten the bearings with the differential rotating freely. Well, since on our boxes the diff bearings can be replaced only by removing the pan, a problem arises with adjusting these bearings. I scoured a bunch of forums, including Drive2, no one had done this, the answer was found only on one (Vektrovsky in my opinion) and it was superficial, I’ll write which one below, I decided to take a risk. There was also a thought that the drives were hanging too much, but it was decided to postpone this problem, because... This is a problem with our differentials and should be eliminated by tightening the seats for the drive. Well, since the seals do not leak, and the drives do not dangle relatively much, the problem is put aside. I also looked for the dimensions of the bearings to replace with an analogue in size, asked on various forums and again to no avail. That's why I'm telling you their sizes.
Thickness 17mm Outer diameter 63mm Inner diameter 38mm Tapered bearing.
Well, perhaps it's time to get started. Attention, this procedure requires some skills and tools, if you are not confident in yourself, leave this undertaking for servicemen
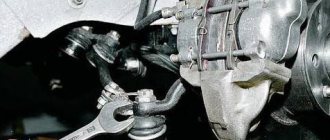
We hang it in front of the car
Differential bearing arrangement
A tapered bearing is a type of rolling bearing and is a structure consisting of two rings in the shape of a truncated cone with running grooves. Between them there is a separator with rollers. They are cylindrical, conical, barrel-shaped, needle-shaped and twisted in shape. Conical by their design are divided into single-row and double-row.
As an element of the mechanism, the differential bearing is capable of operating under conditions of high loads and rotation speeds. Therefore, tapered bearings are included in both axlebox assemblies for railway transport and wheel hub elements of automobiles.
Symptoms of a problem
During vehicle operation, the following differential breakdowns are possible:
- excessive noise levels;
- the appearance of a lubricant leak;
- strong knocks and impacts in transmission;
- bridge wedge and so on.
If you experience any extraneous noise while driving, you should stop the car and check the crankcase temperature level. The normal value is 55-60 degrees Celsius. In a situation where the crankcase is very overheated, it is worth checking the device for the presence of oil in it, as well as the quality (presence of dirt in the composition). If this is necessary, then it is worth adding lubricating fluid.
Noise may occur if the seal of the unit is broken and a leak occurs. If eliminating the existing damage does not bring results and the noise remains, then it is worth continuing to check the differential. In particular, the cause of extraneous sound may be damage to the gearbox, failure (wear) of bearings, damage to gear teeth, and so on. Such problems can be eliminated by adjusting or replacing elements.
Another problem that may arise during operation is the appearance of oil leakage through oil seals or gaskets. In such a situation, you should start by checking the fasteners and replacing gaskets and seals. Most often, the drive axle operates without failures, but after 4-5 thousand kilometers, extraneous noise may appear. Such consequences are real in case of wear of differential elements or malfunction of roller bearings.
A simple check of the differential can be done with your own hands, in a garage. To complete the work, you need to prepare a jack and call an assistant. In this case, the verification process is carried out according to the following algorithm:
If you cannot identify the problem yourself, then you should contact a professional car service center. The experts not only identify the problem, but also guarantee its elimination in a short time.
Why might you need to replace a differential bearing?
Types of defects are divided into the following groups:
1. Initial defects:
- depreciation;
- furrows;
- bullies;
- destruction of the surface layer;
- rust;
- the result of the passage of electric current.
2. Secondary defects:
- fatigue shells;
- gap
If any defect is present, intervention will be required. The bearing cannot be repaired; only replacement is possible.
How are repairs carried out?
To carry out restoration activities you will need:
- Ball bearings in the amount of 2 pcs.
- Gaskets (oil seals) of drives in the amount of 2 pcs.
- O-rings for sealing. There should be different: right and left.
- Transmission pan lining.
- Thread locker.
- New gearbox oil.
To adjust the differential bearing, the transmission must be removed. They are adjusted on a dismantled unit with the secondary shaft gear (key pair) freed. After the box has been removed, the differential is removed from it.
The following is done:
- The axle gears are released from the differential and rotated 900.
- Using the necessary tool, remove the retaining ring, which is located in the gear axis.
- After removing the stopper, the axle and, together with it, the gears themselves can be easily removed.
- Take a head of the required size, an extension, then unscrew the bolts that secure the driven gear to the differential frame.
- Then the driven gear is released from the housing (you can use a hammer).
Now you need to look at the working surfaces of the parts that were removed for any defects. If small irregularities are identified, they should be eliminated using sandpaper. If there is more serious damage to the parts, it is necessary to replace them. Also, if during inspection chips, cavities or other defects are revealed on the driven gear, then it must be replaced.
Related product:
Suprotek Reducer additive for transmission units
Restores the surfaces of gear teeth and bearing races in gearboxes of any type. This reduces noise and vibration during operation of the unit, facilitates its operation, and extends its service life by 2.5-3 times.
A transmission differential is a type of mechanical gearbox that transmits rotation from a driveshaft to an axle shaft. This device allows the wheels to spin at different speeds when the car turns. For rear-wheel drive vehicles, this unit is located in the drive axle housing, and for all-wheel drive vehicles, it is located in the transfer case.
Replacement process
The next step is to carefully look at the location of the bearings. If there is a hole in these places, the housing should be replaced; if cavities are found on the tracks and rolling elements, an indentation mark or a defect in the separators, then the bearings are changed. The differential bearings are then sealed using a tool. The outer rings from the gearbox housing are crimped. This is done using a special device. If there is no puller, then the axle flaps are first crimped, then replaced with fresh ones.
The outer rings are removed using a bit. There is an adjustment ring underneath them. Before compressing them, it is necessary to prepare new copies of the parts. If necessary, change the gear responsible for the speedometer. The differential is reassembled after changing the bearing.
Adjustment of VAZ differential bearings
The differential is a unit that allows you to split the torque when each of the axle shafts acquires its own newtonometers. It also adjusts the rotation speed of the wheels. When turning, the outer wheel travels in a huge arc and begins to slip. To prevent this, a differential is used.
Because of this, the wheels have different torsion angles at speed. To adjust this element to the condition of the track, it is necessary to adjust the differential.
The elements consist of two parts: outer rings, which are clamped into the bridge stockings; and internal ones, the compaction of which goes to the differential. You can do the replacement and adjustment of these units yourself.
To adjust the differential bearings, you need to:
- Loosen the bearing caps so that the adjustment nuts can turn.
- These nuts need to be used to tighten the bearing with a little force.
- Tighten the bearings with nuts, turn the gear first in one direction, then in the opposite direction. When doing this, the rollers, which are located in the bearings, occupy the desired position.
- To measure the lateral gap in the clutch of the final drive gears on the rear axle housing, you need to strengthen the pointer and move its probe to the top of the tooth along the outer edge of the gear. The gap should be 0.15-0.2 mm. Measurements must be taken on at least six teeth in the reverse zones of the crown.
- In order to reduce the distance, using a screwdriver or a thin metal rod, the nut for adjusting along the edge of the reverse gear is unscrewed, and the other one is tightened.
Unscrewing and tightening the nuts must be done by the same amount, orienting them along the grooves. Each unwinding must end with a puff. This action ensures stable contact of the outer ring of the bearing with the nut, which, in turn, guarantees fixation during operation. To increase the distance, you need to perform the same steps, but in the opposite order.
Adjustment stages
- After the distance has been adjusted, it is necessary to check the play on the axle. To do this, attach the pointer to a tripod, and rest the probe against the end of the driven gear. The backlash is measured, and the part is rocked in the direction of the axis.
- The adjustment nut, which is located on the opposite side from the driven gear, sets the play on the axis from 0.055 to 0.035 mm.
- Then the nut is tightened and the preload is set: 0.1 mm, if the bearing mileage is no more than 10 thousand km; 0.05 mm – if more than 10 thousand km. Turning the nut one notch is equal to “compressing” the bearing by 0.03 mm.
- After making the adjustment, you need to tighten the bolts on the bearing cap and install the locking plates. The lateral distance is checked again.
Preload selection
Creating preload during installation is usually accompanied by measuring force (in some cases, displacement) or friction torque.
General information about preload
Depending on the type of bearing, the preload can be radial or axial. For example, precision cylindrical roller bearings, by design, can only have radial preload, while angular contact ball bearings or tapered roller bearings can only have axial preload.
Preload with springs
The preload force remains virtually constant even when the bearing moves axially due to thermal expansion.
F = kd
Where
| F | = | preload force |
| k | = | coefficient, described below |
| d | = | bearing bore diameter |
For small-sized electric motors, the value of the coefficient k is taken to be from 0.005 to 0.01. If the preload is used primarily to protect the bearing from vibration when stationary, the preload value should be greater - k = 0.02.
The spring loading method is also widely used to create preload for angular contact bearings on spindle units of high-speed grinding machines. This method is not suitable for cases where a high degree of joint rigidity is required, the direction of the load changes, or random peak loads may occur.
Adjustment of UAZ differential bearings
This procedure must be performed by adjusting the thickness of a set of adjustment shims, which are placed between the sides of the closed rings of both bearings and the gear box. When changing main gear parts and differential bearings, make adjustments in this order:
- Press the closed bearing rings onto the nut so that there is a distance of 3-3.5 mm between the sides of the gear box and the sides of the closed bearing rings.
- Dismantle the axle shafts and place the differential assembled with the driven gear into the crankcase, install the linings and cap, do not fully tighten the bolts that hold the covers, and, turning the driven gear with an assembly blade through the throat of the crankcase, roll in the bearings so that the rollers fit into the right place. Then use the bolts to align the cap with the crankcase evenly and completely.
- Unscrew the bolts. Very carefully remove the cap, remove the differential from the axle housing and use a feeler gauge to measure the distances A and A1 between the sides of the gear box and the closed bearing rings.
- Select a set of pads with a thickness equal to the sum of A+A1. To protect the preload in the automatic transmission differential bearings, add a 0.1 mm thick gasket to this set. As a result, the total thickness should be A+A1+0.1 mm.
- Remove the sealed differential bearing rings. Divide the assembled set of pads into two parts. Place them on the necks of the gear box and compact the closed bearing rings to the limit. Then adjust the distance on the sides by moving the driven gear.
Only after changing the differential bearings should you take measurements and compare the height of the new and old assemblies. If the new bearing is larger or smaller than the outdated one by a certain amount, then reduce the thickness of the existing set of pads in the first option and increase it in the second.
Repair of differential cup
Defects of the differential cup are:
- wear of bearing seats;
- wear of the holes for the journals of the satellite crosspiece;
- wear of the holes for the journals of the axle gears.
Worn seating areas of the differential cup bearings are restored by chrome plating, followed by grinding to the required size, as well as metal surfacing by welding. Surfacing should be carried out with heating to avoid warping of the cup. If the differential cup is made of steel, then cold expansion of the bearing seats can also be used.
To do this, a conical mandrel, generously lubricated with oil, is driven through the hole in the cup under a press. After distribution, the necks are turned on a lathe. When the holes intended for the spider journals wear out, these holes are deployed to accommodate the increased size of the journals, which are pre-chromed to obtain a tight fit when the differential cup is assembled. Worn holes for the journals of the axle gears are bored on a machine, and to obtain a normal fit of the journals of the axle gears, the surface of the journals is chrome-plated. The holes can also be restored by boring the holes, followed by pressing in bushings made of a material corresponding to the material of the cup. After pressing, the bushings are processed to the size of the journals of the semi-axial gears with the calculation of obtaining the required clearance.