During operation, a car engine inevitably gets hot, and to prevent its parts from overheating, a cooling system is used. One of its most important parts is the radiator, in which the coolant cools to optimal temperatures. This prevents excessive heating of the power plant parts. Without cooling, the engine will inevitably overheat and fail.
Replacing a Priora radiator with halla air conditioning
With the onset of cold weather, car owners begin to use the interior heater.
Lada Priora is a fairly warm car with a well-designed interior heating system. But there are times when, with the onset of cold weather, the interior is cold and the culprit for this is the heater radiator, which is what will be discussed in this article. Priora is a car with an increased level of comfort. In the “luxury” configuration it is equipped with a climate control system with Halla air conditioning. This installation is quite reliable and easy to maintain.
It is necessary to monitor the condition of the heater and keep it clean. To do this, you need to change the cabin filter in a timely manner to protect the heater radiator from contamination. You can read how to properly replace the cabin filter here.
What kind of troubles can happen with a radiator and what are the consequences?
For the entire cooling system, a malfunction of the device poses a serious danger, because the motor may begin to overheat. On domestic Lada Priora, a combined classic cooling system scheme is used, that is, the liquid system is supplemented with air. Thanks to the implementation of this combination, the optimal engine temperature is maintained under various loads.
There are not many radiator malfunctions. Its main problem is coolant leakage. This happens when the tubes are worn out and damaged. This problem often occurs when the inner surface of the radiator is clogged. This is quite easy to determine, since the forced cooling fan will constantly work.
It happens that the plates become dirty, and the antifreeze does not cool the oncoming air flow, therefore, although the temperature will drop, it will quickly rise, and the fan will start again. The internal radiator tubes may also become covered with dirt, which will certainly impair the circulation of antifreeze. Again, this will lead to overheating of the motor.
If the radiator is seriously damaged, the power plant of the Lada Priora will inevitably overheat.
After an accident, the car requires pdr dent removal, for this you need to contact a specialized body repair shop; on the website dmi.com.ua you can order such a service at a favorable price and excellent quality.
Radiator replacement
The first thing you need to do before replacing the heater core is to prepare the tool.
Required tool:
- Screwdriver "" or "-";
- Ratchet with a “13” head or a “13” spanner;
- Sealant;
- Antifreeze 5l;
- Container for draining antifreeze;
After preparing the tool, you can start working
If the radiato is clogged from the outside:
Replacing a radiator on a Prior with Halla air conditioning
It happens that when using a car without a cabin filter, excess debris may fall onto the radiator of the heater, which under the influence of the heater fan can clog it.
In order to eliminate this ailment, it is enough to remove the radiator and wash it.
Video of replacing the heater radiator on a Priora without air conditioning
With the onset of cold weather, the driver's interest in the operation of the heater increases sharply. The motorist checks the stove for various faults. In some cases, a radiator failure is detected. How is the radiator of a Priora stove replaced? As a rule, this component cannot be repaired and must be replaced. Having opened the dismantling manual, the driver may discover that the parts in his Priora are located differently than in the instructions. It's all about the air conditioner. The process of removing the heater radiator in older versions of Priora without this option differs from dismantling it in new cars where air conditioning is already present. We will look at both options.
Modern Priors are equipped with Halla or Panasonic air conditioners. There are differences in the operation of the two models, but the location of their installation does not differ, depending on the air conditioner brand, so the process is the same. As an example, we will consider a Priora with Halla air conditioning.
Replacement option for a car without air conditioning
The replacement of the radiator of the Priora stove without air conditioning begins with zeroing the negative terminal of the battery. Then the windshield trim is removed along with the wiper seats to facilitate the work process. The further operation is performed in stages:
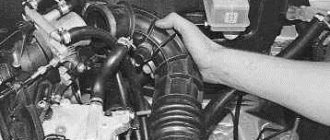
- The tubes supplying the refrigerant to the injectors are removed.
- The cover is removed by unscrewing seven screws.
- The tightening element on the hood seal is unscrewed.
- The flat plugs on the engine sound insulation are pryed off and turned out.
- The insulating elements are removed along with the linings.
- The clamps on the radiator pipes are loosened and removed. You will need to prepare a container for draining the antifreeze.
- The wiring connected to the heater is removed.
- The wire holder is removed and moved to the side.
How to replace the cooling radiator on a VAZ 2170-VAZ 2172?
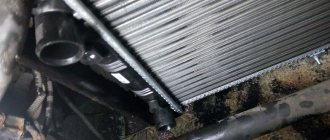
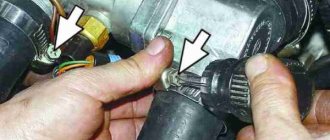
1) Before you start work, drain all the coolant from the radiator (How to drain the liquid, read “here”) and proceed to removing the electric fan (If you don’t remove it, you simply won’t be able to pull out the radiator), to do this, first disconnect the negative terminal with the battery, loosen the bolt that secures it, then remove the air filter housing because it will interfere very much (Read “here” how to do this), well, you can start removing the electric fan, first disconnect the wiring from each other, wiring the electric fan has a connector and block on the side (see photo 1), then unscrew (it’s most convenient to use a wrench) two bolts that secure the electric fan to the casing on the left and four nuts, two of which are located on the top and two below (see photos 2 and 3 below) and then remove the electric fan by pulling it to the top and putting it aside.
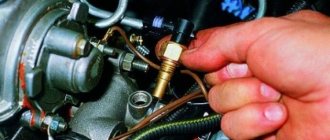
2) Next, remove the sound signal, because it will not allow you to remove the radiator (For information on how to do this, read the article: “Replacing the signal on the Lada Priora”) and then loosen all the clamps that secure all the supply pipes to the radiator (see. photos 1 and 2, pay attention to photo 1, there is another pipe indicated by an arrow, so don’t miss it) and disconnect them, immediately after which unscrew the two nuts that secure the radiator to the body (see photo 3) and then remove a holder that keeps the hose from dangling from the hole in the cross member of the engine compartment (see photo 4), and that’s it, you can safely then tilt the radiator towards the car engine and then pull it out of the engine compartment.
Look again at photo 1 above, there the arrow indicates the upper hose, unlike the pipes, it is attached not with a worm clamp, but with a tape clamp, tape clamps are not convenient and after the first unscrewing, it is already difficult to secure the hose with them so that it holds just as tightly, Therefore, replace this clamp (If you have a band clamp) with a worm clamp, it is much more convenient and can be tightened with a wrench or a screwdriver!
Before installing a new radiator or re-installing an old one (if you solder it), check for the presence of two cushions on which the radiator stands (see photo 1), they sometimes still remain in the mounting pins, so look everywhere for torn or lost elasticity cushions, replace them with new ones , as well as remove and check the rubber-metal bushings; if necessary, they are also replaced with new ones.
If you still decide to install the old radiator (Perhaps you simply removed it in order to gain access to other parts), then before installing it, rinse it outside with a stream of water and dry it thoroughly, and by the way, before connecting the pipes back to the radiator, Lubricate them with sealant, a small layer, otherwise the pipes may begin to leak, which will cause you a lot of inconvenience and problems with the constant purchase of coolant!
Search
replacing the cooling radiator on the previous one The cooling radiator enters the cooling system when the engine is running, the coolant moves in a circle, and most of it is in the cooling radiator; when moving at speed, the radiator is cooled by the air flow, so the liquid is cooled and the engine does not heat up much.
To change the radiator in a car, this is useful: you will need all the wrenches that you have in your arsenal, as well as screwdrivers, containers into which you will drain the coolant (or one large tank), and stock up on the last coolant as you need will drain the old one, if it is in poor condition, then it is better to pour good fresh fluid into the radiator and expansion tank after assembly!
Where is the cooling radiator?
It is located in the front part of the body, secured with nuts, they are attached to the TV (the TV is the headlights; it still connects the bumper and side elements), removing the radiator from it is not difficult. Priority, because there is enough space to crawl with your hands, but However, if you stock up on the right keys, the replacement process will be completed even faster, and the collar will be just that, and the hat goes to it.
You may also like
When do I need to change the radiator?
If it has leaked, the radiator should be replaced to make it easy in the summer, just pay attention in the winter to the coolant, and to be more precise, before its level, if it starts to drop, the entire cooling system will need to be checked and to detect the leak, so to recognize that the radiator is leaking in a certain way, you can only use the best ultraviolet light (this makes the coolant very visible) or by removing it and placing it in a huge water tank (by removing the radiator, you can very accurately determine whether there is hole), before placing it in the radiator, you will need to pump compressed air through the coolant fill hole in the radiator (this hole simply does not need to be submerged in water or plugged well than any other holes to prevent the air from passing 100% and), For more information on how to perform this test, watch the video below:
If the holes in the radiator are not huge, then you cannot change it at all, but simply solder it carefully and for a short time, but if you want to install the radiator and, as they say, forget about it, then it is better to buy a new one, as is usually the case, it is not hermetically sealed, it lasts for a long time, and if a pebble gets into this place, the soldering immediately flies away (this depends on how well the radiator is soldered)!
How to remove the heater radiator on a Priora without air conditioning
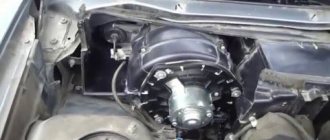
Since the beginning of production, AVTOVAZ has installed a heater from the “ten” on the Priora (catalog number: 21110-8101012). The disadvantage of this design was that the heater radiator is removed towards the vacuum brake booster, which allows this to be done. As a result, the heater assembly has to be dismantled.
- Remove the wipers.
- Remove the frill (wind flap).
- Remove the soundproofing of the engine shield.
- Disconnect a bunch of connectors with wires.
- Unscrew the heater mountings.
- Divide the heater into two parts (left and right).
- Remove the right side of the heater (in the direction of travel).
- Move the left side to the side to gain access to the heater radiator.
- Drain the antifreeze.
- Replace the heater radiator.
The whole procedure took several hours. This is shown in more detail in the video:
There is another way to replace it. To gain access to the heater radiator, instead of the heater housing, it is necessary to remove the vacuum brake booster along with the brake pedal. This allows access to the left side of the heater (in the direction of travel) and to the radiator itself.
Replacing the radiator of a heating device in a Lada Priora car
Almost every motorist who owns a domestic vehicle discovers a malfunction of the car’s heating unit in the winter. After all, only with the onset of severe cold does a person begin to think about how to avoid freezing while driving a car. Naturally, everyone uses a stove for this.
However, what should those for whom this very device has ceased to function properly do? After all, only the heater can ensure that the cabin maintains a normal temperature, allowing for comfortable movement.
In this article we will look at only one reason why the heating device stops working, we will learn about the principles of repairing and replacing the heater radiator installed in a Lada Priora car.
If the motorist is sure that it is necessary to replace the heater core, it may take a lot of time to eliminate the faulty object, since most likely, in the process it will be necessary to replace not just a blown fuse, but to carry out more serious repair work. True, you should not immediately despair because of your ignorance; the material contains detailed instructions to help everyone understand how to replace the stove radiator in a Priora with and without air conditioning.
Replacing the radiator of a heating unit in a Priora that is not equipped with air conditioning
Replacing the heater radiator on a Priora without air conditioning may make sense if warm air has stopped flowing into the cabin, while the heater itself is working. If, in addition to the above problem, there is also a water leak from under the Priora stove, the motorist will have to remove the poorly functioning unit in order to solder the latter. Sometimes repairs are impractical and you have to replace the old device with a new one.
So, first of all, you need to start by removing the negative terminal from the battery. The fact is that the issue here is not only about the safety of the master himself, but also about additional insurance, which allows him to avoid several unpleasant surprises that, if handled carelessly, can arise not only with wiring, but also with electrical equipment.
If you are replacing the heater radiator on a Priora without air conditioning, after de-energizing the system, you can begin to dismantle the windshield trim. At the same time, the wiper levers, which can cause future discomfort during operation, should also be removed.
After this, you should rid the unit of all plastic tubes through which the liquid located in the windshield washer reservoir goes directly to the nozzles. Only after all the above steps have been completed will it be possible to remove the decorative trim located along the edges of the windshield.
In fact, it’s easy to carry out such a manipulation - just get rid of seven self-tapping screws.
Replacing the heater radiator on a Priora can only be done after removing the hood seal. Before dismantling, it should be noted that in the middle of the lining there is a screw that tightens both halves of the structure. Using a screwdriver or any knife, you can gently lift the plugs (this element serves as the “cover” of the screw) and unscrew them.
After this, you can begin to remove the sound insulation, which is located in the power unit compartment. To do everything correctly, you will have to unscrew the screws and remove the pads (there is no clear rule about which of them to remove first: left or right). Then you should get rid of the pipes that go directly to the radiator. A person who wants to understand how to get to the heater radiator on a Priora must loosen the clamps holding the structure itself.
After this, you can remove all the wires going directly to the stove from the connectors. You can remove them using two keys, in particular, one “10” and the other “8”. After unscrewing all four nuts, move the wiring harness to the side, which is held by the holder.
The “13” key will help to dismantle the bracket located on the brake pedal. Only after this can you begin to remove the heater radiator on a Priora that does not have air conditioning. A regular Phillips screwdriver will help you dismantle the device, allowing you to remove 3 screws.
All the rest of the work consists of installing a new unit and reassembling the system in the reverse order of the described actions.
In fact, there is another way to replace the system element of interest. To open free access to this element, dismantling not the stove body, but the vacuum brake booster will help. It is worth noting that this procedure will only be successful if the brake pedal is removed along with it. Such actions help to get closer directly to the left side of the stove and the desired device.
Difficulty of choice
If it has become noticeably cold inside the car, it is worth checking the car's heating system. Most likely, the problem will be detected in the heater radiator and you will soon have to buy a new one.
The Internet is full of advertisements for the sale of heater radiators for Lada Priora, but how to choose a quality product and not “run into” a fake?
The first thing that should indicate the originality of a part is its price. High-quality spare parts cannot be cheap; manufacturers of original radiators will not allow this.
Second. The original radiator of the car heating system has small cells, i.e. the distance between the vertical slats is minimal, only factory equipment can provide this. Factory equipment “works” only with high-quality metal; the honeycombs should not be too soft.
Manufacturers of counterfeit products save on small things; they do not install “liquid swirlers” in counterfeit radiators, plastic parts that increase the heat transfer of the coolant in the radiator of the heating system. To check their presence, you should shake the part; a specific sound will indicate their presence or absence. If they are made of soft material, this method is useless.
Once the radiator has been selected, it is time to change it. Replacing an old one or installing a new radiator in a Priora requires certain actions.
Removing the Lada Priora radiator
We remove the radiator to check it for leaks (if a leak is suspected) or replace it if damaged.
Remove the radiator fan (see “Removing the radiator fan”).
We disconnect the bracket for fastening the sound signal from the security alarm of the upper cross member of the radiator frame (see “Removing the sound signal of the security alarm”) and remove the sound signal from the radiator.
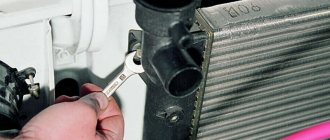
Using the “8” socket, we loosen the clamp securing the radiator supply hose...
...and remove the supply hose from the radiator pipe.
Using an “8” socket with an extension, we loosen the clamp securing the radiator outlet hose.
Remove the outlet hose from the radiator pipe.
Using a 10mm socket, unscrew the two nuts securing the radiator to the upper cross member of the radiator frame.
Radiator attachment points to the top cross member of the radiator frame (shown with engine removed for clarity).
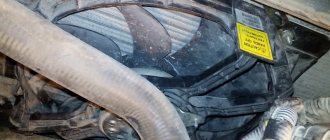
Tilt the radiator towards the engine...
... use a screwdriver to loosen the ribbon clamp securing the steam exhaust hose... Remove the steam exhaust hose from the radiator pipe.
We take out the radiator, removing the pins of its lower mounting from the rubber pads. If it is necessary to replace the rubber bushings of the upper radiator mounting...
...remove the metal spacer sleeve...
...and a rubber bushing from the radiator bracket. Install the radiator in reverse order.
If the rubber cushions came out with the radiator, then when installing it, first insert the cushions into the holes in the lower cross member of the radiator frame. Cushions that are torn or have lost their elasticity should be replaced with new ones. We replace the ribbon clamp of the steam exhaust hose with a worm clamp.
Pour coolant into the cooling system and bring the fluid level in the tank to normal (see.
"Replacing the coolant").
Removing, replacing, installing a cooling system radiator
Symptoms: the engine is poorly cooled, traces of coolant on the radiator of the cooling system, coolant decreases from the system too quickly.
Possible cause: the radiator of the cooling system is damaged.
Tools: socket set, wrench set, Phillips screwdriver, compressor.
Note. If defects are detected, the radiator should be replaced, since its repair is possible only in a specialized workshop.
1. Drain the coolant from the system.
2. Disconnect the negative cable from the battery.
4. Disconnect the wiring harness plug from the electric fan.
5. Unscrew and remove the two bolts securing the fan shroud on the left, and then unscrew the two nuts securing the fan shroud on the top.
6. Unscrew the lower fastening nut of the fan casing.
7. Remove the electric fan assembly with its casing.
9. Unscrew and remove the three lower screws securing the front bumper to the left and right front fender guards.
The radiator is leaking: what to do, how to find the leak and how to fix it
The cooling radiator is the main element of the engine cooling system. The operation of a cooling radiator is the active transfer of heat into the atmosphere from the heated coolant. This process is important for efficient engine operation, because The coolant, before giving off heat in the radiator, takes this heat from the heated components and parts of the engine. This was originally intended by the designers, but life makes its own adjustments to the operation of the car on the road.
A situation when the arrow on the dashboard begins to treacherously creep up, and, unfortunately, this arrow is not an indicator of the fuel level, but an indicator of the coolant temperature, modestly indicating that the car is starting to overheat. Steam is pouring out from under the hood, and a liquid stain of coolant is slowly but surely spreading on the asphalt. The radiator is leaking, what should I do?
Causes of radiator leaks in the car cooling system
Before you do anything, you need to figure out what led to this result. This may be external damage as a result of stones, or the plastic elements of the radiator may crack as a result of an impact in a minor accident. Such minor damage, as a rule, cannot be immediately identified, and problems arise from them over time. In the meantime, the driver continues to operate the car, gradually, drop by drop, losing coolant from the system.
What is the danger of antifreeze leaking from a car cooling system?
As the coolant level drops, the risk of engine overheating increases, which in turn can lead to the following problems:
Deformation of the plane of the cylinder block or cylinder head
Cylinder head gasket deformation
· Changes in the configuration of the cooling system and associated failure of system components
All of the above cases will lead to expensive repairs.
What to do if the cooling radiator is leaking
The first rule in this case is to monitor the coolant level. In fact, periodically checking the vehicle's technical fluids before a trip is a good rule; this will help to promptly notice an emerging problem and eliminate it. Even if the cooling radiator leak is small, do not underestimate the scale of the current situation. Over time, radiator leakage will increase, and this point can be overlooked. The driver will not like the result.
Therefore, if such a situation occurs, it is necessary to have a supply of coolant or distilled water. Yes, if the loss of coolant is small, then for the first time you can use distilled water, but you need to take into account that the more distilled water gets into the system, the more we increase the freezing point of the coolant. Therefore, if it’s winter outside, you shouldn’t get carried away with distilled water, but add coolant.
What to do in case of major damage and leakage of the cooling system
If there is serious damage to the engine cooling system, repairs are inevitable; operating the vehicle in this case is extremely undesirable. And in order not to end up with engine repairs, you should move the car to a technical center using a tow truck, or, in extreme cases, on a cable.
How to seal plastic parts of a cooling system with a leak
If the design of the radiator allows, then you can use a heat-resistant sealant-adhesive, better known as cold welding. In some cases, you will need to remove the radiator from the car.
Cold welding is a special two-component sealant that may contain metal shavings. Such sealants allow you to quickly restore plastic or metal parts.
The gluing process itself is not complicated:
· Before applying the sealant, the surface must be prepared, cleaned and degreased.
Removing the Lada Priora radiator
We remove the radiator to check it for leaks (if a leak is suspected) or replace it if damaged.
Remove the radiator fan (see “Removing the radiator fan”).
We disconnect the bracket for fastening the sound signal from the security alarm of the upper cross member of the radiator frame (see “Removing the sound signal of the security alarm”) and remove the sound signal from the radiator.
Using the “8” socket, we loosen the clamp securing the radiator supply hose...
...and remove the supply hose from the radiator pipe.
Using an “8” socket with an extension, we loosen the clamp securing the radiator outlet hose.
Remove the outlet hose from the radiator pipe.
Using a 10mm socket, unscrew the two nuts securing the radiator to the upper cross member of the radiator frame.
Radiator attachment points to the top cross member of the radiator frame (shown with engine removed for clarity).
Tilt the radiator towards the engine...
... use a screwdriver to loosen the ribbon clamp securing the steam exhaust hose... Remove the steam exhaust hose from the radiator pipe.
We take out the radiator, removing the pins of its lower mounting from the rubber pads. If it is necessary to replace the rubber bushings of the upper radiator mounting...
...remove the metal spacer sleeve...
...and a rubber bushing from the radiator bracket. Install the radiator in reverse order.
If the rubber cushions came out with the radiator, then when installing it, first insert the cushions into the holes in the lower cross member of the radiator frame. Cushions that are torn or have lost their elasticity should be replaced with new ones. We replace the ribbon clamp of the steam exhaust hose with a worm clamp.
Pour coolant into the cooling system and bring the fluid level in the tank to normal (see.
"Replacing the coolant").
Video on the topic “Lada Priora. Removing the radiator"
Replacing the PRIOR radiator replacing the PRIOR radiator HOW TO REMOVE ENGINE COOLING RADIATOR ON PRIOR LUX HALLA
The radiator must be replaced if a coolant leak is detected from it. In a workshop that has special equipment, the VAZ 2170 radiator can be checked and repaired. You will need: a 10" wrench (a socket head is more convenient), a screwdriver with a Phillips blade, and pliers with long thin jaws.
1. Drain the coolant (see “Replacing the coolant”). 2. Remove the electric radiator fan for the Lada Priora (see “Removing and installing the electric radiator fan with casing”). 3. Remove the horn (see “Removing, installing and adjusting the horn”).
4. Loosen the clamp securing the supply hose to the radiator.
5. . and remove the hose from the radiator pipe of the VAZ 2172.
6. Similarly, disconnect the outlet hose from the radiator.
7. Unscrew the two nuts securing the radiator to the body of the VAZ 2171.
8. Remove the steam hose holder from the hole in the upper cross member of the engine compartment.
9. Tilt the radiator towards the engine. Loosen the strap clamp of the steam exhaust hose...
10. . and remove the hose from the VAZ 2170 radiator fitting.
Helpful advice Tape clamps for fastening hoses are inconvenient to use and are difficult to re-ensure the tightness of the connection. When disconnecting the hoses for the first time, we recommend replacing the band clamps with commercially available worm-type clamps.
12. Remove the two lower mounting cushions from the radiator if they remain on the radiator mounting pins or remove them from the holes in the cross member if they remain on the body of the VAZ 2171. Replace the torn or lost elastic cushions.
13. Remove the rubber-metal bushings from the radiator brackets. Replace torn or loose rubber bushings. 14. Rinse the outside of the radiator with a stream of water and dry. If there are cracks in the plastic radiator tanks, replace the Lada Priora radiator. 15. Check the tightness of the Lada Priora radiator by plugging its pipes and lowering it into a container of water, supplying air to it at a pressure of 0.1 MPa (1 kgf/cm2). No air bubbles should appear from the radiator for at least 30 seconds. If the radiator does not fit completely into the container, check it sequentially from all sides. 16. Install the priora radiator in the reverse order of removal, first placing the lower mounting pads on the radiator pins and inserting the upper mounting bushings into the brackets.
Helpful advice To eliminate the possibility of coolant leakage in the future, before connecting hoses to the VAZ 2172 radiator, lubricate the radiator pipes with a thin layer of sealant.
17. Install the electric fan and all removed parts in the reverse order of removal. 18. Fill in coolant (see “Replacing Prior coolant”).
Radiator malfunctions and their consequences
A broken device poses a great danger to the entire cooling system, since its instability can lead to overheating of the power plant. The Lada Priora uses a standard combined cooling system, when the liquid system is supplemented by an air system. Thanks to this combination, it is possible to more effectively maintain the optimal engine temperature under various loads and operating modes.
There are not many malfunctions of this element as such. The main problem with the radiator is the occurrence of coolant leakage. This happens due to a violation of the integrity of the tubes caused by damage to the radiator. Another common problem is clogging of its inner surface. This can be determined due to the constant operation of the forced cooling fan.
The temperature drops, but rises quickly and causes the ventilation unit to turn on again, even when driving at high speed. This is due to the fact that the oncoming air flow cannot cool the coolant due to dirty plates. Contaminants can also be deposited on the inner walls of the radiator tubes, which will impede the circulation of antifreeze. And, as a result, the engine will begin to heat up excessively.
When the device is broken, the power unit overheats.
Causes of malfunctions
The main factors causing problems with the radiator are the following:
- wear of elements of a natural nature (any part sooner or later wears out and fails);
- mechanical impacts leading to damage and deformation;
- operating the engine in violation of the manufacturer's requirements and recommendations.
Breakdown can be caused, among other things, by the use of low-quality coolant, mixing antifreeze with other types of antifreeze, and the use of all kinds of sealants that can clog the pipes and affect the circulation of the coolant (coolant). At the same time, the human factor cannot be ignored when, due to incompetence in matters of radiator maintenance and repair, a part has to be replaced.
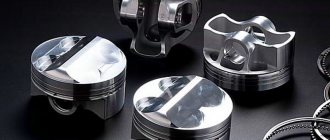
Often, simple dirt and poplar fluff that clog the plates can cause the engine to heat up. Due to systematic overheating, the fuel in the cylinders begins to detonate due to the increased temperature of the coolant. As a result, the cylinder head burns out, the block itself becomes deformed from high temperatures, and cracks appear. And ultimately, the destruction of the piston group and crank mechanism completes the picture. It's not far from a major, expensive engine overhaul.
You need to carefully monitor the condition of the cooling system and the radiator in particular.
Signs of trouble
Even a beginner can determine that there are some problems with the radiator. This does not require special knowledge. It is enough to understand in general terms the principle of operation of the cooling system of the Lada Priora.
Troubleshooting
| Symptoms | What are they related to? |
| On the instrument panel, the arrow of the coolant temperature indicator constantly approaches the red zone. | This provokes the inclusion of forced cooling and indicates engine overheating. |
| Constant overheating can also be determined by the deposit on the spark plugs. | During normal engine operation, the coating is sand-colored; when overheated, it is white. |
| It is necessary to carefully monitor the level of coolant in the expansion tank. | A sharp or gradual decrease in level will indicate the presence of a leak, which may be associated with a leak in the radiator. |
Low coolant levels will also lead to rapid overheating. It is easy to find a leak by characteristic smudges on the surface, as well as by the presence of antifreeze or antifreeze where the car is parked.
If the air conditioner does not turn on
Sometimes the air conditioner categorically refuses to turn on after installation. Here's why this might happen:
- problems with electrical wiring. It is necessary to carefully inspect the wires for damaged insulation and short circuits. You should also check the latches on all terminal blocks. Some of them, being new, do not always fit tightly into place, which leads to an open circuit;
- error when assembling the electrical circuit. This is another common option. Each air conditioner model has its own basic assembly diagram. It is difficult to make a mistake when assembling it, since all the important wires have insulation of different colors. However, an error cannot be ruled out. The solution is obvious: check the instructions again and find the error;
- The fuse has blown. Usually the same F9 that was mentioned above is lit. This can happen due to a short circuit in the electrical wiring, or due to an incorrectly assembled circuit. If the air conditioner does not turn on, you need to remove the fuse and inspect it. If it fails, the thread in it will be broken, and its body will be slightly melted. This fuse must be replaced. Then you should carefully check the wiring. And only after that you can try to start the air conditioner again.
Fan doesn't work
But sometimes another problem occurs with the Priora stove. The driver turns the heater switch, and in response there is silence. The electric motor is not working. What is the reason. There may be several of them:
- The fan motor burned out.
- The heater control unit has failed.
- The fan speed resistor has burned out.
- Broken electrical wiring.
The easiest way to determine if a resistor is broken. In this case, only the maximum speed is turned on, and the stove does not respond to other positions of the handle.
Symptoms of a problem
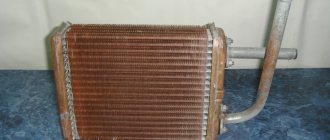
The Lada 2170 model received a liquid heater, which is connected to the engine cooling system. The radiator is a heat exchange device; due to this component, the air entering the Priora’s cabin is heated. Coolant constantly circulates through the radiator; this part of the heater is subject to wear.
It is worth checking the radiator in the following cases:
- The stove stopped heating properly.
- The coolant level drops.
Once you disassemble part of the heater system, you will see a rusty and most likely leaking radiator. There may also be leaks in hoses, pipes and the junctions of these elements. You should check the heat exchanger of the stove only after you have made sure that there are no defects in the operation of the gearmotor and damper.
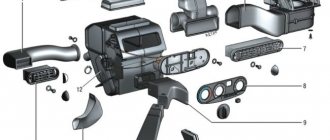
Priora stove diagram
What is included in the heating system
The heater is located in the engine compartment in the area of the right windshield trim. It is attached to the front panel. The entrance to the heating system is occupied by a filter, which is responsible for cleaning the air used for heating and ventilation.
The design of the Priora stove consists of a number of elements:
- filter cover;
- filter, which is used for heating and ventilation;
- heater housing;
- micromotor gearbox;
- radiator;
- additional resistor on the fan;
- fan.
Principle of operation
In addition, the Priora heater device includes important components, without which normal operation of the stove would be impossible. These include the following mechanisms:
- The operation of the control unit is based on turning the knobs, each of which is responsible for one or another system parameter.
- The cabin temperature sensor allows you to maintain the required temperature at a constant level. This mechanism is located in the headliner trim.
- The additional resistor is located in the fan housing along with the fan, radiator, filter and damper.
- The radiator is connected through hoses to the system that cools the engine. During vehicle operation, coolant circulates from the engine to the radiator all the time. The heater is controlled by a damper, which changes the direction of outside air, directing it towards or past the radiator. The damper can be located in an intermediate position, which provides for the division of the external air flow: one part is directed to the radiator, and the other passes past it.
- The micromotor is responsible for controlling the movement of the damper. It is located on the left side of the body. The micromotor gearbox has an output shaft, which is connected to the axis on the damper.
This is exactly the design of the Priora stove (2010). But we have not yet considered all working issues.
Air flow distribution
As mentioned earlier, the heated air is distributed throughout the entire cabin, rather than blowing at one point. This heating turns out to be more efficient. Such heating features are provided for by the design of the Priora heater. The following elements are responsible for performing these functions:
- air ducts from the side deflector and glass blower;
- air distribution housing;
- flap;
- damper gear motor;
- air duct for blowing feet.
The air distribution housing and air ducts are mounted behind the instrument panel. Inside the air distributor housing there are dampers that are responsible for changing the direction of air flow. The rotation of the dampers is the result of a gearmotor, which is located on the air distribution housing.
When the car is moving, air enters the cabin under high-speed pressure. For this, holes are used that are located in the wind window trim on the right. To make the air flow more powerful and independent of the speed of the car, a heater fan is provided. The electronic fan motor can operate at four speeds.
Interior ventilation
The car interior should not be sealed; ventilation is an important point in maintaining a comfortable climate. The air comes out due to valves that are located on the trunk panel; they can be found behind the bumper. Opposite the valves, in the trunk lining, there are holes through which air escapes. Every Priora owner should know about such moments so that these holes remain open while loading the trunk. The diagram of a Priora heater without air conditioning, which is attached below, may also be useful.
Standard generator on Priora - article number and price, where it is
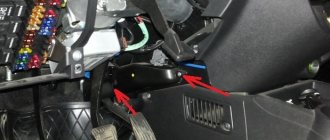
The installation location may vary for different car brands and models. You should look for it in the engine compartment, near the rubber cushion on which the engine is mounted. 90A article 3282.3771, is a source of energy in the electronic equipment system of 2170-72 Priora cars.
Generator for Priora produced by BATE price from 4120 rubles
- Rectified current 90 A
- Power 0.98 kW
- Voltage 14 V 100 A
It has article number 5132.3771 and is a source of energy in the electronic equipment system of 2170-72 Priora cars.
Replacing a Priora Cooling Radiator with Panasonic Air Conditioning
Lada Priora radiator cooling system is being changed
When to change
On a Lio Priora, the radiator must be replaced if an antifreeze leak is detected. The general symptoms of this are: lack of engine cooling, coolant is rapidly decreasing, no traces of antifreeze are observed.
Please note that if you find a breakdown, then during self-repair you will need to replace the radiator, since repairs can only be carried out in specialized workshops with special equipment.
It is also not recommended to use sealants or similar products to seal leaks on Prior. When used, the cooling elements become clogged and future repairs will be more expensive.
Tool you need:
Step-by-step guide for replacing the engine radiator on a VAZ 2170 Priora:
Priority (with Panasonic content) radiator replacement without frying
Replacing the cooling radiator
frets in
Panasonic
conde (Not to be confused because Khala condominium remains different for our client.) Changed.
Change the cooling radiator PRIOR 2171 16v xs PANASONIC
Change radiator cooling priority
2171 16v xs PANASONIC
After
replacing the cooling radiator
(Lusar).
. then disconnect the expansion hose fastener from the front panel.
Note. To repair the radiator yourself, rinse it thoroughly and check for cracks in the plastic elements. If they do, it won't work. If not, connect the pipes and lower them into the water. Blow air to find the leak.
Also, of course, before attaching the hoses, apply a thin layer of sealant to prevent further leakage.
Features of replacing the radiator on a Lada Priore with air conditioning.
They installed 3 types of radiators on Priora: prefabricated alloy, for cars without climate control (software) and 5 types soldered for Hala and Panasonic air conditioners.
The heat losses of soldering radiators on a Lada Priora with air conditioning are 1.5 times greater. First, the condenser is cooled, which is placed in front of the radiator to cool the engine. Therefore, installing the wrong type of product will of course perform additional tasks to overheat the engine. It is also worth noting that the lack of cooling may be due to poor pump performance.
Conversion of VAZ 2110 into Priora
Replacing knock sensor Priora 16 valves
Salon:
- Priorovsky salon in a VAZ 2110 - installation of wiring, panels (dashboard), door trim, ceiling trim, airbags, tunnel (beard), interior lighting, plastic elements of door pillars, seats.
- Review of armrests - among other options, there is also the installation of an armrest from Priora.
- Priora steering column switches on the VAZ 2110 - installation of Priora/Kalina/Niva-Chevrolet steering column switches.
- Pockets in the door trim of the VAZ 2110 - among other options, there is the installation of Priora door pockets.
- Heater unit knobs - installation of heater unit adjustment knobs from Priora without air conditioning.
- Gear shift drive n/o - installation of a new model of the backstage from Priora.
- Instrument panel with navigation from Priora on VAZ 2110 and Kalina 1
- The steering wheel is from a new Priora model in the top ten without any modifications.
Body, external parts:
- Bumper from Priora for VAZ 2110 - modification of the bumper or crossing.
- Semi-Priora, semi-VAZ 2110 - interchangeability of body parts of Priora and "Tens".
- Priora windshield for VAZ 2110 - installation of a frill.
- Priorovsky rear-view mirrors on the VAZ 2110 - installation of mirrors.
- Euro handles for the VAZ 2110 - among other options, there is the installation of Priora door handles.
- Door sills from Priora - installation of Priora decorative door sills on a VAZ 2110.
- Windshield wiper trapezoid - installation of a wiper trapezoid from Priora on a VAZ 2110.
Engine compartment:
- Priorovsky expansion tank for VAZ 2110 - installation of the tank.
- VUT and GTZ Priora on VAZ 2110 - installation of a vacuum brake booster and master brake cylinder.
- Priorovsky adsorber on VAZ 2110 - installation of an adsorber.
- Priora front suspension on the VAZ 2110 - installation of shock absorbers, struts and suspension springs.
- Air conditioning on a VAZ 2110 - installation of an air conditioner or some of its elements.
- The best engine cooling radiator for a VAZ 2110-12 - which Priora cooling radiator is suitable for the “Ten”.
- Replacing the alternator belt, if there is power steering - installing the Priora alternator belt.
- Engine from Priora - installation of engine 21126 on a VAZ 2110
- Expansion tank - installation of a coolant reservoir from Priora.
- Crankcase protection - installation of protection for the internal combustion engine and gearbox from Priora.
Noise, vibrations, seals:
- Door window seals and Priora velvet guards on the VAZ 2110 - installation of velvet guards and edging for the side windows of the Priora on the “Ten”.
- Priorovsky gutters on VAZ 2110 - installation of Priora windshield gutters.
- Additional door seals for VAZ 2110 - among other options, there is the installation of Priora door seals.
Electrical:
- ESD on VAZ 2110 - installation of Priora electric power steering.
- Electric drive of the heater damper on the VAZ 2110 - installation of a stepper electric drive of the dampers and the SAUO Priora unit.
Miscellaneous:
- Rear beam of Priora on VAZ 2110 - installation of a beam from Priora.
- Anti-roll bar suspension - installation of a Priora stabilizer.
- Modification of the gas tank cap of the VAZ 2110 - installation of the Priora gas tank cap.
xn--2111-43da1a8c.xn--p1ai