Do-it-yourself suspension spring replacement
Due to compression and stretching, the spring dampens unevenness, potholes on the road, as well as vibrations of the car body. Since the springs take the heaviest impacts, they often burst, although this is very difficult to detect until it is removed. Experienced drivers can guess the problem by bumps in potholes, car pulls, or noise in the chassis. Replacing a suspension spring with your own hands is not difficult if you follow the preliminary steps. With the appropriate equipment, it is accessible even to beginners.
Let's consider the stages of removing and replacing the front and rear suspension springs of a car. The procedure is similar for almost any car brand.
Replacing the front suspension spring
The chassis, like all components and assemblies in a car, needs maintenance and repair: over time, shock absorbers, ball joints, springs, levers, bearings and hubs fail. Replacing the front suspension springs is a job that requires care and precision and is not particularly difficult, but here you must follow the rules for disassembly and reassembly in a certain order and use a special tool.
In this article we will look at how the front springs (FS) are changed on Ford Focus and Renault Logan cars, and what conditions must be observed. And when replacing these parts, do not forget about precautions; neglect of safety precautions can result in injury or even injury.
Drawings of universal threaded ties
Let's return to the question of how to make a device for tightening shock absorber springs yourself. Below is the appearance of the finished devices:
Factory-made threaded ties
On one side of the rod there is a left-hand thread, on the other - a right-hand thread. The standard thread pitch is M18. But buying threaded rods is not enough here. And to cut the thread yourself, you will need special equipment.
Drawings of the components that make up the entire structure are shown here:
Threaded tie (3 parts)
To make parts, you need a lathe, drilling and, probably, milling machine. It may be easier to contact a workshop. Print the drawing by downloading it from the website.
Most likely, there are no other drawings of universal ties on the Internet. And what is shown above is taken from a book on repairing domestic cars. You can use it.
Let's say the ties were made according to the drawings and all the parts fit together. But even then the advice about using lubricant remains valid. You need to take solid oil or cyatim and apply this material to the threads of the nuts.
Packaging cyatim-201, 20 gr.
Cyatim-201 lubricant is a rather expensive material. You can reduce consumption by mixing it with machine oil in a 50/50 ratio. Good luck.
How to replace a spring on a car
Many modern cars are equipped with a McPherson type front suspension, consisting of parts:
- shock absorbers (struts);
- hubs and bearings;
- steering knuckles;
- support bearings;
- levers;
- ball joints;
- front beam;
- springs;
- transverse stabilizer;
- stabilizer struts.
The spring is placed between the upper and lower cup (support) of the shock absorber and is held in place by a tightening nut screwed onto the shock absorber rod.
To remove the PP, it is necessary to dismantle the rack and disassemble it. The suspension on a passenger car can also be multi-link, with a slightly different design, but the principle of disassembling shock absorber struts is the same.
The design of the chassis on the front axle is somewhat different in cars such as the VAZ classic, but independent suspension is also installed here. On rear-wheel drive VAZ cars, the shock absorber is also located in the center of the spring, the PP is pulled together between the upper and lower control arms. Replacing a spring on an old Zhiguli is not very difficult, but the procedure is slightly different.
Screed process
The process of tightening springs is exactly the measure that drivers face. That category of enthusiasts and craftsmen who prefer to make shock absorber spring ties with their own hands from scrap materials rather than take their car to a service center knows what the tying process involves. For beginners, we will describe the algorithm of actions for familiarization.
It must be remembered that designs can be of different configurations: the factory version differs from a self-designed product. But in one case or another, you cannot do without a device. The work process will turn into a long nightmare with unpredictable consequences. However, enough of the horror stories. Let's take a look at the algorithm of actions.
- After placing the car on a lift, inspection hole, or placing the car on an overpass, you need to put the handbrake on and put shoes under the wheels.
- Remove the strut with shock absorber.
- Fix the puller on the upper and lower coils of the spring. Next, the compression process is performed by hand. It all depends on the design. This could be a frog or hooks.
Causes and signs of failure of the front suspension springs
All car parts fail sooner or later; they have a certain resource. The service life of the front springs, regardless of the car model, is quite long (at least 40,000 km), but parts may require premature replacement for various reasons:
- the machine is often overloaded;
- the vehicle is driven on uneven roads;
- the shock absorber lost its elasticity, the entire load fell on the PP;
- There was a factory defect.
The spring sags over time, loses the necessary elasticity, and quite often the coil breaks on the PP. It is quite simple to determine the malfunction by external signs:
- a car placed on a flat area “falls” on the side where the spring is broken or “folded”;
- the “front” of the car is too low in relation to the rear;
- the breakage of the coil is visible visually, you just need to carefully examine the defect;
- While driving, a click is heard in the area of the front shock absorber (if the coil is broken), and a knocking sound is also present if you try to rock the car up and down in the area of the shock absorber while the car is stationary.
If a defect is detected in the software, the part must be replaced; it cannot be restored.
Replacing the front spring of Renault Logan
Before repairing the front suspension, you need to prepare the necessary tools. To disassemble Logan chassis parts you will definitely need:
- a set of open-end and combination wrenches;
- hexagons and asterisks;
- socket heads and collars;
- set of ties (2 pcs.);
- hammer;
- 21mm spanner wrench with large bend.
On Renault Logan-1, we replace the front spring in the following sequence:
- set the car on a flat surface, put stops under the rear wheels;
- open the hood, use a 6-point hexagon to hold the shock absorber rod, and use a 21-point spanner to unscrew the top nut of the shock absorber strut;
- jack up the car, remove the front wheel on the side where the shock absorber is removed, and place a “goat” under the bottom for insurance;
- unscrew the bolts and nuts securing the shock absorber to the steering axle (18mm wrenches); if the lower bolt rests against the brake cylinder, you will have to loosen the lower caliper fastener and remove the upper one to move the caliper away from the shock absorber;
- remove the bolts, move the steering knuckle towards you (away from the car), dismantle the shock absorber strut assembly with the spring;
- if the spring is broken or sagged, there is no need to tighten it, so simply unscrew the second upper nut on the shock absorber rod;
- We put a new part in place of the broken one, if the PP is of normal size in height, we fasten the ties to the spring coils, gradually tighten the coils, pressing them alternately on one side and the other;
- you don’t need to tighten it much, it is important that the nut on the shock absorber rod can be tightened, then tighten it until it stops;
- We install the rack in place and perform the assembly.
When installing the spring, it is important to get the coils into the grooves of the lower and upper cups, in this case the PP will tighten without problems. On Logan, it is often possible to do without zip ties, compress the spring with your hands and tighten the nut. In the absence of any complications, the work can be completed in two hours if you have metalworking skills; on a lift, replacement can be done even faster.
Shock absorber operating principle
During smooth compression of the shock absorber, the liquid located under the piston experiences compression, but due to practical incompressibility, it is forced to flow from cavity B of the working cylinder into a cavity of lower pressure. The fluid moves in two directions. Most of the liquid flows through the eight holes K, lifting the bypass valve plate, pressed by a weak spring sprocket, into the cavity L (the movement of the liquid is shown in figure a by thin arrows). The liquid displaced from cavity B does not completely flow into cavity A; part of it, equal to the volume of the rod inserted into the shock absorber, exits into cavity C through two grooves T in the compression valve body.
When the rod is pressed sharply, the fluid pressure under the piston in cavity B increases, as a result of which the compression valve opens and compresses the spring (fluid movement is shown by bold arrows). The liquid flows into the upper cavity A of the working cylinder in the same way as during a smooth compression stroke. During the compression stroke, the bypass valve has virtually no effect on the hydraulic resistance developed by the shock absorber. The required resistance required during sudden compression is provided by the compression valve.
During the reverse stroke, i.e. when the piston moves upward (recoil stroke), liquid from the upper cavity A of the working cylinder through holes P in the piston and four cutouts H of the throttle disk (the rear shock absorber throttle disk has six cutouts) flows into the lower cavity B of the working cylinder. The volume of liquid displaced from cavity A is less than the released volume of cavity B under the piston by the amount of the volume of the rod removed from the shock absorber. The freed volume is filled with liquid coming from cavity C through the holes P of the compression valve, which lifts the intake valve plate, pressed in the plane of the compression valve by the legs of a weak spring sprocket (the movement of the liquid is shown in Figure b by thin arrows).
During the recoil stroke, when the car body is thrown up on the elastic elements of the wheel suspensions, the pressure above the piston in cavity A of the working cylinder increases. The liquid through the holes P in the piston presses on the recoil valve discs and bends them. At the same time, the valve spring, which supports the discs, is compressed, and the flow area for liquid flow increases. The required hydraulic resistance to dampen vibrations during the recoil stroke is provided by the calibrated spring of the recoil valve. Cavity B during sharp recoil is filled in the same way as during smooth movement of the piston. The intake valve does not significantly affect the hydraulic resistance during shock absorber operation; it is designed for free admission of fluid into cavity B.
Replacing the front spring of a Ford Focus-2
To dismantle the PP on a Ford Focus-2 car, you will also need to remove the wheel and jack up the car. Sequence of remaining actions:
- to access the upper bolts of the rack, remove the plastic wiper panel, having first removed the rubber seal;
- remove the front caliper (attached with two 15mm bolts), carefully move it to the side using a hose, dismantle the brake disc (it does not have a mount, it is simply removed);
- disconnect the stabilizer strut from the shock absorber, unscrew the bolt securing the axle to the strut, separate the knuckle and shock absorber from each other;
- from above, unscrew the three bolts of the upper shock absorber support (ratchet with a 13-mm head);
- the bolts on the upper shock absorber cup are located asymmetrically, so during further installation it is necessary to align the holes on the metal plate and in the “glass” under the strut, install the upper cup in the same position in which it was before;
- We fasten the ties to the spring, holding the shock absorber rod with an asterisk hexagon, unscrew the top nut with an 18 mm spanner, tighten the coils, it is better to clamp the stand in a vice;
- We change the spring and reassemble.
If one of the PPs breaks, it is better to change the springs in pairs at once - the coils sag over time, and when replacing the PP on only one side, the front part of the body rises unevenly, the car can “fall” to one side.
Important points when replacing suspension springs
When repairing the front suspension, you need to take into account the specifics of replacing the front springs: if you do not follow some rules, complications may arise in the future, for example, you will have to re-do the work or make another purchase. Characteristic specifics of this repair:
- The front springs should be replaced in pairs and try to match them according to stiffness and height. Almost all parts are marked with a paint mark; it is necessary that the paint color of both springs matches;
- The service life of the spring largely depends on the performance of the bump stop and shock absorber, so the condition of these parts also needs to be monitored. If the bump stop is missing or is in poor condition, it will not be able to soften the impact, for example, if a wheel falls into a hole, the spring may break;
- When purchasing spare parts, you should not buy the cheapest parts; defects often come across here. It's better to spend a little more money, but you won't have to redo the work in the future. The most ideal option is to purchase original spare parts, or if you buy non-original ones, then from a well-known manufacturer with a good reputation;
- When removing and installing a spring, it is necessary to use ties; all traditional methods of tightening spring coils often lead to injury.
Drawings of universal threaded ties
Let's return to the question of how to make a device for tightening shock absorber springs yourself. Below is the appearance of the finished devices:
Factory-made threaded ties
On one side of the rod there is a left-hand thread, on the other - a right-hand thread. The standard thread pitch is M18. But buying threaded rods is not enough here. And to cut the thread yourself, you will need special equipment.
Drawings of the components that make up the entire structure are shown here:
Threaded tie (3 parts)
To make parts, you need a lathe, drilling and, probably, milling machine. It may be easier to contact a workshop. Print the drawing by downloading it from the website.
Most likely, there are no other drawings of universal ties on the Internet. And what is shown above is taken from a book on repairing domestic cars. You can use it.
Let's say the ties were made according to the drawings and all the parts fit together. But even then the advice about using lubricant remains valid. You need to take solid oil or cyatim and apply this material to the threads of the nuts.
Packaging cyatim-201, 20 gr.
Cyatim-201 lubricant is a rather expensive material. You can reduce consumption by mixing it with machine oil in a 50/50 ratio. Good luck.
can I wedge in? If the puller is in the form of separate 2-3 staples, then it’s not fun. The staples have a bad tendency to slide along the coils of the spring all in one direction, the spring bends in an arc, like a shot, and where it will fly after that and on what fingers it will hit the head is unknown. I squeezed the spring and placed it next to the car, I turned behind the car, at that moment it shot and jumped above the roof of the house, I pressed my head into my shoulders and waited for where it would fall: on my head or the roof of the car, it fell on the barn.
Car repair: changing the strut springs yourself
The strut springs of passenger cars act as an elastic element, with the help of which a minimal change in wheel camber is set during the operation of the suspension parts. This is necessary to ensure vehicle stability on the highway. The design, which involves the use of coil springs, was first put into practice in the 30s of the 20th century and has since been actively used on most cars.
Preface: Let's figure out how the shock absorber strut works.
During constant use of the vehicle, springs under high loads eventually fail.
Upon closer examination of the racks, a malfunction was discovered: the spring broke.
Most often, a coil breaks off in the upper parts of these parts. This negatively affects the stability of the car. In addition, the broken edges of the springs make extraneous sounds when moving, causing irritation to those in the cabin. The malfunction can only be eliminated by replacing the worn part.
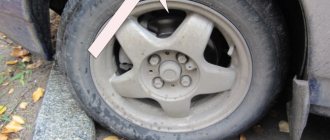
We lift the car and remove the wheel. We see the integrity of the spring and strut.
You can check the integrity of the strut springs in a simple way. Raise the car on a jack and inspect the area where the parts are located. To be more sure of the need for urgent repairs, you can try checking the condition of the springs by touch. True, not everyone can do this due to the inaccessibility of the place.
It is quite possible to replace the strut springs yourself.
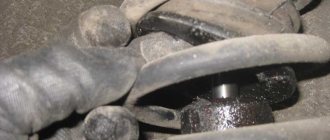
Using these clamps, we compress the coils to relieve tension.
To do this, you will need a set of appropriate tools. First of all, this is a special clamp, with the help of which the coils of the spring are captured and compressed. It is most convenient to do this in a large vice. The spring must be compressed to relieve its tension, without which it will not be possible to remove the cup holding it.
To remove the spring, you must dismantle the entire rack. With the removal of all elements adjacent to it.
Disassembling the rack begins with removing the wheel and removing all adjacent elements. After this, the locking nut on the grenade is unscrewed. After completing the action, nothing prevents you from removing the stand. Next, the spring is directly removed. As mentioned above, using a clamp, its lower and upper edges are fixed, after which the holding part of the bowl is removed and the spring is removed directly. Assembly is carried out in reverse order.
In what order should assembly work be performed after replacing the spring on the strut?
It is worth noting that replacing strut springs is always done in pairs:
It should be noted that springs can only be replaced in pairs.
It is impossible to change just one spring, because, firstly, the degree of elasticity of the remaining and the new one will be different, because the first one has already been working for some time and metal fatigue will inevitably be felt in it, and secondly, the springs may not match in height , which will affect the vehicle's handling.
When the time comes to assemble the front strut, it is necessary to replace the support bearing, regardless of its condition.
Simultaneously with replacing the springs, it is recommended to install new support bearings, regardless of the degree of wear of the old ones.
Since the procedure described above is considered a serious intervention in the chassis of the car, upon completion it is imperative to adjust the camber and toe of the wheels .
After intervention in the chassis, it is necessary to carry out wheel alignment and alignment.
By the way, it is precisely this circumstance that serves as a convincing argument in favor of carrying out repairs in a car service center, where all the necessary procedures will be done for you right away. Unfortunately, it is still impossible to adjust the wheel alignment angle without special equipment, but specialists will cope with the task in a couple of tens of minutes.
What is a puller
Shock absorber spring pullers are a special device that can be used to compress the springs of a shock absorbing element. After compressing the element, you can continue the dismantling activities that have begun. There are many options for the device in question. We may be interested in the simplest version of a removable device.
The object in question is two slats made of metal.
The entire length is threaded. There are hooks installed along the edges of the product, which, when turned, move towards each other. In other words, when you need to compress the spring element, you just need to turn the rack. At this moment, the hooks tighten the spring structure.
There is another option for tightening the shock absorber spring struts - a belt.
The design consists of 2 “frogs”, which are tucked into durable belts made of fabric. They are thrown onto the upper coil of springs. After this, you need to work with the “frogs”, alternately clicking on each of them.
The process of the movements performed involves gradual tensioning of the belts, tightening them into a spiral. After compression, the workflow continues.
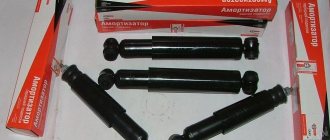
A device for tightening shock absorber springs is sold in automobile stores and on the Internet. Its cost is high, as is its quality.
Photo: Factory version with left and right threads, pitch M-18.
The elements do not fly off and do not hit the car owner in the forehead during disassembly. But some drivers “with hands and head” make pullers with their own hands.
Do-it-yourself suspension spring replacement
Do-it-yourself suspension spring replacement
Due to compression and stretching, the spring dampens unevenness, potholes on the road, as well as vibrations of the car body. Since the springs take the heaviest impacts, they often burst, although this is very difficult to detect until it is removed. Experienced drivers can guess the problem by bumps in potholes, car pulls, or noise in the chassis. Replacing a suspension spring with your own hands is not difficult if you follow the preliminary steps. With the appropriate equipment, it is accessible even to beginners.
Let's consider the stages of removing and replacing the front and rear suspension springs of a car. The procedure is similar for almost any car brand.
Replacing the front spring
The springs are replaced in pairs, as are the brake discs. This is due to the fact that they must be equal in height so as not to cause distortions in the front of the car.
Tools
• key head 21;
• hex key, 7;
Ties are the main element of the spring replacement procedure
We assume that the front shock absorber and spring assembly has already been pulled out of its socket. Removing the shock absorber is a painstaking procedure that involves dismantling the front plastic panel, wheel, and headlight.
Before starting replacement, the shock absorber assembly should look like this:
What are we doing
1. Place ties on both sides of the spring and secure them.
2. Tighten the ties, the spring compresses. There is no need to rush, we do everything carefully and alternately.
3. Unscrew the nut securing the shock absorber support using a 21mm wrench and a hexagon.
4. Remove the support.
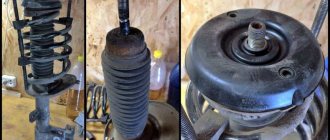
5. When disassembled, the upper mount consists of four components: the nut, the lower shock absorber mount, the bearing and the spring support cup.
6. These elements are replaceable, they can be damaged, just like the spring. For example, the support cup may rust over time.
7. Easily remove the old spring with boot from the shock absorber rod. We don't touch the ties.
8. Lubricate the supporting hemisphere of the body with silicone or other thick lubricant in order to eliminate squeaking when driving.
Shock absorber device
The shock absorber consists of a steel reservoir 4 (29) connected by welding to the lower mounting eye 1; Inside the tank, a working cylinder 13 (30), made of a steel pipe, is freely placed. From below, a compression valve is pressed into the working cylinder (all the way to the end), which consists of a housing 2, a valve 39 inserted into it with a spring 40 and a valve seat 3. The valve seat is screwed into the body; its position is selected in advance according to the given hydraulic characteristic of the compression valve, and then is controlled by a limit nut 38, which, in turn, has a collar that serves as a stop for the spring sprocket 6, which presses the intake valve plate 5 towards the plane of the compression valve.
Rod 14 (23) is made of carbon steel. The working surface of the rod 14 of the front shock absorber is coated with a layer of chrome and polished. Rod 23 of the rear shock absorber is polished without coating with a layer of chrome. At the upper end of the rod 14 of the front shock absorber there is a groove cut for the locking ring 20, which secures the thrust ring 21.
The upper end of the rod 23 of the rear shock absorber is welded by contact welding to the upper mounting eye 22, and a casing 28 is welded to the flange of the eye, protecting the rod and seals from direct contact with dirt and moisture. At the lower end of the rod, a nut 37 secures the piston 32 with the parts of the recoil valve and bypass valve.
The recoil valve includes a throttle disk 10 (33), covering eight piston holes located along the circumference closer to its axis, a disk 9, a set of thin adjusting washers 35, a plate 31, a calibrated spring 8 (36), a nut 37, screwed in until it stops, and set of adjusting washers 7.
The bypass valve consists of a restrictive plate 12 with a washer, a spring sprocket 11 and a plate 31 that closes the bypass holes of the piston, located along the circumference further from its axis.
The working cylinder is closed on top by a rod guide 15 made of zinc alloy. Inside the guide there is a metal-ceramic bushing along which the rod moves. The felt seal 26, located under the reservoir nut, protects the internal cavity from the penetration of dirt, and the internal rubber seal 27, installed in the holder 19 and pressed by the spring 16 through the holder 18, prevents fluid from leaving the shock absorber. To seal the tank, a sealing gland 17 is placed between the cage and the rod guide, which is compressed through the fiber washer 25 when the nut 24 is tightened.
How to compress a spring in the field
Some craftsmen use seat belts in the absence of ties. To work you need 2 seat belts, 2 levers (fittings, strong sticks, pipes).
Spring compression procedure
1. Thread the straps on both sides of the spring and tie with a secure knot.
2. We take the above materials as levers.
3. The spring is placed on its side.
4. We insert the lever under each belt and tighten it. We fix it with wire.
5. We begin to alternately twist the levers to compress the spring.
6. The spring is compressed, continue the following procedures.
DIY rear suspension spring replacement
Rear springs come in two types: assembled with a shock absorber and without it (for example, on Renault Logan). They should also be changed in pairs on the same axis. As with the front springs, it is assumed that the preliminary steps have been completed and the spring is available for removal.
Without shock absorber
1. Raise the rear of the car on a jack.
2. Install the ties on the spring and compress to the desired position.
3. Using a flat-head screwdriver, remove the spring from its socket.
4. Remove the ties, as well as the upper and lower elastic bands.
5. Change the spring and perform the reverse assembly process.
With shock absorber
1. Unscrew the lower bolts of the shock absorber.
2. Jack up the rear of the car (under the rear axle stocking).
3. As you rise, watch the brake hose and the spring, which gradually comes out of its socket.
4. If the lifting height is sufficient, remove the spring and spacers.
5. Replace the spring and shock absorber assembly.
6. When returning it, it is important that the spring fits exactly into the lower recess of the cup.
7. Lower the car body.
8. Tighten the lower bolts of the shock absorber.
If the replacement is carried out correctly, the clearance increases by 6-7 cm.
Sprung and unsprung masses
| The total weight of the car is 880 kg. 400 kg of unsprung mass acts on the front axle and 300 kg on the rear. Next, the weight is distributed equally between the wheels of one axle, i.e. each front wheel accounts for 200 kg, each rear wheel 150 kg. The unsprung mass components add up to 180 kg. The sprung weight is never equal to the gross vehicle weight. |
Each car has a total sprung mass, which is distributed over the individual wheels of the car. The weight should be distributed equally on the wheels of one axle. The weight on the front and rear axles, of course, can be different. In static conditions, the distribution of weight on the wheels is proportional to the total weight of the vehicle. This book describes basic techniques for distributing weight to individual wheels.
To clarify the situation, the total weight of the vehicle is divided into sprung and unsprung weight. Unsprung masses include wheels, brake calipers, wheel hubs, hub axles, part of the transverse suspension arms, suspension springs and shock absorbers, rear axle beam of the dependent suspension, part of the drive shafts.
Note that there is no need to know the absolute value of sprung and unsprung mass. Fine adjustments to weight distribution can be made in relative units, although absolute scales are often used. The adjustment methods described in this book do not require knowledge of the absolute weight of the car; if desired, everyone can enter absolute values for their own purposes.
Toyota Sprinter Japanese tithe › Logbook › Replacing the springs and strut support in the front suspension
It's time for the front springs to sag. In addition, I have been haunted by a problem with the caster of the left wheel for two years. After an impact 2 years ago, the caster went inward, that is, in simple words, the longitudinal inclination of the left wheel was out of tolerance. This is affected either by the spar or the strut support. Since my support was all cracked, the rubber base itself was all cracked, so it was decided to change it when replacing the springs.
And so, it was ordered: 1. Front springs Kayaba RK 3801 2 pcs. — 2342 rubles; 2. Shock absorber support RBI T1332F 1 pc. — 1566 rubles; 3. Oil seal RBI T13U0001 2 pcs. - 154 rubles.
As it turned out, the oil seal comes with the shock absorber support, so I should have ordered one. I didn’t order two supports, since everything was fine on the right side, but during disassembly, play in the support bearing was discovered. In the future I will change the support on this side as well, but for now I limited myself to changing the lubricant.
Let's get to work. Dismantled the left pillar. There was an error with the spring tensioners. For the front ones they are too long and tightening the spring is quite a problem. I pulled the racks together with the cup, and later this cup hit the garage door when I dismantled the spring and began to remove the ties. In general, I used zip ties to tighten the springs on their sides, so that if the ties slipped, the support would not shoot at my jaw, but somewhere in another direction