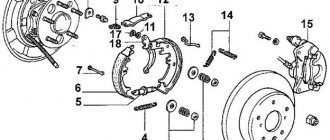
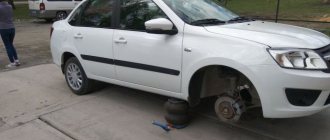
We replace the pads of a Lada Largus car in case of maximum permissible wear of their linings - the minimum thickness of the pad, including its base, must be at least 6 mm. The pads also need to be replaced when the brake disc is replaced, the linings are oily or have deep grooves, cracks and chips on them, as well as when the linings detach from the base of the pads.
We carry out the work on a flat area, inspection ditch or overpass.
Attention! The brake pads of the front wheels must be replaced only as a set - all four pads. Replacing the pads of only one brake mechanism can lead to the car pulling to the side when braking.
If the fluid level in the hydraulic brake reservoir is at the MAX mark, then before installing new pads, use a syringe or rubber bulb to pump out some of the fluid from the reservoir. This operation must be performed so that when the piston is pressed into the wheel cylinder of the brake mechanism while installing new pads, fluid does not flow out from under the reservoir cap.
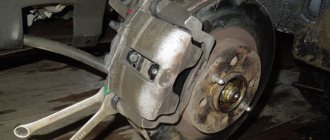
We remove the front wheel and securely fix the car on a factory-made support stand. Before installing new pads, it is necessary to move the wheel cylinder piston as much as possible inside the cylinder.
2283-14-02-01 (Copy)
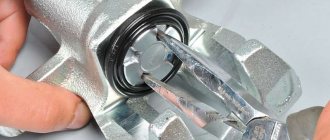
To do this, insert a screwdriver with a wide blade through the hole in the caliper between the brake disc and the caliper and rest it on the caliper, move the bracket, recessing the piston into the cylinder.
To do this, insert a screwdriver with a wide blade through the hole in the caliper between the brake disc and the caliper and rest it on the caliper, move the bracket, recessing the piston into the cylinder.
To do this, insert a screwdriver with a wide blade through the hole in the caliper between the brake disc and the caliper and rest it on the caliper, move the bracket, recessing the piston into the cylinder.
Let's sum it up
Since the LADA Largus brake system has a significant impact on traffic safety, the elements require increased attention and timely replacement of the front brake pads. It is not recommended to allow excessive wear of the working surfaces. The specified consumables that have become unusable must be replaced immediately. Buy only products of decent quality, which will allow you to gain confidence in the stable operation of the brake unit only in normal mode, but also in emergency situations.
- https://avtonomnaya-gazifikaciya.ru/priora/zamena-perednih-kolodok-na-larguse.html
- https://ZamenaRenault.ru/largus/elektrika-i-tormoza/zadnie-kolodki.html
- https://ZamenaRenault.ru/largus/elektrika-i-tormoza/kolodki-tormoznye-perednie.html
- https://carfrance.ru/zamena-perednix-tormoznyx-kolodok-na-lada-largus-svoimi-rukami-artikuly-s-abs-i-bez/
- https://ladaevolution.ru/zamena-kolodok-lada-largus-svoimi-rukami-poshagovaja-instrukcija/
- https://el-guide.ru/remont/zamena-kolodok-na-larguse-16-klapannom.html
- https://LargusCenter.ru/remont/zamena-tormoznyih-kolodok-largus.html
- https://oootdssk.ru/zamena-zadnih-kolodok-largus/
2283-14-02-02 (Copy)
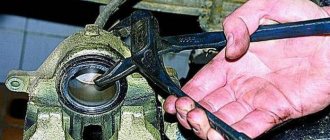
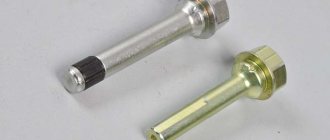
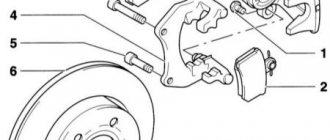
Using a 13mm spanner, unscrew the bolt securing the bracket to the lower guide pin, holding the pin with a 15mm spanner.
Using a 13mm spanner, unscrew the bolt securing the bracket to the lower guide pin, holding the pin with a 15mm spanner.
Using a 13mm spanner, unscrew the bolt securing the bracket to the lower guide pin, holding the pin with a 15mm spanner.
Do-it-yourself dismantling of the caliper on a VAZ-2110
The very simple design of the product and the triviality of the process of dismantling it allow even a novice motorist to carry out repairs and maintenance. If you carefully follow the recommendations below, you are unlikely to encounter difficulties at any stage of the process. You will save a lot of money spent on a trip to a service station, and a considerable amount of time, because the service time is comparable to the time required to travel to the workshop.
Dismantling VAZ caliper
The sequence for dismantling the product is as follows:
- The first step is to jack up the car and remove the wheel. To be on the safe side, it can then be placed under the bottom of the car in case the jack fails;
- On a VAZ 2112, the caliper is attached to the bracket using two M17 bolts, which you should unscrew. Penetrating lubricant may be needed to strip the bolts;
- If you need to replace the VAZ caliper or carry out a comprehensive repair, unscrew the product from the brake hose. You seal the hose tip and you can begin further disassembling the product.
2283-14-02-05 (Copy)
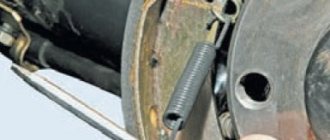
Remove the two spring clamps of the pads.
Remove the two spring clamps of the pads.
Remove the two spring clamps of the pads.
Using a metal brush, we clean the spring brackets and pad seats in their guide from dirt and corrosion.
Before installing new pads, we check the condition of the protective covers of the guide pins. We replace the torn or lost elasticity cover.
Recommendations after the replacement procedure
Having installed new parts, there is no need to hastily go to busy road junctions to test them in practice. It is possible that the first time the brake pedal is pressed firmly, the driver will be surprised by the low efficiency of its response. Even if the pads are of the high quality announced by the manufacturer, the situation may be unpredictable.
This is explained by the accompanying wear of the discs of the same name, which come into contact with the new pads only at the edges, almost without braking. It is best to choose quiet streets and try to slow down smoothly several times. So, all the parts will be able to “grind in” over the entire surface. At the same time, you can evaluate the effectiveness of new elements of the braking system.
Initially, you need to try not to stop abruptly for at least the first 100 km, because with strong heating, the top layer of the new pads heats up, and the brakes will not immediately be able to be as effective as possible.
2283-14-02-06 (Copy)
To do this, remove the guide pin from the hole in the guide block and replace the cover.
To do this, remove the guide pin from the hole in the guide block and replace the cover.
To do this, remove the guide pin from the hole in the guide block and replace the cover.
To replace the upper guide pin cover, you need to unscrew the bolt securing the bracket to the pin and remove the bracket from the pad guide.
Before installing the pin, put a little grease into the hole in the pad guide.
Replacing brake caliper guides for VAZ 2110, 2111, 2112
Lately, there has been a grinding noise when braking. An inspection of the brake system showed that the discs and pads were in good condition.
One of the reasons for grinding and rattling of calipers may be worn guides. Also, worn guides can lead to uneven wear of the pads (when one of the pads wears out faster than the other). This is exactly the wear that was on the old pads when they were last replaced.
Inspection of the guides showed that they are not jammed, but the lubricant has coked and thickened, and there is also noticeable play.
4 guides were purchased along with anthers, the price was 40 rubles per piece. And also a special lubricant for brake systems BOSCH SUPEFIT (5000000151) for 50 rubles. One bag is just enough for four guides.
It is important to know that not any high temperature grease will work for caliper guides. Do not use ceramic grease or copper-based grease. These lubricants coke and cause the guides to jam.
They can also be aggressive towards anthers. As it turned out later, BOSCH lubricant is not suitable for guides; the temperature range is only -25°C +130°C, which is naturally not enough for this unit. Although the manufacturer claims that this lubricant is universal and is exactly suitable for guides. I found supporting information in the official brochure about the use of lubricant
These lubricants coke and cause the guides to jam. They can also be aggressive towards anthers. As it turned out later, BOSCH lubricant is not suitable for guides; the temperature range is only -25°C +130°C, which is naturally not enough for this unit. Although the manufacturer claims that this lubricant is universal and is exactly suitable for guides. I found supporting information in the official brochure about the use of lubricant.
We'll ride it for now, and we'll see.
Before replacing the guides, remove old grease and thoroughly wash the bracket. To remove the old grease I used 646 solvent.
Its disadvantage is that it is aggressive to the rubber from which the anthers are made, so after using the solvent, I washed the staples with a degreaser. New lubricant should be applied in a thin layer.
The boots on the new guides turned out to be complete crap, several tore at once, so I had to install the old ones, which turned out to be in good condition. By the way, when assembling, you should first put the boot on the bracket, and then on the guide. This makes it much easier and less likely to tear the boot.
After replacing the guides, the grinding noise when braking no longer bothers me.
https://www.drive2.ru/l/5112419/
next article:
2283-14-02-08 (Copy)
If the part of the piston protruding from the wheel cylinder prevents the installation of the caliper on the brake pads, then use sliding pliers to recess the piston into the cylinder.
If the part of the piston protruding from the wheel cylinder prevents the installation of the caliper on the brake pads, then use sliding pliers to recess the piston into the cylinder.
If the part of the piston protruding from the wheel cylinder prevents the installation of the caliper on the brake pads, then use sliding pliers to recess the piston into the cylinder.
Similarly, we replace the pads on the other side of the Lada Largus car. After replacing the pads, press the brake pedal several times to set the gaps between the pads and discs. We check the fluid level in the tank and, if necessary, bring it up to normal.
During operation, the surface of the brake disc becomes uneven, as a result of which the contact area of the new, not yet worn-in pads with the disc decreases. Therefore, during the first 100 km after replacing the pads, until the new pads have broken in, be careful, as the car’s braking distance may increase. In this case, the pads may become hotter than usual, up to the appearance of slight smoke and odor, especially in hot weather.
[How to save on maintenance of Lada Largus] [Maintenance of Lada Largus at 15,000/45,000/75,000/105,000 km] [Maintenance of Lada Largus at 30 thousand km] [Maintenance of Lada Largus at 60 thousand km of run] [Maintenance of Lada Largus for 90 thousand km of run] [Maintenance of Lada Largus for 120 thousand km of run] [Independent maintenance - general recommendations] [Safety rules for self-carrying out maintenance] [Tools required for carrying out maintenance Lada Largus maintenance] [Lamps used in the Lada Largus car]
Lada Largus: replacing the brake pads of the front wheels
Choosing pads
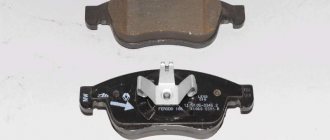
It is recommended to change the pads when their thickness is less than 6 mm. At this moment, many Largus drivers who change pads for the first time ask themselves: what kind of pads do I have in my car? And they immediately go to the Internet for information. And here additional questions arise. Online stores sell pads for engines with 8 and 16 valves, as well as with and without ABS. Which pads to take, which ones are better? In order not to be overwhelmed with the choice, do not be too lazy to remove the wheel, clean the dirt from the pads and find the serial number on them, which should be used as a guide when purchasing. Better yet, check the numbers on all wheels.
According to the catalog, the Lada Largus comes with two types of original pads:
Number 410608481R, look like this:
Number 410602192R, they look like this:
It is not recommended to install pads 410602219R on an 8-valve engine, since they are used on 16-valve internal combustion engines and on the Largus van.
Recommended analogues:
- SANGSIN SP1243 – made in Korea.
- BOSCH 986467720.
- TRW GDB1465.
What types of brakes are there?
Throughout the history of the automotive industry, 3 types of brakes have been installed on cars:
- tape;
- drums;
- disk.
The first cars had a band brake system. The wheel axle was covered with tape. The driver had access to it at any time. If he needed to slow down, he pulled the tape, and this allowed him to reduce the speed.
Through “evolution,” the band brake was replaced by a drum mechanism. The principle of operation is the simultaneous rotation of a hollow drum with a wheel, which is bursting inside with pads. This slows down the car. This type of brake has proven itself well, but it also has disadvantages. With frequent heavy use, the drum overheats, since the ventilation in this closed system is not the same as that of a disk mechanism.
Just like overheating, moisture getting into the mechanism is also harmful to the drum. When individual parts become wet, the effectiveness of the brakes decreases. If any part in the drum wears out or falls off, it remains inside the system. This is both a minus and a plus. Indeed, in this case, the driver will hear a knock, and it will be possible to take measures to replace the part.
The disc brake system is the most reliable mechanism that eliminates the above-mentioned disadvantages of previous systems. Disc brakes work by rotating the disc simultaneously with the wheel, and when you press the brake pedal, the pads jam the rotation of the disc from the outside. Unlike the drum, the disc is ventilated, so it is less susceptible to overheating than the drum. The discs do not retain moisture and damaged parts. The operating principle of this system is based on the ability to work under heavy loads. Therefore, you can stop your car faster with disc brakes.
Such mechanisms are often front-facing and ventilated. Ventilation holes cover the entire radius of the disc. Some modifications have transverse ventilation holes. With their help, excess heat is removed, weight is reduced and worn parts are removed.
Due to the fact that the drum mechanism costs much less than the disk mechanism, today both disks and drums are used.