Despite the fact that these two units are inextricably linked with each other, in our material we will consider them separately. This will allow you to understand in detail all the nuances and features of the operation and repair of the two devices.
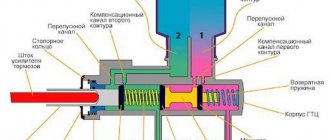
I – main cylinder body; 2 – low pressure sealing ring; 3 – drive piston of the “left front-right rear brake” circuit; 4 – spacer ring; 5 – high pressure sealing ring; 6 – pressure spring of the sealing ring;
7 – spring plate; 8 – piston return spring; 9 – washer; 10 – locking screw;
II – drive piston of the “right front-left rear brake” circuit; 12 – connecting sleeve; 13 – tank; 14 – brake fluid emergency level sensor; A – gap
Why do the brakes disappear in the VAZ-2110?
If the brakes on a VAZ-2110 leave much to be desired, you should not blame the head cylinder (GTC) immediately, especially since there are several additional reasons for mechanism failures:
- The working cylinder is leaking; this process can occur gradually or quickly.
- Look at how much brake fluid is in the reservoir. The brake line may have broken, causing fluid to leak.
- The same thing sometimes happens with rubber hoses. They can rot or break through.
In fact, determining whether the master cylinder is to blame for brake failure or not is simple - examine its appearance. If there are traces of leaks, then your fears are not in vain.
Also pay attention to the following signs of a gas turbine engine malfunction:
- The brake pedal remains in the same position when pressed and applied.
- Alternatively, it moves idle, that is, nothing changes in the operation of the brakes.
Malfunctions and ways to check them
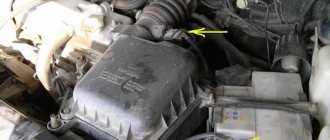
It is possible that you may need to replace the vacuum booster on your VAZ 2110. The cause may be various malfunctions, the characteristic symptoms of which are as follows:
- When you press the brake pedal, a hissing noise occurs, and at the same time, the engine speed often increases;
- The car starts to shake;
- Spark plugs stop working efficiently;
- Fuel consumption increases noticeably.
You yourself understand perfectly well that if the vacuum brake booster hisses on a VAZ 2110, there is nothing good about it. Therefore, it is necessary to take appropriate action. This applies to all malfunctions that may occur.
Before replacing the vacuum booster on a VAZ 2110, it should be checked.
This procedure is performed as follows:
- As with normal bleeding of brakes, with the engine not running, press the gas pedal several times;
- After 5 or 6 presses, keep the pedal in the down position, resting it on the floor, and start the engine;
- After starting, the pedal itself will move forward a little.
This situation is typical only for a working vacuum amplifier. Therefore, if a vacuum has not formed, check the connections and the hose for leaks, plus examine the condition of the check valve. Often the reason lies in the destruction or deformation of rubber components, which can be easily replaced.
There is also a high probability of damage to the diaphragm, on which a hole is formed over time. You can purchase the diaphragm with a repair kit, the cost of which is no more than 500 rubles.
Replacement
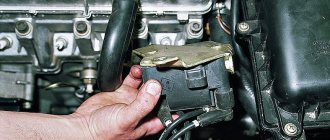
To replace an element, you need to understand the main issue - how to remove the vacuum booster from a VAZ 2110. Directly replacing the old element with a new one will not be difficult, just like the reassembly process.
Therefore, we will tell you about the main thing - dismantling the amplifier. Let's start with the fact that the procedure is not complicated, but it requires accuracy and sequence of steps. If you follow the recommendations, the work will take little time and will not take much effort.
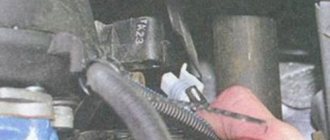
- Disconnect the block with wires, which includes brake fluid level sensors in its design.
- Hold the booster check valve with one hand and carefully disconnect the hose with the other. It is advisable to disconnect the hose with a strong hand, since this will require a lot of force.
- Remove the two bolts connecting the booster and master cylinder.
- Carefully remove the cylinder from the amplifier.
- There is no point in disconnecting the brake lines.
- Give access to the dashboard, which will allow you to unscrew the nuts holding the brake pedal bracket. There should be 4 of them.
- It is recommended to dismantle the bracket and amplifier through the engine compartment, since there is enough free space for such manipulations.
- Remove the pin lock plate. To do this, pry the finger with a screwdriver and squeeze it out.
- Now you can easily disable the brake pedal and booster.
- To disconnect the amplifier and bracket, you will have to unscrew the two nuts on the mount.
- A new one is installed in place of the dismantled old vacuum amplifier, and the reassembly procedure is performed in strict sequence of the dismantling process.
Is it always possible to repair the GTZ?
The main brake cylinder of the VAZ-2110 can indeed be repaired, but not always, so when starting repairs, keep the following features in focus:
- It is impossible to repair the part without a repair kit created specifically for repairing the VAZ-2110.
- It is impossible to repair the damage if there are scratches on the interior mirror.
Drivers believe that repairs are a more profitable undertaking than buying a new mechanism for restoring the brakes of a VAZ-2110. Although experts do not agree with this, explaining: if a part breaks once, another repair is not far off, and so on ad infinitum. That’s why it doesn’t hurt to gain knowledge of what it looks like to replace the master brake cylinder of a VAZ-2110 with your own hands in a garage.
Consequences of brake fluid leakage from the GTZ
When brake fluid leaks from the master cylinder, brake fluid can get onto various parts of the car. As you know, TZ is quite chemically active and often damages other parts of the car.
For example, when liquid leaks, it can fall on the vacuum booster membrane, which will soon lead to its rupture and, as a result, air leakage from the receiver, and of course, replacement of the vacuum booster itself.
VUT membrane rupture
Also, when brake fluid leaks, it gets into part of the engine compartment, behind the steering rack, and causes great damage to the paintwork.
List of required tools
Repairing a car is not as difficult as it seems; special tools will come to the rescue:
- screwdriver with flat and Phillips tips;
- key designed for 10, 17 dimensions;
- container filled with brake fluid - ½ liter is enough;
- brake fluid;
- ordinary medical syringe.
When replacing a part yourself, you need to enlist the help of a friend who can periodically press the brake pedal.
Disassembly
To replace and repair a damaged master brake cylinder, you need to remove it from the VAZ 2110; to do this, you should carry out several steps:
- Carefully disconnect all pipelines from a part such as the main cylinder;
- Disconnect the block equipped with wires from the emergency brake fluid indicator. They are connected by terminals;
- It is necessary to prevent fluid leakage and contamination of the mechanism; to do this, it is necessary to cover the openings of the unit and pipelines;
- Next, you need to remove it along with the tank; to do this, unscrew the fastening nuts that secure it to the vacuum type amplifier;
- After the VAZ 2110 fluid level sensor is removed, you need to drain all the brake fluid from the cylinder and basque;
We can only add to this that if there is no great need, you should not remove the reservoir from the master cylinder. To completely disassemble it, you need to remove the tank. Assemble and then install in place in exactly the reverse order.
Before you begin assembling the unit, all components must be washed with purified brake fluid or isopropyl alcohol. After this, everything must be carefully dried using a compressor, and then each of them must be wiped with a dry, clean cloth.
The main thing is not to get mineral oils directly or indirectly on the components; it is also dangerous for the front components of the main type brake cylinder, kerosene and diesel fuel to get on them.
If you find that the brake pedal has increased travel, it is recommended to bleed the brakes. The intricacies of the procedure can be found in this article: https://vazweb.ru/desyatka/tormoza/kak-prokachat-tormoza.html
How to remove an old VAZ-2110 cylinder
Replacing the master brake cylinder of a VAZ-2110 involves first removing the old model. The subsequent installation of the new model depends on how well this process goes. To avoid mistakes and miscalculations, follow these instructions:
- Disconnect the brake fluid indicator related to the GTZ from the expansion tank located in the VAZ-2110.
- Unscrew the closing valve of the expansion tank.
- Using a syringe, pump out the liquid, and then unscrew the pipeline from the general brake system.
- If you have a 10 key, disconnect 4 tubes, 2 on each side.
- Gently push the tubes to the side so that they do not interfere with the removal of the cylinder.
- Next, your task is to get to the bolts that secure the part to the vacuum brake booster. To do this, unscrew the screws using a Phillips head screwdriver. These screws are responsible for holding and securing the engine compartment upholstery.
- Bend the upholstery material and 2 nuts will become available to you.
- Remove the GTZ by removing it from the studs directly with the tank.
- If the tank also needs to be replaced, then the old sample is slightly pryed with a screwdriver and removed, and a new one is put in its place.
Replacement instructions
Replacement or repair of the unit can only be carried out after dismantling the main brake cylinder and disconnecting it from the vacuum booster. Removal proceeds as follows:
- The first step is to disconnect the negative terminal from the battery. The next step will be the dismantling of the GTZ pipelines. Before this, it is necessary to remove all working fluid from the cylinder reservoir;
- There is an emergency indicator next to the GTZ - you also need to disconnect the block with wires secured by terminals from it;
To inspect the parts and subsequently replace it, it is necessary to disassemble the brake master cylinder on a table or workbench. Having determined which parts need to be changed, you can begin repairing. Ready-made repair kits for the VAZ 2110 are sold on the automotive market. Before assembling all parts, the body must be washed.
IMPORTANT: rubber structural elements must not be wiped with oil or gasoline, as these liquids will lead to deformation of the rubber products.
Source: remontvazov.com
Installation of a new VAZ-2110 cylinder
Features of installing brake parts are included in the following list:
- If there is a need to replace the tank, this must be done before installing the cylinder.
- To install the master cylinder, follow the reverse order of the instructions for removing the defective attachment.
What does the cylinder installation look like:
- Try to get the pusher rod into the hole located on the master cylinder.
- Then slide onto the 2 studs, tightening the mounting nuts tightly with a 17mm wrench.
- All that remains is to connect the pipeline tubes, but do not tighten them too tightly.
- Open the reservoir cap and pour brake fluid inside.
- Place the engine compartment trim in its original place and secure the result with self-tapping screws. At this point, the replacement of the VAZ-2110 master brake cylinder can be considered successfully completed.
- Now it’s time to properly bleed the system - put your partner in the car, make a couple of pedal strokes, press and release some brake fluid along with the air. The goal is to ensure that there are no air bubbles when opening the fitting.
Video instructions for installing a new part to replace the old one on a VAZ car can be viewed below:
FAQ
When the engine is running, the pedal slowly sinks to the floor with constant force, is it necessary to change the turbocharger?
Smooth subsidence of the pedal is a frequent sign of leaking GTZ seals. In this case, it is possible to repair the part by installing new cuffs from the repair kit.
Brake fluid leaves the reservoir, but then appears, is it the GTZ?
Changes in the level of brake fluid in the reservoir are not necessarily a sign of a breakdown of the turbocharger. The fuel fluid can also either go down or rise due to airing, boiling due to overheating of the pads, or jamming of the actuator cylinders.
Does it make sense to install a repair kit or is it better to replace the GTZ?
It makes sense to install a repair kit when only the rubber parts are worn out. If the piston is severely worn or the housing is damaged, it is better to replace the entire turbocharger.
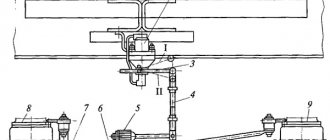
Wheel cylinder
1 – block stop; 2 – protective cap; 3 – cylinder body; 4 – piston; 5 – seal; 6 – support plate; 7 – spring; 8 – crackers; 9 – thrust ring; 10 – thrust screw; 11 – fitting; A – slot on the thrust ring
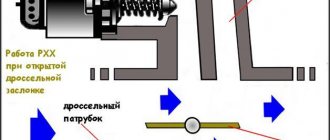
The rear wheel brake mechanism (Fig. Rear wheel brake mechanism) is drum-type, with automatic adjustment of the gap between the shoes and the drum. The automatic clearance adjustment device is located in the wheel cylinder. Its main element is a split thrust ring 9 (Fig. Wheel cylinder), installed on the piston 4 between the shoulder of the thrust screw 10 and two nuts 8 with a gap of 1.25–1.65 mm.
The thrust rings 9 are inserted into the cylinder with tension, providing a shear force of the ring along the cylinder mirror of at least 343 N (35 kgf), which exceeds the force on the piston from tension springs 3 and 7 (see Fig. Brake mechanism of the rear wheel) of the brake pads.
When, due to wear of the linings, the gap of 1.25–1.65 mm is completely removed, the shoulder on the thrust screw 10 (see Fig. Wheel cylinder) is pressed against the shoulder of the ring 9, as a result of which the thrust ring moves after the piston by the amount of wear. When the braking stops, the pistons are moved by the force of the tension springs until the cracks stop against the shoulder of the thrust ring. This automatically maintains the optimal clearance between the pads and the drum.
There is a leak between the vacuum seal and the main valve. brake cylinder?
07/27/06 15:05 Reply to message There is a leak between the vacuum seal and the main valve. brake cylinder? by neor
The red light came on, wait, the yellow light came on, wait, and the green light, go.
07/27/06 15:33 Reply to message Leaking between the vacuum seal and the main valve. brake cylinder? by neor
07/27/06 15:36 Reply to message Leaking between the vacuum seal and the main valve. brake cylinder? by neor
07/27/06 15:37 Reply to message Re: Leaking between the vacuum seal and the main valve. brake cylinder? user BRAKE
The red light came on, wait, the yellow light came on, wait, and the green light, go.
07/27/06 15:59 Reply to message Re: Leaking between the vacuum seal and the main valve. brake cylinder? by Flamer
Nuances of repair
O-rings require special attention. The time the rings are in isopropyl alcohol should not exceed twenty seconds, after which they should be dried immediately using a compressor.
The surfaces of the mirror, as well as the piston elements, must be completely clean and free of rust. Every disassembly and repair of a faulty brake master cylinder must be accompanied by replacement of the O-rings, even if they are in good condition. The cuffs of the device also require attention; if they are swollen and frayed, they must be replaced.
Brake hoses are used to supply brake fluid from the master cylinder. If there are cracks or abrasions, they must be replaced. Details: https://vazweb.ru/desyatka/tormoza/zamena-tormoznyh-shlangov.html
After all, it is necessary to check the elasticity of the piston springs; this should be done under load. The length of the spring under load should be 39.01–45.9 N (3.8–4.8 kgf) - 41 mm, with another option the following indicators should be 82.01–99.48 N (8.35–10 .15 kgf) – 21 mm. When free, the spring should have a length of 59.8 mm. If the springs do not have such indicators, then they must be replaced.
Source
Principle of operation
Hydraulic dual-circuit brakes with diagonal distribution are predominantly efficient and reliable. This is due to the fact that if one circuit fails, the second will allow your car to brake.
The circuit system is arranged as follows - one of them is responsible for the left rear and right front wheel, and the second circuit is responsible for the left front and right rear wheel.
This way, you will be able to brake without damaging the brakes or causing other problems with the system.