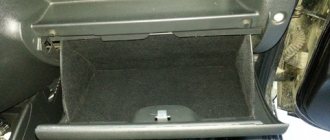
Glove box, glove compartment, or glove box - all these words designate one important place for storing small items in a Lada Priora car. It contains everything: from wet wipes to a minimal set of tools and wires for charging mobile devices. This is a very useful compartment built into the dashboard on the passenger side.
The small storage compartment on the dashboard of the car is equipped with an electric light - in the dark, by its light you can find everything you need.
How to remove the glove compartment on Kalina and Priora? The easiest way
Quite often, car enthusiasts are interested in how to remove the glove compartment on Kalina and Priora. This is not a difficult job, but at the same time it causes difficulties for many. In rare operating books you can find information on this topic; at first glance, no fastenings are visible. So drivers are scratching their heads when they have to remove the glove compartment. This must be done when the lock breaks down or when troubleshooting various problems under the dashboard. Also, many people are annoyed by the high noise of this interior element. The fact is that it is made of fairly hard plastic. Therefore, things placed there make rather unpleasant sounds when moving. In this regard, many motorists prefer to soundproof the glove box.
To watch online, click on the video ⤵
How to remove the glove compartment on a PRIOR Read more
Removing and installing the glove compartment of the Lada Priora (LADA PRIORA) More details
LADA PRIORA DIARY 9 ENTRY (eliminating glove box rattling) More details
Diary of Lada Priora 2. Entry 12 (Remove the glove compartment, dismantle the rear side door trim) More details
Repair (glove compartment) of the glove box - LADA GRANT More details
How to remove a torpedo on a Priora with your own hands Read more
reworking the panel of Priora 1 into Priora 2 Read more
Diary of Lada Priora 2. Entry 9 (We disassemble the door card and glue it). More details
20 COOL PRODUCTS FOR LADA GRANT FROM CHINA WITH ALIEXPRESS Read more
The steering rack on a Priora is knocking - how to tighten it?! More details
Soundproofing VAZ 2170 Priora Read more
Armrest cover for Lada Priora More details
Pasting and reupholstering the Priora armrest with eco-leather (we do it according to Feng Shui) More details
LADA PRIORA 6 REGISTRATION EVERYTHING IS SIMPLE AND QUICK (CRICKETS IN THE CABIN) More details
LADA GRANT Replacement of the glove compartment lock More details
Lada Granta. Glove compartment lighting with LEDs Read more
Lada Granta glove compartment lock. Repair is forever. / Garage 73 More details
Replacing the cabin filter on Priors with air conditioning! More details
Diary of Lada Priora 2. Entry 16. Dismantling the center console (beard) More details
Malfunctions
Most often, problems arise with the latch lock. In some cases, the tongue simply does not fit into the groove. Official dealers recommend replacing the entire torpedo. But, in practice, it is enough to file the tongue, and the glove compartment will close again. In other cases, the problem turns out to be in the lock itself. Removing it is not as easy as it seems.
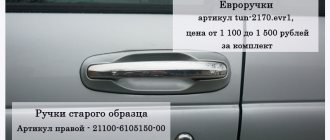
First you need to get to the mount. To do this, bend the handle on one side of the removed box. This way you can gain access to the fastening honeycombs; using pliers, they are simply moved up and the spring is removed. Next, repeat the action on the reverse side. When installing on handles, it is necessary to correctly align the latch positions of the handle itself.
Improvements
The glove compartment on Kalinas and Priors has many jambs that significantly reduce the comfort of driving. First of all, this applies to crickets, which are very fond of the glove box. Plastic also interacts quite noisily with the objects in it. Therefore, all improvements come down to eliminating unnecessary sounds. Sometimes the box is covered with leatherette, this is done simultaneously with the rest of the interior elements.
It's best to start by eliminating crickets. The biggest source of squeaks is the metal axle of the glove box. To do this, it is removed from the case and wrapped with electrical tape. This eliminates the gap that causes the noise. Usually, after this action, crickets are no longer observed. Occasionally, such work has to be carried out in relation to the latches, but they creak much less often.
Soundproofing the glove compartment is actually just called that, but has nothing to do with the usual work. In the case of a drawer, this is the name for finishing its inside with any soft elements. Most often, various fabrics are used for this. You need to start work by preparing patterns. To do this, measure the dimensions of the glove compartment. After that, we try on the pieces to specific parts. If everything fits, we put them on superglue. After it dries, we install the glove box in place.
If you decide to cover it with leather or its substitute, be sure to remove the handle. It will interfere with the work process. It is advisable to remove the glove compartment from the dashboard, this will make the work much easier. Next, it is covered with leather or other material. After tightening, wait until it dries and put it in place.
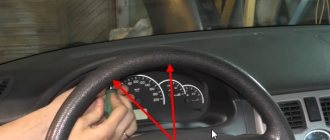
Additional feature
Let's go back to our switch. It is located on one of the walls of the glove compartment - this is where it is most convenient to reach with your hand. Most often it depicts “zero” and “sun”. Therefore, many may mistakenly assume that this switch is responsible for the lighting in the car or glove compartment. But that's not true.
The switch actually regulates the climate inside the glove compartment. This is very convenient because it often gets hot, especially in summer and in direct sunlight. After setting the low temperature, cold air will flow out of the dampers, and the glove compartment will act as a refrigerator. This is very convenient, especially on long roads across our endless Russia.
In such a situation, I would like to quote a classic: Oh, how many wonderful discoveries we have. Yes, indeed, many people think that they know everything about cars. However, every day we discover something new in it. I am happy to share this with you and thank you for your likes and subscriptions, everyone!
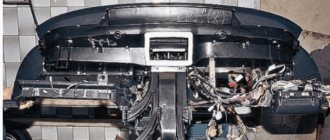
Torpedo
The glove compartment is part of the car's dashboard, and accordingly also affects the attractive appearance of the interior. Therefore, it is important to monitor her condition. The main factor reducing the effectiveness of a torpedo is dust. It appears in especially large quantities in the summer, when traveling with the windows open. It is its accumulations that must be dealt with first.
The main means of keeping the panel clean is a regular cotton rag. Use it to wipe the dashboard; it is recommended to do this daily. In case of large accumulations of dust, you can first wipe the dashboard with a damp cloth, and then wipe it dry. Polishes are used to add shine. They process the torpedo according to the instructions. A cheaper option is shoe shine. This sponge costs a penny, but the result is in no way inferior to polish. Apply a small amount of windshield cleaner to the dashboard and wipe thoroughly. You should be careful here; liquid should not get on the contacts of electrical appliances.
How to quickly remove the glove box on a Priora model car
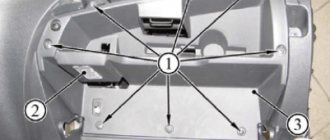
In order not to damage the car interior, you need to know how to remove the glove compartment on a Priora correctly. The design of this part of a passenger car interior is more than simple. The procedure for removing the glove box will take several minutes. Sequencing:
- Open the box lid by pressing the special button and lower it down until it stops.
- There are restraints on the left and right sides of the trunk lid. After opening the lid, you need to release the right stopper with light finger pressure.
- Then you need to do the same procedure with the second, left, limiter. Only after it is released it is necessary to move the part to the left.
- Next, the glove compartment lid can be easily removed. If after all the manipulations it does not want to be released, you just need to gently pull it down.
After all the planned actions have been completed, you need to attach the cover to the front panel in reverse order.
Types of tuning of the Priora central console
Below are some of the most popular examples of console modifications by Prior owners.
Painting
Painting is carried out in several stages. To begin work on modifications, it is necessary to dismantle the console and remove all attached electrical equipment from it, such as a clock, climate control unit and media system.
Then the factory paintwork on the plastic is sanded, primed and painted.
Pros and cons of this method:
Pros:
Minuses:
- The impossibility of returning everything to its original appearance;
- Long and expensive work process;
Pasting with film
This type of modification is the most popular and widespread due to its speed and low cost. With such modification, as well as with painting, it is necessary to dismantle the center console and all attachments. After removal, the console is treated with a degreaser and a film is glued to the degreased surface and, using a hairdryer, stretched over all convex areas.
Pros and cons of this method:
Pros:
- Cheapness;
- Rapidity;
- The ability to return to its original appearance;
Minuses:
Not durable, the film quickly begins to sand and crack;
Installing a 2DIN radio
This modification involves sawing off excess parts of the console, which may interfere with the installation of a large two-din radio. Practically no modifications will be required if you install such a radio in the center console of a luxury Priora, since a larger multimedia system is installed there from the factory.
Step-by-step instructions for dismantling the standard radio:
- Before removing the Priora's standard radio, it is recommended to disconnect the negative terminal of the battery from the body.
- Carefully insert a thin steel plate into the slots located under the Scan and TA buttons. The tools must be placed at a slight angle to the side, being careful not to damage the plastic of the radio panel.
- The plates must be inserted until a click appears, indicating that the latches are actuated.
- Then you need to pull the head unit out of the cavity in the Priora instrument panel. To do this, turn the plates slightly to the sides and use them as levers for dismantling. If the tool comes off, it should be reinserted into the groove until it makes contact with the latch.
- Pull the equipment out of the shaft, carefully disconnect the power plugs, antennas and connections to the speakers.
Many owners cannot remove the head unit from a Lada Priora car using the given method, since the tool bends, but the latches do not come off. Instead of plates, it is allowed to use nail files or special keys used to remove Pioneer or Sony radios.
Alternative dismantling method:
- Before removing the radio from the Priora using nail files, you need to completely open the glove box lid.
- Insert the file into the cavity of the right latch until it makes contact with the latch. Then turn the instrument slightly to the right, disengaging the tongue from the audio device body.
- Gently push the rear of the radio through the glove box. Since it is necessary to simultaneously hold the clamps and push the equipment out of the installation shaft, it is recommended to hire an assistant.
- After the body of the audio device extends 2-3 mm, you should move the latch on the left side.
- Continue pushing the radio until it comes out 30-40 mm from the mounting socket. Further movement is limited by the antenna coaxial cable, which is secured with plastic clamps along the lower edge of the instrument panel near the glove box. It is necessary to cut off the clamp and disconnect the connector located in this place.
- After the audio device is completely removed from the mounting socket, you should carefully disconnect the existing plugs.
For vehicles with air conditioning, the cabin filter 2170 has the following location - directly in the heater housing in its front part.
If the equipment is normal, normal or standard, then the heater has an old design, no different from the tenth family. The filter element will be located in the upper left part of the stove body. Its location will be shown below after dismantling all the parts under which it is located:
Non-standard reasons for removing the glove compartment on a Priora
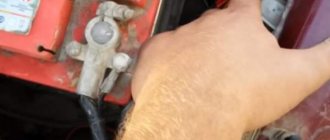
Any part of the engine, trunk and interior of the car periodically needs a “shake-up”.
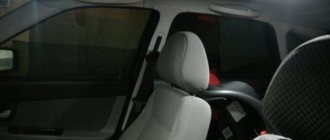
This can be either regular cleaning or a complete replacement or adding new components. In the Lada Priora car, the interior is a solid “4”, and this seems to be enough. But some owners want to somehow improve their “swallow”. What could be improved in the glove compartment? The first is bright lighting. When the car is assembled at the manufacturing plant, standard lighting is installed in the glove compartment - an incandescent lamp, which lights up when the dimensions are on. An alternative to this conservative design is an LED lamp. The color of its rays can be standard white or multi-colored. The main advantage of this modification is that the lighting works even when the dimensions are not turned on.
The second is painting in different colors. To diversify the interior of your Priora, you should use cans of paint (liquid dyes can leave streaks). To do this, you need to purchase the desired paint, remove the glove box, and paint it. Then, after complete drying, install it in place. This “tuning move” can be used not only to paint it one color, but also to create a pattern or design on the lid or inside the glove compartment.
Third, pasting the inner surface of the glove compartment with fabric. Many people consider one of the disadvantages of the Priora to be the nondescript plastic interior (dashboard). The glove compartment of a car, made of plastic without softening upholstery, creates a lot of noise and looks unattractive. To correct this drawback, you can cover the glove compartment yourself with soft material. Most often, carpet is used for these purposes - an artificial finishing fabric that is easy to clean and
can last several decades. An analogue of carpet is considered to be artificial stretch suede - Alcantara. This material looks more respectable and expensive.
Most car enthusiasts still use carpet to improve the glove compartment. It comes in two types: regular and self-adhesive. To carry out finishing with the first type, you need to buy additional glue, which is not necessary for the second type. When working with regular carpet, unpleasant moments may arise: for example, too much glue gets on the material and it bleeds through the front side. To avoid such troubles, it is better to use self-adhesive carpet.
How to remove the glove compartment of a Priora car - instructions, cooled box
Glove box, glove compartment, or glove box - all these words designate one important place for storing small items in a Lada Priora car. It contains everything: from wet wipes to a minimal set of tools and wires for charging mobile devices. This is a very useful compartment built into the dashboard on the passenger side.
The small storage compartment on the dashboard of the car is equipped with an electric light - in the dark, by its light you can find everything you need.
How to remove the glove compartment on Priora 1 and 2
To remove the glove compartment of a Priora car, you do not need to make any preparations. It's simple and can be done in 2 minutes leisurely. Usually the glove compartment on Priora 1 and 2 is removed when it is necessary to get to the diagnostic connector. There is only one goal - to find out what errors appeared in the operation of the machine. But it’s not enough to just remove the glove compartment on a Priora - you need to install it correctly.
If a fastener becomes damaged, it is unlikely that it will be found anywhere. Therefore, you will have to go in search of a new storage compartment, which will take your time and cause inconvenience. Removing the glove compartment on a Priora car is carried out according to the following algorithm:
- Open the glove compartment.
- Stretch your hand inward, closer to the right edge. Press down on the right stopper and pull it out of the engagement.
- While holding the cover, disengage the left stopper.
- Pull the glove compartment cover towards you, slightly downwards, while moving it out of the fastening axes.
The glove box is part of the “torpedo” - the facing elements of the interior. The glove compartment lid allows you to keep all the contents in one place without creating clutter in the car interior. The Priora is not a spacious car, so get ready to save space here too.
Video for Lada Priora 1
Video for Lada Priora 2
What are the fuses in the Lada Priora mounting block responsible for?
So let's now go over the fuses:
- Fuse F1 is responsible for the electric radiator fan of the engine cooling system
- Fuse F2 is responsible for the heated rear window
- Fuse F3 is responsible for the high beam (starboard side)
- Fuse F4 is responsible for the high beam (left side)
- Fuse F5 is responsible for the sound signal
- Fuse F6 is responsible for the low beam (left side)
- Fuse F7 is responsible for the low beam (starboard side)
- Fuse F8 is responsible for the alarm signal
- Fuse F9 is responsible for the heater fan
- Fuse F10 is responsible for the instrument cluster, interior lighting, brake light
- Fuse F11 is responsible for the windshield wiper, heated rear window (control)
- Fuse F12 is responsible for output “15” devices
- Fuse F13 is responsible for the cigarette lighter
- Fuse F14 is responsible for the side light (left side)
- Fuse F15 is responsible for the side light (right side)
- Fuse F16 is responsible for terminal “15” of the ABS
- Fuse F17 is responsible for the left fog lamp
- Fuse F18 is responsible for the right fog lamp
- Fuse F19 is responsible for seat heating
- Fuse F20 is responsible for the immobilizer control unit
- Fuse F21 is responsible for the rear fog light
- Fuse F22 – F30 – reserve location for fuse
- Fuse F31 is responsible for the electrical package control unit
- Fuse F32 – reserve location for fuse
Electrical equipment that consumes a large current during operation is connected through relays that protect the switch contacts from burning. To replace relays and pin fuses, special plastic tweezers 1 and 2 are provided in the mounting block. A blown fuse is identified by a burnt-out jumper; if in doubt, you can check it with a tester.
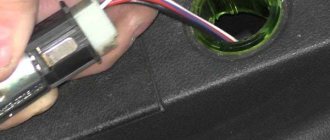
If the light does not come on, how to change the light bulb in the glove compartment
A small lamp in the storage compartment built into the instrument panel on the passenger side of the Lada Priora car works to perform a useful function. At night, instead of illuminating the space with a flashlight and trying to reach something important with your other hand, you can calmly use the light that this small source creates. When the Priora's glove compartment light doesn't come on, it becomes very unusual.
Some car owners go further - they install additional lighting, like a small tuning, so that the contents of the pocket are much more visible. If the light does not work, the reason may be several problems. The lampshade is “recessed” inside the system, and therefore you will have to get close to it.
When the glove compartment light does not light up, we are talking about two items - the limit switch and the lampshade. The glove compartment switch of a Priora car wears out over time. In such cases, even if everything is fine with the light bulb, there will still be no light inside the box. When the light does not light, they begin to disassemble the structure.
You can replace the light bulb in the glove compartment in the following order:
- Open the glove compartment cover. There is no need to remove it.
- Using a flat-head screwdriver, pry up the lampshade without letting it fall.
- Replace the light bulb or limit switch.
Some owners replace the old light bulb, which gives a warm light with a yellowish tint, with a part that is installed for the Lada Vesta. The new car's lampshades provide cold light with a white tint, which allows you to see everything much better, and the text on paper is more legible.
How to make a cooled glove box on a Priora: instructions - homemade
The glove box can be made even more practical. Since documents must be carried with you and tools are often relegated to the trunk, you can skip the cooler bag. It is enough to connect the cooling to the glove box. To carry out the work you will need:
- headlight corrector handle;
- insulation (about 2m by 1m);
- two fittings, two connecting rubber bands;
- a hose about 0.5 m long, suitable in diameter for the fitting;
- old, unnecessary disc box;
- two clamps.
To make a cooling glove box for a Priora, follow these steps:
- Remove the glove box cover.
- From the disc box, cut out the core - a round valve gate. It has a central hole. You yourself need to make holes in the form of sectors, which will occupy about a quarter of the total area of the circle opposite each other.
- Next, from the same box, cut out two strips in the shape of the letter “L” and use them to make a stand for the resulting plastic blank. Glue the letters “G” with “Moment”.
- Attach the resulting installation to the square handle rod. Strengthen the connections using a stapler. Cover the valve with madeleine (otherwise it will creak during operation).
- Inside the box, in the round recess, make two holes in the shape of sectors - exactly the same as on the valve.
- Also screw two self-tapping screws into the round recess to hold the valve in place.
- Place the valve, additionally securing it with a screw. It is driven through the central hole of the valve. The valve handle should turn easily, without squeaking.
- The fittings must be brought to the required dimensions using a knife (in accordance with the hole that appears). Attach the fitting using glue.
- Cover the inside of the glove box lid with insulation.
- Make a hole in the upper passenger air duct by inserting a fitting.
- First attach the hose to one fitting. Then cover its “body” with madeleine to prevent squeaks. Connect the hose to the second fitting. Tighten the connections with clamps.
The system is ready for use and will be turned on manually.
Materials and tools needed for work
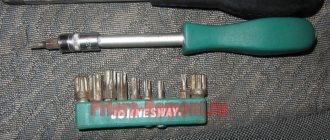
The main tool needed to remove the glove compartment and return it to its original place is a Phillips screwdriver.
This tool is necessary for removing glove boxes and putting them back in place on some car models
In addition, you may need:
- scissors for cutting insulation;
- knife;
- drill.
Materials to create a cooling effect in the glove box will require:
- a handle for a Lada-Kalina headlight range control, worth 80 rubles;
- drain hose for a washing machine (0.5 m) costs 120 rubles;
- 2 fittings (with rubber gaskets) costing 90 rubles;
- insulation material, which costs 80 rubles/sq. m;
- madeleine ribbon priced at 90 rubles;
- 2 small screws;
- 2 clamps;
- glue Moment worth 70 rubles.
To cool the glove compartment on cars of any brand, a half-meter hose is enough. Most often it has to be shortened based on the layout of the parts. Thermal insulation material is also in almost all cases sufficient in a size of no more than 1 square meter. m.