The VAZ car became the best in the Soviet automobile industry, and its popularity is still quite high. This is partly due to the high saturation of the market with these cars. They are available to almost every resident of the country, which is why they have become the “people's working” transport.
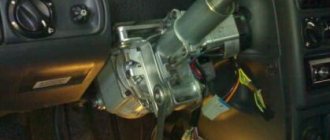
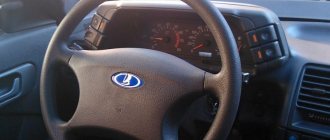
Steering wheel on a VAZ
Today, spare parts for VAZ are in demand, because so many cars needing maintenance require a large volume of parts. Among them is the steering wheel, some buy it simply to replace the old one, while others decide to embellish the interior a little, buying the steering wheel only for the purpose of some kind of tuning. It is important to consider that almost all steering wheels are interchangeable; in some cases you just need to use additional bushings.
How to remove the steering wheel?
Dismantling the steering wheel on VAZ 2114 and 2115 is carried out using the same method. However, remember that according to the Code of Administrative Offenses, replacing a steering wheel with a steering wheel different from the original is considered illegal modification of the steering structure and vehicle control system. Such tuning falls under Part 2 of Article 12.5 of the Code of Administrative Offenses on driving a vehicle in the presence of malfunctions or conditions under which its operation is prohibited. Recently, traffic police officers have been quite zealous in catching violators of this article, so think carefully before embarking on the replacement process.
The standard VAZ 2114 steering wheel looks unattractive, so someone may want to replace it
Required Tools
To remove and then install a new steering wheel, you will need the following tools:
- new steering wheel (make sure the part you choose fits your car);
- set of screwdrivers with straight and Phillips slots;
- 24 mm socket head;
- pencil or marker;
- hammer (in some cases);
- a soft metal drift (included with the hammer);
- wire cores (in some cases).
Please note that after completing all the work, you will have to remove traces of a pencil or marker from the steering wheel cover and front panel. To avoid problems with subsequent cleaning, consider the coating material of these interior elements. You should not use permanent, or as they are also called, indelible markers, especially if the parts are covered with high-quality natural leather of a light shade. The easiest way to remove marker is water-based. But it is better to use a regular pencil: it can be erased with a regular eraser.
Steering wheel removal process
There is a signal inside the steering wheel that receives power from the battery, so the first thing you need to do is turn off the power to the car. To do this, you just need to disconnect the negative terminal. After this, you can safely begin the dismantling process.
- Remove the ignition key from the lock.
- Turn the steering wheel so that the system locking the steering shaft is activated. Your steering wheel is now locked in a straight position.
- In order to subsequently correctly install the new part while maintaining control accuracy, apply a mark to the steering wheel with a pencil. Place a similar mark on the dashboard right next to it.
- Using a straight screwdriver, pry the cover with the Lada inscription on the steering wheel and remove it. This element is attached using ordinary plastic clips, so removing it is not difficult. However, due to the thin plastic, the part breaks easily. If you plan to continue using your old steering wheel, be careful.
- Under the trim you will see two screws. They hold the steering wheel cover. Unscrew them using a Phillips screwdriver and then remove the cover.
- In the central part of the structure you will see a large nut. It should be unscrewed using a 24 mm socket.
- The steering wheel no longer holds anything. To remove it, grab the steering wheel with both hands and pull each side in turn. There's no point in trying. If the part has not been dismantled before, it will be quite difficult to move. Do not try to remove the part with one jerk: you may accidentally injure yourself.
- If attempts to remove the steering wheel using the method described in point 7 are unsuccessful, use a small hammer and drift. In addition to additional tools, you will need an assistant. One person from the pair should pull the steering wheel, and the second should hit the drift attached to the end of the steering shaft with a hammer.
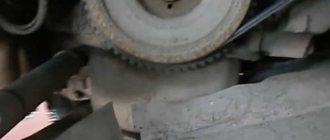
Removing the steering wheel for VAZ 2114 and VAZ 2115
Experts recommend not turning off the central nut completely, as it can protect you from serious injury in the event of a sudden break of the steering wheel. Make several turns while performing step 6, and when the part comes off the steering shaft, unscrew it completely by hand.
Video: how to remove the steering wheel on VAZ 2114 and 2115 cars
In this simple way you can dismantle the steering wheel on a VAZ 2114 and VAZ 2115.
What kind of steering wheel can I install?
If you decide to replace your old steering wheel, it means that its appearance did not suit you in some way. Of course, the issue may be a breakdown or external damage, however, even in this case, you should consider installing third-party models. What if you like one of them much more than the previous steering wheel?
Sports models
When tuning their iron horses, car enthusiasts often look at sports steering wheels. Their appearance helps create the image of a fashionable racing car. The sports steering wheel has a smaller diameter than a regular steering wheel, which significantly improves maneuverability. In addition, it saves space inside the car. And various design options give room for creativity when styling the rest of the interior.
The design of a sports steering wheel can refresh the interior of the car
Unfortunately, sports steering wheel models have as many disadvantages as advantages. It is not as safe in a collision as the stock steering wheel. Its construction uses metal, so upon impact, the risk of serious injury increases. In addition, sports steering wheels are not equipped with airbags.
To install such a steering wheel you will need special adapters. They can be divided into two categories:
- cast;
- corrugated.
Moreover, the latter are much safer, since in the event of an accident they can fold up and absorb part of the energy.
The corrugated adapter for the sports steering wheel can fold upon impact, therefore it is considered injury-proof
Buy a sports steering wheel from trusted stores and from well-known manufacturers. Make sure you have the appropriate certificate. A poor-quality steering wheel, even with a corrugated adapter, can play a cruel joke on you if you get into an accident.
Steering wheels from other VAZ car models
Steering wheels from more modern models of VAZ cars, such as Lada Priora, Kalina or Granta, look prettier and are much more comfortable in the hands. Installing them will not be difficult, provided that you replace not only the steering wheel itself, but also the steering column column. Otherwise, the hub size will not match.
The Lada Kalina steering wheel looks more stylish and presentable than the standard part from a VAZ 2114 or 2115
Read on to learn how to choose the right steering wheel for the VAZ 2114 and VAZ 2115.
What you need to know when installing
Please note that not every steering wheel is suitable for installation on VAZ 2114 and VAZ 2115 cars. You need to choose a steering wheel with the same contact group as the original part.
choose a steering wheel with the same contact group as that of the VAZ 2114 and 2115
This is quite easy to do if you plan to install a steering wheel from other VAZ models. For example, a steering wheel with a Europanel from a VAZ 2110 is ideal for these purposes.
Causes of malfunctions
There are a number of reasons why the instrument lighting of the VAZ 2114 may stop working correctly.
The most common of them are:
- light bulbs have burned out or diodes have failed (with LED backlighting);
- contacts and connectors have oxidized;
- fuses are blown;
- damage has occurred in the wiring itself;
- the integrity of the common contact board has been compromised;
- Lost contact with the “mass”.
In order to find out the exact cause, you will have to perform dismantling work and carry out diagnostics. You don’t need any complicated tools for this—it’s enough to have a simple tester (multimeter) or voltmeter.
Installation Rules
Installing the steering wheel is a dismantling process in reverse order. If you can handle the removal, then you will be able to install it.
- Installation begins by transferring the mark from the old steering wheel to the new one. Be extremely precise: the correctness of further control of the machine depends on this. The mark on the new part should be exactly in the same place as on the previous one.
- Put the steering wheel back in place. Make sure that the mark on it and on the front panel match the same as in the case of the old part.
- Replace the central nut and tighten it. If it does not fit tightly in the socket head, insert the wire strands between them. When the nut is in place, remove the wires and secure the nut tightly.
- Replace the steering wheel cover and tighten all screws.
- Make sure the steering wheel is straight. If even a slight displacement is observed, the part will have to be reinstalled.
- Replace the battery terminals and test your new steering wheel by driving it away from major roads. At first, its diameter may be unusual, but the ease of driving should remain the same.
if the nut falls out of the socket, use the wire strands
The most difficult thing in the process of replacing the steering wheel on a VAZ 2114 and 2115 is choosing the right parts. Pay attention to the markings on the steering wheel, covers and, if necessary, adapters. In some cases, it may be necessary to replace the steering column switches. But dismantling and installing a new steering wheel itself will not cause you any particular difficulties if you strictly follow all the instructions.
Installation and connection of the EUR steering wheel from Priora in VAZ 2113, 2114, 2115
I rode my father’s viburnum and realized that there was no escaping progress, especially since I plan to change the rack by 3.2, or even 2.5 turns, and without an amplifier there will be no life at all. I bought it at Stinger. The kit includes everything you need: 1. The amplifier itself (a new model, not glitchy in short). 2. Adapter. 3. Steering shaft. 4. Wiring. From myself: 1. I don’t see any problems with the mechanics. 2. For electrical purposes, you need to look for a connection diagram.
I started to disassemble: 1. Removed the steering casing (nothing complicated). 2. Disconnected and removed all switches (wipers and lights). 3. Removed the ignition switch (the first problem is that you need to unscrew the bolts with a chisel, since there are no edges (!). 4. Use a chisel to straighten the clamp securing the shaft and steering rack (at the engine shield). 5. Use a chisel to unscrew the two bolts securing the steering column (also quite inconvenient). the adapter is attached, I'll clamp it in a vice and knock it out through the sleeve). 10. Measured so that only a little bit came out of the nut and sawed it off (you can use a grinder, I made do with a saw and a file). EUR to the adapter (four nuts for 13 plus growers). 14. Replaced the ignition switch (I used hex bolts, it’s more convenient).
Photo: 1. Standard steering column without casing. 2. Steering column mount. 3. EUR in place).
Mechanically: I bought: 1. Adapter for steering wheel (for Priora). 2. Steering column switch block (also from Priora) 3. Steering column cover from Priora (not yet available). I installed everything, although I haven’t figured out the sound signal yet, but I’ll do that one of these days)). Electrics: 1. Extended the power wires to the battery (plus with a fuse, minus just a wire). 2. Tightened the ground (black thin wire for controlling the power steering, screwed under the instrument cluster). 3. Connected the wires to the instrument cluster. 3.1. The orange wire from the red block to the first from the EUR block is double yellow-red (photo 2). 3.2 Gray + yellow wires from the red block to the third from the EUR-blue block (photo 4). 3.3 Brown-red from the white block to the second block from the EUR-brown block (photo 3). In photo 5 from bottom to top: 1. Yellow-red. 2. Brown. 3. Blue. 3.4 There are also wires there, for k-line and so on, I didn’t connect them (wiring for Priora is not provided in Samara). 4. Collected everything.
Now the feelings: 1. Yes, everything is super 2. At low speeds it’s just a fairy tale) 3. As the speed increases, it turns off and the car steers as before (that is, clear and intelligible feedback). 4. Unlike the early Kalinovsky EURs, this one, when turned off, does not betray its presence in any way (I don’t feel it at all).
Disadvantages: 1. Because of the adapter, the steering wheel dropped (not fatal, but still). 2. The bullet column has lengthened, the steering wheel has become closer to the driver (in principle, everything can be treated by adjusting the seat and I, at 186 cm, did not experience any inconvenience). 3. The steering wheel covers the instrument cluster.
To the diagram: 1. Power steering harness; 2. EURU power supply circuit fuse; 3. Diagnostic contacts of the EURU harness; 4. EURU; 5,6,7 - connecting blocks of the electrical power steering harness, connected to the wires of the instrument panel harness, disconnected from the blocks to the instrument cluster; 8. Block (red) of the instrument panel harness to the instrument cluster; 9. Block (white) of the instrument panel harness to the instrument cluster; 10. Alarm block; 11. Ground terminal.
From myself: THE COLOR OF THE EUR WIRES MAY DIFFER.
1. Button: well, it’s not realistic to put it in its regular place, so I had to think about it. The task was to save the button, not to cut the wiring and place it in a convenient place - as a result, it is now on the panel. I am comfortable. 2. Tilt of the steering column: I placed washers under the far fasteners (which are closer to the engine compartment) of the EUR with an adapter, with them the angle of the steering column changed and the steering wheel stopped blocking the instrument cluster
https://www.drive2.ru/l/288230376152839628/, https://www.drive2.ru/l/4899916394579278194/, https://www.drive2.ru/l/4899916394579281273/
Installation of steering rod opening plugs in VAZ 2113, 2114, 2115
I have long dreamed of closing the steering linkage openings, and I came across factory plugs in a store.
Diagnostic procedure
In order to remove the instrument panel, you will need a set of screwdrivers and two wrenches - 8 and 21.
The entire procedure is performed in the following order:
- Unscrew the three screws and remove the trim.
- Unscrew the five screws on the right side of the console and remove the screen.
- Disconnect the negative cable from the battery.
- Disconnect the wiring harness that goes to the cigarette lighter.
- Disconnect the heater fan mount.
- Unscrew the bolts responsible for fixing the steering block brackets.
- Remove the light bulb sockets, light guide and decorative insert.
- Remove the lamp responsible for illuminating the hydraulic corrector.
- Unscrew the screws of the top and bottom rows of the panel and completely dismantle it.
How to replace a steering wheel
The whole process is divided into several stages:
- Preparatory:
- Disconnect the battery by removing the negative terminal. If this is not done, a signal will sound when unscrewing the central nut with a screwdriver.
- Remove the ignition key from the lock.
- Lightly turn the steering wheel to lock the steering column.
- Place two marks: one on the steering wheel, the other on the dashboard so that they coincide in direction.
- Withdrawal.
- Installation.
Dismantling
To remove the steering wheel on a VAZ-2113, 2114, 2115 car, you need to:
- Using a flat-head screwdriver, pry off the plastic trim that is installed on the steering wheel cover. It is enough to press the latches. Act carefully so as not to break.
- Use a Phillips screwdriver to remove the two screws.
- Remove the cover.
- Place the socket head 24 on the knob and release the central nut.
Attention! For safety reasons, it is recommended not to completely unscrew the nut so that it does not injure the driver when removing it.
- Holding the steering wheel with your hands and rocking it to the sides, remove it from the central shaft.
- It happens that it is not possible to immediately disassemble the steering wheel. A hammer and a drift come to the rescue. Place a piece of metal against the end of the central shaft, then use sharp and gentle blows of a hammer on the drift to move the steering wheel.
Note! Help from a second person will be helpful. The process will speed up if an assistant pulls the steering wheel towards you at the moment of impact.
Installation
After removing the old steering wheel, you need to install a new part.
To install the steering wheel, you must:
- transfer the mark marked on the removable sample to the new copy;
- place the steering wheel on the central shaft so that the marks match;
- tighten the nut.
When choosing a product, you must carefully look at the compliance of the purchased item with the requirements of the manufacturer.
What kind of steering wheel can I install?
There are many options for steering wheels that can be installed on the VAZ-2113, 2114, 2115. The main thing is to choose the right mount for the central shaft.
When choosing a steering wheel, you should pay attention to:
- dimension, shape;
- type of fastening, product material;
- additional features that can be connected.
Sports models
Tuning enthusiasts want to make their car as individual as possible, and therefore they rush to install decorative trims on it, change body kits and bumpers, and attach steering wheels from famous brands of racing cars. The result is a fashionable car that attracts the attention of passers-by. By reducing the diameter of the steering wheel, the maneuverability of the car increases, there is enough space inside the car for a comfortable fit.
However, installing a sports steering wheel has its disadvantages:
- the design does not include an airbag;
- For fastening, special clamps or adapters are required.
Important! If you want to install a sports steering wheel, you can contact the sales points of such parts. Experts will tell you which product should be installed on a specific car.
Steering wheels from other VAZ car models
For models 2113, 2114, 2115, copies from more modern representatives of the domestic ones, Kalina, Grant, are suitable. They are more convenient and have an aesthetically attractive appearance. Installation of such products requires replacing the steering column column. The “steering wheel” from model 2110 fits perfectly.
What you should know when choosing a steering wheel
When changing the steering wheel on VAZ-2114 and 2115 cars, you need to select a similar product with an identical contact group. The diameter of the control element affects the quality of vehicle control. The smaller the size, the more effort required when driving.
Choosing the right steering wheel is not an easy task. In cases with non-original products, the installation process may take some time, taking into account the selection of appropriate components. It all depends on the desires and capabilities of the car owner himself.
Why do you need an on-board computer?
In previous articles we have already talked about what an on-board computer is, what it is needed for and what types they come in. But let me repeat myself so that you clearly understand all the advantages of having an on-board computer, and there are probably no disadvantages, except perhaps spending money on the purchase and that’s all.
Let's take, for example, the on-board computer STATE 115×24. With this model in your possession, you can:
- set the radiator fan start temperature; this function is very useful, for example, in winter, when you can control the temperature of the coolant, thereby monitoring the temperature of the heater radiator.
- The function of drying and warming up the spark plugs before starting the engine is very useful.
- The function of resetting settings and ECU adjustments is needed to switch to gasoline with a higher or lower octane number (from 92 to 95 and vice versa), and this function is also needed to reset settings after a long trip with increased load on the engine.
- The ability to read errors allows you to monitor the condition of the car and change non-working sensors and elements in a timely manner.
We install the steering wheel from Priora 2 on a VAZ 2114
The idea arose to change the steering wheel on the 4 to a more interesting one in appearance to match the interior of the cabin - I chose the steering wheel from the Priora 2 in eco leather with perforations with gray stitching to match the design of the seat upholstery and door cards, a good combination.
And in terms of tactile sensations, the steering wheel from the Priora is more pleasant (perhaps eco-leather gives such a thrill), due to the thicker steering wheel, the steering wheel coverage is better than on the relay from the VAZ 2114, in general, steering is a pleasure.
To switch to Priora, you had to buy the following steering wheel:
✔️ Steering column from Chevrolet Niva 2123 is simple (I took it assembled with a bracket - it will not be needed during installation) - 1500₽ + delivery ≈2000₽. ✔️ Steering column cable from Chevy Niva assembled with steering column switches - 1000₽ ✔️ Steering column cover from VAZ 2112 euros 500₽ you can get it from Priora, it will be a little more expensive. ✔️ Priora 2 steering wheel in eco leather with gray stitching, a dummy airbag along with it (I got it of not the best quality, it will be replaced with a better one without alteration in eco leather and stitching), lower gray insert - 5900₽ + delivery = 6300₽ Also on little things I had to buy an additional 2-pin chip to connect an audio signal from the cable to the steering wheel pad - it requires small terminals for connection!
You will need bolts for the ignition switch with a breakaway cap when installing it on a new steering column.
The installation process is not as complicated as the process of removing the steering column from 2114 with breakaway bolts that are attached under the steering column in 2 places, it was very difficult to knock them down and unscrew them (with the ignition switch it was much easier - 4 screws were quickly torn off with a chisel and a hammer) from the beginning I knocked it out with a chisel at approximately 45°, as much as possible, in the end one bolt came out easily, and with the second I had to use everything that was at hand - I used WD40, then the idea came to buy pliers so that it could be done better it was possible to clamp the head of the bolt and turn it (it’s not convenient to clamp it with flats), after the bolt was torn off a little with a chisel and hammer, I had to unscrew it gradually since the bolt was tight, having unscrewed it safely, I saw that it was bent in an arc, that’s why it didn’t give in twisting.
After unscrewing all the bolts and nuts securing the steering shaft bracket, I removed the shaft assembly from the steering column driveshaft by loosening the clamp on the steering shaft splines.
Then you need to sort out the steering columns, namely, remove the steering column assembly (shaft, pipe, adjustment lever) from the VAZ 2114 bracket, put it aside, and put the steering column from the Chevy Niva on the same bracket in the same composition; when installing it turns out that the steering column the shaft and pipe from the Chevy Niva will be approximately 3 cm longer than on the VAZ 2114; This will be exactly what is needed to install the steering wheel and steering column cable with switches and to achieve the correct position of the shift levers in relation to the steering wheel and thus it will be convenient to use them.
We install electric power steering on a VAZ 2114 with our own hands
From its very production, the steering system of the VAZ 2114 car assumed the possibility of installing power steering using an installation kit. This also applies to electric power steering or simply EUR.
This modification will make it easier to turn the car and increase comfortable handling. This is especially true for drivers who drive in the city most of the time.
The main difference between power steering (power steering) and electric power steering is that the strength (efficiency) of the former directly depends on the speed of the engine. At high speeds, turning the steering wheel is too easy. This affects both ride feel and handling.
To overcome such problems, the power steering is not connected directly to the motor, but using a gain regulator. This is exactly the functionality that an electric amplifier has. The operation of the electric power steering is not characterized by a direct connection between effort and motor power, which allows it to be used as much as necessary in a specific situation.
For the VAZ 2114, a similar EUR is suitable as for the Lada Priora.
Additional advantages of using an electric booster instead of power steering:
- Less maintenance requirements (no need to monitor oil, connections).
- In cold weather there is no need to warm up, as when using power steering.
- Installing the EUR is much easier (no need to interfere with the engine compartment).
- High reliability.
- The only downside is the lower power, although on passenger cars like the VAZ 2114 this is not at all noticeable.
Solution
- traditional incandescent lamps,
- LED in a plastic socket,
- SMD LED is a more expensive and reliable option, a super-bright diode.
The choice will always depend on financial capabilities and lighting preferences
The number of backlight and control lamps is up to 19 pieces. It varies slightly depending on the design of the instrument cluster and the modification of the vehicle. Many car owners choose LEDs due to lower energy consumption and longer service life. This backlight is brighter and gives an interesting bluish color instead of the standard green. But due to the design of the diode, the brightness control of the instrument illumination will not work, always turning it on at full power. On a long road trip at night, this can be distracting and irritating to the eyes. But in any case, the choice of light sources is yours.
If you are going to install LEDs, it is recommended to first check them with a tester for the absence of a short circuit.
Light bulbs
Recently, it has become fashionable to install LED lighting for the VAZ dashboard with your own hands. However, not all car enthusiasts correctly connect it to the on-board network. This can cause the light to go out at the most inopportune moment. So, it’s worth checking the contacts of the entire backlight circuit.
There have been cases where, as a result of bumps, all the light bulbs burned out at once. In this case, you need to look for a breakdown in the wiring, you can get stuck like that again!
The same applies to standard incandescent light bulbs that come with the car from the factory. Thus, a break or burnout of one of the light elements can lead to the fact that the entire backlight stops working. If you run the tester through the entire circuit, you can easily find an open circuit.
The board is damaged
The worst thing that can happen and what every car enthusiast fears is the burning of the dashboard, or rather the control board.
There is only one way out - replacement, but many car enthusiasts manage to resurrect such elements using a soldering iron. Although, as practice shows, in 50% of cases it doesn’t last long.
The main reason for board burning is a short circuit. In this case, often the place where the wiring is connected and the most vulnerable point – the backlight – is on fire. If incandescent lamps are installed, they will be dark or black, but the LED backlight burns out in the places where the solder is connected to the board.
Installation instructions
When installing an electric power steering, it is necessary to take into account that it will be necessary to replace the steering column of the VAZ 2114 with an “electrically driven column”. To do this, let's start with the wiring. You will need to deal with the pads. There will be no need for any “twists”. There is a terminal in the block that we need to remove and insert into the block in the harness.
We insert the free terminal of the harness exactly into the place where the standard wire was. You don't need a special harness for this. Connect two 4 square wires to the battery. Don't forget to connect a 50A fuse. The “weak point” will connect to the tachometer, speed sensor, ground, K-line and wiring to the warning lamp. Don't forget to check the presence of speedometer and tachometer signals.
- Remove the casing with switches and ignition switch.
- Unscrew the bolt on the rail and remove it. We need to determine how much larger the “native” part is than our new one.
- We install the shaft on the EUR. After this we attach the shaft itself in its place.
- Setting up the wiring. We stretch two cables to the battery from the passenger compartment, preferably through the left wing. To conduct wiring you can:
- First remove the washer fluid reservoir.
- Take a solid wire and drag it through, trying to get to the hood.
- As soon as it appears near the hood, we attach our wires to it.
- We pull it out together with our wire.
- We connect the EUR electronics. There is a red connector under the instrument panel with an orange wire in it. It is to this that you need to connect the electric amplifier.
- Similar procedures must be done with the gray wire.
- We connect the power ends. In the battery we connect the pink one is a plus, and the black one is a minus.
The installation is now complete. If you did everything carefully according to the instructions, you will enjoy the ease of driving the VAZ 2114.
The instrument panel backlight has disappeared, what should I do?
The dashboard going out is a nightmare for any driver, since with the disappearance of the light, other malfunctions may follow, such as non-functioning speedometer and other indicators.
Therefore, it is worth understanding that if the instrument panel does not light up, then this problem must be eliminated immediately , but not all car enthusiasts are capable of this.
It is worth understanding that if the backlight disappears, then the problem lies somewhere in the electrical circuits. This is where you need to look for the problem. This will require design knowledge of the vehicle's on-board circuit, a tester and related tools, such as electrical tape, a soldering iron or more. Of course, it is not always possible to eliminate the problem locally, and faulty products have to be replaced completely.
Causes of malfunction
Where does the problem lie? As mentioned earlier, it is worth looking for problems in electrical circuits. Let's look at the main locations where problems may be hiding:
- Fuse.
- Backlight bulbs and their electrical circuit.
- Wiring.
- There is a fault in the fuse box.
- Damage to the board.
Solutions
So, when all the main reasons are, so to speak, “in the face,” you can try to determine the exact location of the breakdown, and also fix it yourself. As always, it is worth noting that if a motorist does not know the design of the car or is not confident in his abilities, then it is recommended to contact a specialist car service center.
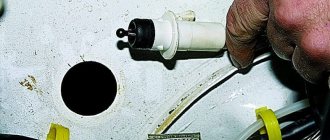
Fuse
General view of a blown fuse
Probably the first cause of all electrical circuit malfunctions is the notorious fuse.
This is where you should start troubleshooting. To find out which fuse is responsible for the instrument lighting, as well as its location in the mounting block, you should refer to the technical documentation. Also, on the fuse cover it is written which element should be checked. If the fuse is found and replaced, but the problem does not go away, then you should look for the source in another place.
Source
Adjusting the steering wheel position
If you don’t like the height and position of the steering wheel, then you will need to grind the edges of the shaft to the size you need or install gaskets between the plate and the body. It is worth remembering that the electric power steering is automatically switched off at speeds above 50 km/h, unlike the same power steering.
Installing electric power steering on your own is quite possible. You just have to remember that even for an experienced driver it will take a lot of time and effort. But for a lover of comfortable driving, the result will justify all costs and hopes.
- Self-replacement and cleaning of the idle speed sensor on a VAZ 2114
- We find out how to improve the headlights on a VAZ 2114
- Button for dimensions and low beams of VAZ 2114: features and replacement
WHAT IS A UNDER PANEL BLOCK?
The block under the panel is a connector for connecting wires.
At the store they offered me to buy an EUR from Viburnum. It wasn’t there with the priors. So which one should you buy?
Which electric amplifier should I install on a VAZ 2114? From priors or from viburnum.
Hello! Bet from priors.
Buy from Priora, because it’s not a fact that it will sit down from Viburnum without problems.