Starter solenoid relay is an electromagnet that performs two functions in the ignition system. The first is to bring the Bendix starter gear to the flywheel ring gear. The second is its return to its original position after starting the engine. A breakdown of the solenoid relay may result in the engine simply won't start. There are not many reasons for relay failure. In this material we will try to describe the signs and causes of failure, as well as diagnostic and repair methods.
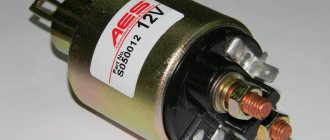
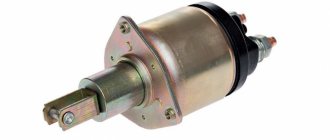
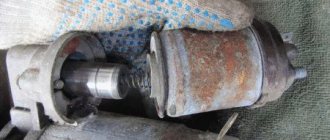
Solenoid relay with core
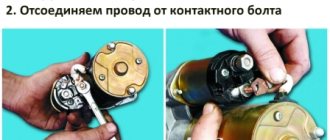
How to remove the solenoid relay?
It is worth noting that when replacing the retractor, it is not necessary to remove the starter, but if, in addition to the retractor, you want to service the starter, then read: How to remove the starter?
To replace the solenoid relay we need:
- Wrenches from “10” to “8”.
- Flathead screwdriver.
- New retractor.
- Remove the negative terminal from the battery with a key set to “10”.
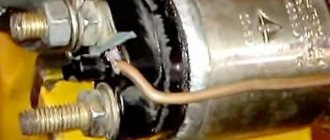
- We find the solenoid relay and remove the red wire terminal from it.
- Then, using a key “8” from the back of the relay, unscrew the two bolts securing the traction relay (shown in the figure).
- We remove the power cable of the retractor and remove the relay.
Important. You need to remove the relay carefully: make sure that the core remains inside . There is also a spring in the retractor relay - make sure it does not fall out.
Starter motor malfunctions TOP-5 reasons
- Wear of graphite brushes. To replace them, you need to remove the back cover. The brushes are attached using springs and clamps.
- Bushing wear. This failure causes increased noise and vibration during operation. It can cause destruction of other structural components. Brushes are especially sensitive to vibrations, since during radial rolling of the shaft they wear unevenly.
- Ground test. In a working motor, the resistance between the housing and the winding should be at least 10 kOhm. This parameter can be measured using a megger.
- Burnout of the rotor windings. This may be indicated by the appearance of dark spots. To replace the rotor, you need to disassemble the entire unit; to do this, you will need to remove the retaining ring and washer from the shaft, and unscrew the studs. The rotor, together with the solenoid relay, is most often the cause of starter failure.
- Destruction of magnets. In new models, permanent magnets are installed on the stator instead of windings, this greatly simplifies the design. But if the workmanship is not high, then they may fall off. In such cases, the entire starter must be replaced.
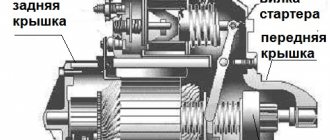
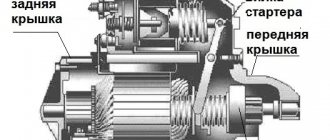
Replacing the starter retractor relay on a VAZ 2114
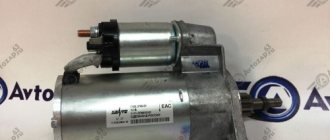
starter retractor relay VAZ 2114
More than once it was advised to deal with the filling of the hood of the fourteenth yourself, in this case there will be no abandonment of tradition. The retractor relay is located directly on the starter, having two wires: a thin red one (with low current from the ignition switch) and a thick positive contact from the car's charging battery.
Diagnostics without removing the starter using a multimeter
To do this, use a multimeter (tester) to first sequentially measure the voltage at the terminals of the battery, disconnected from the vehicle’s on-board network. It is approximately 12.7 V. If the device readings are less than 12 V, the battery is considered to be severely discharged and is not suitable for further testing.
Next, restore the normal connection of the wires and measure the voltage at the battery terminals and relay contacts. Compared to the previous case, it changes by no more than 0.1 V and will be equal at both control points. Turn the key to the start position. The voltage at the relay contacts should not fall below 12 V. Otherwise, the connecting wires are most likely faulty; it is possible that one or more contacts in the current flow circuit have burnt out.
Cleaning contacts and replacing individual parts
After removing the cover, you can assess the condition of the contact plates. Carbon deposits or oxidation should be removed using sandpaper. You can try to replace damaged springs, if any, by selecting ones that are suitable in size and characteristics. Selecting springs is a very complicated matter. It is necessary to measure not only the dimensions, but also the force developed. It will not be possible to do this without having special equipment at your disposal.
Having completed the repair, we place the cover in place, lubricate the joint with sealant, secure it and recheck it. After making sure that all parameters are normal, we install the relay on the starter and perform final assembly.
To be honest, such repairs will not last long. Over time, the plates fade, become thinner and are no longer able to provide reliable contact. We note once again that it is advisable to carry out such work only in situations where there is no access to spare parts. In other cases, the correct solution is to replace the starter solenoid relay with a new and known good part.
Principle of operation
The battery powers the starter coil, which, in turn, acts on the armature under the influence of a magnetic field. It moves and compresses the spring (return), causing the bendix to mate with the splines on the flywheel. At the moment the contact elements close, the retractor winding remains without power, and the magnetic field holds the armature inside the system. Then, after the elements are closed and the engine is started, power stops flowing to the holder coil, and the armature falls into place, as a spring acts on it (as a result, the bendix disengages).
Where is the starter relay located on a VAZ 2114
Having understood the principle of operation and determined the place where the starter relay is located on the VAZ, we look at how it can annoy the owner of the fourteenth.
Dismantling
There should be no problems with the dismantling process. The main thing here is to remove the starter, since the required relay is held on it. Therefore, dismantling is carried out as an assembly.
- Turn on the handbrake, disconnect the battery by removing the negative terminal from it.
- A wire with a large cross-section goes from the battery to the contact of the relay. It can be turned off by unscrewing it using a 13 key.
- Remove the thin winding power wire from the solenoid relay.
- Using the same 13mm wrench, unscrew the three mounting nuts holding the starter to the clutch block.
- You can remove the device through the bottom or top. If you chose the top, then you need to slightly rotate the starter around its axis and remove it.
- The lower output is more difficult, since here you need to remove the crankcase protection. But if parallel work is carried out that requires similar manipulations, problems will not arise.
Repair
Next, you have a choice to make: replace the entire relay or try to repair it.
Only a relay that has a collapsible design can be fully repaired. It is not uncommon for cars to have a relay with a non-separable body. Repairs there are also possible, but only partial.
- Unscrew the pair of bolts that hold the relay on the starter, disconnect the core shackle from the upper end of the drive lever;
- Install a new solenoid relay in its place, thereby completing the replacement.
But if you want to save money or just like to tinker with your car, you can try to bring a damaged relay back to life. To do this, we offer you detailed instructions.
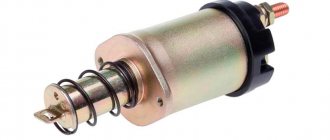
Disassembled element
If this measure does not help, we will disassemble the case and repair it.
- The relay consists of a housing with a winding inside, a core with a return spring and contacts.
- The spring disconnects the starter rotor gears from the Bendix ring when the power to the relay winding is turned off.
- The back cover of the relay is fixed with screws to the body. Therefore, the first thing we do is remove this cover by unscrewing the corresponding fasteners.
- Both contact bolts have a nut, which you also unscrew.
- You will see washers under the nuts. Do not lose them so that you can return them to their place during reassembly.
- Unsolder both terminals of the winding using a soldering iron. Then remove the cover.
- If you find traces of carbon on the contacts, they can be removed with a small file.
- There is a rubber O-ring under the cover. Check it for elasticity and integrity. If the ring is damaged or worn, replace it with a new one.
- Remove the contact plate along with the rod.
- Use a flathead screwdriver to remove the return spring.
- If the spring is deformed or stretched too much, it will need to be replaced. Otherwise, a worn spring will not be able to guarantee the desired contact. As a result, the relay does not work properly.
- Disassemble the contact plate. To do this, you need to remove the retaining ring that insulates the washer. After this, the plate will fall out on its own due to the pressure created by the spring.
- Remove the contact bolts from the cover. Clean the surfaces of their contacts. Often, due to burning of the contact surfaces, the solenoid relay stops working normally.
Contact bolts
- If the carbon deposits are too strong and cannot be removed with simple sandpaper, do not rush to buy new bolts. Just rotate them 180 degrees. So they will touch on the other side, where there is no carbon deposits.
- The relay windings are located in a non-separable housing. If they are damaged, you will have no choice but to completely change the relay.
- Replace all damaged and worn elements of the switching relay, and then put everything back into the housing. Reinstall the solenoid relay and check if the ignition returns to normal.
If the relay has a non-separable housing, many recommend replacing it. But if you wish, you can even repair such a unit. To do this, you need to flare the housing with pliers, then unsolder the contacts and remove the cover. Next, follow the instructions given above.
The last stage of replacement or repair is checking the winding resistance.
If the unit is working properly, the multimeter in ohmmeter mode will show you the following data.
Malfunctions
Everything is obvious here: charred wires, stuck contacts, burnt windings, and general wear and tear also happens. So that trouble does not take you by surprise, you need to listen to the symptoms of the imminent death of the draft relay:
- The engine starts, but the starter continues to spin. Its sound is unnatural and loud.
- On the contrary, the ignition is turned on, but the starter does not turn. Although the click of the relay was audible.
- The ignition works, the starter idles because the engine does not respond.
The pull rod on the unit can be disassembled, although most often not (especially after nine). You can understand the structure of the device itself by replacing the failed part, but it is better to take a new one.
The price of the VAZ 2114 starter solenoid relay is from 300 to 600 rubles, depending on the region of the country.
Checking with the starter removed using a multimeter
This test of the solenoid relay allows you to very accurately perform internal diagnostics and determine the condition of the windings and contacts. Dismantling the starter, depending on the make of the car, is carried out in various ways. For VAZ 2110, this procedure is carried out from below from the pit. Before unscrewing the fasteners, remove the wires (it is better to mark the terminals so as not to confuse them during assembly); you may need to remove the crankcase protection.
To begin with, voltage is applied from the battery to the body and terminals of the relay; operation is accompanied by a characteristic click and visible movement of the rod. Further checks are carried out using a multimeter, which is switched to resistance measurement mode and the range of 200 Ohms is selected.
Video: Checking the starter removed from the car
First, check the serviceability of the retractor and retention coils. To do this, one of the probes is connected to ground, the second touches the contacts in succession. The device readings are 2 ohms. Deviation of the device readings from the specified value is a sign of a break or short circuit. To check the power contacts, remove the core from the relay body and remove the return spring, after which the core is inserted back. The core rod is pressed against the table with a certain force and the resistance between the contacts is replaced. The resistance is approximately 1.5 ohms.
How to remove and install
For convenience, it is better to remove the starter, although many people do without it. On the other hand, you can replace the relay and diagnose the starter at once, you just need to remove it more carefully.
To remove the traction device itself, first of all we disconnect from the battery power, this moment is very important, otherwise you may get a good shock and you will definitely burn all the wiring. It would be good to clean the starter itself from accumulated dust and dirt, it will be easier to work. The process will be described for the type of relay that is assembled and whose parts can be replaced; it is more complicated than a non-assembled one for objective reasons.
- It’s easier to remove the battery terminal with the tenth key (remove the minus!).
- You need to remove the red wire from the relay itself, or rather its terminal.
- Using the eighth key, unscrew the nut of the brush assembly, it is located on the back of the relay, on the bolt, remove the contact that it held.
- Now we unscrew the fastenings of the relay to the ground (these are the same coupling screws).
- You need to remove the power wire and then pull out the pull-out relay.
- Now unscrew the end mounting nuts and remove the upper part of the relay.
- The old relay core must be replaced with a new one.
- And now we remember how we took everything apart and put it back together in reverse order.
When you halve one part of the relay from the other, be careful, firstly, the core may slip out, and secondly, the spring.
Replacing the solenoid relay on a VAZ 2114 is a simple matter. It’s even easier when it’s non-separable; in principle, you don’t have to do anything special, just remove the unusable part and replace it with a working version. The nuts are still the same, we’ll just screw them around the body.
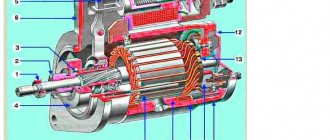
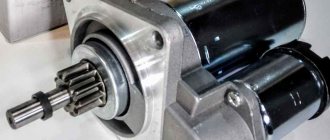
What does the starter consist of?
- DC motor. It consists of a stator with a brush assembly and a rotor with a commutator.
- Solenoid relay. It includes: retractor winding;
- holding winding, it is wound over the retractor;
- anchor with rod;
- two terminals for power wires and one for the control.
- bendix, which can move along the spline shaft;
The main part of the Bendix is the gear that transmits force to the flywheel.
- Gearbox. Usually planetary type, less often cylindrical. It connects the shaft along which the bendix moves with the rotor shaft. The appearance of gearboxes in new models has made it possible to use smaller, high-speed electric motors.
Functionality check
Still, despite the obvious symptoms of wear on the draft relay, you can make a mistake with your conclusions. Therefore, let's first check the starter. Having installed a new solenoid relay, there is a high probability that if something does not work, it will be the starter.
Turn the key in the ignition, the starter should start to wind, the relay click should be heard. In a situation. If the starter fails, you need to change it, not the relay.
We check the traction device itself in this way: we attach two contacts to its back cover (these are copper bolts), the starter winds - the traction relay is definitely faulty. By the way, there is no need to remove the starter, this way the readings will be more accurate.
If you still removed the entire system. Then the actions are as follows: we match the wiring of the contact of the draft relay with the positive of the battery, with another contact we match the battery charger and the ground of the starter. When the contacts touch the marks of the relay, it should respond and start working, with a click before the process. If it works, but as if in slow motion, check the contacts, they could oxidize or burn out.
In order not to spend extra money in the store and not to buy a new retractor, if suddenly the problem is not in it, there is a simple way to distinguish a breakdown of the starter from a breakdown of its pull relay.
We remove the starter and connect the negative terminal of the battery to its ground. Its design (of the starter) contains copper bolts and something similar to a tongue. You need to connect the positive terminal of the battery to this tongue. When there is contact, the solenoid relay will click and start working. If not, it's time to go shopping. The starter is faulty when the negative terminal of the battery is connected to its ground, and the positive terminal is connected to the bolt from which the contact goes to the draft relay (make sure that everything is in order with the contact, otherwise the starter will not turn, and you will decide, what’s the matter with him) - he started spinning, which means he’s a worker.
Checking status
Before changing the relay, make sure that the problem with starting the engine is related to this component.
To do this, consider two situations that indicate its malfunction.
Situation
Your actions
The relay makes clicks, but the armature does not spin
If there are clicks from the relay, check the condition of the armature. To do this, the terminals of the retractor relay are bridged with a large screwdriver or a piece of welding cable to the terminals at the ends. Taking a thin wire or a screwdriver can easily burn the terminals. When the armature is working, after closing the terminals, the armature will spin, which can be determined by the sound. Consequently, the solenoid relay itself has failed and requires repair.
The relay is completely silent
Even if there is silence after closing the terminals, the problem should be looked for in the starter. The relay no longer plays any role here.
Having discovered that the relay has served its purpose, it must be replaced or repaired, if possible.
Changing the starter retractor relay of VAZ 2114
Failure of the starter solenoid relay makes it impossible to start the engine. If the solenoid relay is not working, when you turn the ignition key to the third position, you will only hear clicks, and the starter will not spin. To check the functionality and, if necessary, replace the VAZ 2114 solenoid relay, you need to unscrew the starter power terminals and dismantle it. It is important to remember that before removing the starter on a VAZ 2114 car, you must turn off the power to the battery by removing the negative terminal.
To replace you will need:
- Flat head screwdriver
- Head for 13
- Solenoid relay (average price in Russia is approximately 450 - 750 rubles)
Types of solenoid relays and their manufacturers
Let's briefly touch on the solenoid relays used on VAZ cars. They are divided into four types:
- for non-geared starters of VAZ 2101-2107 (“Classic” models);
- for non-geared starters of VAZ 2108-21099 models;
- for VAZ gear starters of all models;
- for AZD starter gearboxes (used in VAZ 2108-21099, 2113-2115 models).
In addition, as mentioned above, they are divided into collapsible and non-collapsible. Older models are collapsible. New and old are interchangeable .
For VAZ cars, solenoid relays are produced by the following companies:
- Plant named after A.O. Tarasov (ZiT), Samara, Russian Federation. Relays and starters are produced under the KATEK and KZATE trademarks.
- BATE. Borisov Automotive and Tractor Electrical Equipment Plant (Borisov, Belarus).
- Kedr Company (Chelyabinsk, Russian Federation);
- Dynamo AD, Bulgaria;
- “Iskra” A Belarusian-Slovenian enterprise whose production facilities are located in the city of Grodno (Belarus).
When choosing a particular manufacturer, it is necessary to take into account that the highest quality and most common brands are “KATEK” and “KZATE”. Also remember that if an AZD starter is installed on your car, then “native” relays manufactured at the same enterprise are suitable for them. That is, they are not compatible .
Results
The starter retractor relay is a simple device. However, its failure is critical , as it will not allow the engine to start. Even an inexperienced car owner with basic plumbing skills can check and repair the relay. The main thing is to have the appropriate tools at hand. If the relay is not removable, we still advise you to replace it, since, according to statistics, after repairs are completed, its service life will be short. Therefore, if the solenoid relay does not work in your car, buy a similar device and replace it.
Instructions for replacing the solenoid relay VAZ 2114
- After removing the starter, place it on a flat surface and, using a 13mm socket, unscrew the nuts that secure the solenoid relay terminals.
- Next, use a screwdriver to unscrew the two screws that secure the solenoid relay housing to the starter housing, after which you can safely remove it, being careful that the rod spring is not lost during removal.
- We install the starter retractor relay in the reverse order.
- Also, replacing the part we are interested in can be done without removing the starter from the engine; however, for this, some elements of the attachment must be removed.
Video on how to replace the solenoid relay without removing the starter from the engine
Source
How to repair a relay with your own hands
Basically, repair work involves dismantling a number of mechanisms. Here it is important to remember to take precautions - do not rush, do everything very carefully, turn off the power to the machine. It is also worth considering carefully whether there is a need to repair the starter retractor relay yourself. In the absence of the necessary skills, abilities and tools, you should entrust everything to the hands of professionals - otherwise you can not only aggravate the breakdown, but also get injured.
At the same time, if you decide to carry out repair work yourself, disconnect the power from the battery. This is the initial step to disassemble the starter, otherwise all the car's wiring may burn out.
Do not rush to dismantle the device; first, wipe all elements from dirt so that dust does not penetrate inside the system. Only after this we begin to unscrew the brush assembly nut. Next we get the contact. Then we proceed to the coupling screws, the task of which is to connect the assembly to the mass.
If everything is done correctly, we will be able to completely remove the relay from the mechanism. Now we proceed to unscrew the nut at the end, as a result of which the part is divided into two parts. This way we gain access to the core, thanks to which we can replace the faulty element, after which we install the mechanism in its place.
As a final step, it is worth checking the serviceability of the elements. If everything functions as it should, we mount the relay in the vehicle. After completing the repair work, we once again evaluate the performance of the system.
Where is the VAZ 2114 solenoid relay located?
The starter device on the VAZ 2114 model is not much different from other cars of this brand. The fairly simple design of the motor starter allows it to serve for a long time without breakdowns. Jamming and complete failure of the retractor relay makes normal use of the starter impossible. To replace it yourself, you need to know the location of the relay. The photo below shows the exact location of the retractor element.
The photo shows the assembled device. At the top of the picture there is a cylinder to which the power wire goes. This part is the solenoid relay. With some manipulations, dismantling the part takes about 10 minutes. Quick replacement of the VAZ 2114 starter relay is possible due to the convenient location of the element. If desired, you can completely dismantle the part and start replacing the spare part.
Video that clearly demonstrates the replacement process:
The main task of the solenoid relay is to close the circuit in a timely manner. When you turn the key in the ignition switch, the core located in the relay housing is activated. Next, this core drives the bendix, which leads to the operation of the rotor. The gears together with the bendix drive the flywheel. As soon as the engine starts, the driver turns the key to the initial position and the circuit opens.
Checking the solenoid relay with a multimeter
Before checking the solenoid relay, it must be removed from the car along with the starter. Unfortunately, it is difficult to answer the question - how to check the starter solenoid relay without removing it. Naturally, some of its malfunctions can be detected by ear. But, if any are found, you will still have to remove everything from the car and check it on the table.
The only exception is the freezing of the retractor into which moisture has entered. In such cases, it is enough to simply warm up this unit using a hairdryer or a household heater. It is quite simple to understand that the retractor is frozen. If before this everything worked fine, and with the onset of severe frost the starter suddenly stopped showing signs of life, it would be most logical to assume that the retractor froze, and did not fail with other described malfunctions. Although anything can happen.
Also, before you start tormenting the solenoid relay, make sure that:
- The battery is charged and is not the cause of unsatisfactory starter operation.
- There is normal electrical contact between the battery and the starter - the power wires are securely fastened and have not oxidized.
Dismantling. So, we removed the starter from the car. Next, the power wire coming from the power terminal of the retractor into the starter is disconnected. The solenoid relay itself must be removed from the starter housing. To do this, depending on the model, you need to unscrew two or three screws.
If the retractor on your car is secured with two screws, be sure to mark with a marker the orientation of its body, as well as its rod. In some starters, it is impossible to put the retractor back together incorrectly, but still, it’s better to play it safe and put a couple of marks with a marker for orientation.
Now, in order to check the starter solenoid relay for broken windings or problems with the power contact, you only need a multimeter with a continuity mode.
Checking the pull-in winding
It is carried out in the following sequence:
- The multimeter switches to direct dialing mode.
- One of the probes of the device is securely connected to the control contact of the solenoid relay. It is flat, and when removing the starter you disconnected the thin wire coming from the ignition switch.
- The second probe of the multimeter is connected to the power contact with a jumper.
In this position, the current generated by the multimeter should go through the pull-in winding. Accordingly, if the device beeps, there is no break. If it is silent, the retractor winding is broken.
Checking the holding winding
It is carried out in the following sequence:
- The multimeter switches to direct dialing mode.
- One of the probes of the device is securely connected to the control contact of the solenoid relay. It is flat, and when removing the starter you disconnected the thin wire coming from the ignition switch.
- The second probe of the multimeter is connected to the body of the retractor. In this case, you need to make sure that the probe has reliable contact with the metal of the case (clean off any dirt and sand a small area with sandpaper).
In this position, the current generated by the multimeter should go through the holding winding of the starter solenoid relay. Accordingly, if the device produces sound, the winding is intact. If the multimeter is silent, the holding winding of the starter solenoid relay is broken.
Checking the relay power contact
The purpose of this stage of checking the starter solenoid relay is to make sure that when the solenoid and holding windings are activated, a starting current flows through the power contact to the starter windings.
The check is performed in the following sequence:
- The multimeter switches to direct dialing mode.
- The first probe of the device is connected to any of the power contacts of the retractor relay (there are two of them, and they are both threaded).
- The second probe is connected to the remaining power contact.
- The rod (armature) of the retractor relay must be acted upon in such a way that it goes inside all the way. To make this more convenient, the multimeter probes should be secured to the power contacts using alligator clips.
In this position, when we have already connected the device to the power terminals, but have not acted on the rod of the retractor, the relay plate should not be pressed against the power contacts, and current should not flow through them. If, even before pressing the retractor armature, the multimeter worked and showed a closed circuit, this indicates that the power contact of the relay is in a stuck state. Even before disassembling the starter, this should have been evidenced by the continuous operation of the starter even after the ignition key was released.
If everything is in order with the power contact of the relay, then when you press the retractor rod as described above, the multimeter should show a closed circuit. If there is no continuity sound in this position, the contact plate for some reason does not close the power contacts. Before disassembly and inspection, this breakdown should have manifested itself like this: when we turn the ignition key, we hear a click, but the starter does not turn the engine.
If during the test described the multimeter did not beep, but showed some resistance on its display, then this means that the relay does not conduct current well. Such a defect occurs, most often, due to melting of the contact pads, as a result of which the cross-section of this section of the circuit is significantly reduced and the resistance increases. The starter, at the same time, could turn the engine, but barely, sluggishly and uncertainly.
Unfortunately, most retractors cannot be disassembled for repair without barbaric methods. But, if you succeed, then you will see something like the following picture.
This is what melted and heavily oxidized power relay contacts look like. It is clear that the starting current, which, by the way, is more than a hundred amperes, will not be able to flow normally through such a connection. If he can at all. In general, if the retractor shows a defect in the relay contact during inspection, and it was possible to carefully unscrew it, the sites can be cleaned of melted slag and oxides, and perhaps after successful assembly it will all work better than new.
Unfortunately, the manufacturers of the vast majority of car starters believe that there is nothing inside the retractor for the average user to look at. Accordingly, these devices are made absolutely non-separable. On the other hand, the retractor is not that expensive. At least much cheaper than a complete starter. In addition, for many foreign-made starters, craftsmen have long found an alternative replacement among cheap domestically produced retractors.
Therefore, if checking the starter solenoid relay shows that it is screwed, it is easier to buy a new one than to somehow try to repair it. Although car repair gurus, as they say, are knee-deep in the sea - they don’t even throw away a bolt torn in half with a licked thread, but repair it.
Signs of malfunction of the VAZ 2114 retractor relay
The difference between a breakdown of the solenoid relay is that it does not happen unnoticed. Even a faulty element can perform its function for some time. The difficulty of starting the engine if the device is worn out will depend on the number of attempts to turn on the starter.
In frosty weather, this problem will become more pressing, because... Poor VR operation will quickly drain the battery. Before carrying out work to replace a part, you need to make sure that the breakdown is accurately diagnosed. To do this, you need to know the signs of a malfunction in the VAZ 2114 VR:
There are clicks from the starter device, but it does not turn on;
It is recommended to replace the VAZ 2114 starter solenoid relay if one of the problems occurs. Sticking the starter in the on position accelerates its wear. Where the unit's bendix is located, there should be maximum engagement with the flywheel, so slipping is unacceptable. The design of the starting device is made taking into account a short period of continuous operation, so sticking when turned on wears it out.
Signs and causes of relay failure
If the relay is broken, the following signs will tell you about it:
- when you try to start the engine with the key, it does not start, or starts only after two or three attempts;
- There is a buzzing sound after the engine starts. This means that the starter rotates at higher speeds, although it should no longer be.
If at least one of these signs is observed, then this is a reason to be wary. The relay may soon break. There are several reasons why this happens:
- one of the windings, or both, were burned or broken at once;
- deformation of the return spring inside the mechanism;
- a short circuit has occurred inside the part on one of the windings;
- The surface area of the contact plates has decreased, or they have completely burned out.
Understanding the reasons why the relay fails, repairs will take less time, because It’s immediately clear where to look for the problem.
Necessary tool
Without tools, dismantling and installing a new part cannot be accomplished. The procedure for removing the solenoid relay or starter assembly requires a simple set of wrenches. The following tools will be useful for trouble-free work:
- Socket wrench and open-end wrench 13.
- Phillips and flat head screwdrivers.
- Key for 10.
- New retractor.
A simple set with all types of keys will be useful to any driver, because... No one is immune from sudden breakdowns of VAZ cars. The advantage of the 2114 model is that repairing most components is cheap, and even a novice driver can change the retractor on a VAZ 2114.
Basic faults
A fairly simple and reliable design, however, given the high loads and high currents with which the mechanism has to work, various problems appear from time to time. They can be expressed either very simply, for example, the starter does not respond at all to turning the key, or as permanent problems, the cause of which is most difficult to establish.
The main malfunctions of the solenoid relay are listed below, but the difficulty is that the malfunctions can either be combined with each other or be a consequence of the usual loss of contact at the battery terminals. Therefore, troubleshooting must begin from afar. However, here are the problems:
- Short circuit of the holding or retracting windings, then the fuses will simply burn or the control relay will simply not supply voltage to the contacts;
- deposits on contacts;
- winding breakage;
- distortions or damage to the return spring;
- physical damage to the relay housing or parts.
Replacing the solenoid relay on a VAZ 2114
If there is a problem with normal engine starting, you should repair the starter device. First of all, prepare the tool and work area. For normal dismantling, you can free up space under the hood by removing the air filter housing. Next, the replacement process can be described in several steps:
- Remove the terminals from the battery for safe operation.
- Disconnect the power plugs.
- Using a 13mm wrench, unscrew the terminal screwed to the starter housing.
- Unscrew the fastenings of the main body of the unit (3 nuts by 13).
- Remove the unit from the seat and use a size 13 wrench to unscrew the wire from the cover.
- Unscrew the screws securing the solenoid relay with a screwdriver and remove the part.
It is recommended to install only a new one in place of the old device. Even if there is a slight malfunction of the device in the core, the housing assembly should be replaced. It is clear that this approach may not be suitable for some, but the cost of this device is not so high that you can try to restore its operation using improvised means.
Selecting a part for a VAZ-2110
Often the entire starter assembly is replaced, but we recommend not doing this. The pull-out relay is much cheaper than the entire kit.
The choice of a new relay should be approached with the utmost seriousness, since the quality of the part will determine how long it will serve the owner.
Analogs
In addition to the proposed version of the original part, there are quite a lot of analogues that can be installed on a car. So, many car enthusiasts do just that. Let's look at what the automotive spare parts market offers the owner of a 2110:
- Cargo 131143 – the cost is 1200 rubles. High quality for little money.
Price of the retractor relay VAZ 2114
The new design part is manufactured by several companies. Let's consider several product options:
- Spare part from . Quite a quality option. Price - about 600-700 rubles .
- An analog version from the Belarusian one can be purchased at a price of 500-700 rubles , depending on the region. Medium quality.
- The highest quality VR option starts from 1000 rubles .
When searching for a spare part, be careful, because... There are often fakes.
Source