Knocks in the engine
It is not uncommon for even ordinary knocking sounds in the engine to become the cause of its complete failure. Therefore, be careful if you suddenly hear extraneous knocking noises coming from under the hood.
A knock in the engine almost always indicates serious problems, so it is not recommended to get to the service center on your own. Call a tow truck or cling to someone with a rope to get to a service station or garage to determine the cause of the sounds.
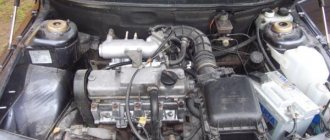
The knocking noise can be caused by various components of the 8-valve and 16-valve engines installed on the VAZ 2110.
| Source of knocking | What you need to know |
| Main bearings | This is a dangerous type of knocking. You need to immediately stop the engine and tow it to the service station or garage. The knock is low-pitched and comes from the bottom of the crankcase. As the load increases or the speed increases, the noise increases; the knocking sound is often accompanied by a drop in oil pressure. |
| Connecting rod bearings | No less dangerous type of knock. You need to stop quickly. Get to the garage or car service only in tow. This sound is ringing, metallic, medium in tone, rhythmic. As the load on the engine increases, the knocking noise increases, but disappears completely when the spark plugs are turned off. |
| Piston pins | A less dangerous knocking option, in which you can get to the service center under your own power, but with minimal engine load. The sound is rhythmic, high-precision, and has a strong metallic tint. It comes from the engine in any operating mode, and intensifies with increasing loads. When I turn off the spark plugs, the sound goes away completely. |
| Worn pistons and cylinders | The knocking does not pose a danger to the engine. If the engine load is light, you can get to the service center or garage under your own power. The sound is similar to the clinking of clay dishes, and is especially audible on a cold engine. When the engine warms up the sound disappears |
| Valves | This is not a dangerous type of knocking in the engine, allowing you to get to the garage or car service station under your own power. Against the background of a dull noise, a metallic knock is heard, which is best heard at medium and low crankshaft speeds from the cylinder head above the valves. This type of knocking noise occurs due to a breakdown of the hydraulic compensators, which should be replaced to eliminate the problem. |
| Detonation knocks | Potentially dangerous to the engine if ignored and nothing is done. Sometimes they lead to the need for major engine repairs or replacement. If you do not delay repairs, knocking can be eliminated by simply replacing the knock sensor. Without overloading the engine, you can get to the garage or service station under your own power. The sound is ringing, metallic, and comes from the engine mainly when accelerating. The cause of knocking is a malfunction of the knock sensor, low-grade fuel and engine overload due to early upshift. It is necessary to replace the sensor and add additives to the fuel to remove carbon deposits inside the combustion chamber and on the valves |
Any knocking noise does not bode well, even if it is the sound from valves or worn pistons. Do not delay in eliminating the causes of noise, otherwise repairs will cost much more.
Removing a VAZ 2110 engine, step by step procedure:
1. First, you need to remove the battery from the car. 2. The next step is to remove the hood. 3. After this, remove the oil from the engine crankcase by unscrewing the drain plug, and remove the coolant from the cooling system by unscrewing the drain plugs of the cylinder block and radiator with the expansion tank cap removed. 4. Now you need to remove the air filter with the intake pipe hose, not forgetting to then close the carburetor on top with the technological cover. 5. Then we take and disconnect the exhaust pipe with the bracket from the engine, lower it slightly down so that the flange can come off the intake valve studs.
6. The next movement is enough to turn the throttle valve drive sector to the stop torque. 7. After this, you need to unscrew the two bolts securing the throttle valve drive rod bracket and move it to the side without disconnecting the rods from it, but so that it does not interfere with further work. 8. Next, having unscrewed the fastening nut, carefully remove the tip of the engine “mass” wire from the stud.
9. Finally, loosen the next two fastening nuts and remove the tips of the “mass” wires from the studs securing the rear cover of the cylinder head. 10. Carefully disconnect the block with wires from the coolant temperature sensor by slightly releasing the clamp.
11. Then gradually loosen the clamps and remove the radiator outlet hose from the thermostat and the radiator inlet hose from the cooling jacket pipe. 12. Now disconnect the wire from the coolant temperature indicator sensor.
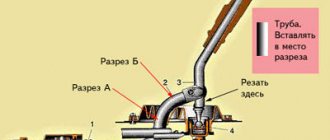
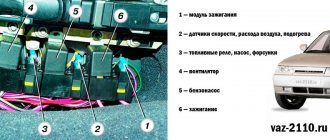
13. Slightly loosen the clamp and remove the heater supply hose from the water cooling jacket pipe. 14. The next effort is to disconnect the block (No. 1 in the figure above) with the wires from the detonation sensor (No. 2 in the figure) (or remove the sensor, but to do this, unscrew the nut of its fastening and remove the sensor from the stud, but be sure to leave it on wiring harness).
15. Now it is important to disconnect the block with wires from the low-voltage terminal of the ignition module by pressing the latch holding it. 16. Then carefully disconnect the block with wires from terminal “D” of the generator, carefully move the rubber boot and unscrew the nut in order to then disconnect the wires from the contact bolt (terminal “B+”) of the generator.
17. Simply disconnect the block with wires from the adsorber by pressing the retaining plastic latch. 18. Now you need to remove the wire from the oil pressure warning lamp sensor.
19. Finally, loosen the clamp and disconnect the vacuum booster hose from the receiver fitting. 20. The next step is to disconnect the vacuum hose of the electro-pneumatic valve from the receiver fitting.
21. By pressing the retaining latch, carefully disconnect the block with wires from the idle air control valve installed on the throttle pipe. 22. Loosen the clamp and remove the canister purge hose from the throttle pipe fitting.
23. Now simply disconnect the block with wires from the throttle position sensor by pressing the latch. 24. Unscrew the fastening nuts, using a second wrench to control the hoses from twisting, then disconnect the fuel supply hoses “1” and drain hoses “2” from the fuel pipes (the fuel supply hose is marked with paint).
25. Be sure to pay your attention to such a detail that there are o-rings in the fuel pipes and it is necessary to remove the ring after disconnecting the hose and, if necessary (it is torn or slightly stretched), replace it. 26. Now remove the heater outlet hose from the water pump inlet pipe.
27. Squeeze the retaining plastic latch and disconnect the injector harness block. 28. Try to unfasten the clamp (cut if necessary) securing the wiring harness to the water pump supply pipe.
29. From the bottom of the car, carefully disconnect the block with wires from oil level sensor 1 in the engine crankcase (next to oil filter 2). 30. Take and disconnect the block with wires from the crankshaft position sensor.
31. Having gradually unscrewed the two bolts securing the cover, we remove two holders with wires from the front cover of the camshaft drive belt. 32. The next step is to remove the wiring harness from under the receiver.
33. Having pulled out the wiring harness from under the thermostat, it is important to finally make sure that all wires and hoses are disconnected from the engine. 34. Having loosened the bolt of the adsorber fastening clamp and, having removed it from the clamp, we remove the adsorber to the side (but without disconnecting the hoses from it) so that it does not become a serious obstacle when removing the engine.
35. Loosen the nut securing the gearbox housings, under which the eye is installed, then remove it from the stud. 36. It is necessary to accurately install the eye under the upper bolt of the VAZ 2110 ignition module.
37. Next, we hang the engine by carefully hooking the cable to two eyelets and pulling it tightly with a hoist or crane. 38. If there is no tap or hoist, it is important to additionally remove the washer reservoir.
39. After this, you should install a suitable board on the front fenders, placing soft pads under its ends so as not to disturb the paintwork. 40. Tie the removed VAZ 2110 engine tightly to it using the eye-rings installed on the cylinder head and gearbox, using cables or ropes that should be tightly stretched. 41. It is necessary to remove the gearbox.
42. Unscrew the two bolts securing the front suspension mount of the power unit. 43. Raise the engine up and secure it on strong, stable supports so that the engine does not touch the flywheel and generator drive pulley. 44. The process of installing the engine of a VAZ 2110 car occurs in the reverse order of the removal process, exactly according to the points indicated. After the repair has been carried out and the engine has been installed in its place, it is necessary to pour oil into the engine crankcase and coolant into the cooling system.
Troubleshooting electrical circuits
It is not enough to know where the Lada Priora fuses are located. In the event of a malfunction, you need to be able to find the cause of the breakdown, eliminate the malfunction and replace the burnt-out fuse element. To gain access to the fuse box, unscrew the latches holding the cover. Having gained access, you need to check the serviceability of the fuse, and also, if it is blown, find out the cause of the malfunction. At the same time, the circuit it protects is checked, starting from the unit or component and gradually moving towards the power source. To check the electrical circuit, you will need a regular multimeter, or, in some cases, a simple test lamp.
The procedure for detecting a breakdown or break is as follows: one multimeter probe or the lead of a control lamp is attached to the ground of the car. Turn on the ignition and touch the terminal of the wire being tested. If there is no voltage, look at the entry point of the conductor and take measurements at this location. So, step by step, the problem section of the chain is identified. Next, a conclusion is drawn about the cause of the malfunction. Usually this is a lack of contact, a break in the conductor and a breakdown or burnout of the part.
We recommend: What to do if the cooling fan on the Lada Kalina does not turn on?
In the Priora mounting block, where the fuse box is located, there are also relays through which the powerful load is switched. The use of electromagnetic relays is due to the need to protect switch contacts from burning when a powerful load is turned on. Sometimes the cause of the malfunction is sticking relay contacts or a malfunction of the electromagnetic coil itself. In case of such a breakdown, the relay armature is not attracted by the electromagnet, and accordingly the contacts do not close. To eliminate the breakdown, it is necessary to replace the faulty parts.
If necessary, a blown fuse can be replaced with a piece of copper wire of the required diameter. However, it should be remembered that this is only a temporary measure, and the factory element should be installed as soon as possible.
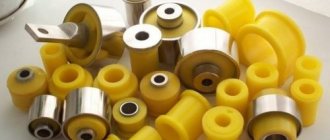
Design and purpose of tens engine mounts
Over the years, vast practical experience has been accumulated on the topic of how to change engine mounts on a VAZ 2110, and videos of repair processes can also be found in abundance. However, few people pay attention to the features of the part. And, it must be said, it is in vain, because such knowledge will help to accurately determine the source of vibration and purchase the necessary spare part for repair.
The main purpose of the engine support is to reduce the level of vibration transmitted from the power unit to the car body. The rubber-metal structure consists of a steel base with a thick rubber cushion. The device has proven itself well, since it is quite reliable and is worth the money.
The eight-valve Lada 2110 engines are attached to the body at three points: right, left and rear. The side supports connect the body to the engine block through through holes. The rear support is attached with two bolts to the gearbox, and two nuts to the body. The importance of this damper part is very significant - it prevents longitudinal vibrations of the internal combustion engine during braking and acceleration.
When should you change the power unit mounts on a VAZ 2110: signs and reasons
Before you change the engine mounts of a VAZ 2110 car and watch a video of this process, you need to study the signs that indicate a breakdown of the rubber-metal mounts. The main symptoms characterizing problems with damper units:
- Vibrations transmitted to the steering wheel and pedal unit when idling.
- Extraneous noise in the cabin when moving on an uneven surface.
- A characteristic knocking sound in the engine compartment during acceleration and braking.
When drawing conclusions after your observations, you should not confuse vibrations on the steering wheel during braking, which are associated with defects in the brake discs or pads. To be more convincing, you need to open the hood and inspect the power unit supports. If you place your palm on a running internal combustion engine, you can feel changes in its operation.
Many years of experience in operating the Lada 2110 allows us to assert that the reasons for the failure of damper cushions are the following factors:
- Deformation phenomena on the rubber support due to mechanical and temperature influences, as well as due to exhausted service life.
- Cracking and delamination of rubber from exposure to chemically active components.
- Loss of elasticity caused by temperature changes.
Premature failure of the damper support can be caused by the owner’s excessive enthusiasm for such extreme techniques as sudden starts and emergency braking. Suspension parts are already subject to serious stress while driving, and a sporty driving style further increases the risk of their failure.
Motor 126 and 127: working life, differences
These engines on Priora had a displacement of 1.6 liters (or 1596 cm3). Optimal for city sedans, the engine size of the Lada Priora gave a good combination of dynamics and consumption: along with very decent acceleration, fuel consumption does not exceed sky-high numbers. Both engines received good marks, because the car behaved perfectly in the city and on the highway.
In fact, the 126 Priora engine became the first sixteen-valve engine for this model, and the 127 is a modified version, “overclocked” by AvtoVAZ designers. In addition to the same engine displacement, they have other identical characteristics. The in-line type of arrangement of four cylinders provides a simplified design that can be repaired on your own.
The distributed multipoint injection system is involved in creating a good, rich fuel-air mixture (a lean mixture can lead to breakdowns). The cylinder diameter is 82 mm, the piston stroke is 75.6 mm, the compression ratio is 11. The “engines” fall under the Euro 4 standard, they are powered by gasoline with an octane rating of 95.
The 126 engine for the Priora received the following characteristics: 98 hp. (72 kW at 5600 rpm), acceleration to 100 km/h in 11.5 seconds (with manual transmission), city consumption 9.1 l - 100 km (manual transmission), maximum torque - 145 Nm.
The 127 engine for the Priora was upgraded to the following figures: 106 hp. (78 kW at 5800 rpm), acceleration to 100 km/h in 11.5 seconds (with manual transmission), city consumption 8.9 liters per 100 km (with manual transmission), maximum torque – 148 Nm.
The difference may not seem so noticeable, but this is a very small but strong step in design on the part of AvtoVAZ (this is where the change to sixteen-valve “engines” with a volume of 1.6 liters ended). For a car of the Lada Priora class, the engine power was sufficient.
In the same block it is necessary to say about the operating temperature. An absolutely normal operating temperature is considered to be between 90 and 95 degrees Celsius. Further, when the car is being pushed in a traffic jam, is basking in the sun, or for some other reason, but can still work - from 97 to 110 degrees. The engine is slow in places and wears out a lot, but you can still get to your destination. A temperature below 90 degrees is a direct sign indicating that the car has not yet warmed up, and it is better to wait in place until the arrow points to the coveted 80-90 mark.
In general, the service life of the Lada Priora engine with a normal driving style and careful treatment is 200,000 km - after this mark the time comes when the “engine” requires major repairs. AvtoVAZ mentioned the timing belt separately as a recommendation, saying that it needs to be checked every 100,000 km (many car enthusiasts talk about the figure of 50,000 km).
All Lada engines have a problem, and it is related to the valves, which will be discussed further.
Do-it-yourself replacement of a VAZ 2110 engine mount
So, having decided that replacing the engine mounts is inevitable (either one or several, for example, replacing the rear engine mount), you need to prepare the car and tools for repair work (drive the car into a pit or onto a lift, have a set of keys, jacks, etc.).
In the case of an 8 valve engine:
- First, use a 13mm wrench to unscrew the alternator belt tensioner bolt and remove the belt;
- A jack is placed under the engine, a wooden beam or a thick board is placed on the top of the jack;
- Next, the engine is raised with a jack so as to relieve the support;
- Then, using a 15mm wrench, unscrew the central nut securing the right airbag;
- Then, using a 13mm wrench, unscrew the bolts securing the pillow to the bracket
- Next, from below in the area of the right arch, using a 17 key, you need to unscrew 3 bolts (the bracket is attached to the spar);
- Now the bracket can be removed and the engine mount can be replaced by tightening all the bolts back after installation.
- Upon completion, the jack at the bottom moves under the box, which raises the gearbox;
- Now, using a 15 wrench, unscrew the central nut securing the pillow on the left;
- Afterwards, you can unscrew the 2 bolts securing the support with a 13 key, and the support itself is removed;
- Next, a new support is installed and reassembled;
- Having completed the stage, you need to go down under the car, then unscrew a couple of 17 nuts (attach the pillow to the body);
- After this, unscrew two more nuts securing the element to the gearbox and remove the rear support;
- All that remains is to use a 19mm wrench to unscrew the nut that secures the cushion to the bracket, then remove the old cushion and install the new element;
- Reassembly completes the process; at this point, the replacement of the VAZ 2110 engine mounts can be considered completed;
Let us also add that for VAZ engines with 16 valves, both the process of removing and replacing the side airbags itself is no different from the process discussed above. When it comes to replacing the front lower airbag, you need to work from below.
First, use a 15mm wrench to unscrew the bolt that secures the front lower support rod to the cross member of the car's front suspension. Afterwards, the nut of the bolt that attaches the support to the engine bracket is unscrewed, and the bolt itself is removed.
To unscrew the bolt, you will need two 15mm wrenches. Now the support can be removed and only the pad or the weight of the entire element can be changed. Now we can proceed to reverse assembly.
The overall process of replacing the pillows is completed by unscrewing the fastening bolt of the upper front support to the body with a 17mm wrench. The bolt nut can be held by hand.
Then the bolt and nut are removed, after which, using a 15mm wrench, the bolt securing the front upper support to the power unit bracket is unscrewed (the bolt and nut are also removed). Next, the support is removed, the cushion or the entire assembly is changed, and reassembly is performed.
- As you can see, the VAZ 2110 16-valve engine mount changes almost exactly the same as on an 8-valve internal combustion engine. The only difference is that there are more supports themselves, and the rear support is changed from below (in the bottom area). At the same time, with the right approach, there are still no special difficulties; it is quite possible to change the cushions on this type of internal combustion engine with your own hands in the conditions of an ordinary garage.
Having installed new VAZ engine mounts (engine mounts for 2110, 2112 and other similar models), you should start the engine to check. If the pillows or supports are of high quality, and the replacement itself is carried out correctly, normally there will be practically no vibrations.
Replacing the right damper support
Before changing the right engine mount of a VAZ 2110 car following the video example, you should install wheel chocks and also disconnect the negative terminal from the battery. The further process is carried out according to the following scheme:
- Loosen the generator fasteners with a 13mm wrench and remove the belt drive.
- Loosen the tensioner bolt.
- Jack up the right side of the car.
- Using a 15mm wrench, unscrew the nut securing the support.
- Using a 13mm wrench, unscrew the two bolts securing the support to the bracket.
- Using a 17mm socket, unscrew the three bolts securing the bracket to the right side member.
- Remove the bracket and install the new support in the reverse order.
Replacing the left damper support
The procedure for changing the engine damper on the left side of the car is performed in the following order:
- Remove the car crankcase protection.
- Place a jack under the car in the area of the gearbox, place a wooden beam and lift the car, removing the load from the support.
- Using a 15mm socket and a wrench, unscrew the support pin fasteners.
- Release the support stop.
- Lower the jack slightly to freely remove the support pin.
- Using a 13mm socket, remove the fasteners of the engine support to the body.
- Pull the support towards the motor.
- Remove the lower support stop and install the new part in the reverse order.
Replacing the rear damper mount
Reading how to change the rear engine mounts on a VAZ 2110 and watching the video is half the battle. It is important to strictly adhere to the order of repair work:
- Remove the engine crankcase protection.
- Using a 17mm socket, unscrew the two nuts securing the support to the car body.
- Using two 19mm wrenches, unscrew the two bolts securing the gearbox and remove the support.
- Clamp the removed bracket in a vice and use a 19mm wrench to unscrew the bolt securing the support.
- Remove the bolt and install a new rubber support in the bracket.
- Assembly of the unit is performed in the reverse order while maintaining the perpendicularity of the mating planes.
Based on practical experience, it can be argued that the process of replacing the damper supports of the power unit on the “ten” is not particularly difficult. Usually, after repair, vibrations disappear, but if everything remains unchanged, then the solution to the problem may lie in a different plane. It makes sense then to look for a problem in the suspension or in the CV joint components.
Front SC
We recommend starting with the front one, since this oil seal is the easiest to replace. Even a car owner without much experience can handle it. Once you learn how to change it, you will most likely be able to replace the rear crankshaft oil seal yourself. But it is better to act according to the circumstances.
Retrieving an element
The steps for replacing the front oil seal are as follows:
- Remove the protective cover located on the timing belt;
- Remove your engine protection. You will have to get under the bottom and unscrew the corresponding fasteners;
- Set the piston of the first cylinder to top dead center on the compression stroke;
- Slightly loosen the timing belt tension, after which it can be easily removed;
- Remove the front right wheel;
- Remove the generator drive belt, and also do not forget to remove the pulley;
- Now we dismantle the fasteners of the crankshaft pulley and take it out. Here you will need to first remove the key;
Choosing engine crankcase protection for a VAZ 2110
Nowadays, you can purchase sump and crankcase protection for a VAZ 2110 at any domestic auto parts store. It costs up to 2,500 thousand rubles. But you need to think about which one to choose.
| Type of protection | Peculiarities |
| Aluminum alloy guard | You can buy aluminum protection for the VAZ 2110. Its advantage is its light weight. It usually fits on standard tens of mounts and installing it is not difficult. It is simple and reliable. |
| Steel protection with powder paint | You can purchase and install steel protection. According to technical characteristics, it is more reliable, but it has more weight. For example, Kamaz makes protection four millimeters thick. Of course, it is very reliable, but when braking, the car begins to “nod off” even more and sags more when driving on a dirt road. Accordingly, the grinding of the bottom of the car on the ground is heard more often. Therefore, it is better to take steel protection with a thickness of 2 mm, and make sure that it has stiffening ribs. This is the optimal combination of weight and strength. |
Consequences of a bottom impact
An impact with the bottom can damage the oil pan. The problem is that there is a breather in the pan of the car, which has an oil intake pipe. And this tube is located a few centimeters from the bottom of the crankcase, not far from the drain hole. When you hit a hard surface, the crankcase will immediately dent. It all depends on how deep it is. If the dent is deep, then there is a very high probability of damage to the suction tube. If it breaks above the oil level, lubricant will stop flowing into the engine. You understand what consequences this will lead to. In this case, it is better to turn off the engine immediately.
If the dent is large
To check the serviceability of the breather, start the engine. At the same time, if the oil pressure check does not go out, then the engine must be turned off immediately. Then add a little oil and start the engine again. If after starting the pressure light does not go out and you see leaking oil under the car, most likely you will have to change the breather. In this case, we turn off the unit and call a friend or acquaintance so that he can tow the car to a car service center or home. You can use a tow truck service.
We find out whether the breather is damaged or not
If the light goes out during startup, then you can slowly drive home or to a car service center. In this case, it is better not to give the car high speeds, since the breather tube may be damaged. In this case, there may not be enough oil to lubricate the engine. By the way, the old system, when the instrument panel showed the oil pressure in the system, was more advanced.
By looking at the oil pressure, it was possible to more clearly determine the damage to the breather. The modern system is structured differently. If the control light on the instrument panel is on, it means no oil is entering the engine at all, and if it doesn’t light up, then everything is fine. This is where the catch lies. Oil may enter the engine, but not in sufficient quantities and we will never know about it. There will be increased wear on the piston group. In this case, after arriving home or at a car service center, you need to remove the engine pan and inspect the breather.
If the breather is not damaged, then we correct the dent on the pallet and put it back. If the breather is damaged, replace it with a new one. When installing the crankcase, you need to buy a new gasket, since the old one is most likely unusable. Complete sealing is required. This is a very important point. If the gasket sucks in air, the pressure in the engine will be insufficient, which can lead to failure of the components and mechanisms of the machine.
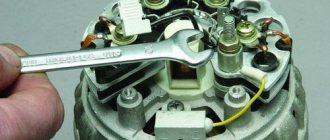
Instructions for removing the bearing from the crankshaft
In every car service, in order to remove any of the several dozen bearings that are in the car, there is always a pressing tool, a puller or any other special device. But in our case, when everything is done in an ordinary garage with your own hands, the car enthusiast has to make devices with his own hands or use improvised means. There are 2 ways to remove the ball bearing from the crankshaft seat in a garage.
Method No. 1
If the bearing is not seated in the rear wall all the way, then it can be removed from the inner race using an inertial hook made by yourself. In order to make it you will need:
- a piece of reinforcement or rod (D = 6-8 mm, L = 300-400 mm);
- a metal cylinder with a through hole, d larger than the selected rod (a hub, a massive sprocket or any other similar object may be suitable).
Making the device:
- One of the ends of the reinforcement is bent at an angle of 900, and the length of the bend should be about 10 mm.
- A metal cylinder is placed on one side of the rod.
- On the other hand, a section is welded and a T-shaped tip is made on it.
In order to remove the bearing with such a homemade device, the rod is inserted into the inner race of the bearing and secured with a bend. When the load moves with acceleration, the T-shaped tip is struck. In order to remove evenly, with each blow the rod must rotate around its axis.
On video: How to press a bearing out of a blind crankcase in 3 minutes?
Method number 2
This method can be used to remove the crankshaft bearing; this can be done using a metal cylinder or bolt (with an approximate diameter of 14.5 mm) so that it fits into the hole in the inner race with minimal clearance. An entry that is too loose or too tight will not work. Removing the crankshaft bearing:
- Lubricant (such as “Solidol”) is placed into the cavity behind the bearing through the hole.
- A rod is inserted into the inner cage and hammered in until the rod is completely immersed.
- Add more grease, and under the influence of its pressure, the bearing is squeezed out of the crankshaft seat.
A crankshaft is a part (or assembly of parts) of complex shape that has journals for attaching connecting rods, from which it receives forces and converts them into torque. An integral part of the crank mechanism.
Work resource
The manufacturer states that the 126 by 16 valve engine can operate stably for 200 thousand kilometers. After this limit, the power plant requires major overhaul. But do not forget that AvtoVAZ is a real lottery; for some Priora owners, the engine caught a wedge at 2 thousand. But if you take care of your Lada car, regularly perform maintenance and replace damaged components, then you can safely count on a service life of 150-200 thousand km.
The resource of the power plant is influenced by many factors, here are some of them:
- Overheating
. Running the engine on a Priora at elevated temperatures significantly reduces its service life. The operating temperature, which we will talk about in the next section, must be maintained at the same level. - Fuel
. The instruction manual indicates what kind of gasoline should be poured into engine number 126 with 16 valves. It is also recommended to visit only trusted gas stations that will not fill you with diluted fuel. - Engine oil
. Everything is simple here - change the lubricant in a timely manner and buy high-quality oils, then the service life will be 150-200 thousand km. For the 16 valve unit 126, semi-synthetics (Lada recommendation) and synthetics are suitable. The oil needs to be changed once a year or every 15 thousand kilometers; as you can see, the fluid does not have a long service life.
Installing piston rings
Now you need to install the piston rings on the piston. As a rule, three rings are installed on one piston. The upper and middle compression and lower oil rings are removable. The rings have an engraving, the inscription should be facing up,
if it is not there, then you can navigate by the chamfer, which is located either along the inner or outer diameter of the piston rings. This chamfer acts as a stiffening rib, which creates resistance to the loads that arise when gases expand in the combustion chamber. If there is a chamfer along the inner diameter, then the ring is placed with the chamfer up, if along the outer diameter, then with the chamfer down. The oil slip rings also have an engraving that should face up; if it is not there, then the direction of the ring does not matter.
The rings on the pistons must be placed in such a way that the ring connectors are not located under each other and do not fall into the groove under the pin. Since, for example, the middle ring connector is located on one side of the piston, the upper and lower ring connectors must be on the other side of the piston, and must be spaced apart from each other, but not fall into the piston pin recess
Motor assembly
For high-quality assembly, you need a table of tightening of engine bolts and nuts, and use a torque wrench to tighten all engine bolts. Each bolt must be lubricated with copper paste, and before installing the liners, lubricate the crankshaft journals well.
When installing new pistons, the cylinders also need to be lubricated with oil. After installing the pistons, you need to turn the crankshaft several times. If the shaft rotates without hesitation, then the assembly of the bottom was successful. Be sure to lubricate all rubbing parts with oil to ensure an oil film when starting the engine. In places where sealant needs to be applied, this should be done using Victor Reinz sealant, then leaks from under the valve cover will disappear.
Let's start to disassemble
First, drain the oil and antifreeze. We remove the protective cover, the air filter with pipes, disconnect the ignition coil connectors, the throttle cable and the throttle assembly.
We remove the thermostat housing and simultaneously disconnect all the available connectors and pipes. We remove all the wiring that was in our way towards the battery.
We remove the generator. We unscrew the eight thirteen nuts holding the intake manifold and remove it. We unscrew all the bolts securing the valve cover, as well as the side engine support.
Unscrew the eight nuts and remove the exhaust manifold.
Remove the timing belt, camshaft pulleys and pump.
In three passes, so as not to deform the part, we first loosen and then unscrew twenty bolts of the camshaft bearing housing, the head is eight.
Remove the bearing housing. We remove the camshafts; there is a distinctive lip on the intake camshaft.
Also, in several passes, we first loosen and then unscrew the ten cylinder head mounting bolts.
Remove the cylinder head. All sixteen valves are replaced.
Cylinder head repair
We mark all hydraulic compensators with numbers using an ordinary clerical touch and put them away. An ordinary magnet will help you pull them out. We dry out the valves and remove the oil seals (valve seals), the valves into scrap metal, the oil seals into the trash. We clean all channels. We take the head for grinding, just in case. After washing it again with kerosene after sanding and blowing it with air, we begin to assemble it.
We arrange the recently purchased valves in the sequence in which they will be located in the cylinder head and begin to grind in one by one. Lubricate the valve stem with clean oil and apply lapping paste to the edge.
We insert the valve into place and put a valve grinding tool on the valve stem. The stores sell a device for manual lapping, but since this is the twenty-first century, we are mechanizing the process. We take the old valve and cut off the rod from it, select a rubber tube for it of such a diameter that it fits tightly. The rod is in a reversible drill, one end of the tube is on it, the other is on the valve being ground in. At low speeds we begin to grind the valve, constantly change the direction of rotation and periodically press it to the seat or weaken the force. On average, the valve takes about twenty seconds. We take it out and wipe it.
The same stripe should appear on the valve seat.
Video of manually grinding valves
For a sixteen valve head, everything is the same, only there are twice as many valves.
After lapping, all valves and seats are thoroughly wiped and washed with kerosene to remove any remaining lapping paste.
We had to grind four valves again, after which the kerosene stopped flowing.
We stuff new valve seals.
We put the valves in place and dry them.
After lubricating it with clean oil, we put the hydraulic compensators in place and, covering them with a clean cloth, remove the head out of sight. We're done with the cylinder head.