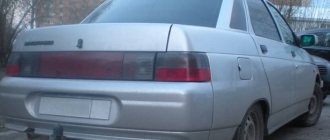
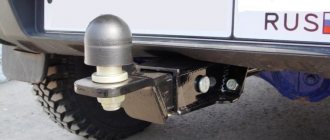
When operating a vehicle, situations arise when it is necessary to transport large items and some cargo. A car trailer is used for transportation. However, to make towing possible, a trailer hitch must be installed on the vehicle. To install a towbar on the VAZ 2114, standard places are provided for attaching a towing hitch, which allows motorists to equip their vehicles with this part.
Features of choosing a tow bar for the VAZ 2114
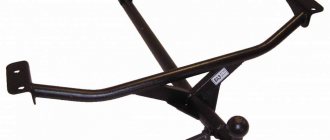
In stores, car owners are most often offered towbars that are attached to the bottom of the body, where the recess for the spare wheel is located. As a result, car enthusiasts have to almost tear the car body to pieces in order to install such a trailer hitch. It is better to give preference to more durable structures that will be attached to something more impressive, for example, spars.
Currently reading
Higher quality models do not require dismantling the bumper, which greatly simplifies the process of installing such a tow bar. The side members have side holes that are simply drilled through.
Experienced car enthusiasts advise purchasing a more expensive, but durable and easy-to-install Bosal tow bar. This product is firmly attached to the side members, equipped with a removable hook and everything necessary for installation and electrical connections.
In order to install the trailer hitch, just refer to the instructions that come with the product, where everything will be outlined step by step. For example, like in the picture below.
Features of installing trailer hitch on vehicles of the Samara-2 line
Traffic rules do not prohibit additional installation of trailer hitches on cars, so owners do not deny themselves this. Moreover, you can buy a tow bar for a very reasonable price.
Since 2010, AvtoVAZ has slightly revised its policy and makes cars for the purpose of sales abroad, therefore the installation of a trailer hitch on a car produced later than this time requires support with official recommendations. Manufacturers of towbars focus attention on this and warn car owners.
It's no secret that VAZ cars tend to inherit the features of their predecessors. So, for example, model 2115 is the successor to the “ninety-ninth”, and that, in turn, received the form of the VAZ-09. Thanks to this, towbar installers were able to gain specific experience, and now provide customers with do-it-yourself trailer hitch installation kits.
Therefore, before you go to a specialized store to purchase a towbar, find out the design features of the rear of your car.
Even the neighboring models 2114 and 2115 differ in the method of attaching the tow bar:
- cars produced in 1997, 2004 and 2007 have changes in the power elements of the body;
- The towbar can be easily selected according to the year of manufacture of the car, based on the specific design of that particular period.
If you have difficulties with this, you can go to the technical center and ask the specialists or discuss with the seller of the trailer hitch kit the possibility of an exchange in case of discrepancy with a specific model.
Tow bar installation process
In order to install a towbar on a VAZ 2114 yourself, you will need:
- a set of keys;
- electric drill with cutter;.
- sealant.
Next, follow these steps:
- Install the cross beam. Most likely, this will require widening the holes in the rear side members, in which case use a milling cutter.
- From the trunk side, lift the sound insulation and insert the plates with welded nuts into the special rectangular holes in the side members. If the nuts do not fit into some holes, they need to be widened using a drill with a cutter.
- At this stage you will need an assistant, since you will need to simultaneously attach the cross beam to the side members by inserting the bolts and try to insert plates with nuts from the other side of the luggage compartment, hitting the bolts. In this case, the nuts are only tightened, and not completely tightened. If the muffler gets in the way, just remove it by disconnecting it from the 2 rear rubber bands. This will lower it and you will have more space for “turns”.
- Install the “piece of hardware” with the towbar itself; to do this, ask an assistant to insert the bolts from above into the holes of the spare wheel. At this time, you apply a piece of iron from the bottom side and tighten the nut.
- Connect both pieces of iron with 4 bolts.
- Align the towing hook of the tow bar exactly along the axis of symmetry and firmly tighten all the previously installed nuts.
After this, all that remains is to connect the towbar socket, which should come complete with the trailer hitch. There is nothing complicated in this process either.
Referring to the wiring diagram that will also be included with the device, connect the wires of the desired colors and check that all signal lights work as expected.
Connecting the socket
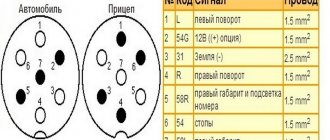
After the tow bar has been installed, proceed to connecting the socket with wires. They provide an electrical connection to the vehicle's towbar. The pinout looks like this:
- Yellow (Left turn signal).
- Free.
- Black (Mass).
- White (Right turn signal).
- Free.
- Red (Stop light).
- Blue (Parking lights).
After making the connection, the wires are pulled into the holes in the niche for the spare wheel. The socket is powered from the car's rear headlight connectors.
Selecting a towbar model
The choice of towbar model is dictated by which model you want to buy or which one you have already purchased. It is possible that you have come across an interesting option imported from abroad with a unique towing device, which will be impossible to find from us and will have to be ordered from there. But we will assume that you bought a new trailer for the VAZ 2114, and installation will be simple. In general, we need a coupling ball. Why a ball? Because trailed equipment based on a ball is most widely used in our country and in Europe. It is the towed ball that has replaced all other options and is capable of providing the necessary smooth ride of the car along with the trailer. The ball is perfectly smooth, often even lubricated. This is done because the ball acts as a bearing for the towbar and when the movement changes, it slides and does not create inconvenience for the driver.
Recommendations for use
When operating a Lada car with a towbar, you must follow some rules for operating this part:
- After each trip, the traction element is treated with special anti-corrosion solutions, dirt and moisture are removed from it.
- The coupling ball, when not in use, is covered with protective lubricant and a special cap.
- When transporting a fully loaded trailer hitch, the vehicle speed should not exceed 90 kilometers per hour.
- Transportation of extra-heavy, large-sized trailers is carried out using a towbar with increased load capacity.
- After installing the trailer hitch, the part is registered with the traffic police.
The towbar expands the vehicle's capabilities. A machine equipped with a trailer hitch is capable of towing trailers or other vehicles. However, you should select towbars that are suitable for your specific vehicle model.
Towbar installation
Installation of towing equipment on a VAZ 2114 has two phases:
- Installation of mechanical elements.
- Assembling an electrical outlet.
For a VAZ 2114 it is quite possible to buy a towbar already assembled and ready for installation. Next, we just need to drill holes in the body and screw it on. After the holes are made, it will be advisable to treat them so that rust does not appear.
Speaking about the electrical component, it is necessary to say that we will need to assemble an electrical circuit with the help of which a light signal will be displayed on the trailer indicating where the driver is going to go.
Roughly speaking, we will need to collect all the signal wires in the back of the car and route them to the socket. In the trailer, you will need to do the same, but all the wires will converge into a plug, which will be inserted into the socket on the towbar and form a closed electrical circuit. 52
products
FilterBy popularityBy alphabeticalBy priceQuick viewTowbar VAZ 2104 1984- VAZ-21H In stock (2)Ball load, kg: 600/50Bumper trim: NoArticle: VAZ-21H
The product is in stock.
Available in store in 2-30 days.
2 460 P/piece
Quick viewTowbar VAZ 2106; 2103; 2101 (except VAZ 21065) 1976- VAZ-23H Available (1) Ball load, kg: 600/75 Bumper trim: No Article: VAZ-23H
The product is in stock.
Available in store in 2-30 days.
2,586 P/pieceQuick viewTowbar VAZ 2105; 2107 1980- VAZ-11H Available (1) Ball load, kg: 600/75 Bumper trim: No Article: VAZ-11H
The product is in stock.
Available in store in 2-30 days.
2,640 P/pieceQuick viewTowbar VAZ 2108; 2109; 21099 1984-2009 (universal) VAZ-04H Available (1) Ball load, kg: 600/75 Bumper trim: No Article: VAZ-04H
The product is in stock.
Available in store in 2-30 days.
2,642 P/pieceQuick viewTowbar for Lada 4×4, 2121, 21213, 21214, 2131, 2329 1977- VAZ-51Available (1)Ball load, kg: 50/800Bumper trim: NoArticle: VAZ-51
The product is in stock.
Available in store in 2-30 days.
2,700 P/pieceQuick viewTowbar Lada Kalina 1119 hatchback 2004-2013/Kalina II 2192 hatchback 2013-03/2016 VAZ-02HEIn stock (1)Ball load, kg: 900/50Bumper trim: NoArticle: VAZ-02H
The product is in stock.
Available in store in 2-30 days.
2,740 P/pieceQuick viewTowbar for Lada 4×4, 2121, 21213, 21214, 2131, 2329 1977 - without removing and trimming the bumper. Ball type: H. Loads: 1200/80 AvtoS VAZ-21 Available (1) Ball load, kg: 1200/80 Bumper trim: No Article: VAZ-21
The product is in stock.
Available in store in 2-30 days.
2,870 P/pieceNewQuick viewTowbar Lada Granta Cross, station wagon, sedan, liftback 2011- / Kalina sedan 2004-2013, station wagon 2005-2013, station wagon 2013-2018, Cross 2014-2018 1241-AIn stock (11)Ball load, kg: 1100/75 Bumper trim: NoArticle: 1241-A
The product is in stock.
Available in store in 2-30 days.
3,470 P/pieceQuick viewTowbar VAZ 2105, 21051, 21053, 2107, 21071, 21073 1981- 1203-A Available (3) Ball load, kg: 600/75 Bumper trim: No Article: 1203-A
The product is in stock.
Available in store in 2-30 days.
RUR 3,540/pieceNewQuick viewTowbar Lada Priora sedan/hatchback/station wagon 2007-; VAZ 2110, 11, 12 sedan/hatchback/station wagon 1996- 1228-ANAvailable (6)Ball load, kg: 1200/50Bumper trim: NoArticle: 1228-AN
The product is in stock.
Available in store in 2-30 days.
3,540 P/pieceQuick viewTowbar Lada Kalina 1119 hatchback 2005-2013/Kalina II 2192 hatchback 2013-, Datsun mi-DO 2014- 1219-ANIn stock (2)Ball load, kg: 1100/50Bumper trim: NoArticle: 1219- AN
The product is in stock.
Available in store in 2-30 days.
3,600 P/pieceQuick viewTowbar VAZ 2113; 2114; 2115 1997- 1216-ANIn stock (4) Ball load, kg: 750/75 Bumper trim: NoArticle: 1216-AN
The product is in stock.
Available in store in 2-30 days.
3,650 P/pieceQuick viewTowbar VAZ 2104, 21043, 21044, 21047 1981-2012 1205-A Available (1) Ball load, kg: 600/75 Bumper trim: No Article: 1205-A
The product is in stock.
Available in store in 2-30 days.
4,030 P/piece We recommend Quick viewTowbar Lada Vesta sedan 2015-, Vesta SW 2017-, Vesta SW Cross 2017- 1234-A Available (10) Ball load, kg: 900/70 Bumper trim: No Article: 1234-A
The product is in stock.
Available in store in 2-30 days.
4 460 P/STSTSETYMBENEMBICE OFFARKOPP Lada Niva VAZ 2121 Urban 2014-, Lada 4 × 4 2121 1977-, Lada 4 × 4 21213, 21214 1993-, Lada 4 × 4 2131, 2129 1995- 1233-AND ANSWER (6) Loading (6) per ball, kg: 800/50 Bumper trim: NoArticle: 1233-AN
The product is in stock.
Available in store in 2-30 days.
4,590 P/pieceQuick viewTowbar Lada Kalina 1118 sedan 2005-2013/1117 uni 2007-2013/Kalina II 2194 uni 2013-/Granta sedan 2012-2016, liftback 2014-2016/Datsun on-DO 2014-1229-EYes in stock ( 1) Ball load, kg: 1100/50 Bumper trim: No Article: 1229-E
The product is in stock.
Available in store in 2-30 days.
4,970 P/pieceQuick viewTowbar Lada X-Ray (Lada X-Ray) 2016-, X-Ray Cross 2018- 1240-A In stock (5) Ball load, kg: 1200/75 Bumper trim: No Article number: 1240-A
The product is in stock.
Available in store in 2-30 days.
5 210 P/pieceQuick viewTowbar Lada Largus (Lada Largus) 2012-, Lada Largus Cross 2012- 1231-A In stock (20) Ball load, kg: 1300/75 Bumper trim: No Article number: 1231-A
The product is in stock.
Available in store in 2-30 days.
5 580 P/pieceQuick viewTowbar Lada Niva 4×4 Urban 2014-, Lada 4×4 2121 1977-, Lada 4×4 21213, 21214 1993-, Lada 4×4 2131, 2129 1995- 1238-EIn stock (2) Ball load, kg: 800/50 Bumper trimming: NoArticle: 1238-E
The product is in stock.
Available in store in 2-30 days.
6,330 P/pcsQuick viewTowbar with galvanized ball Lada Vesta sedan/station wagon 2015-, Lada Vesta Cross sedan/station wagon 2017- 92104-A Available (2) Load on ball, kg: 70/900 Bumper trim: No Article number: 92104-A
The product is in stock.
Available in store in 2-30 days.
6,500 P/pcsShow moreStay in the know!Be the first to know about discounts and promotions
The towbar is one of the most popular accessories for both foreign and domestic cars. Today's market offers trailer hitch models for any vehicle, including passenger cars. Knowing the make and year of manufacture of the car, you can choose a towbar that will best meet your requirements. Thanks to this device, you can transport heavy loads, transport boats, motorcycles and much more. But, in order to do towing, the trailer hitch must first be installed.
Of course, this service will be provided to you at any car dealership, but it will cost a certain amount of money there. Considering that a trailer was purchased, its registration was paid and the rights of the required category were obtained, not everyone would want to pay for the installation of a tow bar. And there is really no need for this, because the trailer hitches are quite easy to install. But before purchasing a product for installation, you need to take into account some nuances.
AvtoVAZ policy
However, this policy of owners does not always coincide with the opinion of domestic automakers. For example, there was no provision for connecting a towbar to a VAZ of older years at all - the owners installed it at their own peril and risk. Even today AvtoVAZ does not recommend operating its cars with a trailer for the first 2000 km:
- The body of most passenger cars does not provide mounting points for a towbar;
- The standard wiring does not have free connectors for connecting the trailer's electrical equipment;
- There is no way to connect the brake system of a trailer (camping car) to a car.
Features of installing trailer hitch on VAZ cars
Since traffic rules do not prohibit equipping cars with towing devices, owners are willing to re-equip their vehicles. Moreover, the price of towbars is affordable for many. (see also the article Features of installing a tow bar on a Renault Duster with your own hands: instructions)
However, in the AvtoVAZ line there are a number of models that have design features of the body, which affects the design of the trailer hitch.
For example, installing a towbar on a VAZ 2106 is distinguished by the fact that this car is rear-wheel drive, which means:
- It is necessary to provide a mounting method that would not limit the operation of the driveshaft and rear axle suspension;
- Provide access to the rear axle lubrication unit;
- Do not interfere with the removal of the resonator and exhaust system pipes.
When installing a towbar on a “classic”, you need to take into account the attachment points of other components and assemblies
At the same time, installing a towbar on a Priora with your own hands is a simpler option, since the car is front-wheel drive. This means that there are much fewer components in the rear part of the body, and more options for attaching the trailer hitch.
It should be noted that AvtoVAZ has changed its policy since 2010, focusing on sales of its models abroad. Therefore, installing a towbar on Kalina or installing a towbar on Grant is often accompanied by official recommendations. Manufacturers of trailer hitches draw the attention of buyers to this fact.
Features of installing a tow bar on the Samara-2 family
It is no secret that the VAZ 2115 model is the successor to the “ninety-ninth”, which in turn inherited the platform from the VAZ-09. Therefore, installing a towbar on a VAZ 2109 at one time allowed trailer hitch developers to accumulate sufficient experience, offering do-it-yourself installation kits for free sale.
If you are the owner of a Samara-2 family car, then before you go to the store and purchase a towbar, be sure to find out the design features of your car.
For example, installing a towbar on a VAZ 2114 and VAZ 2115 differs in other methods of attachment to the body:
- The automaker made changes to the body's power elements in 1997, 2004 and 2007;
- For all the indicated years of manufacture, there are different towbars - towbars.
Installation of a tow bar – VAZ 2115, 2004
Features of choosing a tow bar for the VAZ 2114
In stores, car owners are most often offered towbars that are attached to the bottom of the body, where the recess for the spare wheel is located. As a result, car enthusiasts have to almost tear the car body to pieces in order to install such a trailer hitch. It is better to give preference to more durable structures that will be attached to something more impressive, for example, spars.
Higher quality models do not require dismantling the bumper, which greatly simplifies the process of installing such a tow bar. The side members have side holes that are simply drilled through.
Experienced car enthusiasts advise purchasing a more expensive, but durable and easy-to-install Bosal tow bar. This product is firmly attached to the side members, equipped with a removable hook and everything necessary for installation and electrical connections.
In order to install the trailer hitch, just refer to the instructions that come with the product, where everything will be outlined step by step. For example, like in the picture below.
A few words about workmanship
Made well, the metal is thick. Well cooked. All holes and geometric dimensions were accurately maintained; nothing had to be bent or re-drilled during the installation process.
One minus – the paint job is, to put it mildly, lousy. They simply blew black paint onto the metal for show; there was no talk of any preparation (priming, degreasing the surface, etc.). As a result, bare metal sticks out in some places, and paint remains on your hands in some places as soon as you pick up the tow bar in your hands. Of course, I understand that the thickness of the metal of the towbar is enough to survive a couple of cars without rotting. But a rusty piece of iron sticking out from under the car spoils the whole appearance of the car. And it will be rusty in a couple of days.
In general, I decided to paint the part of the towbar protruding from under the car. I bought a can of black paint, sanded it a little, degreased and blew out 3-4 layers with intermediate drying for 15-20 minutes.
Tow bar installation process
In order to install a towbar on a VAZ 2114 yourself, you will need:
- a set of keys;
- electric drill with cutter;.
- sealant.
Next, follow these steps:
- Install the cross beam. Most likely, this will require widening the holes in the rear side members, in which case use a milling cutter.
- From the trunk side, lift the sound insulation and insert the plates with welded nuts into the special rectangular holes in the side members. If the nuts do not fit into some holes, they need to be widened using a drill with a cutter.
- At this stage you will need an assistant, since you will need to simultaneously attach the cross beam to the side members by inserting the bolts and try to insert plates with nuts from the other side of the luggage compartment, hitting the bolts. In this case, the nuts are only tightened, and not completely tightened. If the muffler gets in the way, just remove it by disconnecting it from the 2 rear rubber bands. This will lower it and you will have more space for “turns”.
- Install the “piece of hardware” with the towbar itself; to do this, ask an assistant to insert the bolts from above into the holes of the spare wheel. At this time, you apply a piece of iron from the bottom side and tighten the nut.
- Connect both pieces of iron with 4 bolts.
- Align the towing hook of the tow bar exactly along the axis of symmetry and firmly tighten all the previously installed nuts.
After this, all that remains is to connect the towbar socket, which should come complete with the trailer hitch. There is nothing complicated in this process either.
Referring to the wiring diagram that will also be included with the device, connect the wires of the desired colors and check that all signal lights work as expected.
What you need to prepare before installation
Before the installation process of the towbar, you will need to prepare the vehicle, as well as the tools necessary for installation. The vehicle is driven to an overpass or inspection hole, the car is de-energized, and, if necessary, the bumper is dismantled.
Among the tools for installation, you need to prepare a set of keys, an electric drill with a cutter, as well as a tow bar, wires and a socket.
Features of choosing a tow bar for the VAZ 2114
In stores, car owners are most often offered towbars that are attached to the bottom of the body, where the recess for the spare wheel is located. As a result, car enthusiasts have to almost tear the car body to pieces in order to install such a trailer hitch. It is better to give preference to more durable structures that will be attached to something more impressive, for example, spars.
Higher quality models do not require dismantling the bumper, which greatly simplifies the process of installing such a tow bar. The side members have side holes that are simply drilled through.
Experienced car enthusiasts advise purchasing a more expensive, but durable and easy-to-install Bosal tow bar. This product is firmly attached to the side members, equipped with a removable hook and everything necessary for installation and electrical connections.
This is interesting: How to recycle motor oil
In order to install the trailer hitch, just refer to the instructions that come with the product, where everything will be outlined step by step. For example, like in the picture below.
Chevrolet Captiva › Logbook › Connecting the towbar electrical... 7 or 13 contacts
When the need arises to transport a trailer, we are faced with the issue of installing a towbar and connecting an socket to connect the towbar’s electrics. If everything is more or less clear with the hardware, then questions arise with the electrical connection.
How to connect the towbar socket to the car's electrical system?
The socket can be connected in two ways: standard; universal.
The use of the STANDARD method is only possible if the car has a socket for connecting the towbar electrics. In such cases, you won’t need a trailer connection diagram at all, you just need to purchase an original set of wires (we plug one end into the socket intended for it, and the other end ends with a towbar socket, install the socket and that’s it) Very often, the pinout of the towbar socket (provided that standard equipment is used) is present in the machine's operating instructions. This is an ideal option as it does not require any changes to the vehicle's electrical system.
But this is a rather rare option.
As a rule, a UNIVERSAL connection method is used.
UNIVERSAL method 1: The car is not equipped with a modern electronic control unit. Thanks to this, electrical wires can be directly connected to existing electrical circuits. That is, the wires that come from the connector are connected to those connected to the rear lighting equipment.
UNIVERSAL method 2: The vehicle is equipped with a multiplex bus. The control unit tests the rear optics. When it determines that it is drawing more current (as a result of the connection to the trailer optics), the driver will receive an error message. In such cases, a “matching block” should be used. The matching unit is connected to the standard electrical system of the vehicle, after which the unit itself transmits the corresponding signals to the trailer’s lighting equipment. The car's control unit does not “see” this device, so problems with connecting the towbar no longer arise.
When connecting the towbar electrics, we learn that there are various socket options for connecting the towbar electrics.
The most common types of sockets have 7 and 13 contacts. On passenger trailers for transporting various cargoes and equipment, 7-pin devices are usually used, but on house trailers 13-pin sockets are used. Essentially, the difference lies in the use of additional contacts necessary to activate the reversing lights and other electrical components of trailer houses (refrigerator, charging an additional battery, etc.)
Pinout of 7-pin socket - Europe (DIN / ISO 1724) 1 Left turn signal 2 +12V (optional) or Rear fog light 3 Ground 4 Right turn signal 5 Right marker and license plate light 6 Brake lights 7 Left marker
13 Pin Socket Pinout - Europe (DIN / ISO 11446) 1. Left Turn (Yellow) 2. Rear Fog Lamp (Blue) 3. Ground for Pins 1 to 8 (White) 4. Right Turn (Green) 5. Left Side dimensions and license plate lights (Brown) 6. Brake lights (Red) 7. Right side of dimensions and license plate lights (Black) 8. Reverse (Pink) 9. +12V from battery (Orange) 10. +12V with ignition ( Gray) 11. Ground for pin 10 (White-black) 12. Signal wire (usually spare) (White-blue) 13. Ground for pin 9
Tow bar installation process
In order to install a towbar on a VAZ 2114 yourself, you will need:
- a set of keys;
- electric drill with cutter;.
- sealant.
Next, follow these steps:
- Install the cross beam. Most likely, this will require widening the holes in the rear side members, in which case use a milling cutter.
- From the trunk side, lift the sound insulation and insert the plates with welded nuts into the special rectangular holes in the side members. If the nuts do not fit into some holes, they need to be widened using a drill with a cutter.
- At this stage you will need an assistant, since you will need to simultaneously attach the cross beam to the side members by inserting the bolts and try to insert plates with nuts from the other side of the luggage compartment, hitting the bolts. In this case, the nuts are only tightened, and not completely tightened. If the muffler gets in the way, just remove it by disconnecting it from the 2 rear rubber bands. This will lower it and you will have more space for “turns”.
- Install the “piece of hardware” with the towbar itself; to do this, ask an assistant to insert the bolts from above into the holes of the spare wheel. At this time, you apply a piece of iron from the bottom side and tighten the nut.
- Connect both pieces of iron with 4 bolts.
- Align the towing hook of the tow bar exactly along the axis of symmetry and firmly tighten all the previously installed nuts.
After this, all that remains is to connect the towbar socket, which should come complete with the trailer hitch. There is nothing complicated in this process either.
This is interesting: How to choose a car compressor for inflating tires
Referring to the wiring diagram that will also be included with the device, connect the wires of the desired colors and check that all signal lights work as expected.
Manufacturer's arguments
Every car owner who has encountered such a problem has wondered: why didn’t the developers initially provide a tow bar?
Indeed, it would be easier that way. But AvtoVAZ employees who work on designing passenger cars have a professional opinion on this matter. Naturally, they are aware that owners install towbars on the VAZ-2115 with their own hands, but they strongly do not recommend doing this.
By all means, trying to prevent:
- the body design of this passenger car does not provide space for attaching a special towing coupling device;
- the standard wiring does not have connectors for connecting the electrical equipment of an additional trailer;
- It is not possible to connect the brake system of a trailer attached to a passenger car as a trailer.
At the same time, the instructions for the VAZ-2115 car have a clause that states that trailers can be towed, but the total weight of additional luggage should not exceed 500 kg.
In this case, how will it be possible to tow the same luggage without a trailer hitch?
Why did it happen so?
Perhaps the automatic requests do not belong to you, but to another user accessing the network from the same IP address as you. You need to enter the characters into the form once, after which we will remember you and be able to distinguish you from other users exiting from this IP. In this case, the page with the captcha will not bother you for quite a long time.
You may have add-ons installed in your browser that can make automatic search requests. In this case, we recommend that you disable them.
It is also possible that your computer is infected with a virus program that is using it to collect information. Maybe you should check your system for viruses.
If you have any problems or would like our support team, please use the feedback form.
It just so happened in our country that a passenger car was never considered by its owners only as a means of transport for the comfortable movement of the driver and his passengers.
On the contrary, its functions also include cargo transportation, including towing all kinds of trailers.
Description of the technical process
- Remove the rear bumper of the car. Under the bumper mount there are two holes that open cavities inside the side members.
- Measure the distance between the outer edges of the holes inside the side members. Cut a piece from the pipe with a length equal to this distance.
- Mark the middle of the resulting segment.
- At the edges of strips 20 cm long, cut holes 5 × 5 cm. Place the strips with holes in the middle of the pipe and weld to it at a distance that allows you to insert a hook with a ball between them. If the hook has mounting holes, drill the same ones in the plates, corresponding to them, and secure the hook between them using bolts and nuts 10.
Attaching the towbar to the side members
After completing point No. 11, you have practically made a towbar with your own hands. All you have to do is install it and connect the socket to the car wiring.
Useful tips
- Due to the fact that a breakdown of the structure while driving can cause a lot of trouble. Avoid butt welding metal. Therefore, it is preferable to attach steel strips to the edges of the beam by cutting holes in them to the size of the pipe section, putting them on its ends, and then welding them.
- Do not use an angle grinder without protective glasses, and do not cook without a mask: take care of your eyes.
- If you want to paint a new towbar with your own hands, then first, thoroughly prepare its surface for painting. To do this, pickle it with any product that contains phosphoric acid to convert rust. Then sand the surface with waterproof sandpaper, pouring water on it to wash away the waste. Dry the assembly, degrease it with solvent for nitro paints or acetone, and cover it with adhesive primer from a spray can. Dry the soil according to the instructions. Sand with 400 grit sandpaper and water until the surface is evenly matte after the water dries. The surface is ready - dry, degrease with alcohol or B-70 gasoline (the solvent will smear the fresh soil). Then you can paint. After this preparation, your paint will last a very long time.
Tug selection rules
You can choose the right trailer based on the brand, model and year of production of the vehicle. Experts advise purchasing only certified samples. Such devices are most often used by hunters, summer residents, tourists and fishermen. The towbar is attached to the frame or body of the passenger vehicle, providing a mechanical and electrical connection between the vehicle and the trailer.
The Towing Unit (TSU) comes with installation instructions. It must be mounted to the body through brackets, its strength elements and the floor in the trunk. Installing a towbar on a VAZ 2114 is quite simple due to the presence of conventional attachment points. Similar points are given in the VAZ 2108-2115 and Chevrolet-Niva models.
See:
When installing the towbar on the 2108, you will need to remove the rear bumper. In some models, VAZ cuts the bumper according to the template that comes with the towbar. Mounting holes must be carefully treated with an anti-corrosion agent. There are 2 elements in TSU:
The first element is fixed in the reserve niche, and the second element is fixed between the longitudinal elements in the rear part. Both parts are tightened with 4 bolts. The body has locking points that flare out slightly to create a rigid structure.
