Much has been said about the importance of uninterrupted operation of all elements responsible for applying the brake. This article will talk about repairing the components of the caliper: the piston (cylinder), guides and replacing their boot - with your own hands, you can also learn about this clearly from the attached video.
To fully understand how to easily repair and replace these parts, it is worth understanding the structure of the front and rear calipers and the reasons for their failure, and what repair kit may be required for this.
The design of this brake element
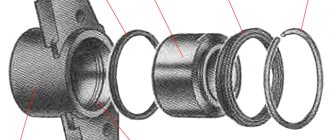
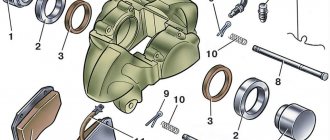
There are two types of disc calipers - front and rear, their design and repair method are slightly different, but their main elements are the same:
- The housing in which the piston (cylinder) is mounted.
- Bypass valve.
- Sealing ring.
- Piston (cylinder).
- Cylinder boot.
- Retaining ring.
- Frame.
- Pressure bar.
- Pads.
- Guide boot.
- Guides.
- 14. Fastening bolt.
- Brake hose.
The difference between the rear disc caliper is the presence of a parking brake.
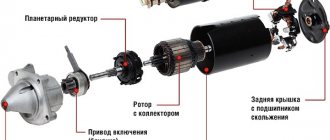
Therefore, the piston (4) has a special thread through which it is screwed onto the parking brake rod (1). Thanks to this, it can operate under the influence of two drives - mechanical (parking) and hydraulic.
What is included in the front brake caliper repair kit?
They produce two types of repair kits - for one and two wheels. The difference between them is only in the number of parts. Typically they consist of:
- lubricants - one or two types (for lubricating the piston of the working brake cylinder and the guides of the caliper bracket), depends on the make and model of the car, as well as the manufacturer of the repair kit. Some inexpensive repair kits do not include it at all, so you will have to buy it yourself;
- cuffs (seals) of the pistons of the working cylinders (one for each caliper);
- boots of working brake cylinders (one per caliper);
- guide boots (two pieces per caliper);
- spare piston (not included in all types of repair kits).
Causes of failure
The caliper as an element of disc brakes is subjected to significant temperature loads, as well as exposure to external adverse factors: dirt, dust, moisture, chemicals. All this happens due to the fact that his device does not allow him to be protected from these negative phenomena. If there is significant overheating, as well as if the boot ruptures, the lubrication of the guides may disappear.
Improper maintenance of the guides, in which some craftsmen manage to stuff inappropriate lubricant into their boots: graphite or similar, leads to their swelling and souring, after which they jam or knock when suddenly activated.
A rupture of the piston boot causes dirt and moisture to enter it. After which it stops working - it starts to jam or, conversely, knock.
Deformation of the sealing ring contributes to brake fluid leakage and oiling of the pads.
About the reasons for caliper failure
This brake system component can break down due to improper maintenance or due to insufficient quality. The main reasons why caliper repair may be required are as follows:
- improper operation, which is associated with filling the guides with poor-quality lubricant - because of this, the boot swells and later “sours”;
- in the future, repair of the brake calipers may be necessary due to moisture getting on the guide, which leads to a breakthrough of the boot;
- Another reason is the piston itself, the body of which is also vulnerable to moisture getting inside;
- low-quality working fluid (brake) can corrode the piston from the inside if the concentration of water in it exceeds the norm.
Video tip for DIY caliper repair:
Repair kit
Replacing a caliper is a drastic measure; often you can limit yourself to repairing and replacing its components. Basically, the standard repair kit includes rubber elements:
- cuffs,
- anthers,
- protective rubber bands of the fitting,
- piston sealing rings.
But depending on the necessary repairs, they may include:
- retaining rings,
- clamping brackets,
- guides,
- directly the pistons themselves.
Thanks to the repair kit, you can significantly save and improve the operation of this brake system unit.
Installing a caliper on a car
After inserting the piston, you need to install the caliper on the car. Installation is carried out in the same way as removal, but in reverse order. If the brake hose tip is attached to the caliper using a special bolt, be sure to replace the copper washers. After installing and assembling the caliper, bleed the brakes (do not forget to add brake fluid to the reservoir). To do this, ask your assistant to press and release the brake pedal 4 times, then press it again and hold it until commanded. With the pedal depressed, unscrew the brake bleeder valve and release the air, close the bleeder valve and have an assistant release the pedal. When the brake fluid appears, place the hose on the fitting and lower it into a clear bottle or jar of brake fluid. Bleed the brakes until no more air bubbles come out of the hose. Lastly, install the wheel and lower the car to the ground.
Signs of trouble
The breakdown of the caliper components and their impending repair can be understood by some signs that occur during braking:
- The car pulls and pulls to the side when braking.
- It feels like when braking you have to put more force on the pedal or, conversely, less.
- The brakes rattle or knock when driving over bumps or when stopping.
- The brakes are jamming, which will be indicated by possible skidding.
- The appearance of brake fluid leaks on the wheel.
- Feedback in the pedal, expressed in a strong pulsation when pressing the brake.
If these symptoms appear, you should not delay repairing faulty caliper elements. You must first figure out why this happened and make repairs immediately. You can learn more about the signs and causes in the attached videos at the end of the article.
Brake caliper piston and other system elements
If we consider the brake caliper design as a whole, we should remember that this is a unit that, with the help of pistons, ensures uniform pressing of the pads. The very design of disc brakes requires them to operate in critical temperature conditions. Between the pad and the disc, as a result of friction, the surfaces of the parts are heated to a temperature of 500-600 degrees Celsius.
Heat is dissipated and removed on other parts of the caliper, due to which the temperature is much lower, but its value is kept at a minimum level of 150 degrees. In such conditions, brake caliper lubrication is critical. In addition, the components and parts of the caliper are constantly exposed to water and salts that appear on the road surface.
Therefore, the lubricant used must have high temperature resistance, be resistant to the chemical effects of brake fluid, and it must not melt or dissolve in water.
Considering the design of a disc brake with a floating caliper, one should note its characteristic features. Its movement relative to the disk during braking occurs in such a way that it can quite easily provoke various malfunctions in the form of critical accumulations of dirt, corrosion, and jamming. In such situations, the pads wear out quickly and fuel consumption increases. A more reliable design is considered to be a fixed version of the caliper, where there is no movement of it relative to the disc.
If the brakes rattle
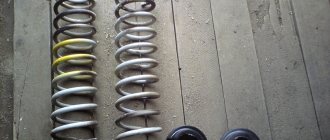
This type of brake has pressure springs or floating calipers.
They are responsible for securing the pads to the caliper body. The reason for their failure is metal fatigue or poor quality. As a result, they lose their elasticity and stop pressing the pads against the body. Because of this, the pads rattle at the slightest passage of irregularities and may come into uneven contact with the disc, which will lead to the appearance of a shoulder or grooves on it. Also in this case, the staples themselves may rattle.
What should you do when your brake calipers or pads rattle? If it is not possible to replace them, then you should try to loosen them with your own hands using pliers to make them more rigid. To do this, you need to pull them out of their seats, unclench them and insert them into place, after which they will stop rattling for a while.
DIY caliper development procedure
Let's move on to a description of the repair itself. The algorithm will be something like this:
- First you need to lift the car using a jack and unscrew the wheel, locking the steering wheel in the extreme position.
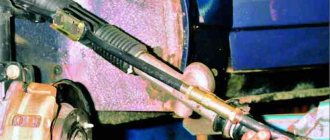
- The mounting spring is removed, and the surface near the brake hose is thoroughly cleaned. To do this, you can blow it with compressed air.
- The brake hose must be clamped with a clamp to prevent leakage of working fluid.
- We continue to repair the caliper ourselves. After this, unscrew the bolt that secures it and remove the hose itself to the side. It is necessary to ensure that dirt particles do not penetrate inside it.
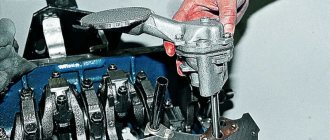
- After this, the caps on the guides are removed, and they themselves are unscrewed using a 7 mm hexagon.
- Using a screwdriver, we recess the piston, moving its body away from the disk to a sufficient distance. You can begin dismantling the old caliper.
- First, take it out of the case and check for moisture. We take the piston out of the housing. To do this, you can remove it from the disk without disconnecting the caliper from the hose. Just press the brake pedal and it should fall out on its own. How to clamp a brake hose? Any tight clamp will do, you can even use the one that is used to secure caps to wheel rims at a tire shop. You can use a vice in which to firmly clamp the body, and remove the piston itself with pliers. Or use compressed air, making sure that the part is not damaged during removal.
- We take out the old cuff, first removing the remaining working fluid. We thoroughly clean the surface in which the protective cover was located and the cuff seats. We rinse and blow with air, after which you can install a new cuff.
- When repairing the front caliper, lightly water the working surfaces of the piston with brake fluid. The piston itself is laid strictly vertically and slightly recessed. We put a protective cover on top. In this case, you need to make sure that the rubber band does not jam.
- Now the piston can be recessed completely, but you need to be careful to prevent the boot from twisting.
- We unscrew the brackets that are equipped with the caliper. We clean the surfaces on which the pads move. Care must be taken not to damage the threads in which the guides are attached. The bracket is screwed into its original place.
- We lay the block, making sure that it has taken its position and is not stuck anywhere. The guides must be cleaned of the slightest particles of dirt. The caliper is put on the bracket, and its guides are tightened with your fingers. We put on the caps and fix the springs. Don't forget to put grease under the brake pistons boot and remove any excess grease from around it.
- All that remains is to put the hydraulic fluid hose back in place and bleed the entire system with a few presses of the brake pedal. We lower the car to the ground using a jack and check the level of working fluid in the tank - refill if necessary. This completes the caliper rebuild.
The piston (cylinder) is faulty
Poor quality of brake fluid, the appearance of rust on the surface when the boot of at least one piston (cylinder) ruptures or as a result of prolonged downtime of the machine entails its partial jamming.
This will initially be heard when its operation is delayed, when the pads begin to knock on the disc. In order to make the repair yourself in this case, you need to disassemble the caliper and pull out the rusty piston; this must be done after the guides have been unscrewed and the boot and retaining ring have been removed.
If the cylinder still moves even slightly, you can squeeze it out using a compressor by inserting a hose into the hole for supplying brake fluid. This can also be done without first disconnecting the housing from the brake system; you just need to press the pedal, after which the created pressure will squeeze the cylinder out of its seat. If it is tightly jammed, then a preventive measure can be soaking it in gasoline and other similar liquid.
It is worth considering that the rear caliper piston cannot be removed, but is simply unscrewed along the threads with pliers or a similar tool. After this, you need to wash the cylinder seat and clean it of dirt and rust. It is also worth doing with the piston (cylinder) itself. Next you need to insert the cylinder into place. It would be useful to replace its boot with a new one during assembly. You can see this in more detail in the attached video.
Rear caliper repair
Actually, let's look at the process using the example of the rear caliper of a Chevrolet Lacetti
The first step is to open the brake reservoir cap, place a bag on the neck and screw the cap into place.
This is necessary in order to limit the access of air into the tank. This will prevent the brake fluid from quickly flowing out of the hose when we unscrew it.
Jack up the car and remove the wheel.
Use a metal brush to clean everything that can be cleaned.
After this, apply penetrating lubricant to the brake hose bolt.
We wait a little and try to unscrew the bolt with a 12 mm wrench.
If it's good, that's good. And if it doesn’t work out, then that’s bad and I don’t envy you.
We wrap the unscrewed hose into a “finger” from a rubber glove and wrap it with wire. During repairs, these measures will be enough to avoid brake fluid leakage.
There are craftsmen who clamp the brake hose for these purposes, but I don’t want to do that. Who knows what will happen to this hose later. It's better not to take risks.
We remove the unscrewed bolt to the side and at the same time try not to lose the copper sealing rings. There are two of them.
That's it, the caliper is disconnected from the system and we now need to remove the caliper cylinder itself. To do this, use the same 12 mm wrench to unscrew the lower bolt of its fastening.
After this, lift the cylinder up. If it is very jammed, then you can help yourself with a large screwdriver or a pry bar.
We take it out together with the upper guide. We look into the hole where the brake hose was previously screwed in and see the back of the piston.
Using something, we need to squeeze out this very piston through this hole.
If it’s really tight, then you can help a little with a hammer, or better yet, with a vice.
After the piston has come out, we assess the situation. If the piston is full of holes and pockets of corrosion, then it is better to replace it. If the corrosion is not significant, then you can polish it with felt and Goya paste. In my case, there were pockets of corrosion, but it was not possible to purchase a new piston. Therefore, after a little polishing, I left it to serve further.
We clean and wash all the grooves in the cylinder.
The far groove is the seat of the sealing collar, and the near one is the boot
After this, lubricate the cuff groove and the cuff itself with piston lubricant. The groove must be lubricated to avoid corrosion under the cuff. Install the cuff into the cylinder. This is done quickly and easily.
Now the most important thing. It is necessary to put on the piston boot and insert the piston itself. To do this, lubricate the piston with the same grease and put the boot on the piston from the back side.
I was filming a video and forgot to take a photo. That's why I inserted a still from the video. It looks bad, but the essence, I think, is clear. The part of the boot that is inserted into the cylinder groove hangs slightly from the piston.
Now, when installing the piston, the boot will fall into its groove in the cylinder. In this case, the piston can be rotated slightly so that the boot placed on it falls into its groove completely. If the boot is bitten a little, then you can help it get into the groove with a screwdriver. But be careful not to tear the boot.
There is nothing complicated. You can easily figure out the place.
Now you can push a little more grease under the boot. This can be done more conveniently using a syringe.
Squeeze the lubricant into the syringe.
We push the piston into the cylinder and excess lubricant will be squeezed out from under the boot.
The piston should move easily and move with bare hands. If it doesn’t move, it means something went wrong or you didn’t eat enough porridge as a child. If the problem is a mess, then you can use this device to recess the piston.
Now you need to wash the seats of the guide pins.
If there is severe contamination, then it will be more convenient to dismantle the whole thing and wash it on the table.
After that, apply a little grease for the guides there. You can insert the guide and use rotational movements to evenly distribute the lubricant.
We install the anthers so that they fit into their grooves. And insert the bottom guide
Clean the pad guides and lubricate them with a thin layer of high-temperature grease
We lubricate the ends of the pads with the same grease.
We do the same with the back side of the block.
It is better not to lubricate the second pad, which faces the piston, so that the lubricant does not get on the piston boot.
We install the pads in place, first making sure that the lubricant does not get on the working area of the pads.
Lubricate the second guide that remains on the cylinder
And install the cylinder in place.
Screw on the brake hose. We remove the bag from the brake reservoir, but do not screw the lid on yet.
We unscrew the bleeder fitting and wait for brake fluid to flow out of it.
It is located at the top of the cylinder and the liquid, filling the volume of the cylinder, will displace the air from it.
After the liquid begins to come out, you can tighten the fitting. To ensure that there is no air in the system, you can have an assistant press the brake pedal several times and bleed the system. If your assistant cleaned the ram properly, ask him not to touch the steering wheel with his hands while pumping the brakes.
That's all you need to do to repair the caliper yourself.
1306 words written... In general, restoring a caliper is much faster than writing about it.
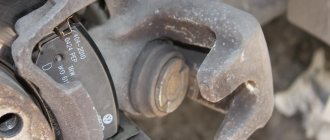
What happens if you don’t service the caliper and don’t notice a worn boot in time.
Don't forget to check the brake fluid level and tighten the reservoir cap. Before leaving, press the brake pedal several times until the piston reaches its working position.
Guide faulty
The main problem if the brake does not work can be jamming and souring of the caliper guides.
Repairing this malfunction with your own hands will not be difficult. By the way, in this case there is no difference when disassembling both the front and rear calipers. To do this, you need to unscrew and pull out both guides. Clean them from dirt or poor-quality lubricant, remove and replace the torn boots with new ones, after filling them with special grease for calipers.
Then put them in place, insert and screw the guides back. Then you should try how freely the pressure bar moves along them. This can be seen visually in the attached video at the end of the article.
We should not forget about the housing of this brake element. If significant rust, dents, sagging or other mechanical damage is found on it, it should be replaced completely.
If the repair had to be done on a removed caliper, then after installing it in place, the brake system should be bled.
Related publications:
- When should you replace brake pads?
- Why do brake pads squeak and whistle when braking?
- Types of brake pad wear sensors and how they work
- How to change brake fluid?
- Do-it-yourself grooving of brake discs, can it be done without removal or is it still necessary to remove it?
Detailed instructions for repairing calipers
The most common cause of brake caliper failure is its souring and subsequent jamming.
If the caliper is regularly maintained and lubricated, it can last for decades without any repairs. But the main thing is to choose the right lubricants!
If interested, read about choosing lubricants. In this article we will work with them, but I will not spend letters in this article describing these lubricants.
Caliper repairs can be divided into three categories:
- Mandatory caliper lubrication when replacing pads
- Reanimation of the caliper if the wheel is already heating up
- Complete disassembly of the caliper and replacement of worn elements
The first two categories can be viewed via the links. And in this article we will look at the third category, when it is too late to drink Borjomi and surgical intervention is necessary.
Most often, the reasons for complete caliper failure are two things:
- The caliper has never been lubricated or serviced. As a result, the piston and guides were severely corroded.
- The caliper was not lubricated with what was needed. As a result, the lubricant turned into plasticine or powder, and the anthers and cuff mercilessly swollen.
In these two cases, you can no longer get by with half measures and you will have to do the job thoroughly.