Side rear view mirrors and interior mirrors are mandatory installations on any car. At the same time, the side mirrors protrude somewhat relative to the body, as a result of which they often break due to minor accidents.
Also, the side mirror can be heated, electrically adjusted, etc. During operation, such solutions fail, which requires replacement or repair of the side mirror.
In such a situation, a side mirror will be required:
- remove from the car (the fastenings are unscrewed);
- remove the mirror element and disassemble the housing;
- replace or repair damaged elements.
It is important to know how to remove the side mirror, as well as how to disassemble the side mirror correctly. Read more in our article.
When do you need to remove the side rear view mirror?
Side mirrors on different cars differ in shape and size, and may have limited or expanded functionality. In this case, the main function is the ability to control the situation around the car.
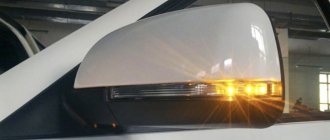
Modern cars have heated and electrically adjustable mirrors, and quite often an additional turn signal is integrated into them.
Such “electronic” and “mechanical” solutions in mirrors usually fail over time. Also, we should not forget about the traditional breakdowns of the side rear-view mirrors (for example, in a parking lot or as a result of minor accidents).
It often happens that during long-term use it becomes necessary to paint the side mirror after damage from flying stones, etc.
Low bed trailer: which one to choose according to needs and manufacturers
- The composition must withstand the weight of the structure, which may include metal parts, plastic and glass of the mirror itself;
- The product must maintain its characteristics despite increased vibrations. Therefore, we immediately exclude Moment type glue from the list;
- The glue should not change its adhesive parameters under the influence of moisture and temperature changes. The glass is constantly under different temperature loads, which are transferred to the glue itself. In summer there is active rays of the sun, in autumn there is high humidity, and in winter there is frost.
And here many will say that the ideal solution would be to use epoxy resin.
I partially agree, since with its help you can really securely fix a product that will hold on and not change its characteristics over a long operational period.
But epoxy resin has one small problem, which for some reason many people forget about. The material is good in many ways. But working with it in relation to our particular task is extremely problematic. To install the mirror reliably and efficiently, after applying the resin to the surface, you will need to firmly press the body for at least 10 hours. Is it better for 12. Question. How are you going to secure the mirror attached to the windshield? Build complex structures or hold them with your hands? I highly doubt it.
Therefore, objectively, the best way out of this situation would be to buy special glue. It is relatively inexpensive. But I can’t tell you exactly how much this or that glue costs. You can get it for a few tens of rubles, or you can spend about a thousand.
How to remove a rear view mirror
First of all, replacing a side mirror is not always necessary. As a rule, only individual elements are changed or the mirror is repaired. As part of the repair, it may be necessary to replace the mirror element, restore the heating or adjustment functions. However, if the side mirror is severely damaged, then a complete replacement is performed along with the housing assembly.
To remove the side mirror:
- it is necessary to reset the negative terminal from the battery (if there is heating, turn signal indicators and other solutions in the mirrors);
- then you should open the car door;
- then remove the handle for changing the mirror angle (if there is a mechanical adjustment);
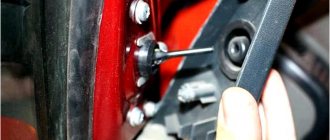
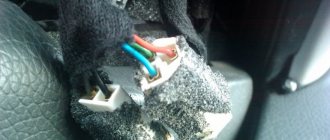
- then you will need to locate the mirror mounting bolts and unscrew them.
Typically, such bolts are covered with a decorative cover (removable with a plastic spatula or screwdriver); Please note that during disassembly, if there are rubber seals under panels, trims and other elements, you must carefully remove them, since it will be difficult to find new seals to replace. - Having unscrewed the mirror mounting bolts, do not rush to remove the mirror itself, as you need to remember the position of the cables, connectors, pads, etc. (for example, electric mirrors);
Diagnosis of electrical faults
Diagnosis of a malfunction should begin with checking electrical faults. First of all, you need to turn on the ignition, but do not start the car, then lower the windows and press the mirror adjustment buttons. If the characteristic buzz of the electric motor is not heard under the casing, then there is a problem in the drive circuit. The first thing you need to do is check the fuse, the purpose and location of which is always indicated in the operating manual for each car. If that's the case, that is. it has burned out, you need to replace it with a new one of the appropriate rating, after which you must check the condition of the connectors in the device, make sure that the electric motors and control panel are receiving power. A multimeter (or, in extreme cases, a test lamp) will help you do this.
How to disassemble a side rear view mirror
It is necessary to disassemble the mirror to repair it. Often this operation is performed if the mirror element needs to be replaced. In this case, the plastic case does not change. Also, the mirror element must be removed if you plan to paint the side mirror housing.
Disassembling the side mirror is carried out as follows:
- The mirror element in the mirror body is secured with plastic latches (2 or 3 latches on each side). To carefully and safely remove the mirror from the case, it is recommended to heat the plastic latches with a simple household hairdryer. In this case, it is important to distribute the heat over the surface of the mirror, and also not to use high heat with a hair dryer. Ignoring this rule may lead to melting of the housing and latches.
- Once the latches become softer, you can remove the mirror. This is done using plastic spatulas or a flat screwdriver, which is pre-wrapped with electrical tape (protection from scratches on the body and on the mirror itself);
- To remove the mirror, insert a piece of soft rag into the gap between the mirror part and the body, after which you can insert a spatula or screwdriver.
The result is a lever that can be used to move the mirror; Gently working on the mirror element, pull the blade and insert another one. A pair of paddles or another lever will allow you to unclip the mirror from the mount. Usually one side snaps off first, and then the other side comes off in the same way. - Once completely disconnected, it is important not to immediately proceed to removing the mirror, as there may be wires connected to it. The connectors must be carefully disconnected, and then the mirror element must be removed. You will also need to unscrew the bolt securing the central frame of the case;
- The necessary repair or replacement work can now be carried out. When finished, reassemble the side mirror in the reverse order.
Other ways to remove a car mirror
If the side mirror is structurally simple or the mirror element is already damaged and requires replacement, to remove the mirror element it may be sufficient to do the following:
- a soft lining is placed on a flat surface;
- then you should not hit the lining too hard with the mirror body;
As a rule, in this case the mirror element “jumps off” from the latches, without damage (this is important for entire rear-view mirrors that are disassembled for repair). Then all that remains is to remove the element completely and carry out repairs.
We also recommend reading the article on how to remove a radio without keys. From this article you will learn about methods for removing a radio in a car without key removers, as well as what nuances you should pay attention to as part of this procedure.
Please note that this method allows you to understand how to remove the rear view mirror, but will require extreme care during the dismantling process. The reason is that there is always a risk of damaging the mirror or its housing.
However, on simple side mirrors (without heating and electrical adjustments), this method of removing the mirror element can significantly save time and simplify the procedure (if done correctly).
Popular and high-quality solutions
In fact, nowadays it is very easy to buy glue for mirrors. The range of stores is huge. Therefore, the main problem is likely to be the choice between the presented list of offers.
If you want the mirror to really last a long time after being fixed to the glass and not be subjected to internal and external influences, I recommend paying attention to one of the compositions that I will give below.
The following adhesives are considered the most popular and high-quality:
Recommendations
Different car models may have different side mirrors. This means that before removal it is necessary to take into account individual design features in advance. In some cases, it will be necessary to remove decorative trims, panels, etc. Only after this will access to the screws securing the mirror housing be available.
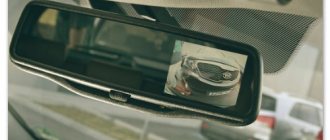
We also recommend reading the article on how to remove the interior rear view mirror in a car. From this article you will learn about the available methods for removing a mirror in a salon, as well as how you can disassemble a salon mirror.
When removing the mirror element, it should be taken into account that the space under the mirror element does not have to be “empty”. As a rule, modern cars have hidden adjustment mechanisms, turn signal indicators and other elements inside the mirror housing. For this reason, replacing a side mirror should be carried out taking into account the design features of the mirrors on the car.
It should be noted that replacing the original mirror element with a cheaper analogue can lead to the fact that the “quality” of the image in the side mirrors, when compared with the original, will be noticeably different. Moreover, even the shade and color of the mirror element may be different compared to the original.
Also, provided there is a heating function, a non-original mirror may take a long time to warm up, the heating zone may be limited (heating does not cover the entire area), etc. To avoid such troubles, experts recommend using only original mirror elements for replacement, even taking into account their higher cost.
Reassembly
I will say right away that the assembly is carried out simply in the reverse order of the previously carried out dismantling work. Therefore, I see no point in talking about this separately.
With mirrors on special mounting brackets, everything is also extremely simple. All that remains is to tighten the fasteners and fix the mirror on the ceiling or side of the car.
But what’s really more difficult is gluing a car mirror. To begin, choose the appropriate composition. Household superglue or double-sided adhesive tape will not work. Tested by many car owners. It's better to ask for the appropriate adhesive at an auto parts store. If found, for gluing you need:
- choose a warm and sunny day without high humidity;
- create a temperature in the garage of 25-27 degrees;
- remove all dirt and traces of old glue from the body;
- walk a little along the joint with sandpaper;
- sand the gluing area on the mirror;
- degrease all surfaces;
- Apply the required thin layer of glue to the holder;
- spray the purchased activator on the fastening area;
- attach the glass to the surface;
- press the mirror to the glass;
- keep as long as the glue manufacturer said;
- remove the remnants of the used activator and glue from your mirror and also the holder itself;
- put the entire structure in its rightful place;
- use as intended.
Nothing complicated. I was recently convinced of this personally when it became necessary to replace a cracked side mirror.
I think you can handle it without too much difficulty. And if you have any questions, just write to us in the comments. We will try to answer you as quickly as possible.
Thank you for your attention! Subscribe and tell your friends about us!
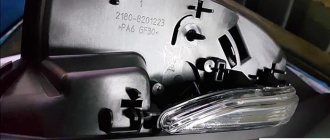
Replacing the mirror element
If you only need to replace the mirror element, the task becomes much easier. Sequencing:
- Use your hand to turn the glass to the upper right corner;
- Insert a screwdriver into the gap formed at the bottom so that its end gets between the mirror element and the rotating plate of the housing in the area of the latch (see section A-A in the diagram). The same can be done with your fingers if they fit into the gap;
- Carefully and smoothly press the mirror element away from the body until it comes out of the latch (a click will be heard);
- Repeat this action with the second latch:
- Press the element away from the remaining clips. This can already be done by hand;
- Remove the part.
Advice. When using a screwdriver, it is advisable to place a protective material (for example, a soft cloth) to protect the parts from damage.
Before installation, look and remember the locations of the clamps. Attach the element to the body and hold it with your palm (not your fingers) along the entire plane. With your other hand, press alternately on the locations of the clamps. The element should snap into place with characteristic clicks.
The diagram shows the right mirror element for the Mitsubishi Lancer. Changing the left one is done in the same way.