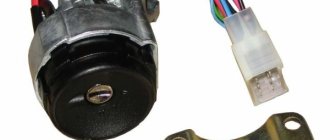
Description and location of indicators and instruments on the panel
In order to fully use the information that the dashboard provides, you need to know the location and purpose of its instruments and indicators, and their characteristics. The instruction manual provides a description of the device. A standard panel consists of a set of measuring and control instruments, as well as alarms.
Instrument panel VAZ 2105
The dashboard typically contains the following components:
- speedometer – speed indicator with trip meter;
- coolant temperature and fuel level indicators;
- indicator lights for battery charge, oil level, fuel reserve;
- control lamps, turning on side lights, high beams, direction indicators;
- voltmeter;
- signaling unit;
- switches for heated rear window, rear fog lights;
- switches for exterior lighting and electric heater fan.
When installing an on-board computer, it becomes possible to monitor more than 20 parameters that allow you to control the operation of components and systems of the machine. The information is reflected on the display (the author of the video is RusLan 404).
Construction of standard car panels
Basically, the panel instruments are located on the left side, opposite the driver, so that information can be easily and quickly read. The usual standardized set of panels, including those on the VAZ 2106 or 2105, consists of the main control and measuring instruments of the car. They are designed to clearly and immediately notify the driver about car malfunctions or the working condition of the leading components and systems of the car, the current speed, the fullness of the fuel tank and other indicators.
The average “tidy” model assumes the presence of the following devices:
- speedometer, which reports speed;
- lamps-controllers for the operating state of car components;
- car mileage counters - daily and total;
- temperature sensor in the cooling system;
- fuel level sensor in the tank;
- engine speed indicator - tachometer (absent in the “five”).
The control and measuring devices of most vehicles are equipped with light bulbs that signal problems by lighting up in bright red. Problems can lead to an emergency. Therefore, in this case, it is better to stop moving and find out the degree of deviation from the norm.
The instrument panel of a VAZ 2105 car consists of electronic, light and mechanical devices (which are gradually being replaced by electronics). If there is a problem with its operation, urgent repairs or complete replacement are necessary.
Possible faults
Dismantling and repair of the device may be required for the following malfunctions:
- The control panel backlight does not light up. You should check the condition of the wiring, contacts, and the serviceability of fuses.
- Not a single sensor or indicator works, and the warning lights do not light up. First of all, you should check the fuse in the mounting block and replace it if it is burned out.
- If the indicator arrows jerk in different directions, the cause is most often poor ground contact.
- Malfunctions may be related to the operation of the dashboard itself. It is necessary to dismantle the shield and carry out diagnostics.
- Sometimes the functionality of the device is caused by a malfunction of the cigarette lighter. The instrument panel does not work or does not function correctly.
- The functionality of the control panel sometimes disappears after tuning.
Tuning with LED lighting
EUR lada kalina: malfunctions and solutions, electric power steering does not work, reasons
Electric power steering is a component used to provide more comfortable driving. Not so long ago, domestically produced cars began to be equipped with EUR, in particular, in this article we will talk about Lada Kalinas. What malfunctions can occur with the Kalina EUR and what troubleshooting methods are there? Find answers to these and other questions below.
Why does the electric power steering on the Lada Kalina not work, turns off and refuses to work, what are the signs of a steering wheel with power steering knocking, jamming, biting or squeaking? To repair the system yourself, you need to know how diagnostics are carried out and what causes precede the breakdown. Most often, the failure of the amplifier is caused by a breakdown of the unit itself and the amplifier fails. Problems of this type are resolved by thoroughly checking the system to identify the exact problem.
As practice shows, often the inoperability of the electric amplifier (failure) is associated with a breakdown of the speed controller.
Consequences:
- the steering wheel is jammed,
- jams
- becomes tight
- and others
Because the speed controller sensor ensures activation and deactivation of the electric power steering under different driving modes. The amplifier on Kalina works if the car is moving at low speed. When the speed begins to increase, the booster automatically turns off, allowing for safer machine control when driving at high speeds.
So, briefly about the reasons for the inoperability of the EUR:
- The speed controller has failed or the control unit does not receive or disappears a signal from it. In this case, the reason may lie in either a breakdown of the sensor, damaged wiring, or poor contact of the controller with the on-board network.
- The voltage in the vehicle's electrical network has decreased. The reasons can be different, ranging from a dead battery and an inoperative generator to the use of inappropriate electrical equipment in the car.
- The permissible crankshaft speed has been exceeded.
- Incorrect operation or failure of the control module. Depending on the cause, the control unit may need to be repaired; more detailed diagnostics need to be done.
Diagnostics
To check the amplifier in a car, you need to remove the plastic trim on the steering column; to do this, unscrew the bolts securing it from the bottom.
Then you will need to get to the 8-pin plug, its pinout is as follows:
- The blue contact is connected to the ignition switch, this is 12 volt power;
- the red-brown contact is the connection cable to the tachometer;
- the gray contact goes to the car speed controller;
- white and pink wire - amplifier control indicator;
- black-yellow contact is a diagnostic line;
- the next contact is empty, the wire is not connected to it;
- brown contact is ground;
- empty.
More accurate results will be obtained by checking the amplifier using a scanner. But since such equipment can usually only be found at service stations, you can try to check the operation of the system with a paper clip.
To check you need to do the following:
- First the ignition is turned off.
- Then, using a paper clip, you need to close contacts numbered 6 and 7 of this plug, while the plug itself does not need to be removed.
- Next, the ignition must be turned on.
- After completing these steps, the EUR failure indicator located in the dashboard will begin to blink; by the number of blinks, you can determine whether the system is broken (the author of the video is Gosha Vakhromeev).
How to understand where to look for the cause by the blinking indicator icons:
- one long signal and one short signal - the electric amplifier is working;
- one long and two short - no engine speed signal;
- one long and three short - the torque controller is out of order or there is no power supply;
- one long and four short blinks—problems in the operation of the electric power steering motor;
- one long and five short - the steering shaft position controller has failed;
- one long and six short - the motor rotor position controller has failed;
- one long and seven short - problems with the electrical network - the voltage is either too high or very low;
- one long and eight short - the control module of the electric amplifier has failed;
- one long and nine short - the speed controller is broken.
Installation and repair instructions
Dismantling the control panel may be required for repairs, tuning the panel, replacing sensors, etc. The procedure is simple and can be performed at home.
Tools and materials
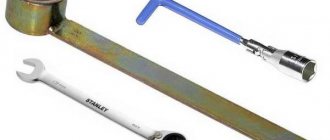
To disassemble and repair the dashboard, you must prepare the following tools and materials:
- a set of keys;
- Screwdriver Set;
- diagnostic tester;
- new sensors and parts needed for replacement;
- elements for tuning.
It is better to buy originals to avoid fakes.
Algorithm of actions
To dismantle the tidy, you need to perform the following steps:
- Turn off the power supply to the machine by disconnecting the negative terminal from the battery.
- After unscrewing the mounting bolts, you need to remove the casing from the steering column.
- By removing the plugs and unscrewing two screws, the instrument panel is removed.
- Next, the wire plugs are disconnected.
- After opening the glove compartment, you need to unscrew the mounting bolts. The bolts securing the shelf for things are unscrewed in the same way.
- By pulling the handle of the hydraulic light corrector, you need to remove it. Then, using a socket wrench, unscrew the mounting nut and push it in.
- In the glove compartment, disconnect the power cord for the backlight lamp.
- After unscrewing the two bolts, you need to move the heater control unit.
- Next, you should dismantle the air duct.
- The next step is to unscrew all the console fasteners.
- When the last two fastening nuts in the center are unscrewed, you need to carefully remove the panel from the studs and remove it from the interior.
Next, the necessary repairs, tuning, replacement of sensors are performed, and backlighting is installed. After completing all the manipulations, the assembly of the device is carried out in the reverse order of disassembly.
To make assembly easier, during disassembly you should mark the wires and sort the devices and sensors.
Malfunction of the electronic engine control unit (ECU, ECM, controller)
An electronic engine control unit, abbreviated as ECU, ECM, controller, is an electronic device that, using various signals from engine sensors, controls the composition and amount of fuel supplied to the engine. Having a built-in diagnostic system, it can recognize problems in the system, warning the driver about them through a warning lamp (Check engine). It also stores diagnostic codes that indicate areas of trouble to help technicians make repairs.
Symptoms of a malfunction of the electronic engine control unit:
— Lack of control signals for injectors, ignition, fuel pump, valve or idle mechanism, and other actuators. - No response to Lambda - regulation, temperature sensor, throttle position sensor, etc. - No communication with the diagnostic tool. — Physical damage (burnt radio elements, conductors).
You can purchase an electronic engine control unit (ECU, ECM, controller) from us!
DON'T STROKE - BUY CHEAPER! ! !
Causes of malfunction of the electronic engine control unit:
1. Unqualified intervention in the car’s electrical system when installing alarms and carrying out repairs. 2. “Lighting up” from a car with the engine running. 3. “Reversal of polarity” when connecting the battery. 4. Removing the battery terminal with the engine running. 5. Turning on the starter with the power bus disconnected; 6. Contact of the electrode during welding work with the sensors or wiring of the vehicle. 7. Water entering the ECM. 8. Broken or shorted wiring. 9. Malfunction of the high-voltage part of the ignition system: coils, wires, distributor
ECU diagnostics involves reading errors recorded in the controller’s memory. Reading is performed using special equipment: PC, cable, etc. via diagnostic K-line. You can also get by with an on-board computer that has the function of reading ECM errors.
The ECU stores diagnostic codes that indicate areas of trouble to assist technicians in making repairs.
If the ECM fails due to a problem in the wiring or actuator, a simple replacement may not give anything other than two, three, etc. burnt blocks.
To find out which controller is on your car, you will have to remove the side frame of the car's instrument panel console. Remember the number of your ECU and find it among the tables presented.
You can purchase an electronic engine control unit (ECU, ECM, controller) from us!
DON'T STROKE - BUY CHEAPER! ! !
The information will also be useful to you: Varieties of electronic engine control systems (ECM, controllers), which are installed on different models of the VAZ family car.
If you haven't found the answer you are looking for, then ask your question! We will respond shortly.
Don’t forget to share the information you find with your friends and acquaintances, as they may also need it - just click one of the social networking buttons.
Tuning ideas
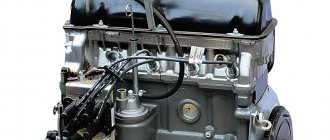
The VAZ 2105 was little modernized, mainly in the engine. Owners of “fives”, like UAZ cars, often resort to tuning the instrument panel to give it a modern look and increase functionality.
On the VAZ 2105, tuning is possible in the following options:
- purchase a ready-made kit, which includes dials for sensors, instrument panels, parts for lighting, wiring and terminals for connections;
- A budget option is to illuminate devices with LEDs of different colors;
- More technically difficult is the texture and color change of the console.
With the help of LED lighting, you can change the design of the control panel, make it stylish and give it a personal look.
Diagnosis of failure
How to properly check a car's electrical circuit:
- First, diagnose the circuit from the generator to the coil. Make sure that the contacts in this area are not oxidized; there may be breaks. If there is oxidation, then the contacts just need to be cleaned. Bad wires must be replaced.
- Check the functionality of the coil. You need to find out if there is spark. Take out one high-voltage wire and bring it to the metal. When you try to start the engine, a spark should jump between the cable contact and the metal. If it is not there, then it is necessary to more carefully diagnose the main components of the ignition system.
- Also diagnose the performance of the spark plugs and distributor. Sometimes the inability to start the engine is due to the formation of carbon deposits on the spark plugs; if this is the case, then the deposit must be removed. There can be many reasons for the appearance of soot; read more about them, as well as options for getting rid of it.
Replacing a VAZ 2105 torpedo with a VAZ 2107
This alteration had been planned for a long time, all the parts were lying around and waiting in the wings. The installation of the torpedo was accelerated by a leaking heater radiator.
To replace you will need:
Torpedo VAZ 2107
(used 800 RUR)
Beard 2107
(200 RUR)
Wiring 2107 injector: from the fuse box to the dashboard
(used 800 RUR)
Dashboard, VAZ 2107 injector
(2900 RUR)
The whole job took me 2 days, I did everything slowly. The first day was spent disassembling the old torpedo and replacing the heater radiator (it’s still a mess)
I worked with a friend, more than half of the time was spent talking.
I was very pleased with the work done, all that remained was to set the clock and deal with the ESP buttons (I plan to move them to the armrests of doors with a kalina block)
The appearance will change a lot, 07 torpedo in my opinion
AutoNews / Reviews / Tests
How to Remove the Instrument Panel on a VAZ 2105
Nuance for replacing the device panel of the VAZ 2104-2105-2107
Disconnect the ground wire from the battery.
Unscrew the fastening screws and remove the facing casing of the VAZ 2107 control shaft.
- panel and its accessories
- 1 - ashtray body
- 2 — bracket for securing the glove box lid lock
- 3 - ashtray
- 4 - glove box lid lock
- 5 — decorative insert for radio mounting panel
- 6 — radio mounting panel
- 7 — insert of the lower panel of the radio receiver mounting
- 8 — facing of the radio mounting
- 9 — liner of the upper panel for mounting the radio receiver
- 10 – plug for the windshield heating symbol display
- 11 — instrument panel
- 12 — loudspeaker trim
- 13 - instrument panel
- 14 — instrument panel insert
- 15 — glove box body
- 16 — glove box cover
- 17 — hinge link of the glove box lid
- 18 — instrument panel shelf
Using a narrow sharp tool, remove the side window heating nozzles from the device panel, the body ventilation nozzles of the VAZ 2105 and the plug 10 of the windshield heating sign board from the device panel 11.
Replacing lamps on the panel of a VAZ 2105 - 2104
Hello, I'm tired of advertising on video clips on YouTube, and you understand why their advertising, for this advertising...
Replacing the VAZ 2105 torpedo. 02/21/17. - part 1.
MY AFFILIATE PROGRAM Log in and EARN.
- — Unscrew the screw (located under the plug) securing the shield of 11 devices, remove the shield, disconnect the plugs and wires from the devices.
- — Remove the facings 12 from the left and right loudspeakers, overcoming the resistance of the two holders located along the upper edge of the facings.
- — Unscrew the four screws that secure the speakers, pull them out of the device panel and disconnect the wires.
- — Remove shelf 18 and body 15 of the glove box by unscrewing the screws securing them.
- — Unscrew the nut of the speedometer day counter and pull out the counter cable from the instrument panel of the VAZ 2104.
- — Remove the electronic clock, cigarette lighter and light switches and heated rear window from panel 6 of the VAZ 2107 radio mount. Disconnect from their wires.
- — After unscrewing the fastening screws, remove the radio and disconnect the wires of the VAZ 2105.
- — Pull out the lower insert 7 of the radio mounting panel by the upper part.
- — By pressing on the left and right sides of the edge of the panel 6 for fastening the radio receiver, release the hooks of the upper insert 9 and pull it out of the panel.
- — Remove the decorative insert 5 mounting panel by pressing out the two hooks in the upper part of the insert from the inside.
- — Unscrew the 6 screws of panel 6 securing the radio receiver (including two screws that immediately secure the device panel) and remove panel 6.
- Instrument panel mounting points. Arrows indicate attachment points
Through the gaps in the panel 11 of devices and the glove box, unscrew the four nuts of the upper fastening of the device panel, as well as the two remaining screws of the lower fastening, remove the panel and the panel insert
Install the device panel in reverse order.
Location of lamps on the instrument panel: 1 — speedometer illumination lamp (AMH 12-3-1 (T3W); 2 — signaling unit (A 12-1.2 (W1.2W); 3 — battery charge indicator lamp (AMH 12- 3-1 (T3W); 4 — instrument cluster illumination lamp (AMH 12-3-1 (T3W); 5 — insufficient oil pressure warning lamp (AMH 12-3-1 (T3W); 6 — fuel reserve warning lamp (AMH 12-3-1 (T3W); 7 — voltmeter backlight lamp (AMH 12-3-1 (T3W); 8 — control lamp for turning on the external lighting (AMH 12-3-1 (T3W); 9 — control lamp for turning on the direction indicators (AMH 12-3-1 (T3W); 10 - high beam indicator lamp (AMH 12-3-1 (T3W)
What is included in the electrical circuit?
The VAZ electrical circuit consists of many components. We are talking about the generator, battery, optics, fuse blocks, warning lamps, as well as the instrument panel and other components. We are talking about both injector and carburetor engines. The system wires are marked in different colors, they correspond to those marked on the diagrams, this allows the car owner not to get confused during circuit diagnostics and repairs.
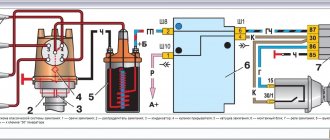
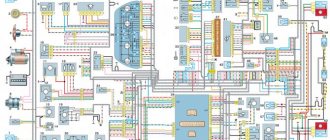
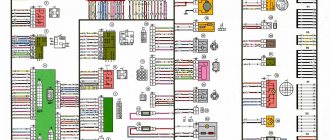
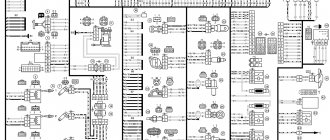
Complete wiring diagram for the domestic “five”
The wiring diagram of a VAZ 21053 carburetor or injector as a whole gives a complete picture of the circuit, without any specifics or explanations. Accordingly, the service manual for the vehicle should contain additional appendices explaining the purpose of electrical devices. In any case, one of the main components of the circuit is the ignition system. In general, there is nothing complicated about it, but during repairs it is easy to get confused in the wiring that goes from the relay to the fuse block and from to the block.
The wiring system also includes the electrical circuit for the instrument panel and engine start. Almost all equipment of the “five” is indicated by separate applications in the service manual, which greatly facilitates the repair and diagnostic procedure. For example, car owners often face the problem of direction indicators and fog lights not working correctly.
It is quite possible that devices refuse to function normally if the generator is not working correctly. Of course, if you have a diagram, it will be much easier to detect a malfunction. It should be noted that injection versions, unlike carburetor versions, are more complex due to the presence of additional sensors and regulators, injectors and other components.
Possible reasons for dismantling the shield
In what cases is it necessary to remove the dashboard of a VAZ 2107 car? There may be several reasons for this:
- panel tuning;
- replacing burnt out light bulbs;
- repair of individual devices that have failed.
VAZ 2107 is a legendary car, which hundreds of thousands of car enthusiasts have repaired independently.