02/28/2022 8,958 VAZ 2110
Author: Ivan Baranov
When replacing the clutch release bearing of a VAZ 2110, the main difficulties are that you additionally have to dismantle several more components and the most labor-intensive process is the process of removing the gearbox. In a word, to replace a small bearing, you need to disassemble almost the floor of the car.
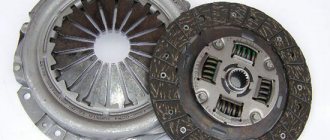
Set for VAZ 2110
It is better to carry out all work on an overpass.
Units and parts to be dismantled:
- accumulator battery;
- air cleaning element together with a box and an air flow sensor;
- clutch cable;
- Transmission.
[Hide]
VAZ 2110 clutch: main components and signs of malfunction
The VAZ 2110 single-disk clutch has a central pressure spring, the drive operates by means of a cable, the casing is attached to the flywheel and to the pressure plate. In short, the following elements can be distinguished:
- a crankcase with a cover and support planes, through which the clutch assembly is attached to the frame;
- casing;
- pressure and driven disks, flywheel and release fork;
- release bearing that disengages the clutch;
- cable wire going to the pedal.
As for breakdowns, the main malfunctions of the VAZ 2110 clutch are associated with its wear. However, there are many other reasons for clutch failure:
- drives the VAZ 2110 clutch, that is, there is deformation of the driven disc, breakage of the friction linings, deformation of the pressure plate, problems with the cable, etc.;
- incomplete engagement of the clutch (slippage) - burning or wear of the friction linings, the appearance of oil deposits on the surface of the discs and flywheel, jamming of the drive, etc.;
- when the clutch is working normally, jerking is observed - jamming in the drive, damage or deformation of the pressure plate, etc.;
- when turning off, the appearance of noise is noticeable - the shutdown bearing is coming out of position;
One way or another, if the clutch is faulty, the driver cannot control the car normally, gears are difficult to shift, the clutch slips, traction is lost, etc. The solution is to replace individual components or the entire assembly as a whole.
By the way, if the clutch is not very worn out, replacing only the failed components in some cases allows you to save significantly. For example, installing a clutch disc will cost less than replacing the clutch basket and disc assembly. As a rule, after troubleshooting, only worn parts of the VAZ 2110 clutch are often replaced (for example, only the VAZ clutch disc or release bearing is replaced).
However, if the condition of the unit leaves much to be desired, a complex failure of its main components is noted (VAZ clutch basket, release bearing, driven pulley, etc.), then this clearly indicates that it is better to replace the clutch completely. It turns out that everything will directly depend on the state of the node.
- As for the selection of clutches, today the market offers both original parts and an alternative to domestic kits (imported clutch kits). As practice shows, when choosing a VAZ 2110 clutch, price plays the last role, since it is important to purchase a high-quality solution.
In fact, the top five kits are:
- Kraft Tech (Turkey) – parts are able to cool well and remove wear products on their own;
- LUK (Germany) - has the property of damping vibrations, which maximizes comfort;
- Valeo (France) – high reliability, softness and wear resistance;
- Sachs (Germany) - thanks to production technology, withstands heavy loads in various operating conditions;
- VIS (VazInterService) is a popular domestic solution that is not inferior to imported analogues in a number of indicators.
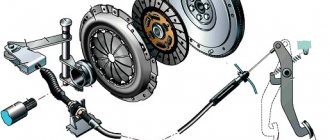
How it works and what it consists of
The VAZ 2110 has a single-plate clutch with a central pressure spring. The drive operates via a cable. The casing is attached simultaneously to the pressure plate and flywheel. The design also provides for a driven disk.
The factory clutch system for the VAZ 2110 is called VIS. Many people complain about it because it doesn’t work very effectively, although others are sure that there is no more worthy alternative for the “ten”. So opinions differ on this matter.
The main components of the system include:
- casing;
- Crankcase with a cover and supporting planes with which the unit is attached to the frame;
- Driven and pressure plate;
- Release bearing. It disengages the clutch;
- Flywheel;
- Shutdown plug;
- The cable wire that goes to the pedal (far left in the car interior).
Causes of clutch disc wear
Wear of the mechanism in question is a completely normal phenomenon that occurs sooner or later. But sometimes it happens that the situation is strongly tilted in favor of “early”. Let's try to understand the reasons for the accelerated wear of the friction disc:
- Frequently holding the car on the verge of starting. For example, when you are stuck in a traffic jam, you constantly move without releasing the left pedal all the way.
- Off-road driving. In order not to stall, it is necessary to regulate the speed of rotation of the wheels with the left pedal.
- Sharp gear changes and aggressive driving style. It's no secret that this leads to increased wear of all machine parts.
- Low quality of parts - by saving on spare parts, you have every chance to repeat the replacement procedure in the near future.
The most interesting thing is that the cause of wear can be an incorrect setting of the driver’s seat, in which the left foot regularly holds the pedal in the pressed position.
Signs of clutch wear
We indicated the main sign of wear on the VAZ 2110 clutch at the beginning of the article - disc slippage during acceleration. This symptom begins to appear in the last gears, since the mechanical resistance during acceleration at such speeds is much higher. The more the disk is worn, the lower the speed it becomes noticeable. In addition, a specific smell appears from rubbing against the basket.
Another no less accurate indicator of friction disc wear is the position of the left pedal when starting off. If the car starts to move at the moment when the left pedal is in the upper position, then most likely the mechanism will not “live” long. But this may also be due to incorrect clutch pedal adjustment.
In case of unnatural wear of the disc (fractures, cracks, chips), the car may twitch when moving away, and characteristic sounds may be heard from under the hood.
When is it necessary to install a new clutch on a VAZ 2110 car and why?
Restoring a car on your own has always required not only some effort, but also financial investment. It is precisely because of the last factor that car owners try to carry out repairs themselves, thus saving on payments to service station workers. Clutch repair, of course, is not comparable in labor intensity to changing the working cylinder , but even if you have basic skills, it is quite doable in a garage.
To prevent replacing a VAZ 2110 clutch disc from becoming a waste of time and money, it’s a good idea to find out the symptoms indicating the need for repairs; experienced car enthusiasts already know them, but it will be useful for beginners:
- Loss of engine power.
- Vibrations when pressed or a “cotton” pedal.
- Switching on gears occurs with slipping or is accompanied by crunching and jerking.
- Spontaneous gear shutdown.
- Difficulty switching on speeds.
- Friction lining smell.
It is important to clearly identify the source of the problem; for example, a “stuck” pedal may also indicate that drive cable . Experienced motorists regularly check the condition of the friction mechanism every 80,000 km so that the installation of the VAZ 2110 clutch is fully justified.
Clutch diagnostics on a VAZ-2110
The VAZ-2110 received the mechanism from the eight and nine virtually unchanged, only the downforce was adjusted, which corresponds to the engine torque.
Clutch diagram.
Nevertheless, every clutch has its time. The resource of the unit greatly depends on the driving style and operating conditions. And besides, from the kit manufacturer. By the way, it is not at all necessary to change the clutch assembly due to a failed driven disk or release bearing; it is expensive.
But replacing any element of the mechanism, as well as the entire clutch, at a service station will cost at least 3-5 thousand rubles , not counting the cost of materials. Therefore, it makes sense to do the repairs yourself. This is not the simplest operation, but it is quite accessible even for a novice driver.
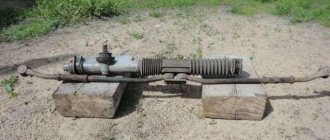
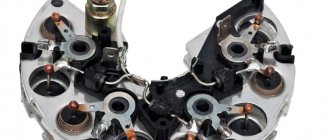
Clutch kit: basket, disc, bearing and mandrel.
Main problems
The clutch mechanism contains important parts, the repair of which must be treated with great responsibility. It consists of:
- pressure plate – clutch basket;
- disengaging clutch with a bearing, in other words, a release bearing.
It becomes possible to simplify the repair and replacement of the clutch basket, this also applies to changing the release bearing, since today in the package you can find clutch parts supplied by the machine manufacturer. Thus, there is no need to change parts separately. Based on car maintenance technology, it is recommended to change them completely.
Signs of a clutch problem include a situation in which the car does not gain enough power. Noise may be heard when depressing the clutch pedal. The car may also jerk and skid when starting off. Most often, certain problems in the clutch appear due to wear of parts. When it comes to novice drivers, the picture is different. As a rule, the driver himself is to blame for choosing the driving mode illiterately. There is often a situation where car owners compete with each other, starting quickly from a traffic light.
Lada 2112 Sochi › Logbook › Cleaning the throttle assembly on a VAZ 21124
In general, my problem was that the car stalled when I released the gas pedal.
Preface:
How does contamination of the inner surface of the throttle pipe (TP) affect engine operation? The main working element of the throttle pipe is the throttle valve (VV). It is she who, when opening, changes the flow area of the pipe. This ensures the supply of air volume necessary for complete combustion of fuel in the engine.
But even when closed, with the gas pedal completely released and not pressed, the throttle body must allow a certain amount of air to pass through, which is necessary for the engine to operate at forced idle speed (FID) and idling speed (IDL). To do this, during the production of the DP, the closed position of the DP is adjusted so that there is a small gap, called thermal, between the internal and walls of the DP and the DP itself. The thread of the screw that regulates the thermal gap is coated with a special sealant to prevent spontaneous or intentional rotation in the future. Another purpose of the gap is to prevent the DP from biting against the DP walls when closed. When the DS is closed, air also flows bypassing the DS, through the bypass channel (the gap between the walls of the calibrated hole and the tip of the idle air control (IAC) rod). During engine operation, the position of the IAC rod is constantly changing, providing IAC regulation. The volume of air passing through the DP when the DP is closed is rigidly fixed in the controller firmware, so an actual change in air compared to a constant may make it impossible to regulate the idle. In practice, this usually leads to the following rather characteristic interruptions in engine operation:
1. The engine has difficulty returning to idle speed when the gas pedal is released. For example, when braking or coasting in neutral gear. The engine speed, instead of a smooth return to XX speed, suddenly drops sharply to 400-600 revolutions, after which the engine stalls or shakes violently, and XX speed is difficult to restore.
2. Hot starting of the engine is very difficult, and if measures are not taken in a timely manner, cold starting. When trying to start the engine, you have to turn the starter for a long time. The exhaust pipe already smells of gasoline, but the engine still won’t start. But as soon as you open the remote control slightly, by 2-10%, by pressing the gas pedal, a miracle happens, the engine starts, “wasting” the first few seconds.
The cause of the above malfunctions is a mixture of dust microparticles and oil particles passing through the air filter, coming from the crankcase ventilation system. During vehicle operation, this mixture gradually settles on the inner surface of the diesel engine, in those places where there is the greatest air turbulence. Those. immediately behind the remote control and on the IAC rod. As a result, over time, the thermal gap at the DZ becomes overgrown with dirt and the cross-section of the IAC bypass channel decreases. Thus, as a result, we get the following: the cross-section of the air channels is reduced, the composition of the mixture is enriched.
When dirt accumulates above a certain critical level, different for each engine, when the speed control system can no longer cope with the flow area in the combustion chamber that has changed due to dirt (which it also knows nothing about), characteristic interruptions begin to appear. Throttle pipes operating in systems controlled by GM controllers are much less susceptible to loss of functionality in the presence of dirt. In them, gases from the crankcase ventilation system are supplied to the throttle space. It should be noted that on 1.6-liter engines, due to changes in the channels of the crankcase ventilation system, several times more oil vapor began to flow into the combustion chamber
From practice, dirt in the DP should be taken into account as one of the possible reasons for the unstable operation of the engine at IH and IH after 10-15 thousand kilometers. Naturally, this value may vary somewhat depending on the areas in which the vehicle is used.
Some site
Process:1.
Unscrew the cap from the expansion tank to relieve pressure in the system.
2.
Remove the plastic cover on the engine
3.
We unscrew the trunk clamps on the remote control, on the mass air flow sensor and on the crankcase purge hose.4.
In general, we unscrew all the clamps going to the remote control
5.6.7.After cleaning the insides of the unit looked like this:
With two flashlights and screams about some mother, in the dark we put everything back together and checked
Result:
Two days, the flight is excellent, the engine keeps the revs rooted to the spot, does not stall while driving, does not stall at idle, and the car itself has become much faster...
Which VAZ 2110 clutch is better?
This question is asked by every VAZ 2110 owner when he is faced with the need to choose a mechanism. Below are the results of reviews of devices by experts in the Russian automotive market. It is also worth noting that during the research process, the most popular manufacturers among domestic motorists were considered.
- Krafttek. The kit does not include a bearing, so you will have to buy it additionally, and there is also no quality mark. The basket is equipped with 18 petals and the driven shaft (Y 3200A B0206) has 4 springs. This mechanism is recommended for use in the VAZ 2110.
- German manufacturer Luke (Lamellen und Kupplungsbau). The set is complete, you don't have to buy anything else. The packaging contains the MT14 quality mark. In addition, the driven shaft is marked with markings for proper installation. The element basket also has 18 petals, and the driven shaft is equipped with 6 springs. It is also worth noting that the basket side is marked on the shaft.
- Valeo, manufacturer France. A complete set, you don’t have to buy anything extra. Moreover, this clutch comes with a lubricating fluid for the mechanism, as well as a CD with installation instructions. There are 18 petals in the basket.
- Russian. The kit does not include driven and pressure pulleys, as well as a release bearing. Nevertheless, the product received the AYA70 quality mark. There are 12 petals in the basket, and 6 springs on the driven shaft. The product has been approved for installation in the VAZ 2110.
- Pilenga, country of origin unknown. The kit does not include a pressure pulley and a release bearing, so if you decide to replace the mechanism completely, then these components will need to be purchased. There are 18 petals in the basket. There are 8 springs on the driven shaft. There are no approval marks on the packaging.
Actually, any of the clutches listed above is suitable for VAZ 2110 cars. For example, the Luke cannot produce maximum torque, so engine power will be reduced when driving. Krafttek is a fairly reliable, time-tested mechanism, although you will have to purchase some additional elements to install it.
It is worth noting that this unit also has many positive reviews on the Internet from other motorists. But keep in mind that if the package for this mechanism does not contain lubricating fluid and a CD with installation instructions, then this is a fake. Having installed such a device, be prepared for the fact that it may fail after 5 thousand kilometers.
Service
It comes down to checking the condition of the pads, drums and discs, checking and adjusting the free play of the pedal, periodically replacing the fluid, checking the rubber part of the lines for leaks.
Checking the condition of the cuffs of the working cylinders and bleeding the system to remove air from it.
Read on the topic: What to do if there is air in the brake system.
All elements of the VAZ 2110 brakes are repairable, except for the vacuum booster and rubber parts of the lines.
The amplifier and rubber lines cannot be repaired, so if problems arise, they are replaced.
Repair of the master cylinder comes down to replacing all rubber elements (cuffs, gaskets).
It is performed when liquid leakage is detected from it. The same applies to working cylinders.
Repair of VAZ 2110 brake mechanisms includes replacing pads, discs and drums if severe wear is detected.
Important features of clutch assembly
Proper assembly of this spare part at home involves taking into account some important nuances:
When you are centering a disk, you need to use a mandrel specially designed for this or equip yourself with a primary shaft. This method will allow you to place the gearbox in place. Once the job of placing the shaft spline into the clutch splines is completed, the input shaft can be easily pulled out. The cable is attached to the fork and slightly loosened. Subsequent adjustments are carried out only when the clutch assembly has come to an end.
Don't forget to secure the control levers and traction lever to the panel. Tighten the fasteners well to prevent them from coming loose on the road. Be sure to connect the battery and, finally, connect the filter housing that cleans the air flow.
How to change the clutch basket
Clutch basket for VAZ 21101
As noted above, garage conditions, a jack and several support blocks are quite suitable for changing the clutch basket. Ideally, it is better to use a lift. Before you begin work, you need to familiarize yourself with the repair manual for your car, the mandatory repair methods, as well as car maintenance. So:
- You need to find a catalog of parts, since many of them may be missing or some of them will be superfluous.
- Immediately before removing the clutch from the gearbox, you need to mark how the rotating parts are placed so that there is no vibration during reassembly.
Clutch basket for VAZ 2110
- The shift lever is removed from inside the car.
- There is now clear access to disconnect the gearbox.
- The bolts that secure the basket to the flywheel are unscrewed. When turning the flywheel, you need to hold it with a mounting tool.
- The driven disk and basket are dismantled.
- The clutch release clutch with the bearing is removed.
- During the repair process, you need to inspect the clutch fork, or rather its condition. Also inspect other parts for wear.
- The release bearing is pressed out of the clutch; of course, this is labor-intensive work. Next, replace the clutch bearing. As a rule, it is better to use lubricants recommended by the manufacturer to lubricate parts.
Note! The parts must be thoroughly washed in kerosene, and they must be fault-detected. Do not install clutch elements that are already damaged.
All parts must be cleaned of obsolete lubricants and then lubricated with a new compound. At the end of the work, the treated elements are mounted in the opposite order to disassembly. The removed gearbox with clutch is installed in its place.
Note! It is recommended to pay special attention to the tightening of the bolts; in this case, it is necessary to clarify the parameters of such tightening.
Changing the clutch basket is not as difficult as it seems at first glance; it is enough to have minimal knowledge, skills and the ability to use special devices. To perform the work correctly, it is important to follow the recommendations. Today, with the help of videos and photos, you can repair or change important clutch elements with your own hands. Also, an important role is played by correctly selected step-by-step instructions, without which it is difficult or impossible to complete this or that process. To avoid having to redo the work again, you need to purchase only high-quality spare parts, the price of which directly depends on the manufacturer.
Preparatory stage
Before changing the clutch on a VAZ 2110, you need to prepare a place for repairs and tools. For this process, the most suitable solutions are: a car lift or an inspection hole. If there are no such conditions, due to a hopeless situation, it is possible to replace the clutch with a 2110 in “Spartan conditions”. It is enough to find a flat surface area in a garage box, a parking space or in the yard.
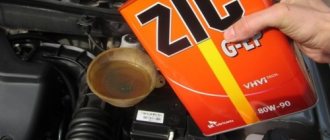
It is more practical for a car owner to ask in advance how much new clutch parts will cost to replace a VAZ 2110. This will help prepare the necessary budget. The price of spare parts varies and depends on the manufacturer. Among manufacturers of quality parts, the leaders are: Sachs, Luk, Valeo and Krafttech. These spare parts are guaranteed to fit the vehicle and have a long service life. Poor quality parts may not fit at all or may fail in the first days after repair.
Step by step instructions
So, if you decide to change the clutch device yourself, but do not want to bother with dismantling the gearbox, then we will look at the replacement process without removing the box. Let's get started:
- Unscrew the screws securing the left wheel of your car and place the front part of the VAZ 2110 on a jack. To protect yourself, place bricks under the car body. Also place wheel chocks under the rear wheels.
- Next, you need to completely remove the wheel and unscrew a few mounting screws that hold the ball joint in place.
- After removing the wheels, open the hood and disconnect the battery. To do this, it will be enough to remove the negative terminal from the battery. This is done in order to prevent short circuits during repair work.
- Now you need to remove the air filter element housing. This must be done in order to gain access to the screws with which the gearbox is attached to the internal combustion engine.
- If there is engine protection, then let's start removing it. Unscrew all the screws around the perimeter of the motor protection and remove it.
- Remove the long screw that secures the anti-roll bar.
- Now let's get down to one of the most crucial moments in this work process. If you decide not to dismantle the transmission, you will still need to move the unit to the side. In order for the unit to move freely, it is necessary to remove the left mudguard. After this, unscrew all the ball joint bolts.
- Next, move the left strut behind the wheel drive. Otherwise, you will not be able to move the gearbox.
- After this you will need to disconnect two connectors from the transmission. To the right of the unit there is a plate responsible for fastening the jet thrust. By the way, the other part of the plate is located at the gear shift lever. Visually remember the location of the jet thrust fastener, otherwise you will have to sweat later to adjust the unit selector to the working position.
- With the connectors disconnected and the torque rod removed, the transmission is essentially freed from its main mounts. Now you need to disconnect it directly from the internal combustion engine. Here, use wrenches and remove several bolts (usually no more than three) and one nut.
- Now it is necessary to dismantle the rear cushion, which, in fact, attaches the gearbox to the engine. This should be done so that the engine is not released too much, so it is better to place the internal combustion engine on a jack or on supports.
- The same must be done with the gearbox, having first moved it to the required distance. Here you may need help, since it will not be easy to move the unit and place supports under it alone. In addition, everything must be done carefully to prevent mechanical damage to the unit.
- You now have access to the clutch mechanism. Replace it, and then reassemble all parts in the reverse order. Tighten the transmission-to-engine screws securely. After replacing the clutch, you need to center the disc.
A few notes
Taking advantage of the fact that you have climbed quite deep into the inside of the car, you can carry out some additional actions so as not to return to this in the near future.
- It is advisable to change the release bearing along with the clutch;
- You also need to check the clutch paddles and the clutch basket itself. If there is significant wear, do not be lazy to replace them, otherwise in the near foreseeable future you will have to climb into the hole again;
- The driven disk must be centered
. It would be good to use a special mandrel for this purpose. If this is not available, you need to at least select a wooden round of the required size. When the basket fasteners are tightened, if the alignment is done correctly, the mandrel (or its substitute) should come out without any effort. But don’t fall out on your own.
Actually, this completes replacing the clutch on a VAZ 2110 without removing the box and draining the oil. As you can see, nothing super complicated was required, although we did have to tinker. If this is not your first time seeing the jack and keys, the whole procedure will take you no more than 2-3 hours, and even then with smoke breaks. Note: if the box had also been dismantled, it would have taken you much longer, and you might have had to spend the whole weekend fiddling with the hardware.
When adjustment is needed
You need to send the car to the garage and start adjusting the clutch system of your VAZ 2110 as soon as you notice signs of deviation from the normal operation of the unit.
The clutch greatly affects the performance of the entire car. What can we say, without it you will not be able to engage a single gear. Therefore, you will not be able to go anywhere.
The pedal may be too tight or fall apart at the slightest pressure. Both situations indicate that the clutch needs to be adjusted.
In general, the work is carried out in two stages:
- Clutch travel is checked;
- The setup itself is carried out directly.
But the first thing you should start with is studying the most important tool for repairing all components, assemblies and mechanisms of the VAZ 2110. Of course, we are talking about the instruction manual. Open it at the clutch section, study the main nuances, understand the essence of the unit, its design, operating principle, and then become familiar with the adjustment process.
Now we will talk about two main setup steps.
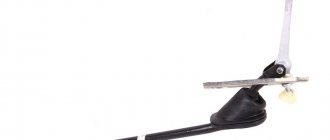
Procedure for removing and replacing the clutch release fork:
1. First, after removing the gearbox, you need to remove the clutch release bearing. 2. The next step is to remove the rubber boot (number 1). You need to pry it off with a screwdriver and pull it off the clutch release fork (number 2 in the photo). If the protective rubber cover has defects (cracked, deformed, no elasticity), then replace it with a new one. 3. Using a screwdriver, pry up the plastic bushing of the fork axle, and using pliers on the inside of the clutch housing, squeeze the petals that fix it and remove this bushing. If this plastic cap is defective (no petals, cracks or other obvious signs of wear), replace it with a new one. 4. Now it’s time to remove the clutch release fork. Lift it and remove its axle from the bushing that is pressed into the clutch housing and remove the fork, removing the axle, and then the lever from the holes in the clutch housing. 5. Squeeze the ends of the fork spring retainer and remove it. If the retainer has defects (no elasticity or even broken), then replace it with a new one. 6. The plug that is responsible for turning off the drive must be replaced with a new one if it has:
- 1 – the fork lever is cracked, bent or deformed;
- 2 – the legs of the part in the area where they contact the bearing coupling also have obvious defects and signs of wear.
7. Inspect the yellow metal bushing; if it has defects, press it in and insert a new one until it stops. 8. Before installing the drive release fork back, lubricate both bushings (metal and plastic) with grease. 9. Now you can safely mount the clutch release fork back in the order of dismantling. But, pay special attention to the protrusion on the plastic bushing; it should fit into the pothole on the clutch housing, and it
Some tips
- If you start having problems with the brakes, first of all you need to carry out an external inspection of the vehicle: check the fluid level in the reservoir, make sure that the front/rear cylinders are not leaking. There should not even be stains of brake fluid in the brake hydraulics.
- “Brake fluid” must be filled with the same brand; it is recommended to completely replace the brake fluid at least once every two years.
- If faults are identified in the gas turbine engine, and it has already served for at least a year, it is more advisable to replace it completely than to repair it. The same can be said about the rear working cylinders.
- Before changing the turbocharger, the brake fluid should be removed from it; this operation is usually done using a syringe.
- Usually a leak in the master cylinder is not visible, but if there is any suspicion that this part is faulty, you should remove the main cylinder - there will be traces of leaks at the rear, and this indicates its faulty condition.
- If, during an external inspection, cracks were found on the brake hoses, it is better not to take risks and immediately replace the defective parts.
Didn't find the information you are looking for? on our forum.
We recommend reading:
Which gasoline is better for VAZ 2114
Air leakage through injectors symptoms of VAZ 2114. Possible malfunctions, cleaning and adjustment
Vibration in the cabin when idling VAZ 2114 injector causes
Repair of the underbody of a VAZ 2107
VAZ 2114 injector boils, reasons
Error p1602 vaz 2114 how to fix
What is an ESD for a VAZ or an ECU for a VAZ 2114
Master cylinder, slave and clutch VAZ 2101. Replacement and repair, fluid pumping
Causes of brake failure
So:
- If your car suddenly loses its brakes, do not rush to blame the master cylinder.
- The cause may be a leaking slave cylinder. If it is leaking, the liquid may flow out gradually, or maybe much faster.
- Check the brake fluid level in the reservoir and the condition of the main brake.
- If traces of leaks are visible on the master cylinder, then this is the cause.
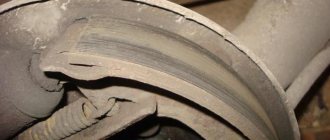
- The cause of a brake fluid leak may also be a broken brake line. The rubber brake hoses may fray or the tubes may become rotten or ruptured.
Brake hoses fray
The working cylinders could also be jammed.
If the master cylinder does not work:
- It will show traces of brake fluid leaks.
- The brake pedal will not be pressed.
- Also, the brake pedal can simply move to idle without creating any effort.
Important points when replacing the cable
Unscrewing the fastener
- As practice shows, the procedure for replacing a cable on a “ten” begins in the engine compartment. You are required to hold the fork and at the same time pull the cable that is removed from the fork.
- Then the cable fastener is removed from the bracket, which is located on the gearbox. Having completed this procedure, we go into the interior and dismantle the damaged element, that is, the cable.
- The result of the repair is influenced not only by the quality of the new cable, but also by the correctness of the entire replacement procedure.
- If you are dealing with a “ten” from an experimental industrial batch, then the bracket will be presented as a bolt with a Phillips-head screwdriver. To dismantle such a fastening element, you cannot use a regular screwdriver. A special shortened tool will be required.
- If the cable breaks while driving, you can unscrew the bracket with a handy tool, but through the safety block.
- It is strongly recommended to replace the non-standard bolt with a regular one, which can be unscrewed with a simple wrench.
- Be sure to keep a set of tools in your car, since it is extremely rare for a cable to break at the right moment. There is hardly a right moment for any kind of machine breakdown.
conclusions
Dismantling the intake manifold of a 16-valve VAZ-2112 is quite easy and simple. Of course, it’s worth understanding at least a little about the design of the main power unit, but if desired, any car enthusiast can remove this unit.
Since I removed the flap for flushing, I decided to immediately replace the gaskets on the receiver; it is not known when they were changed before me. The procedure for removing it can be found on the Internet, but it’s a pleasure to remove it (((. At first I couldn’t feel the nuts, because I didn’t know where they were))) Then I couldn’t unscrew it because everything was stuck.
And then I couldn’t remove it because the breather pipe didn’t want to come off until I pryed it open with a screwdriver. He became like a stone. In general, in addition to the gaskets, I had to change both the breather and the oil dipstick seal.
Gaskets cost 65 rubles. , I’ll tell you right away, buy silicone ones, rubber ones are very difficult to install and they don’t last long.
The pipe and clamps and seal cost about 300 rubles.
Now the most interesting thing is that when I took it off, I was a little freaked out) the rubber bands were burnt out, there were some deposits in the receiver itself, there was generally some kind of dirt in the back that couldn’t be picked with a screwdriver. And there’s some kind of crap in the block, blackness, dirt, yuck... how could the car get like this? Now I have to do it! In general, look at the photo!
Full size These are gaskets, as if they were cauterized on one side
Full sizeBreaker who didn't want to take off
Full size Such poop inside the breather
None I’ll measure the compression test today, let’s see what it shows!
Description of the engine structure, the procedure for repairing the power unit of the Lada 2110 car, the stages of assembly and disassembly of parts of the Lada 2112 cylinder head, adjusting the engine valves with your own hands VAZ 2111, VAZ 2112, VAZ 2110. Maintenance of the engine of the Lada 2112 car. Instructions for repairing the cooling system, exhaust exhaust gases, power supply of the Lada 2111. Features of the 8 and 16 valve engines of the Lada 2110. Operation of the main components and assemblies of the engine Remove the plastic engine shield and disconnect the high-voltage wires from the spark plugs (see Replacing spark plugs for VAZ-2111, -2110 engines). Disconnect the throttle assembly from the receiver (see Removing the throttle assembly) and the throttle drive cable. We disconnect from the receiver the vacuum supply hose to the electro-pneumatic valve of the VAZ 2110... ...and the hose of the vacuum brake booster of the VAZ 2112.
Using a 10mm socket, unscrew the two nuts securing the VAZ 2112 receiver to the cylinder head cover supports.
Using a Phillips screwdriver, loosen the clamps securing the couplings connecting the receiver to the intake manifold.
We remove the VAZ 2111 receiver. Use a 10mm wrench to unscrew the bolt securing the guide tube of the oil level indicator of the VAZ 2112. To remove the intake manifold, use a 13mm socket to unscrew the five nuts securing it to the cylinder head of the VAZ 2110.
We remove the intake manifold of the VAZ 2112... ...and the manifold gasket. We install the VAZ 2111 intake manifold and receiver in the reverse order.
None Prepare a standard set of tools and perform the following sequence of actions:
- Remove the plastic engine shield and disconnect the high-voltage wires from the spark plugs (see “Replacing spark plugs”). We disconnect the throttle assembly from the receiver (see “Removing the throttle assembly”) and the throttle drive cable (see “Removing the throttle drive cable”).
- Disconnect the vacuum supply hose to the electro-pneumatic valve and the vacuum brake booster hose from the receiver.
- Using a 10mm socket, unscrew the two nuts securing the receiver to the cylinder head cover supports.
- Using a Phillips screwdriver, loosen the clamps securing the couplings connecting the receiver to the intake manifold.
- We remove the receiver.
- Using a 10mm wrench, unscrew the bolt securing the guide tube of the oil level indicator.
- To remove the intake manifold, use a 13mm head to unscrew the five nuts securing it to the cylinder head.
- Remove the intake manifold and manifold gasket.
At this point, the repair work to remove the receiver and intake manifold on the VAZ 2112 engine has been completed. Install the intake manifold and receiver in reverse order.
Source