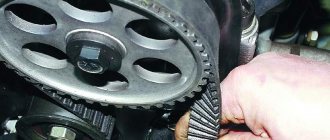
Lada Priora is a Russian car that is popular among experienced motorists due to its advanced design. Good acceleration capabilities and powerful engine. Another advantage is the low cost of this vehicle. According to the car manual, we will take a step-by-step look at the timing marks (timing belt). Which is located on the engine with 16 valves.
The tension roller guides the belt
However, experts advise changing the belt after driving 50,000 - 60,000 km. It is possible to carry out such a replacement yourself, in your garage. But don't forget about the marks on the shafts. If the instructions are followed, this procedure will be quite accessible to the amateur motorist.
Setting the piston of the first cylinder to the TDC position
When carrying out work related to removing the camshaft drive belt (timing), the valve timing may be disrupted; to prevent this from happening, the piston of the 1st cylinder is set to the TDC (top dead center) position of the compression stroke. If the valve timing is incorrect, the engine will not be stable or operate properly. Set TDC according to the mark on the camshaft pulley (when installing according to the marks on the flywheel or crankshaft pulley, the piston of either the 1st or 4th cylinder may be in this position). After this, be sure to make sure that the marks on the flywheel or on the crankshaft toothed pulley are aligned (if the generator drive pulley is removed). If the marks on the flywheel or crankshaft pulley do not match, then the valve timing is incorrect (the piston of the 1st cylinder is not installed at TDC). In this case, it is necessary to remove the camshaft drive belt and rotate the crankshaft until the marks align. Important! Rotate the crankshaft exclusively by the pulley mounting bolt (do not rotate the crankshaft by the camshaft pulley itself).
TIP Since it is inconvenient to turn the crankshaft using the bolt that attaches the pulley to it, you can do this in one of two ways
- Engage any gear (it is better if it is IV) and slowly move the car until the mark on the camshaft pulley aligns with the mark on the rear cover of the camshaft drive belt.
- Engage any gear and lift one front wheel. Next, turn the suspended wheel until the mark on the camshaft pulley aligns with the mark on the rear cover of the camshaft drive belt.
Tensioning the alternator belt in a Priora car - nuances of implementation
Any car enthusiast knows that there will definitely come a time when you need to tighten the Priora alternator belt. It is known that the belt drive of this car is quite durable, but during operation there is a slight stretching of the belt itself, as well as a decrease in the adhesion of its surface to the pulley and roller.
Literally as soon as you notice a whistling alternator belt on a Priora, you need to start tightening it at the same moment, especially since this is not difficult to do.
Before tensioning the Priora generator belt, you need to prepare an open-end or socket wrench for 19 and a special two-end tension wrench directly for the roller. This key is similar to the one used to change discs on an angle grinder.
The process of adjusting the alternator belt on the Priora is carried out as follows:
— unscrew the roller nut, while holding the clip of the roller itself with a key;
— by lightly rotating the tension wrench, we turn the eccentric cage of the tension roller, while increasing the belt tension;
— We screw the roller nut.
TDC marks VAZ 2110 2114 8 valves
The TDC marks are located on the camshaft timing belt pulley (lug) and on the rear camshaft drive belt cover (tendril).
In addition, the marks are located on the flywheel (risk) and on the scale of the rear shield of the clutch housing (triangular cutout). For clarity, the gearbox has been removed.
Additionally, marks are located on the crankshaft timing pulley (dot) and the oil pump cover (triangular cutout). These marks are visible only when the generator drive pulley is removed.
You will need: a socket wrench “17”, a socket wrench “10”. 1. Disconnect the wire from the “–” terminal of the battery.
2. Set the gear shift lever to neutral and place chocks under the car wheels.
3. Remove the right front wheel and the right mudguard of the engine compartment.
4. Open the hood and remove the three screws securing the front camshaft drive belt cover. Please note: the screws on the side fastening of the cover also secure the wire holders. Remove the front cover.
5. Rotate the crankshaft by the bolt securing the generator drive pulley to it until the marks on the camshaft pulley and the rear cover coincide.
6. Remove the plug from the hole in the clutch housing and check the alignment of the marks on the flywheel.
Camshaft marks
The VAZ 21126 engine uses two switchgears. One of them is needed for optimal operation of the intake valves, and the second is installed in order to regulate the movement of the exhaust valves.
Each camshaft has its own pulley, which is not recommended to be replaced with another. This pulley allows the camshaft mechanism to operate correctly. A phase sensor is installed on the right side of the pulley.
The marks are located on the pulleys. They are located on the crown of the ledge at the bottom. Experienced mechanics call them movable because they move with the rotation of the camshaft.
Attention! Beginning car owners should remember that the marks have different sizes. It all depends on the manufacturer who made the pulley.
To see the marks, experienced mechanics advise wiping the pulley with a clean rag to get rid of dirt and dust. Then you will notice a small notch in the metal.
But the crankshaft marks will help all parts of the 126 engine from the Lada vehicle work equally. At the output of the crankshaft there is a gear. And this gear is connected to the device by means of a key. This is where the mark for correct installation of parts is located. Because if the position is incorrect, the key simply will not fit as expected.
The notch is made in the form of a slot or a conical hole. It is found on the outside of the engine pulley.
Additional guidelines are also applied to the outer engine housing so as not to make mistakes when setting marks. To do this, install another mark on the rear side of the timing belt housing. It is needed for the correct alignment of the camshaft pulleys.
Similar article Reasons for the formation of emulsion in the engine
Another notch is located on the engine oil pump. It is needed for the correct orientation of the crankshaft. And it will be difficult to find the last mark. It is located on the flywheel.
There is a small cutout in the flywheel housing. According to the standard, it is covered with a rubber plug. It is pulled out and inserted with pliers.
TDC marks VAZ 2112 2111 16 valves
On the engine mod. 21126 (16 cl) marks are located on the camshaft toothed pulleys (protrusions A) and the rear camshaft drive belt cover (slots B).
There are also marks on the flywheel (risk) and the scale of the rear shield of the clutch housing (triangular cutout). For clarity, the gearbox has been removed. Additionally, for all engines, marks are located on the crankshaft gear pulleys (dot) and the oil pump cover (triangular cutout). These marks are visible only when the generator drive pulley is removed.
You will need: a 17mm spanner, a 5mm hex wrench, a TORX T30 wrench, and a Phillips screwdriver.
1. Disconnect the wire from the negative terminal of the battery.
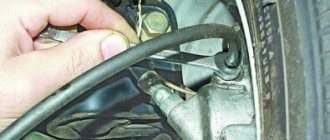
Preparatory operations
First, disconnect the negative battery terminal, remove the engine protection and drain the antifreeze.
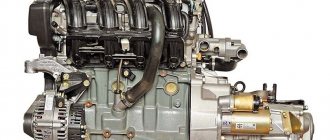
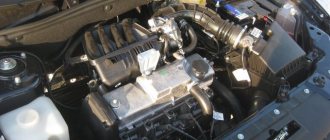
Engine 16 valves Priora.
Remove the protective cover, not forgetting to disconnect the absorber purge valve.
How to set timing marks for Priora 16 valves
Replacing the timing belt for Lada priority
16 valves
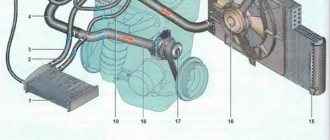
The timing belt synchronizes the reverse rotation of the crankshaft and camshafts. Without the support of this process, engine operation is generally impossible. Therefore, the procedure and timing of belt replacement should be approached very carefully.
Planned and unplanned time replacement
When using a timing belt, the timing belt stretches and loses strength. When critical wear is reached, it may break, in other words, the camshaft gear teeth may shift relative to the correct position. Thanks to the characteristics of the 16-valve Prior, it threatens to encounter valves with cylinders and subsequent expensive repairs.
According to the service instructions, the belt is replaced at a mileage of 45,000 km. But when performing routine maintenance, you should inspect the timing belt for early wear. Prerequisites for unplanned replacement:
- cracks, bunches of rubber or the appearance of waves on the outer surface of the belt;
- damage to teeth, folds and cracks on the inner surface;
- damage to the end surface - raking, delamination;
- traces of technical fluids on each surface of the belt;
- in other words, easing excessive belt tension (prolonged operation of an overly tensioned belt causes micro-undermining in the structure).
Procedure for replacing the timing belt on a 16 valve motor
To do the job correctly, use the following tool:
How to install a timing belt from the previous 16 valves.
- ends at 10, 15, 17;
- keys and keys at 10, 17;
- flat screwdriver;
- special key for tensioning the timing belt;
- pliers for removing circlips (instead of a special wrench).
Removing the old belt
Remove the plastic protective cover. Open the inspection hole in the clutch housing and check the flywheel mark. Our customer remains marked, including the camshaft gears, in the up position. To do this, rotate the crankshaft with head 17.
The basis of the operation of the gas distribution mechanism
When the mixture is compressed, a spark enters the working cylinder and the mixture explodes, pushing the piston. He pushes the connecting rod, the connecting rod pushes the crankshaft. Everything is known. The valves, by timely opening and closing, ensure tightness in the cylinder at the right moment and free inlet and outlet in other cycles. The camshaft controls these devices by pressing the valve mechanism with its cams. The Priora engine has 16 valves. They are controlled by two camshafts. And the camshafts are driven by the crankshaft via a timing belt.
To ensure that the valve timing matches and the drive is installed correctly, special marks are applied.
Timing timing marking points
They are applied by the manufacturer in several places and are divided into movable and stationary:
- On the body of the Priora engine
- On camshaft gears.
- On the crankshaft gear.
- On the engine flywheel.
Now in more detail about these tags.
On the engine body of a VAZ 2170
Here the mating marks are installed in three places. They are immovable:
- On the lip of the oil pump housing.
- On the flywheel housing.
- Marks on the plastic protection of the Priora timing belt
The first two types of marks are intended for mating the crankshaft.
That is, the risks on the gear and on the flywheel must coincide with them. The crankshaft drive gear is located in the oil pressure pump housing. This is a slot in the metal skirt that half-encircles the gear from above. It is clearly visible in normal lighting. Sometimes it can be “bombarded” with oil and dust. Then you need to wipe this place with a rag, and everything will be visible.
There is a special arrow installed on the flywheel housing, in the viewing window in the starter area. It must be taken into account that the top dead center is determined only by the average of the three marks.
Marks on the timing case
In fact, they are not located on the motor block, but the plastic casing is very firmly attached to it. Therefore, these notches are referred to as marks on the motor. These are triangular indentations in the upper section of the casing. They are perfectly visible and easy to use. Access to them opens immediately as soon as the outer part of the casing is removed.
Replacing the timing belt on a Priora
The timing belt is designed to drive the engine timing mechanism, transmitting torque to it from the crankshaft pulley.
Unlike 8-valve engines, 16-valve engines are equipped with two camshafts, each of which has its own drive gear. Taking into account the change in the design of the timing drive, the belt is longer and passes not only through the tensioner pulley and the water pump gear, but also through an additional support roller.
Necessary tools for replacement
Having decided that you need to replace the timing belt on a Priora, you should prepare the necessary material and tools. The materials will require a new timing belt. Moreover, you can buy both the original belt and analogues. The original belt product is also equipped with two rollers: a tensioner and a thrust roller. The cost of such a kit is about 5 thousand rubles.
Original kit for timing system on VAZ-2170
If necessary, you should purchase a new pump if the car’s mileage exceeds more than 100 thousand km and the product has never been changed. If you are replacing the pump, you will also need to replace the coolant.
This is interesting! Antifreeze needs to be replaced every 2 years, and antifreeze every 4-5 years.
Of the tools to replace the timing belt on a Lada Priora, 16 valves will be needed:
- Head at "17".
- Set of open-end wrenches.
- Screwdrivers.
- Hex key or T-30 sprocket, depending on the year of manufacture of the car.
- Special key for adjusting the roller. Comes with a set of belt and 2 rollers.
It is not necessary to install the Priora in the inspection hole, since most of the actions will be performed in the engine compartment. Once all the tools and materials are ready, you can start working.
Belt faults
Like any other car with a timing belt drive, the Priora belt may have the following malfunctions:
Cracking and delamination of the timing belt working surface is a consequence of:
- long-term operation;
- frequent temperature changes;
- contact with oil or coolant;
- malfunction of the water pump (pump);
- malfunction of the tension or support rollers.
These same factors, as well as improper tension adjustment, can cause belt deformation and breakage.
Signs of a faulty timing assembly
On the Priora, timing marks (photo shown in the material) are placed on the crankshaft and camshafts. If they suddenly go astray, the belt will slip and the valves will begin to open out of sync, with a slight delay or advance. Signs that the belt on a Priora needs to be changed:
- Extraneous sounds appear when the engine is running.
- The color of the exhaust gases changes.
- Starting the engine becomes problematic.
- Extraneous vibrations are felt.
You should not hope that if the mileage of the car is not very high, then there can be no breakdowns in the engine. There are often cases when happy owners of new cars, just purchased from a dealership, stopped on the highway because the engine seized.
Unfortunately, this also happens. As for the timing belt drive, it can wear out much earlier than expected. This usually happens due to dust and dirt getting on the belt.
Why change the belt?
If you do not notice the problem in time and do not replace the belt with rollers, a break will not take long to occur. If this happens, only a major overhaul will help save the engine. In 90% of cases where the timing belt breaks on a 16-valve Priora engine, the valves fail (bend), as a result of which the cylinder head with the entire valve mechanism is damaged. In addition, the pump may also suffer.
If you notice the slightest damage to the belt, it needs to be changed urgently.
From the factory, 16-valve Prioras come with reinforced timing belts, which guarantee 100 thousand km of safe mileage. However, taking into account our operating conditions, especially in cold regions, as well as possible malfunctions in the operation of the water pump and rollers, it is recommended to replace it at least after 50 thousand kilometers.
It is necessary to change the timing belt on 16-valve Lada Priora engines complete with a tension and support roller.
What happens if you don't change the drive?
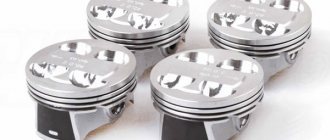
Replacing the timing belt on a Priora must be carried out in a timely manner; the matter must not be delayed until a break occurs. Otherwise, the total cost of repairs may very unpleasantly surprise you. This is due to the fact that there are no recesses for the valves on the pistons. For this reason, a broken belt leads to direct contact between the valves and pistons. After this, the valves usually bend and only need to be replaced.
If everything happens at high speeds, then the consequences are catastrophic - the pistons break off, the connecting rods become deformed. In order not to expose yourself to such risks, it is recommended to promptly monitor the condition of the timing belt and rollers. And most importantly, check the alignment of the timing marks on the Priora and the tension of the drive belt! If it is too tight, it will wear out faster.
Replacing the belt yourself
- hex wrench 5;
- socket wrench or ratchet head 15;
- 17mm head or wrench;
- special key for rotating the tension roller;
- slotted screwdriver.
1. Place the car on a flat surface.
2. Raise the hood, turn off the ground, remove the engine protective cover.
3. Using a hexagon, unscrew the 6 screws securing the timing belt cover.
4. Disconnect the crankshaft sensor by disconnecting the connector on it.
5.Check whether the marks on the camshaft gears match. They should line up with the triangular notches on the top of the timing case.
6.If they match, check the marks on the flywheel gear. To do this, remove the rubber plug from the upper part of the flywheel (under the thermostat). Below it you will see the flywheel crown with a mark that should coincide with the triangular notch on the left.
7. To be more confident in the correct adjustment of the gas distribution phases, you need to check the position of the mark on the crankshaft pulley.
8.To do this, loosen the generator belt tensioner. We fix the flywheel in the position in which it is located by inserting a screwdriver between its teeth into the hole where the rubber plug was located.
9.Using a 17mm wrench (socket or socket), unscrew the bolt securing the generator pulley. We remove the pulley and set it aside, and screw the bolt back.
10.Under the pulley there is a crankshaft gear, which has a mark; it should match the mark on the side cover of the oil pump.
11.If the marks do not match, you need to turn off the gear in the car, lock it with the parking brake, and with a 17-point key placed on the generator pulley bolt, carefully turn the crankshaft until all the marks match. When the marks coincide, it means that the piston of the 1st cylinder is at top dead center. Now you can remove the old belt.
12.Using a 15 wrench, unscrew the bolt securing the tension roller, and using a special tension wrench, turn it counterclockwise. If you plan to replace the rollers, we dismantle it, and then the support roller.
13.Remove the old timing belt.
14.Install new videos.
15. We put a new belt on the crankshaft pulley, pump gear and camshaft gears.
16.Having securely fixed the support roller, tighten the belt using the tensioner roller, rotating it clockwise. If there is no special tool for measuring tension, check it by holding the belt in the middle with your fingers and turning its plane horizontally. A normally tensioned belt can be rotated no more than 90 degrees using your fingers.
17. We take out the screwdriver that secured the flywheel.
18. We turn the crankshaft 2 full turns, after which we check the position of the marks on the camshaft gears and on the flywheel. If they match, we perform installation in the reverse order.
How to check tension
At the end of the work, it is necessary to adjust the tension of the timing belt drive on the Priora. The adjustment is made as follows:
- Using a special wrench, you need to turn the tensioner pulley counterclockwise.
Tensioner adjustment key
- Align the marks on the roller as shown above, and then tighten the fastening bolt.
- Rotate the crankshaft pulley 2 turns by the mounting bolt in a clockwise direction. At the same time, the coincidence of the marks on the camshaft and crankshaft pulleys is checked.
You can check the tension by applying force to a rubber product weighing 10 kg. The deviation value should not exceed 5-7 mm.
When tightening the pulley and roller bolts, it is recommended to use a torque wrench. The tightening torque for each element is equal to the following values:
- for the tension roller – 35-41 Nm;
- thrust roller – 105-110 Nm;
- pump mounting bolts – 15-20 Nm.
After adjustment, you can put the protective cover back in place. Finally, the generator belt tensioner roller is installed, as well as the belt itself. It is also recommended to replace these elements with new ones. Finally, do not forget to fill the coolant before starting the engine.
Upon completion of the work done, you can start the engine and check its operation. If the marks are correctly set, the engine will start the first time the key is turned in the ignition switch. In this case, the engine should operate evenly and keep the speed in the region of 800-900 rpm. Listen to the timing belt drive. There should be no extraneous sounds or noises. The presence of a whistle or hum indicates that the tensioner is too tight and needs to be loosened.
Video: replacing the timing belt and rollers with a pump on a Priora VAZ 2172, 2170, 2172 (timing marks)
In conclusion, it should be noted that the process of replacing the timing belt on a Lada Priora car does not present any difficulties if all steps are performed one by one. Even an inexperienced driver can handle this procedure, so don’t be afraid when the time comes to replace the belt product.
- Author: Andrey
Rate this article:
- 5
- 4
- 3
- 2
- 1
(28 votes, average: 4.2 out of 5)
Share with your friends!
Home →
Maintenance and Repair →
Engine →
Checking and adjusting the tension of the timing belt.
If you want your belt to last long and trouble-free, it is important to maintain its tension in the correct position. To do this, periodically test the tension. Pay special attention to the first tension of the new belt. If the belt is loose, the lateral load on the teeth increases, which greatly accelerates their wear. In some cases, if the belt is very loose, there is a high probability of the belt teeth moving relative to the pulleys. This can lead, at best, to engine instability and loss of power. In the worst case, it will lead to expensive repairs. To check the tension, perform the following steps:
1. Unscrew the 5 bolts securing the protective timing cover and move the cover to the side.
2. Press the timing belt exactly in the center between the camshaft pulleys with a force of 100 Newtons (10 kgf). The belt deflection from the horizontal position should be no more than 7 millimeters. Modern tension rollers are also provided with a tension control mechanism. To check the quality of the tension, make sure that mark A on the outer part of the roller coincides with protrusion B.3. To adjust the tension, slightly unscrew the roller mounting bolt and, by rotating the roller, achieve complete alignment of the marks described above (see figure)
About the resource
Well, now we’ve come to the most interesting thing, namely the resource. You know, now I want to talk specifically about normal belts and tensioning equipment, about “PRIORS” will be a little lower.
Not all manufacturers strictly indicate how often to change the belt, but such information can still be found, even in the car’s operating books.
The average mileage recommended for replacement is 100,000 kilometers. On many foreign cars, this mileage can be much longer, about 150,000 kilometers.
Now the question may arise: what does it depend on? Guys, to be honest, the belt itself can run (as some manufacturers claim) about 200,000 km, but its service life is reduced due to tension and support rollers. They are often the culprits of the cliff!
The support roller is a kind of bearing on which the belt rests, often has a plastic housing.
The tension roller is almost the same plastic bearing, only it is located on a special mount that “tensions” the belt, that is, it keeps it in “tone” and prevents it from “sagging” and jumping onto a tooth.
Both videos must be of simply excellent quality, no, they simply must! With foreign cars this is almost always the case, these “support” and “tensioner” last a long time, and replacement is 100 - 150,000 km in advance.
As you may have guessed, not only the belt is changed, but also the tension and support rollers - THIS IS MANDATORY, REMEMBER THIS! As an indirect reason for a future replacement, there may be noise from the timing drive; when the rollers begin to “bend”, they begin to make noise.
When to change: consequences of untimely change
It is recommended to replace the timing belt on a Priora after different periods of time. The manufacturer claims that it can withstand one hundred thousand mileage, but experience shows that a change may be needed much earlier.
The optimal period is every fifty thousand kilometers. Some argue that over such a short service life, rubber is simply not capable of failure. However, no one takes into account the conditions - roads, fuel quality, etc.
Also, during the operation of the mechanisms, it wears out, the rubber stretches, and therefore does not provide the correct tension of the timing belt, and slippage is possible. The teeth can wear off - because of this, traction with the gears is not ensured.
There is no exact time for a change that would suit all motorists. Some take good care of their vehicles, drive carefully, and use only high-quality fuel. Others use a more extreme type of driving, foreign liquids get on the rubber, etc.
In order not to lose your car during the repair period and not to spend a fortune on restoring the mechanics, write down or remember the date of the last timing belt change on the Priora. Next, regularly check the condition of the rubber; if worn, replace it with a new device.
Signs of possible failure
There are several characteristic signs that should alert the driver:
- When the engine is turned on, extraneous noise occurs. Sometimes drivers confuse a timing belt malfunction with a poorly functioning tension pulley.
- If the color of the exhaust gas has changed.
- The engine doesn't start well.
- An unusual vibration is felt.
Pay attention to these “symptoms”, even if the Priora’s mileage with a new timing belt has not yet reached 50 thousand km
It may fail earlier if foreign liquid gets onto the drive - oil, coolant, as well as dust or dirt.
It’s worse if it’s the coolant that gets onto the drive. Firstly, this means that the gasket that ensures the pump is sealed has failed, or there is a problem with the pump. Then the rubber is damaged and service life is reduced tenfold.
Even if the belt is new, but coolant or antifreeze gets on it, it will fail even after operating for 10 thousand miles. You will have to replace the Priora timing belt and figure out why foreign substances get on it.
How to check the serviceability of the belt yourself
If you suspect that it is time to replace the Priora timing belt, it would not hurt to check the serviceability of this rubber product. Visual diagnostics will allow you to check the serviceability and absence of scuffs on the Priora timing belt.
You should have a choice of one of the tools at hand, or two at once - a 5-point hex key, or a T-30 sprocket bit. If one doesn't work, try the second.
- Open and lift the hood.
- You will see the front panel covering the mechanism and timing belt.
- Take the key and unscrew the five bolts that hold the front panel, remove it.
- In front of you you will see a mechanism, including a tension roller.
- Place a jack on the passenger side and place the wheel in a suspended position. Engage fifth gear while it is working, look at the surface of the belt for damage, even small defects.
- If you notice cracks of any size, mechanical cuts, or threads sticking out, be sure to replace it by contacting a specialist or yourself.
- Check the pump. If any traces of coolant leakage from the pump are noticeable, then the rubber will also have to be changed, even if there is no mechanical damage.
- Check the tension roller. Auto mechanics advise changing it less often than tires. The average lifespan is approximately one hundred thousand kilometers. Change it every other time you change the belt.
- Measure the belt tension. To do this, press on the stretched rubber in the area between the gears of the two camshafts. You need to press with a force of about ten kilograms. Correct tension of the timing belt should not bend more than seven millimeters.
- Check that the rubber is not too loose. Make sure that the Priora timing marks match the original condition. The first, similar to a recess, is located on the outer race of the tension roller. The next one is located at the base of the roller. The maximum deviation is four millimeters; if the tension does not meet the standards, the product will have to be changed.
Found a discrepancy with the standards? Change the product. A belt set with rollers for the Priora 126 engine costs only five thousand rubles. This is a much smaller amount than the cost of a major repair if a component ruptures.