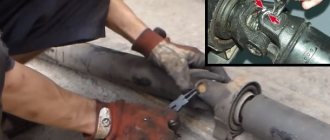
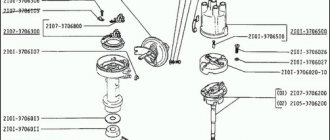
The photo shows the universal joint of a VAZ 2106
Note: The driveshaft is a mechanism that transmits torque from the gearbox to the wheel drive. Used in a variety of vehicles. The main feature is a cardan transmission, invented by Gerolamo Cardano, which allows the transmission of torque between two non-parallel axes. The main working part of the cardan transmission is the crosspieces. They most often require replacement. The VAZ 2106 cardan contains two identical crosspieces. Our instructions will help you replace the VAZ 2106 crosspiece yourself; the replacement is quite simple and will allow you to save on car service costs.
How can you keep a cardan for a long time without repair and disassembly?
- protect the bottom of the car from large cobblestones, stones, and crushed stone flying at speed into the driveshaft;
- use the correct lubricant CV joint - 4, FIOL - 2u, paint the cardan. Corrosion protection will allow you to maintain alignment longer;
- check accessible connections and protective brackets more often, tighten connections;
- do not be lazy to check the gaps in the hinges and adjust them in a timely manner;
- Inspecting the coupling quarterly for cracks in the rubber or defects will allow you to replace it, otherwise the entire driveline may fail, and this will be more expensive.
- Regularly lubricate the VAZ 2107 driveline.
https://youtu.be/https://youtu.be/MhbHBuPffrs
_
VAZ 2107 cardan mount
The VAZ 2107 cardan is attached in several places:
- the rear part is bolted to the rear axle gearbox flange;
- the front part is a movable spline connection with an elastic coupling;
- The middle part of the cardan is attached to the body through the cross member of the suspension bearing.
Cardan mounting bolts
To attach the cardan to the VAZ 2107, four bolts measuring M8x1.25x26 with a conical head are used. A self-locking nut with a nylon ring is screwed onto them. If the bolt turns when tightening or unscrewing, it is secured with a screwdriver.
The VAZ 2107 cardan is secured with four M8 bolts with a conical head
Elastic coupling
The elastic coupling is an intermediate element for connecting the cardan cross and the secondary shaft of the box. It is made of high-strength rubber to reduce vibration. The clutch is removed in case of mechanical damage for replacement or when repairing the gearbox. When installing an old coupling, you will need a clamp of the appropriate size to tighten it. New flexible couplings are usually sold complete with a clamp, which is removed after installation.
An elastic coupling provides connection between the secondary shaft of the gearbox and the universal joint
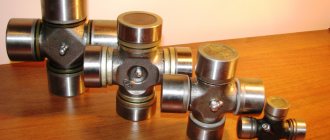
Cross device
The universal joint includes:
- two forks;
- four spikes;
- needle bearings;
- retaining rings.
Geometrically, the crosspiece has perpendicular axes supported by needle-type bearings. The device is made of alloy steel, hardened and has high strength. Thanks to this, the cross is able to withstand high loads for a long time.
As the vehicle moves, the driveshaft crosspiece ensures the alignment of the rotating parts, which constantly change their position in space. In addition, the unit helps dampen dynamic vibrations.
How to diagnose wear on crosspieces
Replacing the crosspiece in a VAZ 2106 is carried out after diagnostics:
When, during rapid acceleration or braking of a car, when changing gears, a knocking sound from the cardan transmission or vibration of the axle is heard, all this indicates wear of the crosspiece and its bearings
There is an urgent need to replace the VAZ 2106 crosspiece, which has become unusable.
If you don’t pay attention to these signs in time, then the result will be destruction of the bearing and the cardan falling out directly onto the road. The axle gearbox and the underbody of your car can also be damaged.
Buy a “VAZ” crosspiece, do not forget to purchase spare retaining rings (if they are not included in the kit), because old rings, as a rule, become deformed or break.
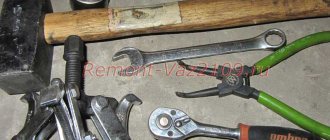
Tool required for replacement
Replacing the driveshaft crosspiece of a VAZ 2106 requires the following tools:
- Two open-end wrenches 13 and 12
- Socket wrenches 27 and 13
- Copper or aluminum extension
- Hammer
- Compression pliers with thin jaws to remove circlips
- Two mandrels for pressing out the cardan cross bearings.
- Universal puller
- Ticks
- Chisel
- Large screwdriver
We remove the cardan
Replacing the VAZ 2106 crosspiece with your own hands is not possible without removing the cardan from the car. So:
- We remove the cardan on a lift or inspection hole. Unhook the handbrake cable spring.
- Using a chisel, we apply marks at the junction of the cardan and the gearbox flange. Using a 13mm wrench, unscrew the nuts (there are four of them). Use a large screwdriver to secure the cardan shaft from rotating.
- Remove the rear end of the cardan.
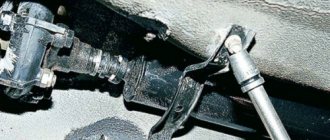
Disconnect the cardan from the bridge
Use a chisel to mark the position of the cardan and flange of the rubber coupling
Mark the position of the cardan and flange with a chisel
- Then we bend the locking tendrils of the seal ring near the rubber coupling
- We move the cage with the seal together towards the propeller shaft
Move the clip to the side
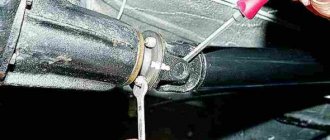
- Using a 13mm socket, unscrew the nuts and take out the safety bar
- Supporting the cardan, unscrew the nuts using a 13mm wrench and remove the plate securing the outboard bearing from the studs. It is attached to the body using rubber washers.
Unscrew the nuts securing the outboard bearing
We pull the cardan out of the slots inside the rubber coupling flange and take it out
It is first recommended to watch how to replace the crosspiece of a VAZ 2106 video.
Rules for choosing a cross
This is what the part looks like
On VAZ 2106, auto mechanics advise changing the crosspieces as a set. In some cases, 3 crosses are replaced at the shank. The best parts are made in Germany. Products from the following manufacturers are installed on the VAZ 2106.
- Trialli with oiler. Made of steel and uniformly hardened over the entire surface. Such parts can withstand significant dynamic and statistical loads.
- Kraft. Made from anti-corrosion stainless steel alloy. The manufacturer provides a warranty on the part.
- Weber, GKN and other foreign manufacturers. The disadvantage of such products is the need to adjust the retaining rings.
- Domestic products. Plus - affordable price.
Replacing the crosspiece on a VAZ 2106 car involves dismantling the cardan. To do this you will need an inspection hole or a jack. Removal and installation are carried out using keys “12”, “13”, “27” and a hammer.
The suspension bearing is installed using a tension puller and an old flange. The release spring is disconnected from the bracket using pliers, then it is dismantled. The cardan is jammed with a screwdriver. Unscrew the nuts and remove 1 end of the cardan. The plank and plate of the suspended structure are dismantled. The cardan is removed. The location of each part is noted so that the balancing of the shafts is not disturbed. The retaining rings are dismantled. Using a puller or vice, remove the bearing. If an anvil is used for this, then the cover of the 2nd bearing should not rest against the plane of this device.
The VAZ 2106 cardan is turned over 180°. Similar actions are carried out with the 2nd bearing. If the process is carried out without a puller, then the blows are made on the crosspiece or on the 2nd part of the cardan (with a transverse crosspiece). The bearing is pulled out of the fork. The transverse cross is disengaged. The puller is installed on the 2nd pair of bearings.
Features of the mechanism
The driveshaft transmits the torque generated by the car's engine to the rear axle, causing the wheels to rotate. It is located under the bottom of the VAZ-2107 car, which is why you can find a raised floor in the cabin.
The cardan on the VAZ 2107 consists of two main parts, which are connected to each other using a cross. This design of the device is necessary because the rear suspension constantly “plays” when driving due to shock absorption. The device is a hollow tube, which is the “arm” connecting the engine to the wheels. Despite the simplicity of the product, the shaft, like other car parts, fails and requires repair or replacement.
Main cardan malfunctions
The main malfunction of the driveshaft is that elements such as the spider and the outboard bearing fail. It is these parts that are the most loaded. The crosspiece and bearing fail for a simple reason - lack of lubrication. Over time, it is necessary to periodically diagnose these elements with the obligatory addition of lubricants. In rare cases, a cardan malfunction may be associated with a defective crosspiece, which requires its replacement.
The malfunctions of the mechanism in question are as follows:
- failure of crosspieces;
- destruction of the outboard bearing;
- violation of the configuration (imbalance) of the shaft;
- breakage of flanges, splines and couplings, which happens under heavy loads;
- excess moisture and dirt inside the crosspieces.
At the slightest sign of malfunction, it is necessary to diagnose the mechanism and eliminate all resulting damage. The malfunction can be identified by the following signs:
- the appearance of a knocking sound when the clutch is engaged, which may indicate wear of the splines or damage to the elastic coupling;
- the occurrence of a grinding noise when the car is moving indicates a lack of lubrication;
- the appearance of vibration when the car is moving, which indicates a violation of the alignment of the product;
- knocking noise during sudden acceleration or braking, which indicates wear of the crosspieces.
We will discuss how to replace the VAZ 2107 driveshaft in the next paragraph.
The process of removing and replacing the cardan
The mechanism is removed for the purpose of carrying out repair work or replacing it with a new product.
Often the driveshaft itself is an unpretentious device, but it is important to periodically check the condition of the bearing, splines and crosses. These are the weak points that need to be periodically looked at and monitored for their condition.
Work on dismantling the cardan is carried out in the following order:
First, you need to secure the car by placing stops under the front wheels, and place the gearshift lever in the “neutral” position. Next, jack up the rear of the car, while suspending one of the drive wheels. We proceed to disconnect the device from the mount to the differential. To do this, you need to unscrew the 4 fastening nuts and then remove the bolts. After unscrewing the fastener, you can separate the product from the differential flange.
It remains to unscrew the two nuts securing the cross member on which the suspension bearing is mounted. After unscrewing, you can dismantle the cardan from the VAZ 2107. Using a wooden hammer, you need to knock out (if necessary) the shaft from the engagement of the splines with the elastic coupling. After the shaft is repaired or replaced, you can install it in place. The installation process is inversely proportional to removal
When installing the product, it is important to ensure that the shaft is positioned correctly.
The driveshaft on cars of the VAZ family is a fairly reliable unit. However, it also needs periodic maintenance. All driveline faults should be repaired as soon as possible. Otherwise, more serious and costly problems may arise.
How to replace a driveshaft bearing?
In order to change the propeller shaft bearing , it is enough to knock out the old bearing, after first removing the retaining ring. And slowly hammer the new bearing into place.
Catalog number of the propeller shaft support bearing:
- 1)180505
- 2)62205
“When you choose a driveshaft crosspiece, it is better to give preference to the VAZ crosspiece”
- 1)Buy a cardan shaft crosspiece;
- 2)Buy retaining rings.
How to buy a driveshaft crosspiece for VAZ 2106, VAZ 2107, VAZ 2101, VAZ 2105, VAZ 2102, VAZ 2104?
Before buying a driveshaft crosspiece , you should go through two stages, the first is to select a driveshaft crosspiece and check the driveshaft crosspiece.
I decided to write down information on how to buy a universal joint for a driveshaft because of frequent requests on the Internet about: What are the best manufacturers of universal joints? What are the quality crosspieces? How to buy a high-quality driveshaft crosspiece? How to determine if the driveshaft crosspieces are defective?
Let's look at a list of reliable and inexpensive crosspieces for the VAZ 2106, VAZ 2105, VAZ 2107, VAZ 2101, VAZ 2102, VAZ 2104, VAZ 2103 (Fig. 1).
- 1) GKN cardan shaft crosspiece is a German-made crosspiece, characterized by good quality and a fairly inexpensive price. I advise you to install such a crosspiece on newer cardans, since when installing a crosspiece on a tired cardan, the crosspiece will also wear out quickly.
- 2)The AvtoVAZ driveshaft crosspiece is produced in Russia in the city of Togliatti. It has excellent quality and price. I would buy a cross from AvtoVAZ.
- 3)VolgaAvtoProm driveshaft crosspieces are also good crosspieces, but you should pay attention when purchasing and take time to check the driveshaft crosspiece.
Checking the driveshaft cross
You can check the driveshaft crosspiece using a regular mirror. Place the mirror on the table surface and place the cross on top. Take the propeller shaft crosspiece by the ends and rock it, checking for any play. If, when checking the crosspiece using a mirror, slight play and knocking are observed, then such a crosspiece can also be installed, but slight vibration will be observed, which is not very pleasant.
Tool for replacing the crosspiece and the outboard bearing of the propeller shaft of VAZ-2101, VAZ-2102, VAZ-2104, VAZ-2105, VAZ-2106, VAZ-2107 (Fig. 2).
- 1)Open-end and socket wrenches for 12, 13, 27.
- Copper hammer attachment.
- Use pliers to remove the retaining rings.
- Flange and puller.
Sequence of work for replacing the suspension bearing and driveshaft crosspiece on a VAZ 2106, VAZ 2107, VAZ 2105, VAZ 2104, VAZ 2101, VAZ 2102
- We bring our car to the inspection pit.
- Raise the rear wheel using a jack.
- Remove the driveshaft from the car (unscrew the 2 bolts securing the outboard bearing of the driveshaft with a 13mm wrench, and unscrew the nuts securing the driveshaft to the shank). (When removing the driveshaft, be sure to mark with chalk (Fig. 5) how the parts were installed for ease of reassembly) (Fig. 3,4).
- Replace the crosspiece (remove the retaining rings using pliers (Fig. 6) , knock out and remove the cup of the crosspiece (Fig. 7,8,9).
How to install the driveshaft crosspiece in place?
Remove the two cups of the crosspiece, tuck the crosspiece into the eyes. Put on the cup (Fig. 10). Install the locking ring and put it on (Fig. 11).
Source: www.autoezda.com
Replacing the VAZ 2106 universal joint
The cardan crosspieces must only be replaced, since the bearing needles and the outer and inner parts of the race wear out, which leads to the formation of play. This indicates the impossibility and inappropriateness of restoring the part. If characteristic signs indicate that the cardan joints need to be replaced, you will need to dismantle the shaft itself, and then begin repairs. For the upcoming work you will need the following tools and materials:
- open-end wrench 13;
- head 13 with a knob or ratchet;
- copper or aluminum extension;
- hammer;
- compression pliers with thin jaws;
- universal puller;
- chisel;
- new crosspiece;
- lubricant “Fiol-1” or “CV joint-4”;
- large screwdriver.
To remove the cardan and replace the crosspiece, you will need a standard garage tool kit.
Removing the cardan
On the VAZ “Six” the driveshaft is mounted to the rear axle gearbox, and closer to the gearbox the driveshaft is held by an outboard bearing. Removing the shaft from the car is carried out as follows:
- Unscrew the cardan mount with a 13 key.
- If the bolts turn when unscrewing the nuts, insert a screwdriver, pressing the fasteners.
- When unscrewing the last bolt, hold the shaft with your other hand, since it may fall on you. We move the cardan to the side after completely unscrewing the bolt.
- Using a chisel on the flange of the elastic coupling, we mark the position of the cardan.
- Using a screwdriver, bend the seal ring near the coupling.
- We move the holder along with the sealing ring to the side.
- We unscrew the central fastening and hold the cardan itself.
- For final dismantling, we pull the shaft off the gearbox.
Removing the cross
After dismantling the driveshaft, you can immediately begin disassembling the crosspiece:
- We mark the universal joint forks to avoid disturbing the factory balancing during assembly. To apply marks, you can use paint (pictured below) or hit it lightly with a chisel.
- We remove the retaining rings using special pliers.
- Having clamped the cardan in a vice, we press out the bearings through suitable mandrels or knock them out with a hammer.
- We disassemble the hinge, moving the crosspiece in the direction of the removed bearing, after which we slightly turn the crosspiece and remove it from the fork.
- Press out the opposite bearing in the same way.
- We repeat the steps described in paragraph 3 and completely dismantle the cross.
- We repeat the same steps with the second hinge, if it needs to be replaced.
Installing the crosspiece and cardan
We install the hinge and shaft in the following order:
- We remove the cups from the new cross and insert it into the eyes.
- Place the cup in place, carefully tapping it with a hammer until a groove for the retaining ring appears. We mount it and turn the cardan.
- In the same way, insert and fix the opposite cup, and then the remaining two.
- Apply Fiol-1 or CV joint grease to the spline joint of the cardan and insert it into the flange of the elastic coupling, fixing the protective ring.
- We attach the driveshaft to the body and to the rear axle gearbox.
Video: replacing the cardan cross on a VAZ 2101–07
The cardan crosspieces are filled with lubricant from the factory. However, when replacing a product, I always syringe the hinge after the repair. There will be no excess lubrication, and its lack will lead to increased wear. For crosspieces, it is recommended to use “Fiol-2U” or “No. 158”, but in extreme cases “Litol-24” will also do. Although I know car owners who use Litol for both crosspieces and spline joints. When injecting, I pump the lubricant until it begins to come out from under the seals. According to the regulations, the hinges must be serviced every 10 thousand kilometers.
The serviced crosspieces are lubricated through grease fittings with a special syringe.
You don't have to be an experienced auto mechanic to replace universal joints. The desire of the car owner and step-by-step instructions will help identify the malfunction and carry out repairs in a garage without making mistakes.
Lada 2106 “Red Garnet” › Logbook › Replacing crosspieces
Good day to all!
Yesterday we replaced the universal joint crosspieces. Due to noise during gear shifting. As it turned out, the bearings on the crosspiece were worn out.
How to determine crosspiece wear
If, when lowering the pedal, when shifting gears, or during sudden acceleration or braking, you hear a knocking sound in the cardan drive, vibration of the axle, this indicates severe wear of the crosspiece and bearings. It is urgent to carry out work to replace these worn-out parts. You can, of course, ignore the symptoms, but then there is a high probability that the bearing will collapse and the cardan will fall out someday right on the road. The gearbox may also be damaged.
You should have the following tools at hand: open-end wrenches 12 and 13, a copper or aluminum adapter, compression pliers, a hammer, a socket wrench 13 and 27. If it becomes necessary to replace the outboard bearing, you will need a tension puller and an old flange of the elastic coupling.
Removing the cardan on a VAZ 2106 Sequence of actions when removing the cardan
Using round nose pliers or pliers, disconnect the tension spring from the body bracket and remove it.
Mark with paint the joint between the gearbox flange and the cardan (this will be useful during assembly). Having jammed the cardan with a screwdriver so that it does not turn, unscrew the self-locking nuts (there are four of them) with a No. 13 wrench.
After the nuts are unscrewed, one end of the cardan can be easily removed.
The relative location of the elastic coupling flange and the cardan should also be carefully noted.
Bend back the 4 locking tabs on the seal ring near the elastic coupling.
Carefully move the cage towards the cardan (together with the seal).
Using a 13mm socket, unscrew the two nuts and remove the safety bar.
Using a 13mm wrench, unscrew the two nuts and remove the plate of the outboard bearing, secured to the body through rubber washers, from the studs that secure it to the body.
Remove the cardan shaft from the splines of the flexible coupling flange and remove it.
Which crosspiece is better to install?
Car service specialists say that if the time has come to change the crosspiece, then it is better to change them as a set, both of them. In fact, this is not always the case. The front crosspiece, as a rule, lasts much longer than the rear one. Sometimes three crosspieces are replaced at the shank, but at the outboard bearing the crosspiece remains fully functional.
Experts advise not to “kill the ears of the cardan”, and not to change the crosspiece unless necessary.
When purchasing, you should not save on cost, it will be more expensive. Quite good crosspieces made in Germany are of high quality and come complete with retaining rings, which come in very handy if the “original” ones break during disassembly.
Trialli reinforced crosspieces (with an oiler at the end of the tenon) - made of high-carbon steel, uniformly hardened over the entire surface. Withstands high static and dynamic loads. The improved seal design provides reliable protection from sand and dust to the bearing units.
Kraft crosspieces (with oiler) are made of a special stainless steel alloy that is resistant to corrosion. The manufacturer guarantees high quality based on multi-stage control during the production process.
Crosspieces from Weber, GKN, etc. The only disadvantage of imported crosspieces is that the retaining rings often need to be adjusted.
Installation of crosspiece VAZ 2106
First, you should check the presence of lubricant in the new crosspiece on the inner surface of the bearing housings and the spikes of the crosspiece. If necessary, lubricate the crosspiece bearings with Fiol. Place seals and plastic plugs on the crosspiece. Insert the spider spikes into the fork. Place the bearing housings and press them into the fork holes. The bearing should go deeper than the groove for the retaining ring. Install retaining rings. Tap the forks with a hammer (preferably one with a plastic striker). The gap between the bottom of the bearing and the retaining ring is eliminated under the influence of impacts and gaps will appear between the ends of the crosspiece studs and the bearing housings. Use a feeler gauge to check the axial free play of the crosspiece - it should not exceed 0.04 mm. If the axial stroke is greater, replace the ring with a larger diameter. Retaining rings are available in five sizes. For clarity, each size has its own color. Rings with a thickness of 1.5 mm are unpainted, 1.52 mm are dark brown, 1.56 mm are blue, 1.59 mm are black, 1.62 mm are yellow. Check the balancing of the cardan drive and the ease of rotation of the hinge forks.
Here is the result. =)
All that remains is to install the cardan in place =)
Source: www.drive2.com
Replacing the driveshaft crosspiece on a VAZ 2106
So:
- We first mark the relative positions of the parts (cardan joint forks) so as not to disturb the factory balancing of the cardan shaft during assembly.
- Then we mark the locking rings and their seats in order to install them in their standard places during assembly. Remove the retaining rings (four from each hinge).
We take out the locking rings
We press the bearings out of the hinge fork using mandrels of a suitable diameter.
Pressing out the bearings
- Since the bearings are not pressed in completely (the joint cross rests against its fork), we remove the bearing using pliers
- We disconnect the cardan joint by moving its crosspiece in the direction of the removed bearing, slightly turn the crosspiece and remove it from the hinge fork.
We disconnect the hinge
- Press the opposite needle bearing out of the hinge fork.
- We carry out steps 3 and 4 for other needle bearings and remove the cross.
- We do the same with the second cross if necessary.
As you can see, replacing the crosspiece on a VAZ 2106 with your own hands is not particularly difficult.
If necessary, replace the intermediate bearing
So:
Unlock the nut securing the front shaft fork. We unscrew it and press the fork using a puller from the front shaft.
Compressing the fork
- Remove the dust deflector from the front shaft.
- Screw the nut onto the threads of the front shaft so that it is flush with the shaft itself
- We compress the intermediate shaft support (we apply force to the inner race of the bearing) and unscrew the nut.
- Remove the support along with the bracket from the propeller shaft
Defective parts
So:
- We thoroughly clean the parts with a brush before inspecting them.
- To cull the cardan transmission elements you will need: a bore gauge, a dial indicator.
- Since we have removed the cardan and disassembled it (albeit partially), we check the integrity of the welds. Drive shaft splines so that they do not contain wear marks
- For the rear cardan shaft, we check the presence of balancing weights, the condition of the seams and measure the diameters of the fork holes for the needle bearing. Dents of pipes and misalignment of the holes of the cardan forks are not allowed.
- At the same time, check (while the cardan is removed) the condition of the rubber coupling of the cardan.
- The presence of cracks, mechanical damage or detachment of rubber from steel liners is not acceptable.
- We check the intermediate support for deformations. Cracks or ruptures of the elastic clip, as well as peeling of the rubber, are not acceptable. Replacing the defective support assembly
- We check the intermediate support bearing, rotate its inner race in two directions, while pressing it against the outer race (the inner race should rotate smoothly). We check the bearing seals for mechanical damage.
- We replace all defective parts.
We assemble the cardan in the reverse order, taking into account the features given below:
- Before installing the front shaft fork, lubricate the splines of the fork and shaft with grease.
- When installing the front shaft fork, tighten the nut securing it with a torque wrench 8.1-10 kgf•m (79.4-98 N•m) and tighten the nut with a chisel.
- When installing the oil seal race, the oil seal itself with the flange onto the front driveshaft splines, we fix the oil seal race by bending its three “tendrils”.
- Using an oil syringe, coat the splined part of the front driveshaft. Remove excess grease with a rag. We unscrew the grease nipple and screw in the plug in its place.
- Having installed the bearing races, we determine the gaps between the end part of the bearings and the upper edge of the annular groove located on the hinge fork using a flat feeler gauge. The permissible gap is within 1.5-1.66 millimeters.
- We select the thickness of the locking rings based on the obtained gap values (we measure the rings with a micrometer).
- After installing the rings, we apply a couple of blows with a rubber hammer to the hinge forks from the reverse sides (this ensures the contact of the needle bearing races with the locking rings and the free movement of the cross).
That's all, all that's left to watch is: Replacing the crosspiece on a VAZ 2106 video.
Replacing the suspension bearing on a VAZ-2106, 2107
The driveshaft is one of the main elements of all-wheel drive and rear-wheel drive vehicles. Its main purpose is to transmit rotation from the vehicle’s gearbox to the rear axle gearbox. It is thanks to this connecting link that the machine is set in motion. But for greater reliability, the cardan must rotate in one plane, be suspended and firmly held in place. In this case, the main task of fixation is taken on by the suspension bearing.
Features and signs of replacement
The service life of an outboard bearing largely depends on the conditions in which the vehicle is operated. Frequent trips on our roads and in off-road conditions primarily break the rubber band. But you can recognize the problem in a timely manner. To do this, you need to pay attention to the following symptoms:
— strong impacts are heard on the bottom during a sharp start from first speed;
— strong vibration appears while the car is moving;
- There is a strong hum when driving at high speed.
If at least one of the symptoms appears, we can talk about the need to replace the outboard bearing. You cannot delay this work. Otherwise, the driveshaft becomes completely uncontrollable, which can lead to damage to the gearbox and serious failure of the driveshaft.
Features of replacing the suspension bearing on a VAZ-2106, 2107
When you first suspect that the outboard bearing is failing, be sure to conduct a visual inspection of the unit. If there is obvious damage, play or knocking, replacement is necessary. The main thing here is to take your time. Your task is to buy a reliable and, most importantly, high-quality replacement. It is better to give preference to original parts that will serve you for some time.
Before making a replacement, be sure to ensure that the remaining components are in good working order - the crosspiece and the elastic coupling. Otherwise, while working, you will have to be distracted and buy additional equipment. Consider one more important point. If you are doing this kind of work for the first time, then it is better to buy a spare cross. This recommendation is easy to explain. To replace the outboard bearing, you will definitely have to remove the crosspiece, and without some experience it can easily be damaged or any of the parts lost.
Before starting work, be sure to make marks with a chisel or paint on all connecting parts of the cardan. In this case, you will not have to carry out additional balancing after assembling the structure. If you assemble the unit incorrectly, then increased noise during movement and vibration will bother you for a long time.
So, the work consists of several stages:
- Stage one - dismantling the cardan. For this:
— drive the car into the inspection hole (you can work on an overpass) and fix its position with the help of shoes;
— remove the spring tensioning the handbrake cable;
— place symbols (“flags”) at the junction of the flange and cardan (we have already mentioned the importance of this work above);
- tighten four nuts (a wrench of “13” will do). Please note that the cardan will rotate, so it is better to fix it with a screwdriver;
— remove one edge of the propeller shaft and lower it down a little;
— make a mark fixing the position of the coupling and flange;
— unbend four special “antennae” designed for fixation (they are located on the seal holder);
— move the cage (it will go along with the seal) towards the driveshaft;
— remove the safety bar (this can be done with a key set to “13”);
— support the propeller shaft, unscrew the two nuts and remove the outboard bearing plate (it is fixed on the body);
— pull the cardan shaft out of the coupling.
- Stage two - removing the cross:
- as in the previous case, make marks at the junctions of the nodes, mark the relative position of the forks and shafts so as not to confuse anything;
— remove the retaining rings;
— place a special puller on the crosspiece and squeeze out the needle bearing. Please note that the bearing will not come out completely, but only 20-30% of its height;
- squeeze out the next one in a similar way;
- knock both bearings out of the fork;
— separate the fork and the cross.
- Stage three - replacing the outboard bearing:
— unscrew the nut on the cardan fork (a key with a “27” will do);
— place the puller on the fork and screw the bolt in a little to create the proper tension. If the fork still does not give in, you can work a little with a hammer (without fanaticism). So, step by step, push the fork out of the slots;
— twist the mounting bolts securing the outboard bearing;
- press the knot against the corners. Next, using a special spacer and a hammer, knock the bearing out of its place;
- replace and put everything back in reverse order.
- Stage four - collecting the cross:
— place the puller in another place and squeeze out the second pair of bearings;
— install seals and plugs;
— treat the crosspiece bearing with lubricant (it is advisable to use Fiol);
- insert the cross into place;
- press the bearing into the fork to such an extent that you can install the retaining ring;
- install the “lock”. Now turn the cross over and perform a similar manipulation with the second bearing. In this case, the first bearing should rest tightly against its restrictive ring. If you did everything correctly, you can easily put on the fixing ring on the other side. If problems arise, you can help the “fixer” with a hammer (again, don’t be too zealous);
— measure the distance between the bearing and the retaining ring. Normal – 10-40 microns;
— lubricate the splines (you can use CV joint-4 or Fiol-2U);
— install everything in place, bend the locking “tendrils”.
Conclusion
Replacing the outboard bearing will not cause you any difficulties. The main thing is to approach the work carefully, purchase high-quality parts and prepare the tools in advance. Good luck.
Note: The driveshaft is a mechanism that transmits torque from the gearbox to the wheel drive. Used in a variety of vehicles. The main feature is a cardan transmission, invented by Gerolamo Cardano, which allows the transmission of torque between two non-parallel axes. The main working part of the cardan transmission is the crosspieces. They most often require replacement. The VAZ 2106 cardan contains two identical crosspieces. Our instructions will help you replace the VAZ 2106 crosspiece yourself; the replacement is quite simple and will allow you to save on car service costs.
Malfunctions of the VAZ 2107 driveline
You can determine that the VAZ 2107 driveshaft is faulty by the following signs:
- Knocking sound after engaging the clutch. The cause of the knocking may lie in a poorly tightened universal joint drive, worn splines, damaged elastic coupling, or failed crosspiece bearings.
- Grinding noise when the car is moving. This sound occurs when the cardan joint bearings (crosspieces) are heavily worn.
- Vibration of the cardan when driving. This phenomenon occurs when there is mechanical damage to the driveshaft or dirt adheres to the driveshaft, which disrupts its alignment. Vibrations also occur when there is significant wear on the gearbox driven shaft, outboard bearings, cardan crosspieces, drive gear flange of the rear axle gearbox, or loose fastening of the cardan drive.
- Knocking noise during sudden acceleration or engine braking. The reason for this lies in the wear of the cardan shaft crosspieces.
You can check the condition of the cardan drive by placing the machine on a lift or inspection hole. The transmission parts should not play when the cardan is “rocked” in different directions.
To eliminate malfunctions, it is necessary to replace the VAZ 2107 driveshaft crosspiece, coupling, and other damaged parts.
Cardan transmissionRemoval and installation
Place the vehicle on a lift or inspection ditch. Chock the front wheels, release the parking brake, and place the gearshift lever in neutral. Raise the rear axle so that the rear wheels can rotate freely.
Remove the safety bracket.
Install the clamp A.70025 on the elastic coupling (Fig. 3-14) and, turning the shaft, unscrew the nuts of the bolts securing the elastic coupling flange; remove the bolts and then the clamp.
Disconnect the rear driveshaft from the final drive gear flange.
Disconnect the rear parking brake cable guide release spring.
Disconnect the intermediate support cross member from the body floor and remove the cardan drive towards the front of the car.
Install the cardan transmission assembly onto the vehicle in the reverse order of removal.
Checking technical condition without disassembling
After cleaning and washing the shafts, check the universal joints for ease and smooth rotation of the forks and for the absence of significant axial and radial play.
Check the driveline balancing on a balancing stand as follows.
If the forks rotate smoothly, there are no jams or noticeable play in the hinges, the imbalance does not exceed 2.15 N.mm (220 gf.mm), and the circumferential clearance in the spline joint is no more than 0.30 mm (according to the average diameter of the spline), then disassembly cardan transmission is not recommended.
Disassembly
Apply marks (with paint or a core) that determine the relative position of the separated parts in order to connect them during assembly in the same position and maintain the same balancing of the shafts.
Place the front driveshaft in a vise. Remove the retaining rings (Figure 3-32).
Note. Before disassembling the universal joints, mark the locking rings and corresponding forks to ensure that the rings are in the same place during reassembly.
Press the bearing housings out of the universal joint fork using a clamp 67.7823.9522 (Fig. 3-33) or a drift with a hammer.
Rice. 3-32. Removing the retaining rings of the crosspiece bearings using pliers.
Rice. 3-33. Pressing out the crosspiece bearings from the universal joint forks: 1-needle bearing; 2 — universal joint fork; 3 — clamp 67.7823.9522
Unscrew the nut securing the universal joint fork to the front shaft. Remove the fork using a puller A.40005/1/5 (Fig. 3-34).
Under the press, using shim half-rings (Fig. 3-35), remove the intermediate support complete with bearing and dust deflector from the front shaft.
Rice. 3-34. Removing the fork from the front propeller shaft: 1 - puller A. 40005/1/5; 2 — puller levers; 3- front propeller shaft fork; 4 - front driveshaft
Rice. 3-35. Removing the elastic intermediate support from the front driveshaft: 1 - splined end of the front driveshaft; 2 - intermediate elastic support; 3- backing half rings; 4 - press punch.
To disassemble the intermediate support, remove the retaining ring (Fig. 3-36), and then use a puller A.40005/2/4/11 to press the bearing out of the support (Fig. 3-37).
Disassemble the rear shaft using the techniques described above.
Rice. 3-36. Removing the elastic spore bearing retaining ring: 1-circuit; 2 - bearing; 3 - elastic support.
Rice. 3-37. Pressing the bearing out of the elastic support
Checking technical condition
Eccentricity check. Front shaft. Install the shaft in the centers and, while turning, check the runout, which should not exceed:
- on the pipe, at a distance of 70 mm from the end welds - 0.55 mm, in the center of the pipe -0.35 mm, along the outer diameters of the slot -0.1 mm.
Rear shaft. Center the shaft. When turning the shaft, check its runout, which should not exceed:
- on the pipe, at a distance of 70 mm from the end welds - 0.55 mm, in the middle of the pipe -0.35 mm.
If the runout exceeds the permissible limits, straighten the shafts under a press. If the runout is large, it is recommended to replace the shafts.
Spline connection. Check the circumferential clearance in the spline joint of the front driveshaft sliding fork. The maximum permissible circumferential clearance along the average diameter of the slot is 0.30 mm.
Check the condition of the race and sliding clutch seal. If necessary, replace the oil seal, and if damaged, replace the holder.
Cardan joints. Check the condition of bearing housings, needles, spider studs, seals, races and forks.
If the bearing housings, needles and spikes of the crosspieces, as well as oil seals or their cages are damaged or worn, replace the crosspieces and bearings assemblies. If the studs and crosspiece bearings are in good condition, check the condition of the oil seals and their races. If the seals have significant ring wear or are leaking lubrication, which can be detected when checking the technical condition of the cardan drive without disassembling, replace the seals with new ones.
The diameter of the fork hole for the needle bearing should not exceed 23.825 mm.
Elastic coupling. Check the condition of the rubber elements of the elastic coupling. If there are cracks or detachment of rubber from metal liners, replace the elastic coupling.
Flexible coupling flange. Check the condition of the centering sleeve of the flexible coupling flange. If the bushing is significantly worn or damaged, replace the flange assembly.
Intermediate support. Check the condition of the bearing by rotating the inner ring in both directions while simultaneously pressing it against the outer ring. In this case, the inner ring of the bearing should rotate smoothly, without jamming. Check the condition of the bearing seals. If the bearing is worn or damaged, replace it with a new one. Check for damage or deformation of the intermediate support and replace it with a new one if necessary.
Assembly
Assemble the cardan shafts in the reverse order of disassembly, taking into account the following instructions:
— apply FIOL-1 lubricant to the spline connections;
— when connecting parts, align the marks placed on the detachable parts before disassembling;
— after assembling the spline connection, pressing the oil seal 0.3-0.5 mm with an axial load, crimp the clip onto the groove of the fork;
[ — tighten the nut securing the front propeller shaft fork with a torque wrench and caulk it.
When assembling the intermediate support, press in the bearing with a mandrel (Fig. 3-38) and install a retaining spring ring in the groove of the support.
Rice. 3-38. Pressing the bearing into the elastic support: 1-mandrel A. 70045; 2- bearing; 3-elastic support.
Place a dust deflector 7 (Fig. 3-39) on the rear end of the front propeller shaft, then press in the support with the bearing using a mandrel (Fig. 3-40) and put on the second dust deflector 12 (Fig. 3-39), press the fork II of the front propeller shaft and secure it with the nut as described above.
Assemble the cardan joint in the following order. After removing the old thickened grease, fill the cavities in the splines of the crosspiece and lubricate the inner surface of the bearing housings with FIOL-2U grease (0.4-0.6 g for each bearing). Lubricate the spikes of the cross with a thin layer of lubricant to prevent the formation of an air cushion during assembly. Insert the spider tenons into the fork.
Rice. 3-39. Front driveshaft parts: 1-elastic coupling; 2-centering sleeve; 3 — elastic coupling flange; 4- oil seal; 5 — oil seal cage; 6 — cardan shaft; 7- dust deflector; 8 — bearing; 9- retaining ring; 10-nut; 11 — universal joint fork; 12 — dust deflector; 13 - elastic support.
Rice. 3-40. Installing an elastic support on the front driveshaft: 1-mandrel A. 74035; 2 - elastic support; 3 - rear part of the front driveshaft.
Place the bearing housings with needles on the spider spikes and press them into the fork holes with a force of 7840 N (800 kgf). Install the retaining rings in the grooves of the fork in their original places according to the marks. Then check the axial free play of the crosspiece, which should be 0.01-0.04 mm. If the free play is greater than specified, replace one circlip of less!'1 thickness with a ring of greater thickness.
When replacing universal joint parts, select retaining rings with caliber 41.7834.4092, which has four blades of different thicknesses (1.53 mm; 1.56 mm, 1.59 mm; 1.62 mm). To do this, install retaining ring 2 (Fig. 3-41) with a thickness of 1.56. When pressing bearings, when the cross rests against the bearing housing (in this case there are no gaps), use a feeler gauge to determine the distance between the bearing housing and the end of the annular groove. Depending on the measured distance, taking into account the axial clearance of 0.01-0.04 mm, insert a second circlip of appropriate thickness.
Rice. 3-41. Cardan joint assembly: 1 — cardan joint fork; 2- retaining ring; 3 - bearing housing; 4- oil seal; 5 — spike of the cross; 6 — bearing needle; 7 — caliber 41.8734.4092; A, B, C, D - probe petals
Note. Retaining rings are supplied in spare parts in five sizes (thickness, mm), each of which has a specific color: 1.50 - unpainted; 1.53 - dark brown; 1.56 - blue; 1.59-black; 1.62 - yellow.
For example, if a 1.56 mm petal passes, then a 1.53 mm ring should be installed. If the measuring probe of the smallest thickness (1.53 mm) does not fit into the groove, then replace ring 2 with another 1.50 mm. If the measuring probe of the greatest thickness (1.62 mm) fits into the groove with a gap, then replace ring 2 with another one 1.62 mm thick.
After installing the retaining rings, hit the forks with a hammer with a plastic striker. Under the influence of impact and elastically compressed oil seals, the gap between the bottom of the bearing and the retaining ring is selected and gaps appear between the bearing housings and the ends of the crosspiece studs. After assembly, check the ease of rotation of the hinge forks and the balancing of the cardan transmission.
Shaft balancing
If parts of the cardan transmission were replaced during repairs, then balancing is required. Dynamic balancing of assembled cardan shafts is carried out on a special stand.
Rice. 3-42. Scheme of dynamic balancing of the cardan transmission.
At a rotation speed of 5500 min~1, the maximum permissible imbalance on supports A, B, C (Fig. 3-42) should not exceed 1.71 I.mm. (175 gf.mm), and when checking the balancing -2.15 N.mm (220 gf.mm). Balancing is achieved by welding metal plates 25 (Fig. 3-31).
Read interesting articles about the VAZ2106 car...
We change the driveshaft crosspiece for a VAZ, UAZ or GAZ
The appearance of a knock when starting to move, changing gears or sharp acceleration, as well as the appearance of noise and vibration of the machine when moving in a certain speed range, may indicate wear on the driveshaft crosspiece. Of course, these symptoms can mean not only the failure of the universal joint. Therefore, it is necessary to carry out an initial diagnosis. You can read how to do this yourself here. To replace the driveshaft crosspiece you will need: 1. Driveshaft crosspiece. 2. Clamp (puller) or mandrel with a hammer for pressing and pressing needle bearings; 3. flat screwdriver; 4. round nose pliers (pliers, pliers) for removing retaining rings; 5. Wire brush; 6. vice (preferably).
In addition, socket and open-end wrenches are required to remove the driveshaft. Well, in rare cases, to remove the old crosspiece you will need... an angle grinder.
The cardan shaft crosspiece is replaced from a removed cardan. Before removing, carefully clean the parts of the universal joint from dirt. ALWAYS mark the relative positions of the parts of the universal joint with paint or a core to maintain the balancing of the shafts during assembly. After removing the shaft(s), we proceed, in fact, to removing the universal joint. Clean any dirt from the driveshaft parts, fork lugs, etc.
ATTENTION. BEFORE REMOVING the driveshaft crosspieces, BE SURE TO MARK THE MUTUAL POSITION OF THE FORKS AND LOCK RINGS (DEPTH TO THE CUPS)
This will allow you to properly assemble the driveshaft later.
Remove the retaining rings (it is worth lightly hammering the needle bearing cups to make it easier to remove the rings) securing the universal joint. Press the bearings out of the forks using a clamp or install a hollow stop under the eye of the propeller shaft fork so that the cross appears as if “in weight”. Lightly tap the bearing with a hammer to knock out the bearing. Turn the driveshaft 180 degrees and remove the second needle bearing cup. Remove the hinge flange and press out the remaining bearings. In new-design hinges, it is impossible to press out the needle bearings in this way due to the increased thickness of the hinge fork. Therefore, install the driveshaft of one of the universal joint forks onto the press support. Using a special bushing using the press rod, move the other hinge fork down until it stops against the driveshaft crosspiece. Having turned the hinge fork 180°, repeat these operations, that is, move the other end of the fork down until it stops against the crosspiece. When performing these operations, the opposite bearing of the spider will partially come out of the fork hole and a bushing with a side cutout can be installed into the resulting gap between the fork and the universal joint. Having installed this bushing on the driveshaft crosspiece tenon, move the universal joint fork down until the bearing is pressed out. Using these methods, press out the other spider bearings. Before installing a new driveshaft crosspiece, it is necessary to clean the fork eyes and flange from dirt and rust. Vilyuy universal joints are filled with grease, but it is better to add a little of it to the bearing (we recommend using FIOL-2U or Litol 24). The pins on the driveshaft cross do NOT need to be lubricated. Otherwise, an air cushion will form during assembly.
Strictly follow the technology when assembling the universal joint
When pressing the bearings, pay special attention to ensure that the needles do not bite and there are no distortions. Otherwise, you will have to re-disassemble and reinstall the universal joint
It is better to press in with a vice. Do not hit with a hammer - the bearing needles may become askew, which will lead to rapid failure of the driveshaft crosspiece.
Make sure that all marks on the relative positions of the parts match. After assembly, check that the forks move without play, but still move freely
Install the cardan in place, having previously lubricated the spline joints and, again, paying attention to the marks
After replacing the driveshaft crosspiece, it is recommended to balance it.
Installation of a new driveshaft crosspiece VAZ 2101
- Remove both cups from the cross.
- Install the cross into the eyes.
- Slowly put on the cup (while making sure that the needles from the cup do not fall apart).
- Squeeze the cup until a groove is formed for the retaining ring (a soft metal socket is useful here).
- Install the locking ring, rotate the cardan, moving the cross towards the cup, and put it on.
- Compress the cup and install the retaining ring.
At this point, the replacement of the VAZ 2101 crosspiece can be considered successfully completed.
Signs of a problem
The need to quickly replace the driveshaft crosspiece will be signaled to you by a click (and sometimes even an outright clatter) when the car starts moving. There is no point in delaying this operation, since the worn crosspiece begins to break the eyes of the shaft and universal joint; vibrations and loads on the gearbox and axle increase, which, in turn, will lead to more serious and expensive repairs. Replacing the driveshaft crosspiece without any problems can be done in the garage with your own hands.
The sequence of repair work is as follows:
- Diagnostics and determination that the problem lies in this particular node.
- Purchase of necessary spare parts, preparation of tools and workplace.
- Removing the driveshaft from the car.
- Direct replacement of a worn part.
- Checking the functionality, assembling and installing the cardan on the car.
The crosspiece, as an element of the cardan, connects individual parts that have special forks at their ends, where it is mounted. An unpleasant clattering sound occurs due to the wear of the bearing, resulting in the formation of a gap. At the moment of starting, the cross first overcomes this gap, and only then the force is transferred to the fork with an impact.
Getting ready for renovation
First, you need to purchase a new crosspiece, and additionally retaining rings for it, since they will also have to be replaced.
On the other hand, the use of a puller and the proposed technology itself are more related to theory, because such a method usually ends in nothing but unnecessary problems. Therefore, it is much easier and several times faster to dismantle the driveshaft. Of course, provided that you have the skills to repair it yourself, and all the bolts can be unscrewed normally.
How to change the crosspiece 2106 with your own hands
In the article you will learn for what purposes the 2106 crosspiece on the cardan shaft is needed, as well as how to replace it with your own hands. The Six is one of the few cars that can be repaired independently, without the help of specialists at service stations. Unfortunately, everyone tries to earn as much as possible, and mechanics are no exception. Along with replacing the crosspiece, they will force you to install a new driveshaft, and this significantly increases the cost of service. Moreover, you can also run into “black” craftsmen who will include in the cost of repairs those items that were not actually completed. But we have moved away from the topic of conversation, let's still look at how a car is repaired.
Problems when paying with bank cards
Sometimes difficulties may arise when paying with Visa/MasterCard bank cards. The most common of them:
- There is a restriction on the card for paying for online purchases
- A plastic card is not intended for making payments online.
- The plastic card is not activated for making payments online.
- There are not enough funds on the plastic card.
In order to solve these problems, you need to call or write to the technical support of the bank where you are served. Bank specialists will help you resolve them and make payments.
That's basically it. The entire process of paying for a book in PDF format on car repair on our website takes 1-2 minutes.
Signs of faulty crosspieces
The VAZ 2106 crosspiece, like any other car part, has a certain service life. Theoretically, the service life of the part is quite long, about 500 thousand km, but the real figures are 10 times less. Therefore, replacement has to be carried out after 50–70 thousand kilometers. This is due not only to the quality of the parts, but also to our roads and the intensity of vehicle operation. Lack of periodic maintenance of crosspieces only brings the need for their replacement closer. The following characteristic signs indicate that there is some problem with the hinge:
- blows and knocks;
- chassis vibrations;
- squeaks when driving or accelerating.
Clicks and bumps
Often problems with crosspieces appear when the seals are damaged and dust, sand, dirt and water get inside the bearings. All these factors negatively affect the service life of the product. When the joints wear out, clicks will be heard when changing gears while moving, impacts at a speed of about 90 km/h, and a crunching or rustling sound will also appear. If metallic sounds occur, it is recommended to twist parts of the cardan, for example, by placing the car on an overpass. If large play is detected, the crosspieces will need to be replaced.
Video: play of the cardan cross
If clicks appear in the cardan area on my car, but I am sure that the crosspieces are still in good condition and should move, then, most likely, there is simply not enough lubrication in the hinges, for which they need to be injected. If clicks appear, I advise you not to delay maintenance, since the bearings will break and it will no longer be possible to do without replacing the crosspiece.
Creaks
The cause of squeaks in the area of the driveshaft is usually associated with souring of the crosspieces. The problem is clearly noticeable at the beginning of the movement and when driving at low speed, while the car creaks like an old cart.
The crosspiece may squeak due to lack of lubrication
The malfunction occurs when the hinges are not maintained, when the bearing simply cannot cope with its task. Sometimes, after removing the cardan, it is discovered that the crosspiece does not move in any direction at all.
Video: how the cardan cross creaks
Vibration
Malfunctions in the form of vibration with the universal joints can occur when moving forward or in reverse. The problem can be present with both old bearings and new ones. In the first case, the malfunction is caused by jamming of one of the hinges. If the vibration persists after replacing the crosspiece, then a low-quality part may have been installed or the installation was performed incorrectly. The crosspiece, whether old or new, should move in any of the four directions freely and without jamming. If you have to exert little effort when moving the hinge by hand, you can lightly tap the bearing cup; it may not be seated properly.
Vibrations in the driveshaft may be due to imbalance. The reason may lie in the impact on the cardan with something hard, for example, when hitting a stone. The balancing plate could also fall off the shaft. In such situations, you will have to visit a car service to eliminate the imbalance, and possibly replace the shaft itself.
Cardan vibrations are caused not only by the failure of the crosspiece. From personal experience I can say that the problem also manifests itself when the outboard bearing breaks, when the rubber in which it is held breaks off. The vibration is heard especially clearly when reversing and when starting to move in first gear. Therefore, before you start replacing the crosspiece, it would be useful to check the driveshaft support.
Which crosspieces to put on the “six”
If you listen to the opinion of service station specialists, they recommend replacing both universal joint crosspieces, even if only one of them fails. But not everything is so simple. The crosspiece located at the front of the driveline travels much longer than the rear one. There are situations when a part in the shank is changed three times, but near the outboard bearing there is no need to replace it. When choosing crosspieces for your car, you should not chase a low price, since repairs will ultimately cost more. Let's look at some hinge manufacturers that you can trust with your choice:
- Trialli. Made of high carbon steel and evenly hardened over the entire surface. The product is able to withstand high impacts of dynamic and static nature. The seal has an improved design, which increases reliability and protection against dust and sand getting inside the bearings.
Before purchasing and installing a universal joint, be sure to consider the size and shape of the cups
Attention should also be paid to the hinge pins. They should not have any burrs, marks or other defects.
For domestic cars, it is better to give preference to crosspieces with a grease fitting, i.e., serviceable ones, which will allow you to periodically renew the lubricant in the bearings. The seals must not have any defects, such as visible tears or manufacturing defects.