Every car owner has a moment when a hum or squeal begins to be heard from under the hood when the power plant is running.
The cause of this phenomenon, as a rule, is wear of the bearings. Most often this problem occurs with the tension pulley or generator.
High rotation speeds and loads lead to wear of these components.
Eliminating the problem of increased noise from under the hood comes down to replacing worn out elements.
But first you need to figure out which element’s bearings create noise and require replacement.
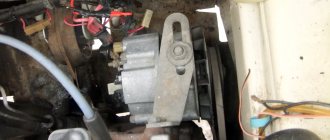
It is not difficult to check; you just need to loosen the tension on the generator belt, remove the belt and start the engine. If the noise stops after removing the generator drive, then it’s time to change the bearings.
Purpose of VAZ-2110 generator bearings
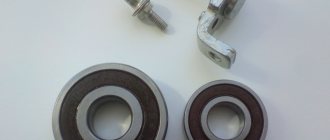
Front and rear bearings of the VAZ 2110 generator
Expert opinion
Nikolay Gray
More than 5 years of experience Specialization: body repair, customization, preparation for painting, detailing
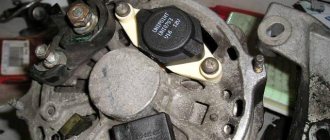
The purpose of generator bearings is very simple: to ensure smooth and uniform rotation of the generator rotor. Both bearings: front and rear are under protective covers. And you can get to them only after dismantling the generator and removing the protective elements.
Replacement
The procedure cannot be called complicated, but it is very important to strictly follow the instructions. Based on our recommendations, as well as video tutorials, you can carry out the replacement yourself without any problems.
You have already found out what bearings are on VAZ 2110 generators, purchased a set of new spare parts, so you can start repairing.
Dismantling works
Front bearing
- Slightly unscrew the mounting nut on the generator, and also loosen the adjusting bolt.
- Reset the alternator belt and start the engine. This will allow you to verify that the problem is with the generator.
- If the noise disappears, then we move on. There is still a lot of work ahead of you.
- Let's move on to the battery, from which the negative terminal should be removed. This is important from a safety point of view and protection against accidental short circuits during repairs.
- Once the terminal is removed, unscrew all the wires going to your generator.
- If you have a crankcase guard, unscrew the mounting bolts and remove it. This will allow you to reach the lower mount of the generator and remove the device. Remove the generator by pushing it through the engine compartment.
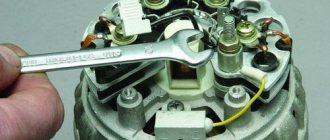
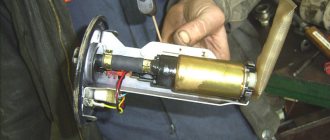
- Using a regular screwdriver or other handy tool, you need to block the generator rotor and then unscrew the pulley.
- The next step is to look for special latches. By pulling them to the side, you will be able to dismantle the device body.
- Next, the generator brushes are unscrewed, as well as the mounting bolts holding the halves of the generator assembly. There should be 4 of these bolts in total.
- We recommend marking both halves of the generator housing to avoid problems during reassembly.
- Use a flathead screwdriver to pry up the cover and remove it.
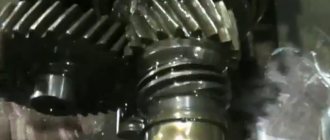
- Practice shows that it is more convenient to remove the rotor from the front cover bearing in the following way. Take a nut and screw it onto the rotor threads. Then hit it with a hammer, first placing a wooden block under it.
- Find a part whose diameter will coincide with the diameter of the bearing being removed. For example, a 27 millimeter head may be perfect.
- Gently start tapping the element so that the bearing comes out of its seat.
- Take the new bearing and prepare to reinstall it.
- The first step is to treat the new bearing with lubricant so that it lasts as long and reliably as possible.
- To install a new component, you will need the old bearing. Place it on top of the new device and lightly tap with a hammer to install.
That's it, the front bearing has been removed and replaced. Let's move on to the back.
Press-fitting
When is it necessary to change?
If a car generator begins to creak and howl during operation, this is the main sign that the bearings urgently need to be replaced . Howling, as a rule, occurs due to the lack of lubrication in the separators of these parts. Alternatively, the bearing cage may simply fail due to wear or fatigue stress. There is one nuance here that should definitely be mentioned. Sometimes on a VAZ 2110, what is heard from the generator area is not a howl, but a thin, barely audible creak, which the car owner can mistake for the creak of a failed bearing. But most often it’s the pump creaking or the sound coming from the pulley on the timing belt. To understand that it is the generator bearing that is creaking, you should remove the belt. If the sound does not disappear, then the problem is in the bearings.
Useful tips
During operation, moisture gets onto the generator, so when dismantling and disassembling, information on how to lubricate the threaded connections is relevant. For this purpose, a WD-40 spray has been created, which is used to treat detachable connections 5 - 7 minutes before unscrewing.
Before replacing bearings, you should inspect the components:
- collector rings, brushes and brush holders;
- diode bridge and voltage regulator;
- stator winding and armature magnets.
Grease LM50
In second place is the SKF lubricant modification LGWA 2 worth 950 rubles, in the third position of the ranking is the EP 2 product from Gazpromneft (issue price 175 rubles).
Thus, it is better to change the front bearing of the generator together with the cover of the same name. A puller is required to remove the rear bearing. However, all repair operations can be performed independently in the garage.
What types of bearings are in the top ten: part numbers and sizes
Bearings in generators of VAZ 2110 cars are closed type, ball, single row, have a double-sided seal.
- The front marking is 6202 2RS (in domestic catalogs under number 180202).
- Rear bearing - 6103 2RS (aka - 24940220).
An important point: when choosing bearings, you should pay special attention to the manufacturers of their hubs. Typically, VAZ 2110 bearing hubs are produced in Samara, their marking is SP3-4.
You can also find hubs on the market from 23 GPP (this is Vologda) and 3 GPP (this is Saratov). It is strictly not recommended to buy bearings on which the hubs are not marked. You also cannot buy Chinese generator bearings, which are now found everywhere, since the quality of these bearings does not stand up to criticism.
How to reduce noise without tuning
If you'd rather avoid making any changes to the generator itself, there are still ways to muffle the sound.
- Installation as far as possible
It is so simple. The further you go, the less likely you are to hear it, so use longer extension cords if possible.
- Create a Soundproof Box
Assembling a generator box not only prevents sound from spreading, but can also serve as a space to store the generator outdoors.
Remember that fuel-burning generators require adequate ventilation to prevent dangerous levels of carbon monoxide from building up. Fire retardant insulation material is a good material for this.
- Install sound deflectors
Sound deflectors are solid materials that reflect sound waves in a different direction. In some cases they are used to create a more direct line towards you, but in this case you obviously want to adjust the deflectors so that they move away from you and your home.
- Install the generator on rubber
Some noise simply comes from vibrations, so if the alternator shakes less, that can also reduce noise. A simple rubber mat under the generator is enough to reduce vibration or purchase a special anti-vibration mat.
Alternatively, buy rubber feet
The best option is to use several noise reduction methods at the same time. The generator will never be completely silent, but these tricks can reduce the uncomfortable noise level.
Work progress
- Remove the generator from the car (see Removing and installing the generator).
- Mark the relative positions of the generator covers.
- Press out the three latches.
- Remove the plastic casing.
- Remove the two screws securing the voltage regulator.
- Remove the voltage regulator with brush holder...
- ...by disconnecting the wire from the regulator terminal.
- Unscrew the four screws securing the rectifier unit and the screw securing the capacitor.
- Bend the three leads of the stator winding so that they make it possible to remove the rectifier unit.
- Remove the rectifier unit with the capacitor.
- To replace the capacitor, unscrew the contact bolt nut, remove the washer and spacer sleeve. Remove the capacitor wire lug from the contact bolt.
- Unscrew the four tightening screws (the screws are tightened with a large torque). Spring and flat washers are installed under the screw heads.
- Using a screwdriver, remove the generator cover from the slip ring side.
- Clamp the generator rotor in a vice (not too tightly, so that the rotor does not rotate) and unscrew the pulley mounting nut. Remove the spring washer and pulley.
- Remove the thrust washer.
- Remove the rotor from the drive side cover.
- Remove the spacer ring from the rotor shaft.
- Inspect the slip rings. If they have burrs, marks, scratches, signs of wear from brushes, etc., the rings must be sanded. If the damage to the rings cannot be removed with sandpaper, you can grind the rings on a lathe, removing a minimum layer of metal, and then grind them.
- Check the resistance of the rotor winding with an ohmmeter (tester) by connecting it to the slip rings. If the ohmmeter shows infinity, it means there is a break in the windings and the rotor needs to be replaced.
- Check with a test lamp whether the winding is short-circuited to the rotor body. To do this, turn on the test lamp to a 220 V AC power supply (you can use a battery and a 12 V lamp). Connect one wire to the rotor body, and the second to each ring in turn. In both cases, the lamp should not light. If in at least one case the lamp is on, it means there is a short circuit and the rotor needs to be replaced.
- Inspect the stator. There should be no traces of the armature touching the stator on the inner surface of the stator. Otherwise, replace the bearings or generator caps complete with bearings.
- Check if there is a break in the stator winding. To do this, turn on the test lamp to a 220 V AC power supply (you can use a battery and a 12 V lamp). Connect a test lamp one by one between all winding terminals. In all three cases the lamp should be on. If in at least one case the lamp does not light, it means that there is a break in the winding and the stator or winding needs to be replaced.
- Check if the stator windings are shorted to the housing. To do this, turn on the test lamp to a 220 V AC power supply (you can use a battery and a 12 V lamp). Connect the lamp to the terminal of the stator winding, and the wire from the current source to the stator housing, but the lamp should not light. If the lamp is on, then a short circuit has occurred and, therefore, the stator or winding must be replaced.
- Inspect the drive-side generator cover and bearing assembly. If, when rotating the bearing, play is felt between the rings, rolling or jamming of the rolling elements, the protective rings are damaged or there are traces of lubricant leakage, and cracks are found in the cover, especially in the places where the generator is attached, it is necessary to replace the cover assembly with the bearing (the bearing in the cover is rolled) .
- Check the ease of rotation of the bearing on the slip ring side. If, when rotating the bearing, you feel play between the rings, rolling or jamming of the rolling elements, the protective rings are damaged, or there are signs of lubricant leakage, the bearing must be replaced. To do this, use a puller to press the bearing off the rotor shaft and press on a new one using a suitable mandrel, applying force to the inner ring of the bearing.
- Inspect the generator cover from the slip ring side. If cracks are found, the cover must be replaced.
- Reassemble the generator in the reverse order of removal. At the same time, orient the generator covers in accordance with the previously made marks. Install the spring washer of the generator pulley with the convex side facing the nut. Tighten the nut to a torque of 39–62 N·m (3.9–6.2 kgf·m).
Which wheels are better to choose: forged or cast?
Additives by lubricant type
These indicators become second in importance. Let's first look at why these are important. The type of lubricant is determined by the base oil that was used to create the product. This indicator affects the duration of use of the lubricant without replacement. Additives affect the extreme pressure effect. Therefore, more attention should be paid to them when choosing a composition for gears. For rolling bearings used in generators, the presence of additives is not very important.
Viscosity
Perhaps the most important indicator for operation is the viscosity of the lubricant. For rolling bearings, you should carefully monitor the consistency of the composition used; it is the level of viscosity that most affects the quality of protection of electric motor bearings from wear. It is also important to understand that generators have different characteristics. The main thing to look at is the rotation speed.
There are special tables that indicate not only the rotation speed, but also the recommended temperature for operation. Based on this, the optimal lubricant viscosity is selected. The use of such tables is justified in cases where it is necessary to select a lubricant for the generator, but there is nothing precisely tested at hand.
Lubricant selection
If you decide that you need to update the lubricant, then it is important to choose it correctly. Actually, it's not that difficult. Of the most common options, the following options are best suited:
- CIATIM 201;
- OKB-122-7
.
In addition, it is possible to use other lubricants with similar characteristics. When choosing, look at the possibility of using the substance in rolling bearings. If you are choosing an unfamiliar lubricant, then it makes sense to read its main indicators.
These are the main indicators that you need to pay attention to when selecting a lubricant. Below we will consider the main points of choice in more detail.
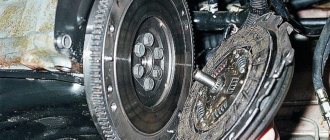
Signs and Symptoms of a Malfunctioning Alternator Overrun Clutch
The generator overrunning clutch is a mechanism that dampens shocks from the pulsating rotation of the crankshaft in time with the power stroke of the piston. Installed on a number of cars that have additional units, for example, an air conditioning compressor.
The main symptoms of the malfunction are vibration and rattling felt inside the car when the air conditioning compressor is turned on. This symptom most often occurs if the car is in gear, the brake is pressed, or it is moving slowly.
The simplest and most accessible way to diagnose an overrunning clutch is to raise the speed to 3000-4000 and turn off the engine. If the clutch is working correctly, you can hear a delayed sound, reminiscent of a turbine stopping due to inertia. If you have an assistant, it is visually possible to see the inertial rotation of the generator when the drive belt of additional units comes to a complete stop.