You can use a radio to pass the time on the road. Typically, drivers prefer to listen to music that is unobtrusive, so that it plays in the background and does not interfere with steering. An autoradio is most suitable for this, which first needs to be configured. But many people don’t know how to properly set up the radio on their car stereo.
Setting up the radio
Basically, setting up the radio consists of several simple steps. The broadcast range is selected and radio channels are searched and stored in the tuner’s memory. The search for radio stations occurs either automatically or manually. In the first case, radio channels are stored in descending order of broadcast quality.
Let's take a closer look at how to configure the radio on common car radios.
Possible reasons for a bad signal
You can easily figure out why the radio does not pick up the radio. Poor reception is most often caused by problems with the antenna. If the cable shield is damaged, the reception will be accompanied by severe interference. If the antenna wire breaks or breaks, or the plug that is inserted into the radio itself comes off, then the radio does not work at all. If an active antenna is used, the receiver does not pick up the radio well due to the fact that power is not connected to the amplifier, or the receiving dipoles are in poor contact with the amplifier module due to oxidation or damage.
Another reason for a poor signal is the distance of the repeater or radio tower from the receiving location and the presence of natural or artificial obstacles standing in the way of the radio channel. Noise penetrating into the radio air from the atmosphere, power lines, trolleybus and tram wires degrades the quality of reception, which is why the timbre on some radios is floating and an unpleasant hiss appears, which hurts the ear. Devices made in Japan have poor radio reception due to their range, which differs from that used in Russia.
If interference occurs when you turn on the windshield wiper, heater or washer, then the problem is related to sparking between the motor brushes.
On cheap Chinese radios, radio interference can occur from various electronic devices, for example, DVRs. Another reason why the radio in the car does not work is a malfunction of the tuner itself. You should also check the speakers, malfunctions of which cause wheezing and crackling noises that make tuning difficult.
Total
The FM modulator is mainly for owners of one-year-old foreign cars with good standard acoustics that are not equipped with USB and Bluetooth. This device is quite capricious: the transmitter is sensitive to interference from the car’s electrical equipment and the congestion of the metropolitan radio network.
We do not recommend using this gadget to play your own music collection not only for these reasons. The audio quality is frankly poor, and is significantly inferior in this parameter to the AUX channel. The rule “the best means the highest quality”, noted in the material on how to wash tar from a car body without damaging the paint, does not work here. In practical terms, even the best FM transmitter sounds worse than a city radio station with a good signal. There are several explanations for this fact:
- The conversion of “digits” into a radio signal and the reverse conversion of information by the on-board audio system unit into sound are different stages, each of which has its own losses.
- Large radio broadcasting stations use special post-processors to ensure that on-air music sounds high quality through the receiver.
In short, we recommend purchasing an FM modulator only as a means of implementing Hands-free technology. Otherwise, it’s better to buy a player or connect your phone via a mini-jack to the AUX connector so as not to be disappointed with the sound quality.
J.V.S.
When tuning stations, it is possible to leave 30 FM radio channels and 15 AM channels in the tuner.
Installing stations manually:
- Select a broadcast band by pressing the TUNER BAND key.
- Click on button 4 to set the station.
- Hold down the key with any selected number on the panel to memorize the station in the radio's memory. The selected number will start blinking, after which you will see the station stored under the selected number. For example: To tune to station number 14, press the +10 key, followed by the 4 key for approximately three seconds or more.
- To store other radio stations in the device’s memory, you need to repeat steps one through three. And to change the settings of the entire station, you need to repeat the entire process from the beginning.
Tuning stations in automatic mode:
Stations will be given numbers by increasing the frequency range.
- Select the range by pressing the TUNER BAND key.
- Press and hold the AUTO PRESET button on the panel.
- To set a different range, you need to go through steps one through two again.
To replace selected stations in automatic mode, you must use manual installation.
Setting up the subwoofer mode
To configure the mode, we will have to work with the preliminary settings, which Pioneer, fortunately, has available. Finding yourself in the menu for these settings is easy. To do this, you need to turn off the radio and then press the power button (top left) and hold it in that position until the display lights up. Fired up? That's all, now you are in the preliminary settings menu. As a digression, let's say that almost all the options discussed below have always been on such radios, with the difference that these settings were entered differently. This is either holding the joystick in a recessed position, or holding the “function” button. But at the same time, the radio must be turned off - otherwise you cannot enter the preliminary menu. Let's move on. So, here is a list of preliminary settings. Turn the knob to find out what options are available. There you can see the language settings, search for radio stations, enable additional inputs, etc. But you need to find the name SW Control. To find this name, turn the knob. Found it? Very good. Next, press the joystick and look at the screen. The inscription REAR SP FUL should pop up on it, which will inform you that all the sound is going to the rear speakers, and we need the system to enter subwoofer mode. Turn the knob further until FUL changes to SW. Leave it like that. The preliminary settings are all done. Now turn on the radio by pressing the power button. As soon as the sound appears, you will immediately notice that the rear speakers cannot be heard at all. Don't be alarmed because this is completely normal. After all, using the preliminary settings, you just entered the rear speakers into the desired mode, and now you still have to configure them. Go to “Audio” again, since now you already know how to do this. In this menu, rotate the joystick to find SW SETTING1. After this, press the joystick briefly, and as a result you will see the SW item on the left side of the display, and as many as three items may appear on the right side: NORMAL, REV and OFF. Well, with OFF everything is clear - this is turning off the mode. You will not need this function for settings. But the NORMAL command means that the speakers operate in normal mode with the diffuser working upward. The inscription REV means that the speakers operate in reverse mode with the diffuser working downward. Rotate the handle to stop at any of these modes. By the way, experienced car enthusiasts know that the reverse mode is best suited for sedan-type cars. After you have launched the selected mode, turn the joystick to the left and exit the settings. Now turn the joystick to find the SW SETTING2 menu. You will find it by turning the handle to the right. This will be the next menu that you have to work with. Press down the joystick and thus light up SW 80 HZ 0 on the display. Let’s give the explanation: 80 – frequency filter. That is, this is the frequency that goes to the speakers. If you have an oval shape, then the frequency range can be limited to 50 hertz. With this cut, you get a nice rich bass in sub mode. But if something doesn’t suit you, then here you can experiment with different options. By turning the knob to the right, you will find the mode power level indicators from -6 to +6. Using the verification method, select the indicator at which there will be no distortion on the speakers. That's all. Setting up the subwoofer mode is complete. Exit the menu using the same BAND button. After this, monitor the rear at different volume levels and adjust the sound power if necessary.
How to improve your radio signal
There are several ways to improve radio reception in your car radio. For example, you can install an active antenna equipped with an amplifier. To eliminate interference, you can make your own power filter. To do this, wind several turns of thin wire around the ferrite core. Power from the machine is supplied to one end of the resulting choke. To the other, you should connect the oxide capacitor and the positive plug of the radio.
The entire structure is placed in a small box made of stainless steel or tin. The body is connected to ground; you also need to solder the negative terminal of the capacitor to it. The more turns and higher the capacitance of the capacitor, the better the filtration. This filter will suppress electrical noise coming from the power supply circuits. Now you can figure out what to do to suppress interference from electric motors and gadgets. To do this, you should bypass the devices with a capacitor. After this, the level of interference should decrease.
Purchasing and replacing an antenna
This method is one of the simplest. Modern active antennas are small in size and mounted together with receiving elements on the inside of the car windshield, without being exposed to precipitation. The disadvantage is that if the glass is damaged, the antenna must be replaced along with it.
After purchasing the antenna, you must connect and install it correctly. To do this, a base along with receiving elements is glued to the windshield from the passenger compartment. The distance to the body frame must be maintained. It must be at least 25 mm, otherwise reception may deteriorate. Then the active antenna module itself is installed. The power wire connects to the blue and white stripe wire of the car radio.
Amplifier installation
This method will help improve the quality of reception at a great distance from the transmitter. Using a standard whip antenna in conjunction with an amplifier increases the sensitivity of the car radio. You should disconnect the plug from the radio and insert it into the amplifier. Power is supplied to it from a blue wire with a white stripe or directly from the battery through a switch. The connector coming from the amplifier is inserted into the radio.
How to listen to music via aux in a car
This method of connecting a phone to a standard device is even older than USB. After all, the connector was used back in the days of cassettes. The connection instructions are so simple that it’s even a shame to post them, so as not to offend the feelings of motorists. But we'll take a chance:
- Buy an aux cord. It is thin with miniature plugs. Sold in any Chinese hardware store. You can buy it in the pink and white giant, however, for some unknown reason, the price for such cords here is off the charts.
- Plug the cord into the phone's headphone jack. Connect the second plug to the radio.
- Play files on your phone. Ready!
Why is it necessary to set up a Pioneer radio?
Before moving on to the process of setting up your Pioneer audio recorder, it’s worth understanding why you need to do this:
- This is done in order to maximize the audio capabilities of the head unit and the acoustics installed in the car.
- Knowing the settings will allow you to easily connect various external devices, eliminate wheezing and distortion of the audio composition, as well as change the interface language and other everyday characteristics, the correct configuration of which will make using the device more comfortable and understandable.
Incorrect adjustment of the radio can nullify the sound of even the most expensive and high-quality professional-level acoustics.
Loudness compensation
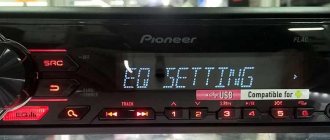
I would like to end here, but we forgot about something - loudness compensation. This is such a regime. It is easy to find it in the audio settings menu by rotating the joystick. Find the inscription LOUDNESS. Press down the joystick, and the same LOUDNESS will light up on the left, and three levels will be displayed on the right: low, medium and high. This setting adjusts the high and low frequencies at low volume. That is, the quieter the sound, the more clearly the effect of this setting is felt. However, if you turn the sound up to full power, this mode will not be felt at all. Therefore, you can fix the high level, which is indicated by the inscription HIGH. Now go to the audio settings in the EQ SETTING1 menu. Press down the joystick until the display shows EQ SETTING1 and three options in columns, adjusting bass, mid and treble. You can move through the columns by tilting the joystick to the right, and the adjustment itself is done by rotating the joystick handle. Using these options, adjust the frequencies to your liking. However, we do not recommend exceeding the low frequency parameter by more than one. From 0 to 1 will be quite enough - take pity on your acoustics. Although, if your speakers are powerful enough, then you can experiment. Now, that’s probably all. This time your “Pioneer” will sound at a professional level. I must say that there are still a few settings left in this radio, but only real music lovers with an ear for music will need them - and that’s a completely different story. We wish you a fun and safe journey! Video about setting up radio stations on Pioneer radios:
TagsTips for motoristsAn article on how to properly set up a Pioneer car radio. Features of setup, step-by-step algorithm. At the end of the article there is an interesting video about setting up radio stations on Pioneer radios.3 -> Sources used:
- https://mgp-avto.ru/nastrojka-radiostancij-na-magnitolax-pioneer/
- https://1avtozvuk.ru/podkluchenie/nastroit-radio-na-magnitole
- https://fastmb.ru/soveti_auto/1621-nastraivaem-avtomobilnuyu-magnitolu-pioneer.html
External ports
- In addition to the radio, the radio can play music from external devices or CDs (older versions).
- To be able to connect external devices, you will need the same “System” menu described earlier in setting the time.
- Go to the menu as described above.
- Scrolling through the menu, select the AUX, USB or Bluetooth option (if this feature is supported).
- Use the arrows on the sides (or tilt the handle itself) to switch the position. There are two options available - enabled (On) or disabled (Off).
- Choose to enable the desired port.
- Press the joystick once to confirm.
- In the same way as in setting the time, exit the menu.
- Further connection depends on the models of the radio and the connected device.
Bluetooth connection
It should be remembered that for the connection via Bluetooth to work correctly, like most other devices that support this function, pairing will be required. The PIN code is entered on the radio and repeated on the device (sometimes, especially if the device has already been connected via Bluetooth, you will only need to enter it on the radio).
To enter the pin code on the radio, take the following steps:
- They turn it off.
- Hold down the power key and go to the initial menu.
- Rotate the joystick to find the PIN CODE INPUT function (will appear if BT is enabled).
- Move the joystick up and down to enter the code. If you need to move between symbols, do it by swinging the handle left and right.
- Confirm by pressing the knob once.
- Exit the menu.
Now you can activate the mode on the device and try to find the radio. Those who like to assign clear names to devices can use the above method, but they must select EDIT DEVICE NAME rather than PIN CODE INPUT. The remaining steps are identical.
Important!!! Pressing to confirm must be done once. Clicking on the same menu again will reset the code and require you to enter it again.
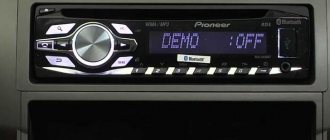
In the radio, the photo of which is presented below, the 3.5 AUX jack socket is located to the right of the radio control buttons, and the USB is behind a plug with the USB brand logo.
Radio "Pioneer" without CD, but with USB and AUX support
Supra
After pressing the MODE button, select the Radio function, then RADIO and the saved band with the broadcast frequency will be displayed on the screen. Pressing BND selects the desired broadcast band.
Next, you need to press the key with numbers from 1 to 6 to use the already saved radio station in the radio.
Press and hold the >>|| button.
Then click the button >>|| to select the desired station. If these keys are not pressed for up to ten seconds, everything will return to its original operating mode.
Automatic tuning and scanning of selected radio stations
Search for existing radio stations in memory:
Briefly press the AS/PS key to start searching for saved radio channels. Any station can be listened to for about a couple of seconds. To automatically save radio channels, hold down the AS/PS key. The receiver will tune in to six optimal stations, which are the most powerful in this broadcast range. This option can be used in any wavelength range. Once the automatic saving of stations is completed, the receiver will stop scanning them.
To tune into a specific radio station, press the >>|| button, this will scan and select radio channels with the best reception signal. By pressing the >>|| button, you can manually select the station you want. Hold down the key numbered 1 to 6 for about a couple of seconds to memorize the channel under the desired key.
Sony
Setting up the radio in the Sony radio will also not be a problem. Searching for stations is usually carried out in two common ways: manually or automatically. Automatic memorization of radio stations:
- Turn on the radio. Long press the Source button and wait until TUNER appears on the display.
- The range is changed by pressing the Mode button. If you press the joystick, a menu of options will appear.
- Rotate the joystick until the VTM option appears. Radio channels are assigned to numbered keys as standard.
To manually scan and save you need:
- Turn on the radio and start searching for stations.
- Once the desired radio station has been found, you need to press the number key from 1 to 6, after which the name “Mem” will appear. Note: when saving a radio station on a digital number that already has a radio station, the previous one is automatically erased.
Thus, you can set up a radio in a Sony radio in 5-10 minutes.
What does the M button on the column mean?
This means
that the gadget is not afraid of dust at all, and it can be immersed in water to a depth of 1 meter and for no more than 30 minutes.
No, seriously, you can just take the speaker
with you when you go swimming in the river or sea.
Interesting materials:
What color are the sneakers? What color is the Witcher's hair? What carbohydrate is included in RNA? What top to wear with wide leg jeans? What top to wear with brown trousers? What is the weight of 10 kopecks in Ukraine? What is the weight of raspberries in a 1 liter jar? What type of retelling? What vitamin is in cod liver? What does cod liver taste like?
Joystick positions
First, let's characterize all possible movements of the joystick. The positions of its handle can be as follows: So, let's begin. We set the volume to about 30 units, not paying attention to possible wheezing during playback. After that, press down the joystick and go to the list of settings. Here you will see a large number of options, but don’t let that scare you: now you only need one setting. Start turning the joystick to the left or right until you find the “Audio” item. Found it? Now you need to press the joystick again and enter “Audio”, and there you will look for the item where the balance and fader are indicated. It looks like this: FADER / BALANCE. Press the joystick again so that the inscriptions FAD 0, BAL 0 are displayed. If instead of zeros there are other numbers, it’s okay. This just means that an adjustment has already been made here before. If you tilt the joystick to the right, you will thus move from the fader settings to the balance settings. Rotating the joystick will allow you to adjust these settings. At such moments, the current menu will flash. Set the fader to position + 15. In this case, the sound must be passed only to the front speakers so that the rear speakers do not interfere with the settings of the front speakers.
How to listen to music in a car via an FM modulator
A modulator is a small device with a screen and a remote control. It is used to broadcast music to an FM receiver. Many premium cars produced in the early 2000s have luxurious built-in media systems that do not support USB or aux connectors. They are designed for playing discs or cassettes. The FM modulator is designed to correct this injustice and add music from your phone to a radio wave. As users note, the sound quality is worse than in the methods discussed above.
Video: pioneer 4019 clock setting
Also, in some Pioneer radios, you can call up the clock settings menu by simultaneously pressing the CLOCK + FUNC keys or by going to the SYSTEM item and finding the corresponding sub-items CLOCK SET/CLOCK OFF, which is located in the main settings block.
How to change language
To change the settings language, go to the system settings (SYSTEM), located in the main settings block, which may require holding down the SRC or SOURCE buttons. After this, we find the LANGUAGE sub-item, where we select the language we need.