When purchasing a car, every buyer should have a good understanding of the vehicle maintenance features. Knowing the main points, it is easier to ensure reliable operation of the car for a long period of time. By identifying a specific breakdown at an early stage, it will be possible to quickly eliminate it. Owners of Lada or other brands of cars must constantly monitor the condition of the car; in particular, it is important to be able to adjust the wheel alignment yourself on a VAZ 2107. Incorrect wheel alignment is not only rapid wear of the tires, it also significantly increases the risk of getting into an accident.
Description
Many modern cars have negative camber on the rear axle, which is built into the design initially, and this angle reaches 2 or even more degrees. Owners of VAZ cars (except for the latest Grant and Kalina-2 models) have zero wheel camber on the rear axle of their cars. It is possible to establish negative camber of the rear wheels using camber plates , which are installed between the rear beam and the rear wheel hub axle.
As you know, when installing many camber plates widely available on the market, in addition to obtaining a camber of -1°, we also get negative toe-in of the rear wheels, which has a bad effect on handling. This result is obtained due to the fact that when designing these spacers, manufacturers do not take into account the angle of inclination of the rear beam arm. Negative toe-in of the rear wheels increases the likelihood of skidding when cornering, as the car receives excessive oversteer, and when driving in a straight line under the influence of road unevenness and lateral influences (for example, wind or when driving on a rut), the car requires constant steering and becomes excessively sharp and unstable .
When designing the SS20 spacers, the angle of inclination of the rear beam arm was taken into account. The axis of symmetry of the camber plate was shifted by an angle α equal to the inclination of the beam lever. This solution allows you to maintain stable behavior of the car when turning and driving in a straight line. When installing SS20 camber plates, a -1° camber and a slight positive toe-in of the rear axle wheels are provided.
The use of branded SS20 spacers, which give negative camber to the rear wheels, slightly increases their track. This has a positive effect on maneuverability. A wider track allows you to increase cornering speed without the risk of tipping over.
First maintenance of Lada Vesta
What kind of work does the first maintenance for the Lada Vesta sedan consist of? This includes replacing the oil, air and cabin filters, changing the engine oil, checking the condition of the brake pads, as well as diagnosing the engine control unit using a special scanner. At the official service station of the Lada brand in Kazakhstan, German synthetic oil Rowe 5W40 was poured into the Lada Vesta of automotive journalists. It was chosen because it is officially supplied to the car showrooms of this dealer network in Kazakhstan. The Lada Vesta engine control unit was checked for errors using a special scanner, which had an interface similar to the Windows 8 operating system. This equipment is certified for the Lada Vesta model car. According to specialists from the official Lada service station in Kazakhstan, this device costs about 300,000 rubles. Fortunately, this device did not show errors in the Lada Vesta engine control unit.
Numbers you need to know
To set the wheels at the correct angles, you need to know these angles, everything is logical.
Definitions for front wheels
What is CASTER
The standard value is 6 degrees.
Thanks to this angle, wheel alignment is ensured due to speed. The CAMBER angle (aka CAMBER) determines the correct lateral inclination of the wheel.
Thanks to the correctly set CAMBER angle, the wheels are aligned due to the weight of the vehicle.
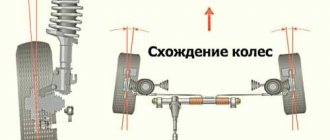
We carry out the camber and alignment ourselves.
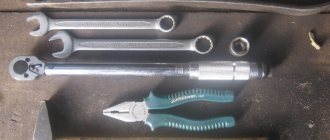
We will not repeat the importance of this operation. This process is important and must be taken seriously. To perform it you need tools and accessories:
- Availability of inspection hole.
- Plumb.
- Chalk or felt-tip pen.
- A set of keys.
- Sliding ruler with scale.
Carrying out the operation of checking and adjusting camber and toe for cars with front-wheel drive and “classics” have some differences. To perform this operation at home, it is necessary to ensure the presence of a flat, horizontal platform. Checking and adjustment is carried out in several stages:
- The car is installed on the site so that the front wheels are straight. There are two marks on the outside of the tire, one at the top and the other at the bottom.
- Apply a plumb line to the wing so that it is in the plane with the applied marks. Next, use a caliper or other measuring tool to measure the distance from the cord to the wheel disk near the upper and lower marks. If the difference is about 3 millimeters, this is normal.
- Next, you need to turn the wheels, rolling the car forward so that the applied marks are located horizontally.
- Again, measurements are taken from the cord to the wheel disk in the vertical plane.
- To obtain more accurate measurement data, this operation must be performed several times.
Basic Concepts
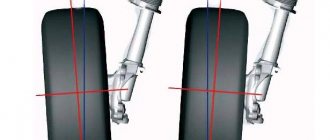
If we consider the concept of wheel alignment, it means how the wheel of a car will be installed vertically. If the upper edge of the wheel is pointed outward, this fact means that the camber is positive. If the edge of the wheel goes inward, then the camber is negative, and it is designated accordingly: “-”.
The diagram shows toe-in (a) and camber (b)
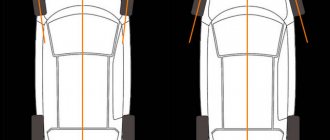
If the camber is adjusted incorrectly, and to be precise, when the camber of only the front wheel is adjusted, the car can drift to the side while moving; this is determined quite simply - the driver takes his hands off the steering wheel, and the car “steers away”.
As for toe-in, it shows how the wheels can converge with each other relative to the road. If we consider cars with rear-wheel drive, then their wheels are placed at a positive angle, but on front-wheel drive the angle is determined by a negative indicator. This adjustment is necessary so that at the time of movement and during further driving the wheels can be aligned and continue to remain in the same position. Of course, incorrect toe adjustment quickly wears out tires and other elements of the car, so the motorist must pay close attention to his car and promptly adjust the wheel alignment himself or with the help of specialists.
Tire wear due to correct and incorrect adjustment
Video: consequences of incorrect wheel alignment
Camber adjustment steps
- First of all, set the wheels in a straight position and make chalk marks on the top and bottom so that their connection can form a diagonal.
- Attach a plumb line to the wing and start measuring. Using a ruler, measure the distance between the cord and the top mark, and then between the cord and the bottom mark. If they are the same, you can be calm about the collapse of your car. But if the difference between these indicators exceeds 3 mm, then this directly indicates the need for adjustment.
- Now roll the wheels a little forward or, conversely, back so that the marks are parallel to the floor. Repeat the previous steps.
- Make a few more moves and take measurements in several places. This is necessary to more accurately determine deviations from the norm.
- Remove the wheel and unscrew the bolts between the steering knuckle and the shock absorber bracket.
- Move the steering knuckle according to your measurements - inward or outward.
- Install the wheel and repeat all measurements.
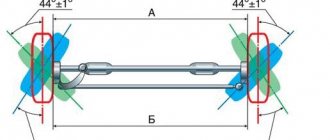
Measuring the longitudinal and transverse angle of inclination of the axis of rotation
Of greatest interest is the measurement of the tilt parameters of the rotary axes. Their position is determined by two key characteristics: lateral inclination and longitudinal (caster).
A short video (2 min) about what a caster is
If the wheels of a car could turn 90 degrees and stand across the body, these parameters could be easily calculated using an inclinometer. But in real conditions this is impossible to do, so you need to limit yourself to a rotation of 20 degrees in both directions relative to the zero position. The difference in the obtained angles must be multiplied by an additional factor of 1.5 - this is necessary to compensate for errors that are allowed during the measurement process.
To determine caster, you first need to turn each wheel 20 degrees in front of the steering axis: right to left, and left to right. In this case, you need to set the inclinometer to zero or write down the results. Next, the wheels are turned behind the turning axis: right to the right, left to the left. If the angle measured behind the steering axis is greater than the angle measured in front of the steering axis, then the caster is positive. If it's the other way around, then the caster is negative. The protractor should show a slight difference of a few degrees. This difference should be multiplied by the same factor of 1.5. For example, if the protractor showed a value of +2 degrees, then the caster value should be taken as +3 degrees.
The transverse inclination is calculated in a similar way, but the protractor is installed in a slightly different position. For additional convenience, you can use a smartphone, on which you should install in advance an application that simulates two mutually perpendicular bubble levels. An ordinary building level, preferably with a rotating bubble, will also work for these purposes.
If the task is not to measure specific numerical values of slopes, but only to compare them (they are not adjustable on most cars anyway), then the results do not need to be multiplied by a correction factor of 1.5. The main thing is to make sure that the angles are equal on both axes (right and left).
In the process of self-measurements, it is not necessary to strictly observe the rotation of the wheels exactly 20 degrees, especially when there are no appropriate tools to determine these angles (for example, graduated turntables). You can turn the steering wheel about 3/4 of a turn. It is necessary to ensure that when turning left and right, the steering wheel is locked in symmetrical positions. To do this, you can put some marks on the bottom of the steering wheel. When the steering wheel is in zero position, the line connecting the marks must run strictly horizontally.
Another way to get accurate results is to draw corners on the asphalt near the wheels using a protractor. If you don't have this tool, you can use a square sheet of paper with equal sides. Folding it diagonally, we get an angle of 45 degrees. Then one corner is folded in half again, resulting in an angle of about 22.5 degrees, which is close to the standard 20. Next, you need to attach the sheet to the wheel and outline its edge with chalk, thereby creating the necessary marks on the asphalt.
Checking parameters and vehicle condition
Checking or adjusting any of these parameters should only be carried out on a fully functional suspension in the following cases:
- replacement of any elements of the steering or chassis system, with the exception of wheel bearings;
- replacing wheel rims;
- increased fuel consumption;
- rapid tire wear;
- incorrect behavior of the car when turning;
- the car pulls to the side on a flat road;
- getting into even a minor accident involving wheels hitting obstacles.
The check will not take much time, but will allow you to detect and eliminate the malfunction in time.