Every second car enthusiast who tries to repair his favorite four-wheeled friend with his own hands has encountered the problem of how to remove the crankshaft pulley. After reading the instructions in the maintenance and repair manual, at first glance, the procedure does not seem complicated, however, when you first try to unscrew the ill-fated bolt, it turns out that this is not so easy. It is completely unclear how to fix the crankshaft so that it does not rotate. Another problem is where is the best way to get to the treasured bolt. Removing the crankshaft pulley causes a lot of trouble because it is too tight. There is a high probability of damaging many parts of the engine compartment or the paintwork of the body.
The problem is that the crankshaft pulley bolt (or nut, depending on the model) is tightened with great force during installation. This is done so that it does not unwind spontaneously, since if unscrewed, serious damage and expensive repairs cannot be avoided. The degree of tightening gradually increases as the engine operates and is aggravated by sticking, coking, and corrosion.
In reality, the entire dismantling process can take 10-15 minutes, but there are some techniques you need to know and use. Different motor models use either a bolt or a nut to secure the pulley. Each option should be considered.
How to unscrew the crankshaft pulley nut?
Removing the crankshaft pulley
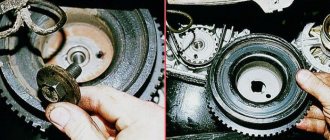
The nut at the end of the crankshaft holding the pulley is a sign of the engine of a classic rear-wheel drive car like VAZ from model 2101 to 2107, Niva and the like. Such a nut is also called a “ratchet”, since it can have ledges for a “crooked starter”.
It is better to do the work above the inspection hole. The crankshaft should be secured by placing the gearbox in 4th gear and applying the parking brake. You should stock up on the following tools in advance:
- socket or socket wrench 36 (or 38);
- lever extension in the form of a piece of pipe.
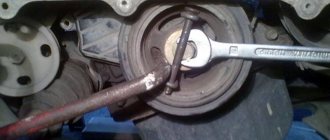
While under the car, try to unscrew the nut with a wrench with a sufficiently long lever. If the attempt is unsuccessful, put the gearbox in neutral and proceed as follows:
- the candlesticks are removed;
- while in the pit, install the key and extension so that the end rests on the floor or spar as the shaft rotates;
- turning the key in the ignition switch gives a short-term impulse.
As a rule, on the first or second attempt the nut comes off and is then unscrewed with a regular wrench. Don't forget to loosen and remove the alternator belt.
How to unscrew the crankshaft pulley bolt?
Unscrewing the crankshaft pulley
The bolt holding the pulley is prevalent in engines in front-wheel drive cars, when the block is located perpendicular to the axis of the car. In this case, you will have to tinker more, since it is more difficult to get to the bolt. To work you should prepare:
- jack;
- “tragus” (stump);
- a socket to the size of the bolt with an extension and lever;
- set of automotive tools.
In search of an answer to the question of how to remove the crankshaft pulley, many car enthusiasts begin to look for an opportunity to do this without prior preparation. By definition, such attempts cannot be successful.
In order to correctly remove the pulley, you must perform the following manipulations::
- the right front part of the car is lifted, the wheel is removed;
- the car is installed on a “tragus”;
- From the top side of the hood, all parts that impede access are removed: the air filter and the engine mudguard;
- the alternator belt is removed;
- to fix the crankshaft, the plug on the clutch block is opened and a pry bar is inserted into the resulting window to jam the flywheel teeth;
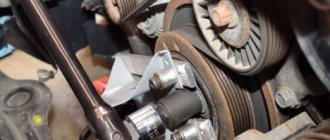
- under the wheel arch, a head with an extension and a lever is put on the pulley bolt;
- the bolt is unscrewed counterclockwise.
In the vast majority of cases, the bolt can be unscrewed. If it does not give in, then you can add the length of the lever. If this does not help, then you should use the help of the starter as described for the pulley nut in the “classic”.
We remove the pulley using folk automotive experience
Any threaded connection, even if tightly tightened. can be untwisted with less effort if you use some folk-automotive tricks. The problem of how to unscrew the crankshaft pulley ceases to be such if you moisten the bolt head or nut in advance with special WD oil, vinegar or brake fluid. Sometimes lightly tapping the edges of the nut helps.
Unscrewing a bolt or nut does not always solve the problem, since the pulley is held quite firmly on the shaft. You can remove the pulley using a regular pry bar, carefully prying it off from different sides. It is important that the force application point is as close to the shaft as possible. For hopeless cases, it is necessary to use a crankshaft pulley puller. This is a special device, which is a pin with a nut on which 2-3 grips are attached. The ends of the grippers are secured to the edges of the pulley, and the end of the pin rests against the center of the shaft. By twisting it clockwise, you can gradually pull the pulley off the shaft.
You should not be sure that in all cars, without exception, the crankshaft rotates clockwise.
For example, in some Honda cars the crankshaft rotates counterclockwise. It follows from this that the thread on the pulley nut (bolt) will be left-handed.
In what cases should the pulley be removed?
Most often, it is necessary to dismantle the crankshaft pulley when changing oil seals. The role of the O-rings is to prevent oil from the crankcase from reaching engine components. Over time, the seals wear out, crack, and as a result, oil leaks appear. To fix this, you need to change the seals. During this procedure, you have to remove the crankshaft pulley.
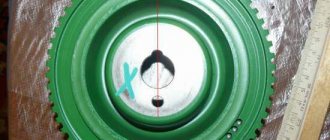
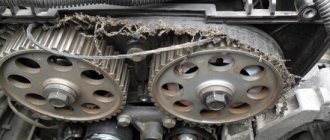
Also, the need to dismantle the crankshaft disk arises when replacing the timing belt on a VAZ 2107 injector. It is changed according to the regulations specified in the operating instructions for the VAZ 2107 injector, as it wears out after a visual inspection or if it breaks. During a technical inspection, the pulley must be inspected to identify any defects. If chips or scratches are found, the part should be replaced.
Damaged part with broken part
The procedure for removing the product itself is not difficult, but some problems arise.
Firstly, with access. The pulley we are interested in is located in the lower part of the engine compartment behind the generator. It is difficult to get to because other engine components are in the way. Before removing the pulley, you need to remove the alternator and power steering belt.
Secondly, the crankshaft pulley mounting nut is very difficult to unscrew. When it is put in place, it is screwed with great effort. This is necessary so that it does not unscrew accidentally while the car is moving, as this can lead to expensive repairs. While the engine is running, the nut is tightened even more. In addition, the process is aggravated by high operating temperatures, at which oil coking and metal corrosion occur under the influence of the external environment.
When and why to change the front oil seal
The manufacturer recommends replacing the front crankshaft oil seal of VAZ 2101-2107 engines every 150,000 km. However, in practice such replacement has to be performed more often. Accelerated wear of the sealing element and the appearance of engine oil leaks are caused by:
- skewed oil seal during installation;
- loss of elasticity due to engine overheating;
- increased radial runout of the drive pulley of mounted units;
- use of low-quality motor oil;
- wear on the crankshaft pulley hub.
In addition, we cannot rule out hardening of the cuff due to natural aging and the possibility of a manufacturing defect - unfortunately, the quality of parts for rear-wheel drive VAZ models leaves much to be desired.
It is impossible not to notice damage to the sealing element - the rotating pulley scatters oil in the front of the engine and throughout the engine compartment. However, do not think that such a malfunction only leads to oiling of the units and a decrease in the lubricant level. If engine oil gets on the generator belt and other rubber parts, it can quickly render them unusable.
Keep in mind that the appearance of a leak through the engine seals is provoked by another factor - increased crankcase gas pressure. For this reason, be sure to check the cleanliness of the engine ventilation system.
Something else useful for you:
Video “Replacing the crankshaft pulley on a VAZ classic”
This video talks about oil leakage due to wear on the crankshaft pulley.
The crankshaft on a VAZ 2105 is removed either to replace it with a new one or to replace its bearings. To carry out repair work, the car must be driven into an inspection hole, overpass, or use lifts. We also prepare a standard set of tools. The procedure for carrying out repair work is as follows:
- After driving the car into a pit, remove the oil pan protection, then drain the oil and remove the pan itself.
- Next we need to remove the crankshaft rear oil seal holder.
- Remove the camshaft drive belt cover and its sealing gasket.
- Remove the camshaft drive chain.
- Now we need to remove the connecting rod caps; first we need to mark them so that each cap corresponds to its own connecting rod.
- Unscrew the bolts securing the covers, remove the cover and liner. Push the connecting rod with the piston up the cylinder.
- We do the same with the main bearing caps. We first mark them relative to their seats, after which we use a seventeen socket wrench to unscrew two bolts of their fastening. The rear cover of the crankshaft main bearing has two half rings in its grooves - one steel-aluminum ring, and the second cermet. To remove them, pry up the ends of the half-rings with a flat-head screwdriver.
- When unscrewing and removing the covers, hold the crankshaft with your hand. Then remove the crankshaft from the car engine. When removing the covers, note that all of them, except the third one, have a groove. All covers have factory marks that correspond to their serial number (the report is taken from the toe of the crankshaft). The fifth cover has two marks, which are spaced along the edges.
- After the crankshaft is removed. We remove the liners from the seats of the main bearings.
This completes the process of disassembling and removing the crankshaft of the VAZ 2105. In general, repair work related to the piston group, boring the crankshaft and replacing liners and main bearing caps is recommended to be carried out with the appropriate experience and knowledge, or contact a specialized workshop.
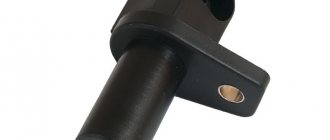
What is a crankshaft sensor ? In order to synchronize the ignition operation and fuel supply to the cylinder blocks on an injection engine, it is necessary to determine the crankshaft speed. This is precisely why you need a crankshaft position sensor , which is installed opposite a special synchronization disk mounted on the crankshaft.
Signs of a malfunction of the VAZ 2107 crankshaft position sensor
- The first thing that may indicate the imminent death of the crankshaft sensor is an arbitrary decrease or increase in engine idle speed.
- Severe reduction in engine power
- Unable to start the engine
Removing the crankshaft position sensor
- Disconnect the contact chip from the sensor by first releasing the latch
- Using a Phillips screwdriver, unscrew the sensor mounting screw.
- After removing the crankshaft position sensor, check its operation using a multimeter
Checking the crankshaft position sensor VAZ 2107
If the crankshaft oil seal on a VAZ 2107 is damaged or worn, oil will leak from its seat. With severe wear, you will even have to often add more to the engine, since the level can drop quite quickly. In this case, it is necessary to replace the oil seal. You can do this yourself, having the necessary tools at hand, the list of which will be given below:
- Key for 41
- Chisel
- Flat blade screwdriver
- Puller
- Hammer
Folk tricks
Let's look at a few folk car tricks that have helped more than one driver.
- Each threaded connection, by the way, not only on the part of the car, can be unscrewed by first lubricating it with a special oil, for example: HP, sunflower oil, vinegar, brake fluid.
- In rare cases, lightly tapping the edges of the bolt and nut with a hammer or wrench helps.
- Removing a bolt or nut does not mean removing the pulley. How to unscrew the crankshaft pulley without a special key? The pulley sits very firmly on the shaft; it can be removed using a pry bar or a screwdriver and carefully pry it off in several places.
A little materiel
Before you twist anything, you need to know where this part is located and what functions it performs. So, in very simple words, the crankshaft pulley is a special wheel that is located outside the engine.
Without a pulley, the operation of the internal combustion engine and the movement of the car is impossible, since the torque from the crankshaft itself will not be transmitted to other engine components. When looking for this part under the hood of a car, you should focus on the generator. The object you are looking for will be below.
It fits onto the protruding part of the crankshaft and is held from turning by a key. It is secured with a nut (less commonly, fastening is done with a bolt). How to unscrew the crankshaft pulley bolt is the main problem.
There are several types of crankshaft pulley:
- Pulley for V-belt. This type is present in any Soviet-made car (including trucks and buses). It has an all-welded or solid-cast design with a groove that completely follows the profile of the V-belt.
- Toothed pulley. It is used on many modern engines after the timing chain has been replaced with a timing belt in order to lighten the entire structure. This belt has teeth on its inner surface. Accordingly, teeth are also made on the outer rim of the pulley.
- Damper pulley. Found on many light-duty vehicles, as well as minibuses. This pulley consists of two parts: an outer working disk and an inner race. A rubber damper pad is placed between them.
This is done in order to reduce the impulse mechanical impact experienced by the gas distribution mechanism and timing belt during engine starting and sudden changes in crankshaft speed. The side effect in this case is the relatively short life of the pulley, and also the fact that the part requires increased attention from the driver or mechanic.
After getting acquainted with the part itself, you can consider situations in which you will have to unscrew the crankshaft pulley nut or the bolt securing it.
Removal instructions
With the clutch disengaged, the crankshaft can be easily turned with a wrench.
To carry out the removal procedure, it is necessary to secure the shaft from turning.
There are special devices that are bolted to the pulley into the technological holes, preventing the shaft from turning. If there is no such device, then you need to install supports under the wheels and place the car on the fourth. You can also secure the crankshaft flywheel by inserting a long screwdriver or pry bar between its teeth.
Removal and Installation
On a VAZ 2107, the injector crankshaft pulley is held in place by a fastening nut. Another name for it is ratchet. To remove the crankshaft pulley, you will need to unscrew this nut. It is better to carry out work on an inspection ditch or overpass. The tools you need to prepare are:
- set of keys and sockets;
- spanner or socket wrench 38 (36); Prepare tools for unscrewing
- extension;
- screwdrivers;
- mount.
If the threaded connection is difficult to unscrew, there are special products, after application of which you can easily unscrew the fasteners. These products include WD oil. You can also use vinegar essence or brake fluid.
Work on dismantling and installing the crankshaft pulley on a VAZ 2107 injector consists of the following steps:
- The car must be set to the handbrake.
- The crankshaft should be fixed by engaging 4th gear.
- After unscrewing the lock bolt and loosening the tension nut, you need to remove the generator belt.
- To get to the crankshaft you need to remove the front right wheel.
- In the upper part of the engine compartment, you need to dismantle the air filter and remove the engine mud shield.
- Next, you need to secure the crankshaft from turning using one of the methods described above.
- Before unscrewing, the nut should be tapped on all sides. Using a spanner, unscrew the crankshaft pulley mounting nut by turning it counterclockwise.
- If you cannot unscrew it manually, you can use another method. To do this, you need to put the car in neutral and remove the spark plugs. The wrench with the extension should be installed so that the end of the extension rests against the spar or floor in the direction of the shaft movement. At this time, you need to turn the ignition key to give a short impulse. Unscrewing the nut using the starter
- After the nut is unscrewed, you can begin to dismantle the disk. The pulley can be removed using screwdrivers or a pry bar, prying it from different sides until it moves from the shaft. It is important to apply force closer to the shaft. Move the pulley away from the front cover
- You can use a special puller, which is equipped with a pin and 2-3 grips. The grips cover the edges of the disk, and the pin rests on the center of the shaft. By turning the device clockwise, the pulley is gradually removed from the shaft.
- Then the consumables are replaced with new ones.
- Assembly is carried out in reverse order.
After completing work on the VAZ 2107 injector, you need to start the engine and check its performance.
Have you had trouble removing the crankshaft pulley?
Survey
- Yes
- No
Loading …
Purpose, where they are located
Half rings or crescents, washers - they are called differently, they have a special purpose. They keep the crankshaft from axial displacement or longitudinal play. Essentially, these are special type bearings that establish the required clearance.
In a classic 4-cylinder engine, the crankshaft has a minimum of 5 bearing points or journals. Their contact area is quite large. This increases the friction force, which becomes even greater when the cheeks touch the supports. To minimize structural imbalance, the necks are made wider than the supports. But such a solution causes longitudinal play, which is a priori unacceptable, since the crankshaft parts begin to fail prematurely as a result.
Metal stoppers in the shape of a crescent are precisely the most effective solution that allows you to maintain the classic design, while eliminating axial displacement. This bearing differs from the standard liner in the presence of side stops or shoulders. The surfaces of the areas where the crankshaft comes into contact with them are also modified. In particular, they are made to fit a ring.
To reduce longitudinal play, washers are also suitable - one-piece rings that are installed strictly in a place specially designed for them. However, such locking elements are rarely used, since lock bearings adhere more tightly to surfaces, wear out more evenly, and are easier to install and remove. And the most important thing is that the washer is installed only on the rear main journal, and the crescents can be placed on any journal.
Structurally, the locking element is very simple. The base is made of solid bronze or steel material, on which, in some cases, an anti-friction protective layer is applied. There must be grooves or recesses for free passage of lubricant, as well as special pins that enhance fixation.
Thrust half rings are placed between the block support and the crankshaft brushes. Here they keep it from axial movement and play to the maximum extent possible. Installed on various necks. For example, in the VAZ-2106 - on the 5th main bearing, which is the first on the flywheel side. In general, according to this scheme:
- anterior - on the third or one of the central necks;
- posterior - on the back neck.
Either 2 or 4 half rings are used. If two are used, then they are placed in the recesses of the lower yoke cover. And if there are four - an upper support and a removable yoke (like on tractor engines). There are also power units with one crankshaft locking crescent or just a washer.
Removal instructions
With the clutch disengaged, the crankshaft can be easily turned with a wrench.
To carry out the removal procedure, it is necessary to secure the shaft from turning.
There are special devices that are bolted to the pulley into the technological holes, preventing the shaft from turning. If there is no such device, then you need to install supports under the wheels and place the car on the fourth. You can also secure the crankshaft flywheel by inserting a long screwdriver or pry bar between its teeth.
Removal and Installation
On a VAZ 2107, the injector crankshaft pulley is held in place by a fastening nut. Another name for it is ratchet. To remove the crankshaft pulley, you will need to unscrew this nut. It is better to carry out work on an inspection ditch or overpass. The tools you need to prepare are:
- set of keys and sockets;
- socket or socket wrench 38 (36);
Preparing tools for unscrewing - extension;
- screwdrivers;
- mount.
If the threaded connection is difficult to unscrew, there are special products, after application of which you can easily unscrew the fasteners. These products include WD oil. You can also use vinegar essence or brake fluid.
Work on dismantling and installing the crankshaft pulley on a VAZ 2107 injector consists of the following steps:
- The car must be set to the handbrake.
- The crankshaft should be fixed by engaging 4th gear.
- After unscrewing the lock bolt and loosening the tension nut, you need to remove the generator belt.
- To get to the crankshaft you need to remove the front right wheel.
- In the upper part of the engine compartment, you need to dismantle the air filter and remove the engine mud shield.
- Next, you need to secure the crankshaft from turning using one of the methods described above.
- Before unscrewing, the nut should be tapped on all sides. Using a spanner, unscrew the crankshaft pulley mounting nut by turning it counterclockwise.
- If you cannot unscrew it manually, you can use another method.
To do this, you need to put the car in neutral and remove the spark plugs. The wrench with the extension should be installed so that the end of the extension rests against the spar or floor in the direction of the shaft movement. At this time, you need to turn the ignition key to give a short impulse. Unscrewing the nut using the starter - After the nut is unscrewed, you can begin to dismantle the disk.
The pulley can be removed using screwdrivers or a pry bar, prying it from different sides until it moves from the shaft. It is important to apply force closer to the shaft. Move the pulley away from the front cover - You can use a special puller, which is equipped with a pin and 2-3 grips. The grips cover the edges of the disk, and the pin rests on the center of the shaft. By turning the device clockwise, the pulley is gradually removed from the shaft.
- Then the consumables are replaced with new ones.
- Assembly is carried out in reverse order.
After completing work on the VAZ 2107 injector, you need to start the engine and check its performance.
How to unscrew a bolt?
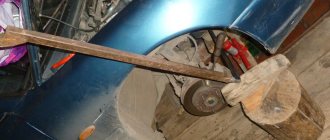
- As a rule, the pulley is attached to the crankshaft with a bolt only on front-wheel drive vehicles. To unscrew the bolt holding the pulley on the crankshaft, you will have to work hard, because getting to the bolt is not easy. Before you begin, you need to prepare the necessary tools: a jack, a head to match the size of the bolt and a lever with an extension, a tool kit for a motorist and a “tragus” (you can use a tree stump as a tragus). The removal phase looks something like this:
- We install a jack on the right side of the car in the area of the front wheel. Jack up the car and remove the wheel;
- Under the car, near the jack, we slip a trestle or stump (whatever is at hand). This will ensure the reliability and safety of bolt removal;
- During the work it will become clear that the bolt cannot be reached. We open the hood of the car and remove all parts that prevent full access. The air filter, the protective brushes of the car engine and the generator belt are usually removed;
- To unscrew the bolt you need to fix the crankshaft.
To do this, you need to lock the flywheel teeth. Open the plug on the clutch block and insert a pry bar or screwdriver into the resulting hole. It is not very convenient to carry out actions to hold the flywheel lock and at the same time unscrew the bolt alone. You can ask someone for help; - We take a head selected to the size of the bolt, with an extension and an additional lever, push it under the wheel arch and put it on the bolt;
- Turn the lever counterclockwise.
By the way, not on all cars the crankshaft moves in the direction of the clock hand. In some Honda models it has the opposite direction, which means that the bolt must be unscrewed to the right.
In most cases, the bolt gives in immediately, but if it is still in place, then you can use a slightly longer lever, and then it will definitely work.
Pulley removal
Unscrewing a fastening bolt or nut is only half the battle. Next you need to pull the pulley out of the shaft. The pulley cannot be removed easily by hand unless its seat is broken. In addition, if the pulley fits tightly onto the shaft, it is also secured against turning by a key.
There are special pullers for removing the pulley from the shaft. There are mechanical and hydraulic pullers.
The design of a mechanical puller is simple. Usually it has three legs, with which you need to hook the pulley itself, and rest the central rod against the shaft. After which, you need to rotate the rod, the legs will straighten and pull the pulley towards you. There are even simpler pullers that you can make yourself. If there is no removable device for the pulley, then you can use pry bars. If one person is filming, then take turns, moving it a little on each side so that there is no distortion. If there are two, then at the same time, from different sides, the pulley is pressed out from the crankshaft with a sharp movement.
It also happens that when using a puller, the walls of the pulley grooves cannot withstand and break off. Therefore, when using pry bars, they must be engaged as close to the shaft as possible.
Causes of wear, loss of half rings
It happens that when disassembling the engine, thrust washers are found in the crankcase pan. On the crankshaft, in the place where these parts should be located, wear is noticeable. Parts may fall out due to the following:
- recently carried out a major overhaul of the engine, without following the sequence of installation of the elements;
- after assembly, the main support covers are mixed up;
- The rear semi-ring is severely worn out because the metal-ceramic and steel-aluminum types of parts were installed incorrectly in places - this also happens when the quality of the thrust half-moons is poor, the material of which does not correspond to the technical documentation.
In general, the main wear of the half rings occurs when the clutch is squeezed out. Especially on a cold engine in winter and sitting for a long time under a traffic light with the clutch depressed. Thus, the cause of wear may be due to insufficient qualifications of the car driver.
The fact is that squeezing the clutch transfers the entire load from the fork to the corresponding crankshaft half-ring. There are even drivers with extensive experience who constantly keep their foot on the clutch. But for this there is a special platform where the left leg should rest.
Design features
To check and replace the sensor, you need to know what it looks like. It wouldn’t hurt to talk a little about its internal structure at the same time. The design of this device is very simple. But it varies somewhat depending on the purpose of the sensor and the installation location. For example, digital ones turn out to be more complicated; they have a semiconductor crystal built into the sensitive part. Between the semiconductor crystal and the small circuit (responsible for switching) there are short sections of connecting conductors.
The semiconductor crystal in the VAZ 2107 Hall sensor must occupy a special position. The magnet is positioned so that its field lines are perpendicular to the plane of the crystal. It is due to this that induction (magnetic) occurs. In this case, some current passes through the crystal. Under the influence of a magnetic field, an electromotive force is generated and supplied to the switching circuit.