Checking the VAZ 2110 generator with a multimeter
It is impossible to imagine a VAZ 2110 car without electrical appliances. Lighting, battery charging, on-board controllers, and electric motors consume electricity generated by the generator. Monitoring the condition of electrical equipment increases the service life of devices and wiring. The article contains practical advice on various ways to check a VAZ 2110 generator with a multimeter.
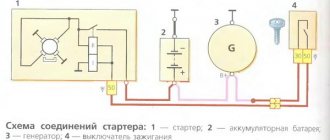
VAZ cars are equipped with three-phase synchronous alternating current generator devices equipped with a diode rectifier and an electronic voltage relay regulator. The V-belt transmits torque from the engine pulley to the electric machine pulley. A constant excitation voltage is supplied to the slip rings with graphite brushes and is removed from the B+ terminal.
Main components of the device:
- front and rear covers with bearings;
- stator;
- rotor;
- diode rectifier bridge;
- output voltage regulator relay;
- brush holder.
Beginning of work
Multimeter device To start testing, no special preparations are required.
You just need to prepare the multimeter itself. It is also advisable to check the generator - inspect the generator stator, diode bridge, voltage regulator, etc. This makes it possible to identify faults at an early stage. In addition, an external inspection of other elements of the vehicle's electrical circuit should be carried out. No further work may be required. Generator circuit So, the test includes several stages:
- Inspection of the relay regulator.
- Checking the diode bridge.
- Checking the stator.
- Checking the rotor.
Possible faults
Complete or partial jamming of bearings. Symptoms – belt break, incomplete charge of the battery (detected by a warning lamp on the instrument panel, a measuring tester, a load fork).
- visually with the engine running;
- Turn off the engine, remove the belt, and turn the pulley by hand. Failure to rotate freely and evenly indicates the need for repair.
Malfunctions of the stator, rotor. The device is operated in an aggressive environment; dirt and caustic liquids may enter. The insulation of the winding wires is destroyed, causing interturn short circuits to the housing.
Signs – cessation of generation, dim lamp light, indicator light is on, extraneous sounds in the generator. It is checked with the VAZ 2110 generator removed using a multimeter.
The graphite brushes have worn out. Symptoms are the same as in the previous paragraph. Checking and replacement are carried out without removing the equipment. Takes 10 – 15 minutes.
The voltage regulator is not working. Signs:
- Battery charging is insufficient, mains voltage is too low, light bulbs are dim;
- overcharging of the battery, bright light, high voltage, drips of dried electrolyte.
It is tested by measuring the voltage at the battery terminals.
Checking the VAZ 2110 generator with a multimeter on a car
To check the electrical parameters of the car, you will need a combination meter that allows you to set the switch:
- constant voltage within 0 - 30 volts;
- resistance 0 – 5 Ohm, 0 – 200 Ohm, 0 – 2 MOhm.
Step-by-step diagnostic instructions
- Set the switch to DC voltage measurement mode. Use the red probe to touch the positive contacts.
- Measure the battery voltage with the ignition off. The norm is in the range of 12.5 - 12.7 volts.
- Start the engine. Idle speed. Devices and lights are turned off. A value of 13.8 - 14.5 volts is considered normal.
- Turn on power consumers (low beam, fog lights, multimedia devices).
If the equipment is in good working order, the tester will show 13.7 - 14 volts. An on-board voltage below 13V indicates a malfunction of the generator unit. Pressing the gas pedal to increase engine speed should not raise the voltage by more than half a volt. A reading above 15 volts indicates a malfunction of the relay regulator.
Check without removing from the car
There are two 100% ways that I personally recommend to you.
1) Check with a multimeter . Of course, not everyone has it, but in fairness it’s worth noting that this is a fairly common device and let’s say your father, neighbor, friend will have it “anyway.” To begin with, we measure with the engine not running, at the battery terminals, the normal voltage should be about 12.5 - 12.7 V, ideally.
We start the car, do not accelerate, and do not turn on any electrical appliances - with the engine running, we measure the voltage, it should be within 13.8 - 14.5 Volts.
Checking the generator components on the table with a multimeter
Once a malfunction is suspected, the device is dismantled and diagnosed.
- Place the car on a viewing hole or lift the front part with a jack, and place a safety support.
- Loosen the fastening, disconnect the negative terminal from the battery.
- Disconnect the wires from the generator.
- Unscrew the adjusting and mounting bolts.
- Remove the belt.
- Remove the device and disassemble.
- Checking the diode bridge of the VAZ 2110 generator with a multimeter is performed in resistance measurement mode, range 0 - 2 MOhm. Silicon diodes used in the rectifier circuit, passing a current of up to 80A during operation, heat up. The cooling radiator is a metal mounting ring. Structurally, two types of rectifiers are produced: with an anode and a cathode on the body. Motorists call parts of the first type positive, the second - negative. A working diode in the forward direction shows a resistance of 0 Ohm, in the reverse direction - about 600 kOhm. A zero value in both directions means a breakdown of the device, a high value means a break. Additional diodes are checked in the same way.
- The rotor field windings are tested with a tester at the switch position of 0 - 5 Ohm. Test leads are connected to slip rings. The resistance value ranges from 1.8 – 5 Ohms. Less is a short circuit, more is a gap.
- The stator windings are tested in the range 0 - 200 Ohm. Alternately touching the terminals of two serviceable windings will show units of Ohms on the instrument indicator; the absence of readings means a malfunction.
- The integrity of the winding insulation is measured by touching one probe to the winding contact, the other to the housing. An infinitely large value indicates normality.
The final confidence in the serviceability of the generator will be given by testing on a bench.
Source
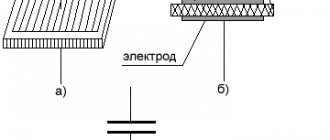
Diode bridge
A diode bridge consists of two plates, one of which is positive and the other negative. Diodes are checked with a multimeter in ohmmeter mode.
Connect one probe to the “+” terminal of the diode bridge, and alternately connect the second to terminals F1 F2 F3 and 0. To make it clearer: we connect one probe to the positive plate, and with the other we alternately touch the terminals of those diodes that are pressed into this plate.
Then swap the probes and do the same. In one case the tester should show conductivity (some kind of resistance), but in the other it should not. So we checked the diodes on the positive plate.
To check the diodes on the negative plate, connect one probe to the negative plate, and the second to the leads of the diodes alternately. In exactly the same way, then we swap the probes and repeat the procedure. In one case there will be conductivity, in the other there will not be.
Types of Voltage Regulators
Having understood what types of these devices there are, what their features and properties are, a complete understanding of the procedures carried out during testing will come. This will also give the answer to what scheme, in what way and how to check the generator voltage regulator. There are two types of regulators:
In the first case, it is meant that the regulator housing is combined with the brush assembly directly in the generator housing. In the second case, the regulator is a separate unit, which is located on the car body, in the engine compartment, and wires from the generator go to it, and wires from it go to the battery.
A special feature of the regulators is that their housings are non-separable. They are usually filled with sealant or special resin. And there is no particular point in repairing them, since the device is inexpensive. Therefore, the main problem in this regard is to check the generator voltage regulator relay. Regardless of the type of regulator, the voltage symptoms will be the same.
Symptoms of a problem
So, in case of low voltage, the battery simply will not charge. That is, in the morning you will not be able to start the car, the lights on the dashboard may not even light up, or troubles will arise while driving. For example, dim headlights at night, unstable operation of the electrical system (problems with electrical appliances - wipers, heaters, radio, etc.).
In case of increased voltage, there is a high probability of a decrease in the electrolyte level in the battery banks, or its boiling. A white coating may also appear on the battery case. When overcharging, the battery may behave inappropriately.
Signs, malfunctions, repair of generator and voltage regulator
In addition, you can also identify the following signs of a faulty voltage regulator (in some cases, some of them may or may not be present, it all depends on the specific situation):
- the control light on the dashboard (although this may be a sign of other malfunctions, for example, that it has burned out, the contact has fallen out, and so on);
- after starting, the battery indicator on the dashboard does not go out, that is, there are obvious malfunctions in charging the battery;
- the brightness of the headlights becomes dependent on the engine speed (you can check this somewhere in a deserted place by placing the car against a wall and accelerating - if the glow changes, then most likely the voltage regulator is faulty);
- the car stopped starting normally the first time;
- constantly discharged quickly ;
- when the engine speed exceeds 2000 rpm, the indicators on the dashboard turn off ;
- the dynamic characteristics of the car decrease , this is especially noticeable at high engine speeds;
- In some cases, the battery may boil .
Car tips
Actually, I already told you about them from above; if the generator refuses to work, then it is easy to notice even inside the cabin.
- All modern cars will be signaled by a warning lamp - “red battery” on the instrument panel. If it lights up or even blinks, then there is nothing good about it, you need to react immediately, otherwise a discharge is just around the corner.
- Weak glow from all instruments. The “warning lamp” may burn out, but if you notice that the instruments begin to glow dimly, this means that the car is running on the battery, and not on the generator. Again you need to check.
- Belt break. If you crawl under the hood and there you see a break in the belt that spins the generator, then you MUST CHECK THE OPERATION! Otherwise, again, you can kill your battery.
These are all obvious malfunctions, but it happens that the battery is dead and everything seems to be fine, but something inside is “gnawing” - maybe it’s the generator? How to check easily and quickly on a car without removing it? Question? And everything is quite easy here
Source
Reasons for failure of the relay regulator
The reasons for the failure of the voltage regulator may be:
- short circuit in the circuit, including interturn short circuit of the excitation winding;
- failure of the rectifier bridge (diode breakdown);
- reverse polarity or incorrect connection to the battery terminals;
- penetration of moisture into the housing of the regulator and/or generator (for example, when washing a car or driving in heavy rain);
- mechanical damage to the unit;
- natural wear and tear of the unit, including brushes;
- poor quality of the device being directly tested.
There are a number of simple methods for checking the regulator, regardless of whether the unit is removable or not.
The simplest way to check the generator voltage regulator
The simplest method of checking the regulator is to measure the voltage at the battery terminals with a multimeter. However, it is worth immediately making a reservation that the algorithm given below does not give a 100% probability of failure of the regulator. Perhaps the generator itself has failed. But the advantage of this method is that it is simple and there is no need to dismantle the device from the car. So, the algorithm for checking the generator voltage regulator with a multimeter is as follows:
- Set the tester to DC voltage measurement mode at a limit of about 20 V (depending on the specific model, the main thing is that it displays values up to 20 V as accurately as possible).
- Start the engine.
- Measure the voltage at the battery terminals in idle mode (1000. 1500 rpm). If the regulator and generator are working properly, the value should be within 13.2. 14 V.
- Increase the speed to 2000. 2500 rpm. In the normal state of the electrical circuit, the corresponding voltage should be about 13.8 (+-) 0.2 V.
- When the speed increases to 3500 rpm and above, the voltage should not exceed 14.8 V.
If during the test the voltage values are very different from those given, then most likely the machine’s voltage regulator is faulty. Remember that the voltage should not fall below 12V and should not rise above 14.8V.
As mentioned above, the regulator can be separate or combined with a generator. Currently, almost all foreign cars, and most modern domestic cars, have combined relays installed. This is due to the specifics of their work and space saving.
Checking the combined relay-regulator
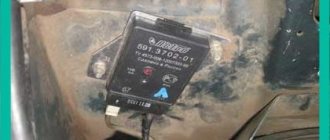
Checking the VAZ 2110 voltage regulator
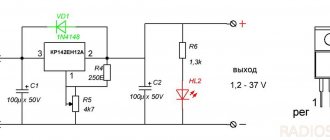
To perform the corresponding check, it is necessary to assemble the circuit shown in the figure. To do this, use a charger or power supply with an adjustable load (it is important that it be used to regulate the voltage value in the circuit), a 12 V light bulb (for example, from a turn signal or headlight, with a power of 3.4 W), a multimeter, and the regulator itself voltage (this can be from a Bosch, Valeo or other generator). It is advisable to have the wires used for switching with “crocodiles”.
Checking the voltage regulator of the generator 37.3701: 1 - battery; 2 — ground terminal of the voltage regulator; 3 - voltage regulator; 4 – terminal “Ш” of the regulator; 5 — output “B” of the regulator; 6 — control lamp; 7 — terminal “B” of the voltage regulator.
If you assemble a circuit in which the voltage is at a standard value of 12.7 V, then the light bulb will simply glow. But if you use a voltage regulator to raise its value to 14.14.5 V, then if the relay is working, the light should go out. Otherwise the regulator is faulty. That is, when the voltage reaches 14.14.5 V (depending on the model of the machine and, accordingly, the regulator) and above, the light goes out, and when it drops to the same level, it lights up again.
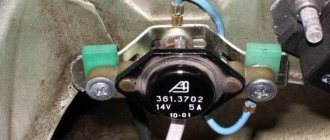
Checking the VAZ 2107 voltage regulator
Checking the voltage regulator on VAZ 2108/2109 cars
Until 1996, a VAZ 2107 with a 37.3701 generator was equipped with an old-style voltage regulator (17.3702). The verification procedure is given above. After 1996, a more modern generator of the G-222 brand was used (integrated regulator RN Ya112V (V1).
As you can see, the verification algorithm for all regulators is almost the same. The only difference is the cutoff values when the relay is activated.
Basic problems
If the generator begins to act up, then the main causes of the malfunction should be sought either in the on-board network, or these are problems with the generator itself. If the generator gives a charge, but not enough, then perhaps it has been “loaded” too much by installing many other gadgets in addition to the standard electrical equipment, and it is already working at the limit of its capabilities.
Our motorists really love tuning the VAZ 2110, adding, for example, speaker power, enhancing the light, etc. In such cases, some people change the battery, for example, installing it with a capacity of 70 Ah, instead of the usual VAZ one with 55 Ah.
But although this may help at first, over time such a battery will run out even faster, since a standard generator will not be able to provide it with a full charge; it does not have enough power for this.
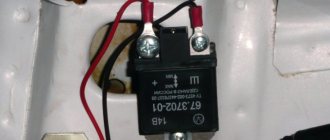
Checking an Individual Regulator
Checking the voltage regulator of the G-222 generator: 1 - battery; 2 - voltage regulator; 3 - control lamp.
As a rule, separate voltage regulators were installed on old cars, including domestic VAZs. But some manufacturers continue to do this to this day. The verification process is similar. To do this, you need to have a power supply with a voltage regulator, a 12 V light bulb, a multimeter and a directly tested regulator.
To check, you need to assemble the circuit shown in the figure. The process itself is similar to the one above. In normal condition (at a voltage of 12 V), the light bulb lights up. When the voltage value increases to 14.5 V, it goes out, and when it decreases, it lights up again. If during the process the lamp lights up or goes out at other values, it means that the regulator has failed.
Brushes and slip rings
Rings and brushes can be checked visually, assessing their condition and serviceability. Check the protruding length of the brushes. It must be at least 4.5 mm. And the norm is 8-10 mm.
Also, the diameter of the slip rings must be at least 12.8 mm. and ideally 14.2-14.4. Worn rings can be replaced if you find them in a store. They are removed with a special puller, and the winding terminals are unsoldered. After installing new rings, they can be turned on a lathe to eliminate runout and sanded with fine sandpaper to eliminate burrs.
Recommendations for increasing the service life of the regulator
In order to increase the service life of the voltage regulator, it is necessary to adhere to several simple rules aimed at implementing preventive measures. Among them:
- do not allow excessive contamination of the generator, periodically inspect its condition, and, if necessary, dismantle and clean the unit;
- check the tension of the alternator belt, tighten it if necessary (either yourself or in a car service);
- monitor the condition of the generator windings, in particular, do not allow them to darken;
- check the contact on the control wire of the relay-regulator, both its quality and the presence of oxidation on it;
- Perform periodic voltage checks on the vehicle battery with the engine running.
Following these simple rules will allow you to increase the resource and service life of both the generator and the vehicle voltage regulator.
Results
Checking the voltage regulator relay is not a difficult task, and almost any car enthusiast with basic repair skills can handle it. The main thing is to have the appropriate tools for this - a multimeter, a power supply with a voltage regulator (although you can connect it to a battery with a charger), a 12 V lamp and pieces of wires for mounting the appropriate circuit.
If during the inspection you find out that the regulator is out of order, then it must be replaced (repair work is usually not carried out). The main thing is not to make a mistake when choosing it and purchase the part that is suitable specifically for your car.
Source